Windows 11 Boot Repair [Step by Step Guide with Pictures]
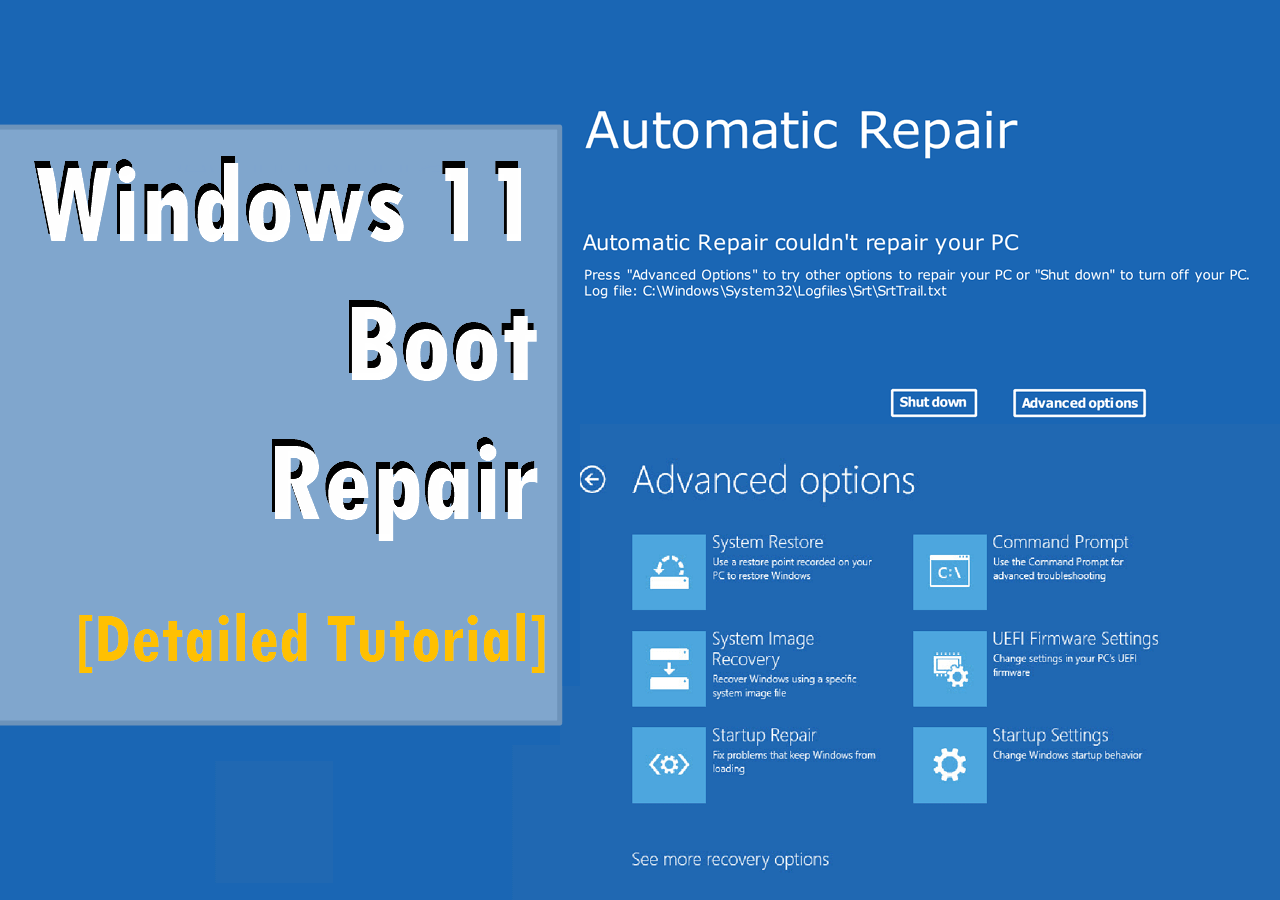
Are you experiencing a completely black screen like the below example or a Blue Screen of Death while booting your computer into Windows 11?
Various issues such as missing or corrupted system files, incompatible updates, disk errors, and hardware problems can cause system crashes and errors.
Here are several solutions to help you perform Windows 11 boot repair. You can try using a Windows installation media to boot into the recovery environment, use the built-in System Restore feature, run the System File Checker tool, or use a third-party boot repair tool like Qiling Backup. Additionally, you can try booting in Safe Mode, disabling any recently installed drivers, or running a disk check to identify and fix any disk errors.
7 Ways to Execute Windows 11 Boot Repair
Here are 7 practical solutions to resolve the Windows 11 startup issue. You can check each solution to find the proper one to fix the error, including running the System File Checker, checking for malware, disabling startup programs, running the System Restore tool, updating Windows 11, resetting Windows 11, and reinstalling Windows 11.
- Solution 1. Rebuild BCD File
- Solution 2. Uninstall the Latest Update
- Solution 3. Restore the System
- Solution 4. Run Startup Repair
- Solution 5. Rebuild MBR
- Solution 6. Run the CHKDSK Command Line
- Solution 7. Run the SFC Offline Command Line
Solution 1. Rebuild BCD File
If you encounter an error code like 0xc000009, it's often due to a missing or corrupted boot configuration data (BCD), which can be caused by incorrect Windows 11 installation, missing or corrupt system files, or incompatible hardware. In such cases, using a powerful tool like Qiling Disk Master Professional can help resolve the issue.
This software provides a Boot Repair feature to rebuild the BCD store for Windows 11, and also fixes various common issues quickly and safely. The guide on how to use the feature can be found here.
Step 1. Connect a USB drive or external drive to a working computer, then open Qiling Disk Master (RE) and click the "Create Bootable Media" option.
Step 2. Select the Qiling Boot Toolkits and other components you need, then click "Next."

Step 3. Select your movable device and click "Go" to create an image on your USB drive/external drive, or burn the Windows ISO file to the storage media.

Step 4. Confirm the warning message and then wait for the creation process to complete.
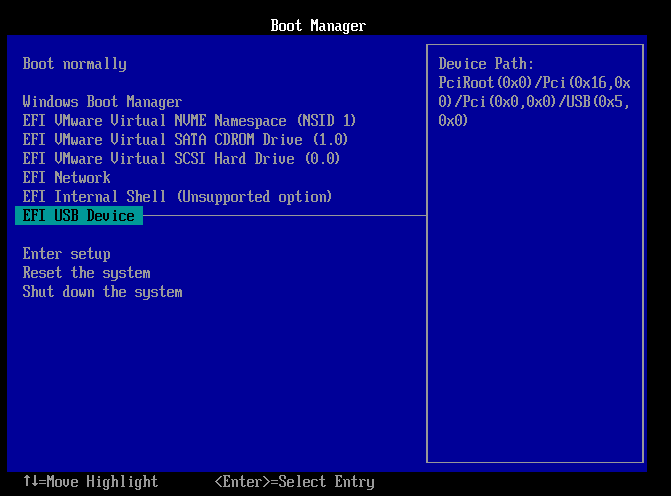
Step 5. Connect a bootable drive to the faulty computer, reboot it by pressing F2/Del to enter the BIOS, set the bootable drive as the boot disk, and exit the BIOS by pressing F10.
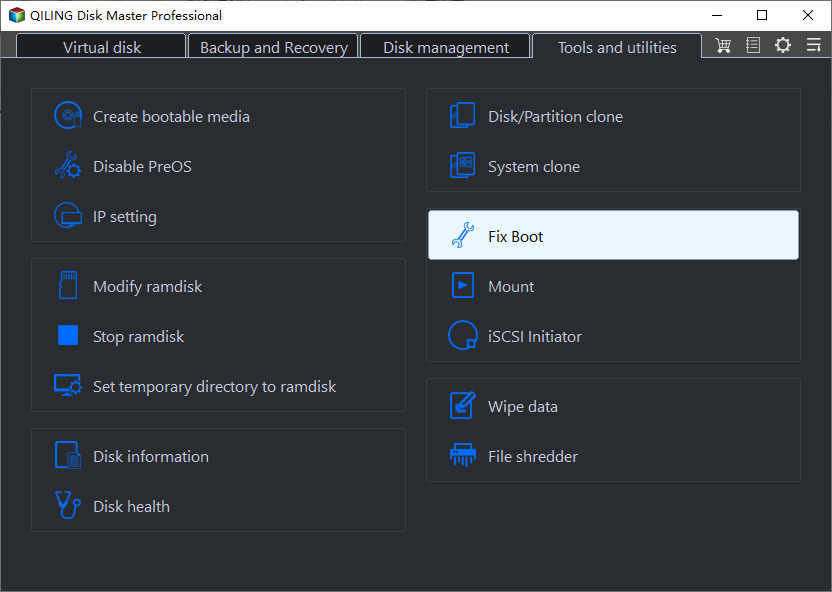
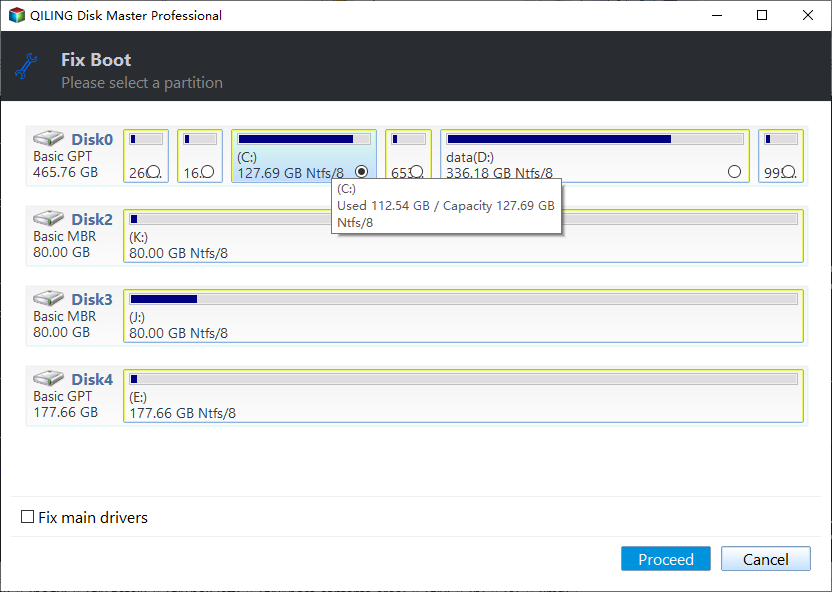
Step 6. The computer will then enter WinPE desktop. From there, open BootRepair, select the system you want to repair, and click "Proceed".
Step 7. The system has been successfully repaired. Click "OK" to complete the boot repair process.
Although a built-The Bootrec.exe program can assist in rebuilding the Boot Configuration Data (BCD), but we recommend using Qiling Disk Master for its user-friendly interface and ease of use for this task. For more information, you can refer to this article.
If you think this software is reliable and practical, share the convenience with your friends.
Solution 2. Uninstall the Latest Update
To fix Windows 11 startup issues caused by updates, try restarting your computer in Safe Mode, disable any recently installed drivers or software, and check for any corrupted system files. You can also try running a System File Checker (SFC) scan and a DISM scan to repair any damaged system files. If the issue persists, you can try resetting Windows 11 to its default settings or reinstalling the operating system. If none of these steps resolve the issue, you may need to seek further assistance from a Microsoft support specialist.
Step 1. Restart your PC 3-5 times, and it will enter the Windows Recovery Environment.
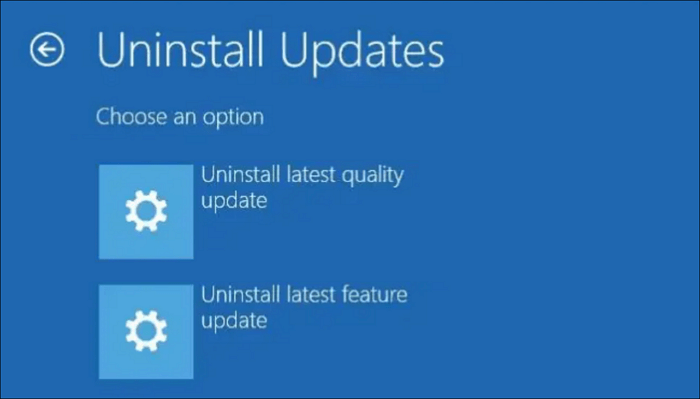
Step 2. Go to "Troubleshoot" > "Advanced options" > "Uninstall Updates."
Step 3. Now you will see "Uninstall latest quality update" and "Uninstall latest feature update." Choose the one that matches the type of your last update to uninstall it.
Step 4. If a Windows update is causing issues, try restarting the computer. If the problem persists, try uninstalling the other update that was installed along with the problematic one. This might resolve the issue and allow the system to function normally again.
This operation will help you get rid of incompatible updates and get your Windows 11 back to a working state.
Solution 3. Restore the System
To repair your Windows 11, you can perform a System Restore, which can help restore system files, settings, drivers, registries, and essential programs to their previous state, either through an automatic or manual restore point.
To restore your Windows 11 computer, go to Settings > System > Recovery, and then click on the "Open System Restore" button. Select the restore point you want to use, and then click on the "Next" button.
Step 1. To resolve the issue, restart your PC 3-5 times, and it will enter the Windows Recovery Environment.
Step 2. Go to "Troubleshoot" > "Advanced options" > "System Restore."
Step 3. Hit "Next" in the pop-up System Restore widget.
Step 4. Select your restore point and click "Next."
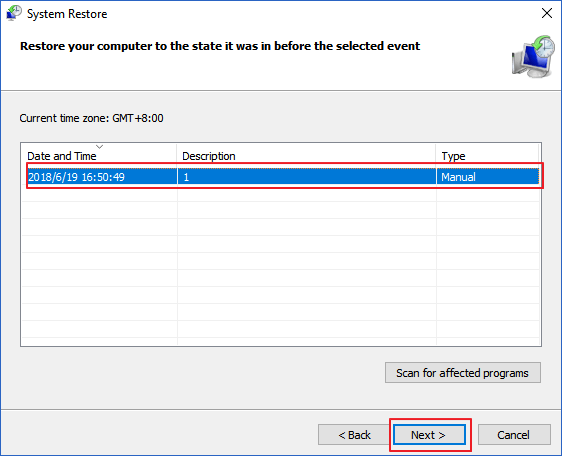
Step 5. To start, you'll need to confirm the message and click "Finish" to start the restoration process. This will initiate the process of restoring your system to its previous state.
This utility is very practical for repairing system errors, but its effectiveness depends on the availability of restore points on your computer. If you don't have restore points, this method is useless to you.
Read also:
Solution 4. Run Startup Repair
Startup Repair is a tool designed to automatically detect and fix various errors on Windows computers, including issues with faulty system files or misconfigured settings. Here is a tutorial on how to use it.
Step 1. Restart your PC 3-5 times, and it will enter the Windows Recovery Environment.
Step 2. Go to "Troubleshoot" > "Advanced options."
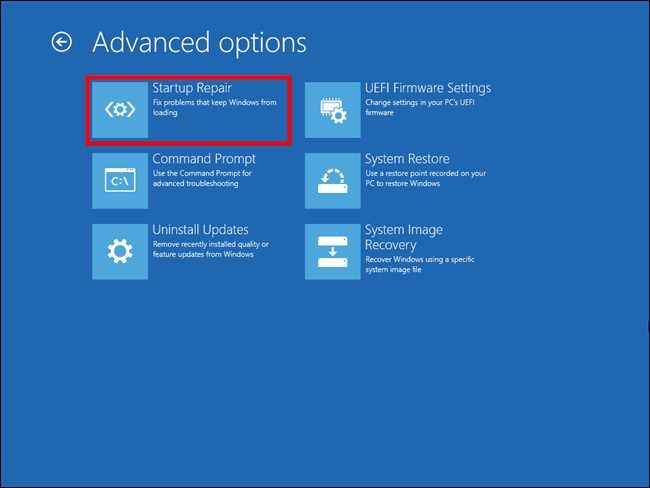
Step 3. Click "Startup Repair" and wait for it to do its job.
Many users are experiencing issues with Startup Repair not working, but trying it won't cause any harm and might still repair the error on their Windows 11 computer.
Solution 5. Rebuild MBR
Corruption of the Master Boot Record (MBR) can also cause the issue, with error messages like "MBR Error 1" or "Invalid partition table" appearing. To fix this, you can rebuild the MBR.
Step 1. Restart your PC 3-5 times, and it will enter the Windows Recovery Environment.
Step 2. Go to "Troubleshoot" > "Advanced options."
Step 3. To troubleshoot an issue, open the Command Prompt and input the following command lines, pressing "Enter" after each one.
- bootrec /fixmbr
- bootrec /fixboot
- bootrec /rebuildbcd
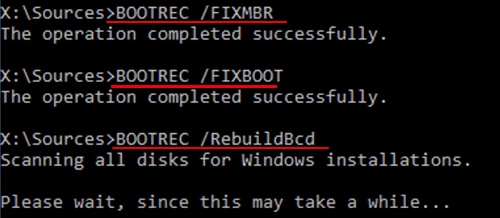
Step 4. Restart your computer.
These commands can help you rebuild MBR and resolve the Windows 11 won't boot issue for your computer.
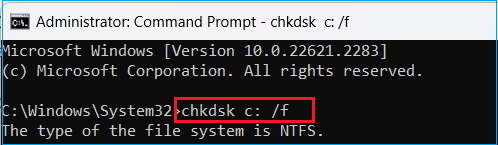
Solution 6. Run the CHKDSK Command Line
To run the Check Disk utility in Windows 11, start by opening the Command Prompt as an administrator. You can do this by searching for "Command Prompt" in the Start menu, right-clicking on the result, and selecting "Run as administrator." Once the Command Prompt is open, type the command "chkdsk" followed by the drive letter of the drive you want to scan, and press Enter. For example, if you want to scan the C drive, you would type "chkdsk C:".
Step 1. Restart your PC 3-5 times, and it will enter the Windows Recovery Environment.
Step 2. Go to "Troubleshoot" > "Advanced options."
Step 3. To run a disk check on your C drive, open Command Prompt, type `chkdsk C: /f`, and press Enter. This will scan the drive for errors and attempt to fix them. The `/f` flag tells the command to fix any errors it finds, rather than just reporting them.
If the CHKDSK procedure fails, you can refer to the article which provides guidance on how to fix the issue. The article will offer a solution to resolve the problem.
CHKDSK Not Working in Windows 11/10/8/7? Fix It Now!
If CHKDSK isn't working on your Windows, you can try using a reliable alternative to repair your system. The alternative is to use the built-in System File Checker (SFC) tool or the Deployment Image Servicing and Management (DISM) tool to scan and repair corrupted system files. You can also try running a full disk check using the built-in Check Disk (CHKDSK) tool with the /f and /r options to scan and repair corrupted disk sectors. If none of these methods work, you may need to consider reinstalling Windows.
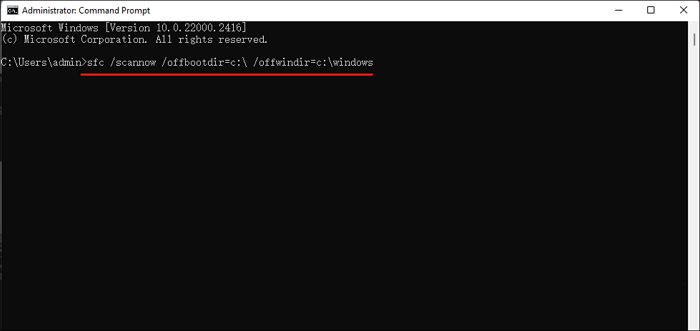
Solution 7. Run the SFC Offline Command Line
The System File Checker (SFC) Scan command allows you to scan for corrupted system files and replace them with a cached version. If your PC can't boot into Windows 11, you can run the SFC offline commands to scan and repair corrupted system files.
Step 1. Restart your PC 3-5 times, and it will enter the Windows Recovery Environment.
Step 2. Go to "Troubleshoot" > "Advanced options."
Step 3. Click "Command Prompt," and then type in the command below.
sfc /scannow /offbootdir=c:\ /offwindir=c:\windows
Then, hit "Enter."
Step 4. Restart your computer.
If you find the presented solutions useful, you're welcome to share them with your friends and family.
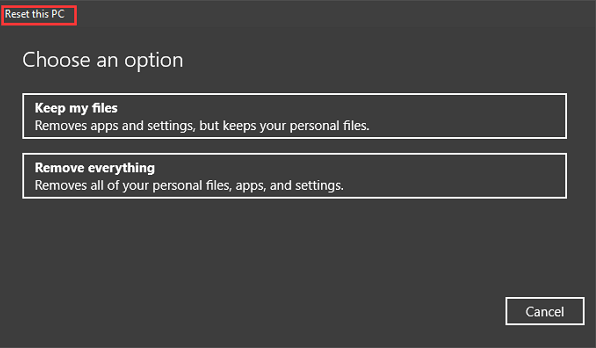
If you've tried all the solutions in this article and your problem persists, consider resetting your PC as a last resort. For more information on this process, you can refer to the article provided.
2023 Ultimate Guide: How to Factory Reset PC
This article provides a comprehensive guide on factory resetting your PC, covering the meaning and procedure of the process, as well as troubleshooting tips to address any issues that may arise during the reset.
Conclusion
Windows 11 startup issue can be resolved with 7 practical methods, with the easiest solution being the Boot Repair feature in Qiling Disk Master, which can fix various issues in just a few clicks.
FAQs on Windows 11 Boot Repair
Hope you have resolved the Windows 11 boot issue. If you have more related questions, here are a few FAQs you can refer to.
1. How do I fix Windows 11 stuck on my boot screen?
To resolve the issue of Windows 11 getting stuck on the boot screen, you can attempt to "Go Back to the Previous Build" by following these steps:
- Press the "Shift" + Power button simultaneously while booting up.
- Select Restart. Then, go to "Troubleshoot" > "Advanced Options."
- Select "Go back to the Previous Build."
2. What causes the Windows 11 boot loop?
Windows 11 boot loops can occur due to various reasons such as installing new drivers, modifying system firmware settings, installing Windows Updates, or malware attacks.
3. Why is my computer screen black but still running?
The computer is showing a black screen because the video cable is not inserted properly, or the display settings are incorrect, or the video driver is corrupted or outdated.
Related Articles
- How to Check USB Speed on Windows [100% Working Solution]
- M.2 vs. SSD, What's the Difference [New Details]
- How to Fix SSD Health at 99% [Full Guide in 2024]
- 2 Best Disk Manager for Windows Server Free Download [Free & Paid]
- Do I need EFI System Partition? Can I Delete the EFI Partition?
If you've used the Disk partition tool and seen the EFI System partition, you're likely familiar with it. But have you ever wondered if you actually need it, and can you safely delete it without affecting your Windows PC setup? - Does formatting a Hard Drive Remove OS? Check Your Full Guide
Formatting a hard drive does not remove the operating system (OS) itself, but it will erase all data on the drive. To format a hard drive without reinstalling Windows, you can use the built-in Disk Management tool in Windows.