How Do I Convert Bootable Disk or Bootable USB to Normal in Windows 11
| Workable Solutions | Step-by-step Troubleshooting |
|---|---|
| 1. Qiling Partition Master | Step 1. To create a bootable disk of Qiling Partition Master, you should prepare a storage media, like a USB drive...Full steps |
| 2. Disk Management | Step 1. Right-click on Disk 4 (or your USB's drive letter); Step 2. Click on Format; Step 3. Click on Yes...Full steps |
| 3. CMD | Step 1. Win+R and Type CMD; Step 2. Type Diskpart and enter; Step 3. Then type list disk in Diskpart Window...Full steps |
How Do I Convert Bootable Disk or Bootable USB to Normal in Windows 11
To convert a bootable USB back to normal in Windows 11, you have several options. You can use the built-in Disk Management tool, which allows you to format the USB drive and remove the bootable flag. Alternatively, you can use the Command Prompt or PowerShell to execute a series of commands that will achieve the same result.
With the advancement of technology, the need for DVD readers or ROMs to install operating systems has become a thing of the past. Today, a simple pen drive and a stable internet connection are all you need to install any Windows or operating system you desire, making the process much more convenient and efficient.
However, turning your USB into a bootable device also comes with some drawbacks, including the risk of losing specific chunks of data or even an entire section of the storage on the removable media.

Many users claim that making a USB drive bootable results in losing the drive letter, leading to lost data or space on the device.
We'll be exploring ways to convert bootable disks back to normal in Windows 11. Let's get started.
How Do I Convert a Bootable USB to Normal in Windows 11
Converting a bootable USB back to normal in Windows 11 or other operating systems can be achieved by formatting it, but this method may not always be effective for everyone.
You're likely reading this article because you've tried various solutions to fix a problem, but it persists. Before diving in, take a moment to ensure you've checked a few essential boxes. Have you recently updated your software or operating system? Have you tried restarting your device or clearing cache?
- Has your USB suffered physical damage?
- Have you stored/copied all the necessary data from the device?
- Yes, I have stored Windows files and other essentials on my disk.
If your USB has suffered physical damage, such as water exposure, broken components, etc., it's futile to try and bring it back to life.
It's possible that your drive warmed up too much while installing Windows, causing the onboard components to become dented or disrupted, which is a relatively common issue. To troubleshoot, thoroughly analyze the drive for any physical damage.
If your USB drive is working fine, focus on copying all necessary files. about the Windows installation itself, as you can always download another ISO image or might already have one.
Be sure to copy your personal files before formatting your device, so you don't lose any important data.
Convert Bootable USB Back to Normal with Full Capacity in Windows 11
Now that we've identified the problem and taken necessary precautions, let's discuss the solution itself. If you want to use your USB for normal purposes again, there are three methods we can try to fix it.
Here are three methods to convert a bootable disk to normal in Windows 11:
Using a tool can make the process effortless and time-efficient, but requires technical computing knowledge. On the other hand, using disk management and CMD commands demands a thorough understanding of technical computing. Let's analyze each method.
1. Convert a Bootable Disk/USB to Normal with Bootable Format Tool
Finding a tool to fix a problem isn't hard, but finding a reliable one that guarantees a solution is a challenge. Fortunately, Qiling Partition Master makes it easy to fix your USB issues.
Step 1. To create a bootable disk of Qiling Partition Master, prepare a storage media like a USB drive, flash drive or a CD/DVD disc, and correctly connect it to your computer.
Step 2. Launch Qiling Partition Master and click on the "Create bootable media" feature located at the top.
Step 3. You can choose to save the ISO file to a USB, CD/DVD, or local drive. If you don't have a storage device, you can save the ISO to your local drive and burn it later. Once you've made your selection, click "Proceed" to start the process.
After the process is complete, you will have a Qiling Partition Master WinPE bootable disk. This disk allows you to manage your hard disks and partitions even when your computer is unable to boot normally.
To load the RAID driver under WinPE, click on the "Add Driver" option from the menu bar, which allows you to add the driver for your device, especially for devices like RAID drives that may not be recognized under the WinPE environment without the necessary drivers installed. This ensures that your device can be properly detected and utilized.
Besides helping you turn your USB back to normal, this tool can also provide additional benefits.
- Convert NTFS to Fat32 and vice versa.
- Other convertible formats include exFAT and EXT2/3/4.
- Wipe hard disk data.
- Reformat Windows 10.
- Resize or move partition.
Qiling Partition Master is the best option to convert a bootable USB to normal in Windows 11, offering features like converting MBR to GPT and migrating Windows from one primary partition to another.
2. Restore Bootable Disk or Bootable USB to Full Capacity Using Disk Management
To restore your USB device using a Windows tool, go to the search bar in Windows 11 and look for "Disk management". Once you open it, you'll see the Disk Management window where you can restore your USB device.
Here's how to access Disk Management to access your USB drive: Disk Management allows you to access all of your physical drives, removable and internal, and we'll be clicking on Disk 4, which is our USB drive.
Step 1. Right-click on Disk 4 (or your USB's drive letter).
Step 2. Click on Format.
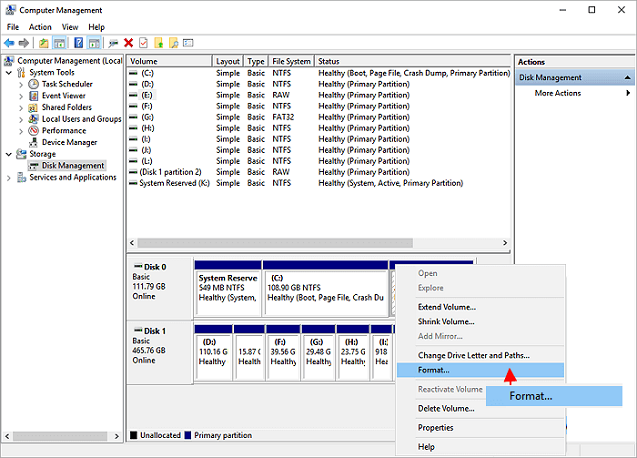
Step 3. Click on Yes.
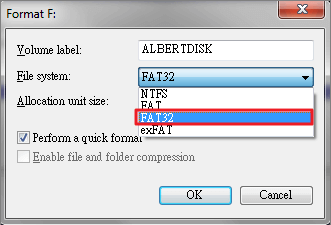
Step 4. Once you get the dialogue box, click on the desired format (e.g. NTFS) and select "Perform a quick format" before clicking "OK".
The disk manager will format your USB drive, allowing you to use it normally on your computer again.
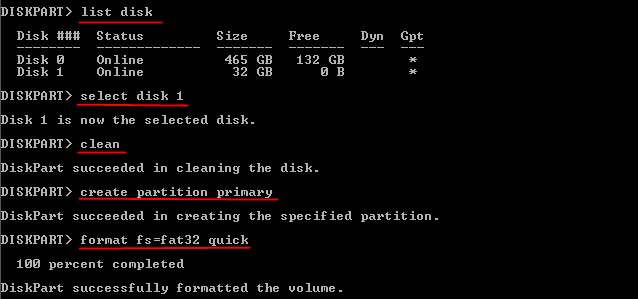
3. Unboot Bootable USB to a Normal One Using CMD
You can use the built-in Windows tool, CMD, or command prompt, to manage your disk drives in various ways. It's a reliable option that can help you achieve your desired results, even if you're not entirely convinced by the previous steps. CMD offers a range of functionalities that can be used to manipulate your disk drives, making it a useful tool to have in your toolkit.
To resolve the issue with your USB, try the following steps:
Step 1. Win+R and type CMD.
Step 2. Type Diskpart and enter.
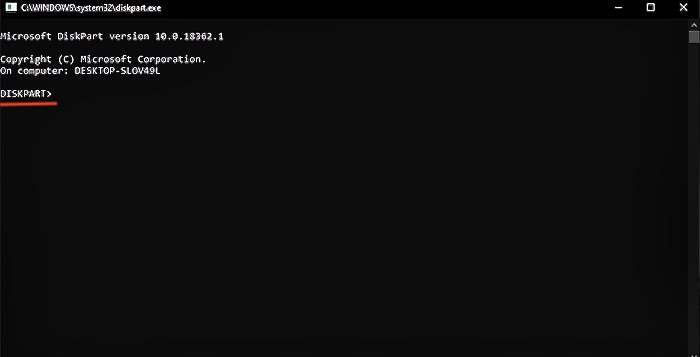
Step 3. Then type list disk in Diskpart Window.

Step 4. Since Disk 4 is our USB drive, we'll type in "Select Disk 4". Then, we'll type the commands to format it.
- Type clean and let it work
- Type create partition primary
- Type format fs=fat32 quick
To view your USB drive in the normal format, follow these steps: ensure it's properly inserted into your computer, go to This PC/Computer, and click on the USB drive icon. It should now be visible in the normal format, allowing you to access its contents.
Conclusion
To recover a USB, follow these steps: disable write protection, check the disk for errors, and use a tool like Qiling to convert the bootable disk or USB to a normal one. Qiling is a recommended tool that can make the process seamless and guaranteed to work in Windows 11. This approach can help you resolve issues with your USB and get it back to its normal state.
Related Articles
- [Full Guide] How to Rebuild MBR | Fix Damaged MBR
- How to Convert NTFS to EXT4 Without Losing Data on Windows 10
- How to Repair MBR on Windows Server (Two Quick Ways)
- Why and How to Merge Partitions to Solve Disk Space Issues?
- How to Transfer Files from PC to PC Using OneDrive
This post covers the step-To transfer files from one PC to another using OneDrive, follow these steps: first, sign in to OneDrive on both PCs with the same Microsoft account; next, move the files you want to transfer to the OneDrive folder on the source PC; then, on the destination PC, open OneDrive and navigate to the folder where you want the files to be transferred; finally, click the “Sync” button to sync the files from the source PC to the destination PC. If OneDrive is not syncing, try restarting the OneDrive sync client, checking your internet connection, or updating OneDrive to the latest version. Alternatively, you can use a PC data transfer tool to transfer files from one PC to another, which can be a more straightforward and efficient method, especially for larger file transfers. - How to Unpartition a Hard Drive on Windows 11/10/8.1/8/7
You can unpartition a hard drive on Windows 11/10/8.1/8/7 using one of three methods: Disk Management, DiskPart, or Qiling Partition Master. This guide will walk you through the process of removing partitions from a hard drive using these tools.