How to Create New Partition in Windows Server 2022/2019/2016 - Qiling
To create a new partition in Windows Server 2022/2019/2016, you can follow one of the four methods outlined in the step-by-step guide. The guide provides a detailed walkthrough for each method, allowing you to choose the one that best suits your needs. Whether you're looking to expand your storage capacity or reorganize your disk layout, creating a new partition can be achieved through these methods.
| Workable Solutions | Step-by-step Troubleshooting |
|---|---|
| Fix 1. Use Thrid-Party Partition Manager Software | Step 1. Check for free space...Full steps |
| Fix 2. Use Disk Management | Step 1: Click "This PC" on your computer...Full steps |
| Fix 3. Use CMD | Step 1 - Press the "Win+R" buttons together on your keyboard...Full steps |
| Fix 4. Use PowerShell | Step 1. Right-click the Windows icon, select Run, type Powershell, and click "OK" to open it...Full steps |
The Necessity of Creating New Partitions in Windows Server
When buying a new laptop or computer with Windows pre-installed, the hard drive usually comes with a single, default partition. While this setup might not cause problems initially, partitioning the drive can resolve several genuine issues, such as:
- Easy backing up of files
When you organize your drive with multiple partitions, it becomes easy to manage and backup your files in separate sections, allowing you to have a complete partition for essential backed-up files.
- Perfect management
Partitioning your system allows you to separate files based on your selection criteria, preventing mixing of files between multiple folders. This can be achieved by creating separate partitions for different purposes, such as an OS partition, a work partition, and a personal partition. This approach helps in maintaining organization and clarity in file management.
- Better probability of retrieving data
When a file is accidentally deleted or access is lost due to partitioning, having a backup system in place can make retrieval easier. This is especially true if the deleted file was not immediately deleted from the backup system. In this scenario, the backup system acts as a safety net, allowing users to recover the lost file without having to recreate it. This can save time and effort, and in some cases, prevent data loss.
- More than a single operating system
Once you create multiple parts in your server, you can install multiple operating systems in different partitions, allowing for separate and independent environments for each OS.
4 Methods to Create New Partitions in Windows Server 2019/2016 and Older Servers
There are several ways to partition your drives on a server, and this blog will describe each method, starting with the easiest and moving on to the hardest. The methods can be ordered by difficulty, with the easiest one coming first and the hardest one last. Each method will be covered in detail, providing a comprehensive guide for server administrators.
- To create new partitions via third-party partition manager software, you can use a tool like Qiling Partition Master or MiniTool Partition Wizard. These programs allow you to resize, move, or delete existing partitions, and also create new ones. They provide a user-friendly interface that guides you through the process, making it easy to create a new partition without affecting the existing data.
- To create a new simple volume using the Disk Management tool, first, open the Disk Management tool by searching for it in the Start menu. Then, right-click on the unallocated space on the disk where you want to create the simple volume and select "New Simple Volume" from the context menu. Follow the wizard to assign a drive letter and file system to the new simple volume, and then format it if desired.
- Method 3. Create a New Partition Using CMD - Complex
- Method 4. Create a New Volume Using PowerShell - Complex
Method 1. Create New Partitions in Windows Server 2019/2016 Using Third-Party Software
Using third-Creating new divisions on your hard drive has never been easier, thanks to party software. Among the many tools available online, Qiling Partition Master Enterprise stands out as the best for disk partitioning. This powerful tool is undoubtedly the top choice for the task, offering a range of features that make it the go-to solution for managing your hard drive's partitions.
- The tool has an interface that is easy to use, making it convenient for users.
- Accurate and fastest execution time.
- Has a comprehensive disk management toolkit that enables you to manage and handle your hard drives efficiently and effectively after the process.
Qiling Partition Master is a versatile tool that supports both Windows and Mac-based computers, and can be downloaded from its official website at https://www.idiskhome.com/main/product_pro.shtml.
Qiling Partition Master Enterprise
Your trustworthy Windows Server disk manager.
- Extend System drive, combine/split partitions.
- Clone disk, migrate OS to HDD/SSD.
- Convert MBR to GPT, GPT to MBR, no data loss.
- 1-click adjust disk layout, create volumes at one time.
To create a new partition on a Windows Server computer, follow these steps: Open the Disk Management console by typing `diskmgmt.msc` in the Run dialog box or searching for it in the Start menu.
Step 1. Check for free space
To divide a disk partition into multiple ones, you must ensure that there is adequate free space to be allotted.
Step 2. Shrink a disk partition to create unallocated space
To resize a partition, start by right-clicking on it and selecting the "Resize/Move" feature. This allows you to adjust the partition's size while keeping the data intact. By doing so, you can free up space on the partition and use it for other purposes.

To free up space, drag the partition's end to the right or left, reducing its size as indicated by the red arrow, and create ample unallocated space. The "Partition size" area will display the reduced space.

To finalize the shrinking of the disk, click the "Proceed" button to save all the changes. This will create unallocated space on the same disk, which can then be used for other purposes.
Step 3. Create a new partition on unallocated space
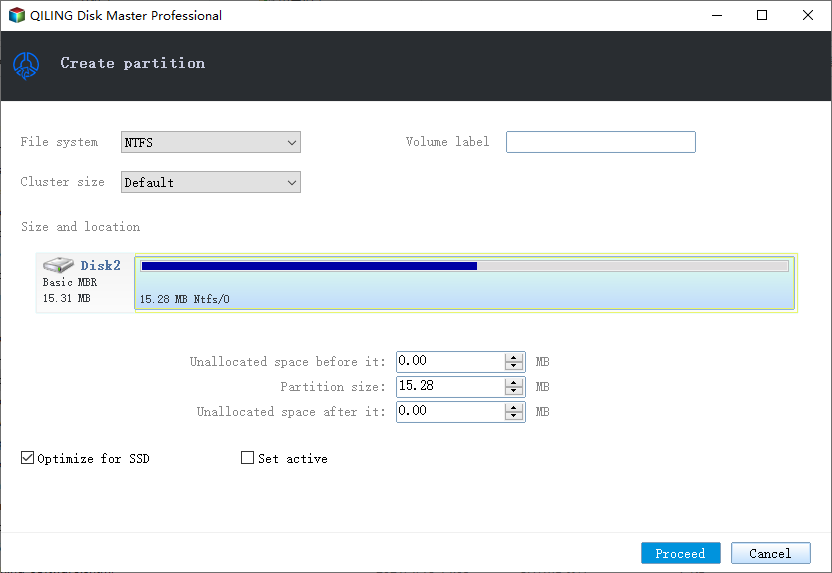
To turn the unallocated space into a usable partition drive with a recognized file system, right-click on the unallocated space and choose "Create".
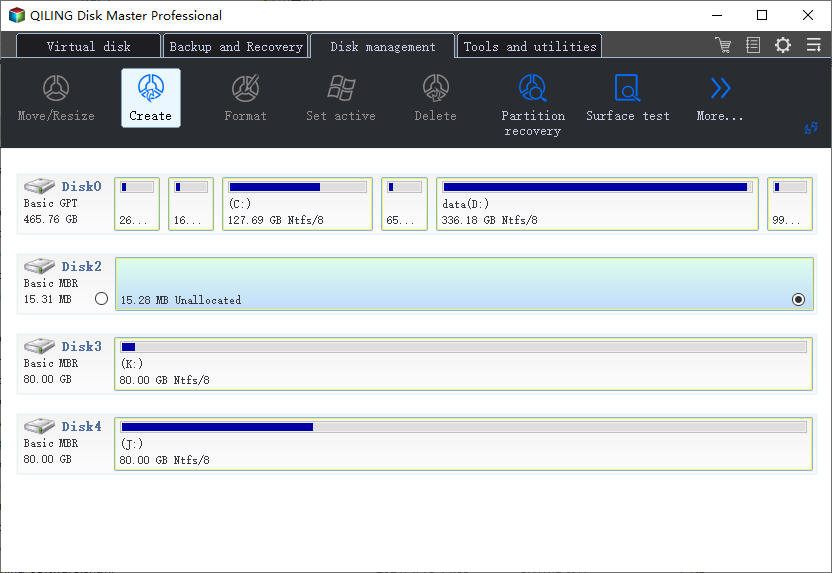
To customize the partition information, select a drive letter, partition label, and file system (such as NTFS, FAT32, EXT2/3/4, or exFAT) and explore other advanced settings.
To create multiple partitions on a hard drive, first, open the Disk Management tool. Then, select the hard drive you want to partition and click "New" to create a new partition. Set the size of the partition and choose the file system type.
Method 2. Create New Simple Volumes in Windows Server 2019/2016 Using Disk Management
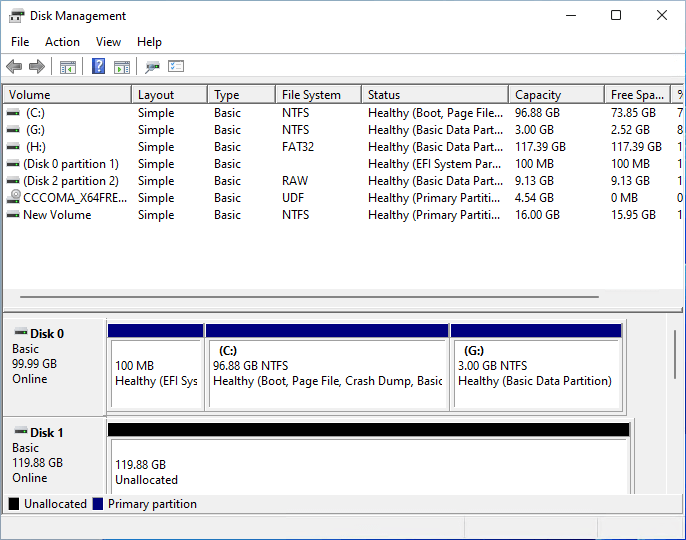
To manage your server partitions and volumes, use the built-in Disk Management tool in Windows. This tool allows you to add or modify your current partition, and can be accessed by following a series of steps. By utilizing Disk Management, you can easily organize your server's storage and make any necessary adjustments to your partitions and volumes.
Step 1: To access Disk Management, click on "This PC" on your computer, then go to the "Manage" option at the top, and select "Disk Management" from the list.
Step 2: Select the "unallocated space" option and click on "new simple volume" to proceed with the process.
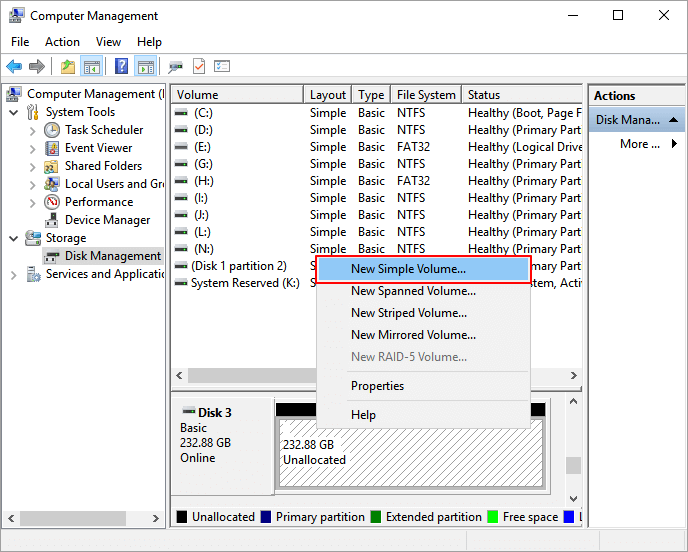
Step 3: Click on the "next" button in the popped up New simple volume wizard.
Step 4: Put your desired size in the "simple volume size" blank.
Step 5:The drive is called the "My Documents" drive. It is a storage location on a computer where users can save and store their documents, files, and other digital content.
Step 6:The format selection includes options for various file systems, such as exFAT, NTFS, FAT, FAT32, etc. Additionally, you can choose to customize the allocation unit size, or select the default option and proceed.
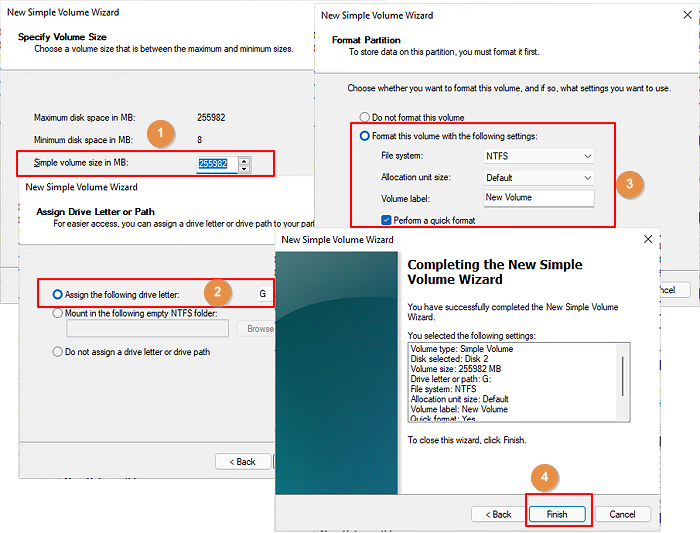
Complete! You will have a perfectly partitioned disk in a few minutes if you have done the above steps correctly.
Method 3. Create a New Partition in Windows Server Using CMD
To access your Windows 10 computer's hidden administrator account, you can try the following methods: using the built-in administrator account, creating a new administrator account, or using the Command Prompt. The first method is the simplest, as it allows you to access the built-in administrator account without creating a new one. The second method involves creating a new administrator account, which can be useful if you need to run programs as an administrator or access certain system settings. The third method, using the Command Prompt, is the most complex and should only be attempted by those familiar with the Command Prompt. If you're unable to access the administrator account using these methods, you may need to reset your computer to its default settings.
Step 1 To open the "Run" option on your computer, press the "Win+R" buttons together on your keyboard.
Step 2 To continue, type "CMD" in the text section and click enter to go forward.
Step 3 - After opening the command prompt, enter the below-mentioned commands, in the same manner, they have been mentioned. Make sure you use the correct cases for each letter, and don't forget to click enter after each command mentioned.
- diskpart
- list disk
- select disk n 1st partition of disk 1: fdisk /dev/sda1
Step 4 If your disk doesn't have unallocated space, you can create some by deleting unnecessary files and folders, or by formatting a portion of the disk. If you're using a Windows machine, you can use the built-in Disk Cleanup tool to remove temporary files and free up space.
- list disk
- list volume
- select volume number
- shrink desired=(*MB)
Step 5 `New-Volume -DriveLetter "Z:" -Capacity 10GB -FileSystem NTFS -HealthStatus Healthy -Size 10GB`
- create partition primary size=*MB
- assign letter=G (choose any name)
- select volume number
- format fs=ntfs quick
Step 6 - Click "Ener".
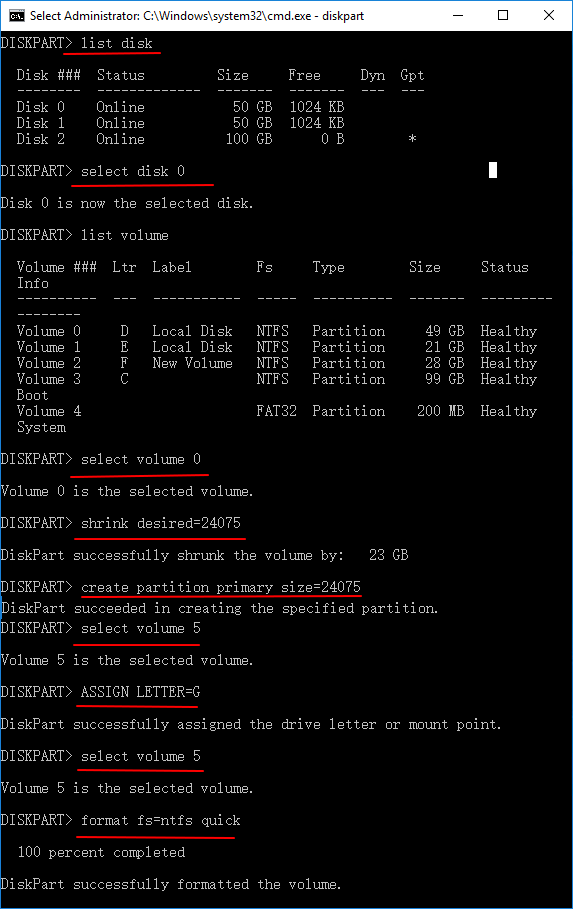
Complete! You have completed the partitioning of your system.
Method 4. Create a New Volume in Windows Server 2019/2016 Using PowerShell
To partition a hard drive using PowerShell, you can use the built-in DiskPart commands or third-party tools like PowerShell itself. If you're familiar with PowerShell, you can use it to partition a hard drive by running commands like New-Partition and Set-Partition, but this is not recommended for those not familiar with PowerShell, as it can be complex and may cause data loss if not done correctly. Instead, use the above steps which involve using the built-in Disk Management tool, which provides a user-friendly interface for partitioning and managing disks. This method is more efficient and safer for most users. Simply type the commands in PowerShell to start the partitioning process, but be cautious and only proceed if you're comfortable with the process and its potential risks.
We are partitioning 10GB and assigning the letter "G" to the new drive using PowerShell.
Step 1. To open the Windows PowerShell, right-click the Windows icon, select Run, type Powershell, and click "OK".
Step 2. Get-ChildItem -Path C:\Windows\System32\drivers\etc\hosts
- New-Partition –DiskNumber 0 -Size 20gb -DriveLetter G
- Get-Partition - DiskNumber 0
- Format-Volume - DriveLetter G - FileSystem NTFS
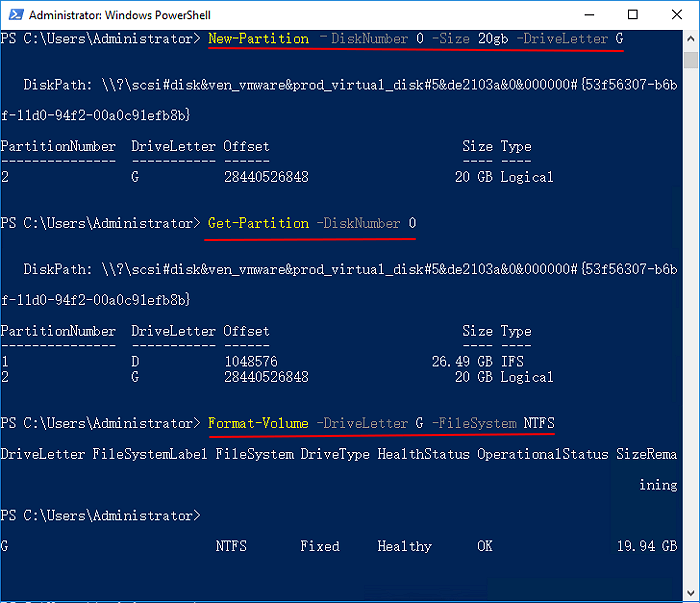
Done! If you followed the steps mentioned above and commands correctly, you are just minutes away from a successful partition.
Conclusion
Creating a partition for your server can be done through various methods, with using the CMD or third-party software being the most effective. However, it's essential to exercise caution when using third-party software, as some may be fraudulent or contain viruses that can harm your server. Instead, opt for trusted tools like Qiling Partition Master, which can easily perform the task without requiring extensive technical knowledge. Using third-party tools offers a significant advantage, making the process relatively straightforward.
Anyone with little computer knowledge can create a partition using any third-party software.
Besides Qiling, there are many other tools available that users can utilize at their discretion.
Arranging the methods in order of complexity will help you choose the best approach. Start with the simpler procedures and only move on to more complex ones if the previous ones don't work out or if you're unable to do them. If needed, you can also refer to online resources or our blogs for more information on disk partitioning methods.
Related Articles
- What Is FAT File System Format (FAT12, FAT16, FAT32)
- How to Fix SSD Full for No Reason
- How to Partition, Format or Wipe Hard Drive Without OS
- [100% Fixed] Can I Extend C Drive from Another Disk in Windows 10/11?
- Best System Clone Service for Windows and Windows Server Users [Your Best Practice]
Are you looking for a reliable and practical system clone service provider to assist you in efficiently cloning operating systems on Windows computers to new drives or new computers with ease? Follow and find the best system clone service here on your own. - System Clone VS System Migration, What's the Differences and How to Use?
System cloning and migration are two distinct processes. System cloning creates exact copies of a system, while system migration moves data to a new system. The choice between the two depends on the intended purpose, with cloning suitable for creating duplicates and migration for upgrading or replacing existing systems. To efficiently perform these tasks on Windows computers, specialized software like Qiling Disk Master can be used.