How to Create UEFI Bootable USB Drive on Windows 10 to Boot and Repair your Computer
PAGE CONTENT:
What Can You Do with a UEFI Bootable DiskCreating a UEFI bootable USB drive is a straightforward process that can be achieved in three ways. First, you can use a UEFI-compatible USB creator tool like Rufus or Unetbootin to create a bootable USB drive from a UEFI-compatible ISO file.
To boot Windows 10 from a UEFI bootable USB drive, you'll need to create a bootable USB drive using the Windows 10 Media Creation Tool. First, download the tool from Microsoft's website and run it.
To repair a hard drive and recover data, you can create a WinPE bootable disk. This allows you to boot into a Windows environment without actually booting into Windows, which can be helpful if your system is experiencing issues.
What Can You Do with a UEFI Bootable Disk
A UEFI bootable USB drive can be used to start a computer when it can't be booted due to a virus or system issues, allowing you to perform a disk check and repair. It's also useful for in-place Windows upgrades, clean installs, backing up systems, and protecting data security.
To create a Windows 10 UEFI bootable USB drive, you can use the Media Creation Tool provided by Microsoft. This tool allows you to create a bootable USB drive that can be used to install Windows 10 on a UEFI-enabled computer.
If you have a computer with a Unified Extensible Firmware Interface (UEFI) instead of the legacy Basic Input/Output System (BIOS), you'll need to know how to create a UEFI bootable USB drive on Windows 10.
Making a bootable disk in UEFI mode involves several different methods. One approach is to use a tool like Rufus or BalenaEtcher to create a bootable USB drive from an ISO file, while another is to use a UEFI firmware utility to create a bootable disk from a CD or DVD. Additionally, some operating systems, such as Windows 10, can be installed directly to a UEFI-enabled computer using a USB drive.
How to Create a UEFI Bootable USB Drive in 3 Ways
There are three common ways to create a bootable USB drive using Windows 10: the Media Creation tool, Diskpart, and third-party software like Rufus.
1. Create a UEFI Bootable USB with Windows 10 Media Creation Tool
To create a UEFI bootable USB media for an in-place upgrade or clean install of Windows 10, you can use the Microsoft Media Creation Tool. This tool allows you to download the Windows 10 installation media and create a bootable USB drive that can be used to install Windows 10 on a UEFI-based system.
To create a Windows 10 UEFI bootable USB, start by preparing a USB flash drive with at least 8GB of capacity. Next, use the steps to create the bootable USB.
Step 1. You can download Windows 10 installation media from the official Microsoft website.
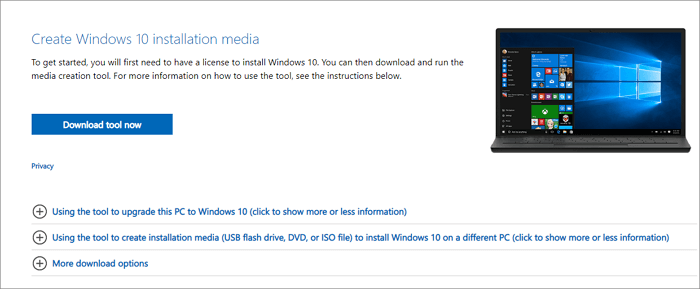
Step 2. Run the MediaCreationTool exe file and click "Accept" to agree to the license terms.
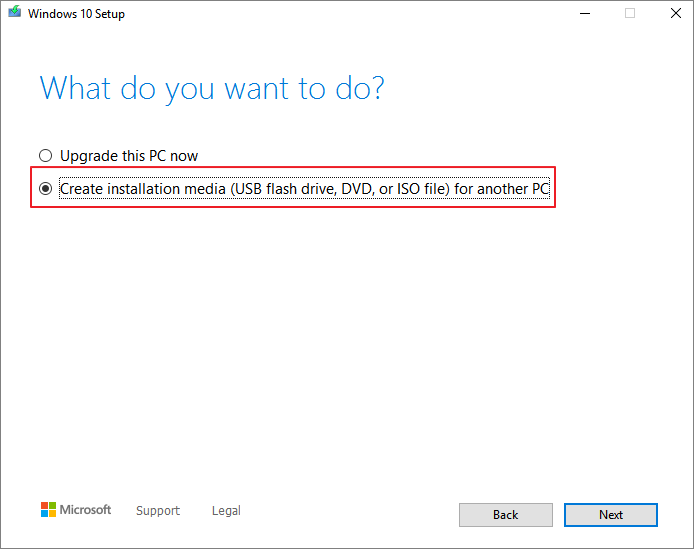
Step 3. On the Windows 10 Setup screen, select "Create installation media (USB flash drive, DVD, or ISO file) for another PC" and click Next.
Step 4. Click "Next" on the language, edition, and architecture screen. Select the "USB flash drive" option, and click "Next".
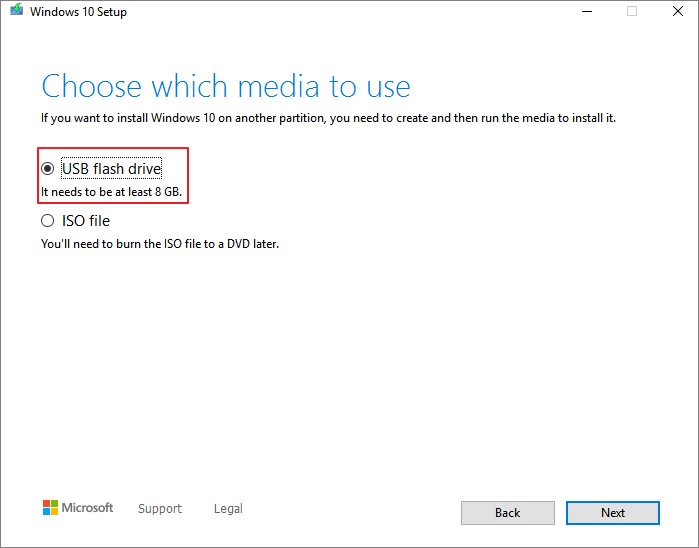
Step 5. Select your connected USB flash drive from the list and click "Next > Finish" to complete the process. The Media Creation Tool will then download the files and create a bootable USB flash drive that can be used to install Windows 10 on devices with support for UEFI and BIOS.
2. Create a UEFI Bootable USB on Windows 10 with Diskpart
With the built-To create a Windows 10 UEFI bootable USB drive using Diskpart utility, you can follow these steps: Open Command Prompt as Administrator, type "diskpart" and press Enter, then type "list disk" and press Enter to list all disks, identify the USB drive you want to use, type "select disk X" (replace X with the number of your USB drive), type "clean", type "convert gpt", type "create partition primary", type "format fs=ntfs quick", and finally type "active". After that, you can copy the Windows 10 installation files to the USB drive. Note that this method is more complex than using a graphical tool, but it's a free and reliable way to create a UEFI bootable USB drive.
The process of making a USB bootable drive will erase all data on it, so it's essential to back up any important files and data before proceeding.
Step 1. Connect your USB flash drive to the computer.
Step 2. To run the Command Prompt as an administrator, type "CMD" in the Search box, right-click on the Command Prompt result, and select "Run as Administrator" from the context menu.
Step 3. In Command Prompt, type Diskpart and press Enter.
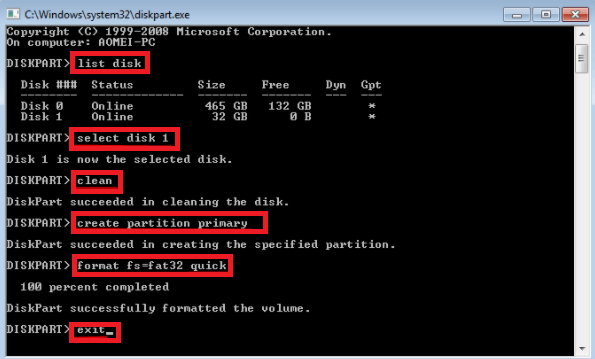
Step 4. Type the following commands in order, and press Enter after each one.
list disk
select disk #
clean
create partition primary
select partition 1
active
format fs=fat32 (it means you format the drive with fat32 file system)
assign
exit
Step 5. To create a bootable UEFI flash drive with Windows 10, copy the Windows installation files to the USB flash drive using copy-and-paste. This completes the process.
3. Create UEFI Bootable USB Drive with Rufus
If you're having trouble creating a Windows 10 UEFI bootable USB using Diskpart, you can use Rufus, a free program that allows you to create a UEFI bootable disk on Windows 10/8/7.
Step 1. Download Rufus from the official website: https://rufus.ie/en/.
Step 2. Connect your USB flash drive to the computer.
Step 3. Run this program and make the following main settings:
- Device: Select your USB flash drive.
- Boot selection: Select the Windows 10 ISO file from the folder location and click the SELECT button to proceed.
- Partition scheme: Select GPT for UEFI.
- Target system: Select UEFI (non CSM).
- File system: Select NTFS.
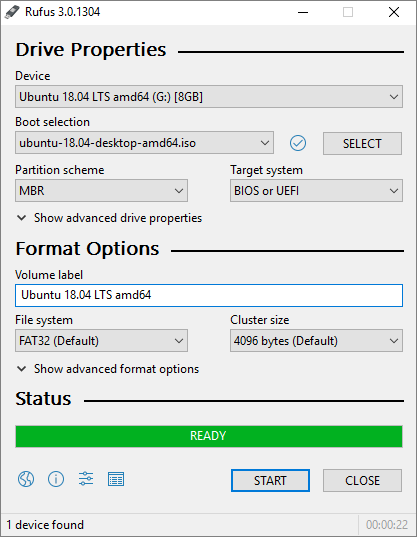
Choose the correct options and settings based on the actual situation, then click the START button to let Rufus create a UEFI USB flash drive.
How to Boot Windows 10 Computer from UEFI Bootable USB Drive
To create a UEFI bootable USB drive on Windows 10, you can follow any of the methods mentioned earlier. Once you have successfully created the boot disk, you'll also need to know how to boot your computer from the USB drive.
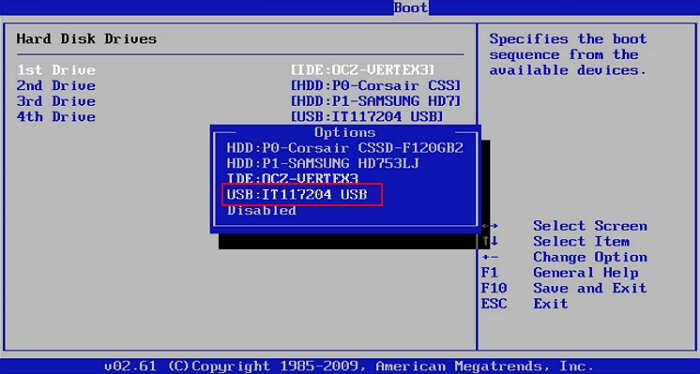
To start your computer from a Windows 10 UEFI bootable USB drive, follow these steps: Insert the USB drive into a USB port on your computer, then press the power button to turn it on. As the computer boots, press the key to open the UEFI firmware settings (this is usually the F2, F12, or Del key, depending on your computer model), and navigate to the Boot settings.
Step 1. Boot the computer from the UEFI bootable USB disk.
Step 2. Restart your computer, hold F2/F11/Del to enter BIOS.
Step 3. To set the UEFI bootable USB as the boot drive, go to the Boot Drive section and select the UEFI bootable USB as the boot drive.
Step 4. Save the changes and exit the BIOS. Wait for your computer to boot up from the UEFI bootable USB disk.
Bonus Tip: How to Repair Hard Drive and Recover Data with a WinPE Bootable Disk
If your computer won't start, you have options beyond using a BIOS or UEFI USB bootable drive. Another way to access your computer and fix errors or manage hard drives is to create a disk management WinPE bootable disk using partitioning software like Qiling Partition Master. This allows you to troubleshoot and manage your hard drives even when your computer is unresponsive.
With simple steps, you can create a Qiling Partition Master WinPE bootable disk that allows you to run it on your computer without system boot partitions, and then use it to repair and manage your hard drives with advanced solutions or restore data by cloning the hard drive.
Steps for creating a WinPE bootable USB drive with Qiling partitioning software.
Step 1. To create a bootable disk of Qiling Partition Master, prepare a storage media such as a USB drive or CD/DVD disc, and correctly connect it to your computer.
Step 2. Launch Qiling Partition Master, click on the "WinPE Creator" feature at the top.
Step 3. You can choose between saving the ISO file to a USB, CD/DVD, or saving it to your local drive, and then burning it to a storage media later. Click the "Proceed" button to start the process.
After completing the process, you'll have a Qiling Partition Master WinPE bootable disk that allows you to manage your hard disks and partitions even when your computer is unable to boot normally.
To load the RAID driver in a WinPE environment, first click on the "Add Driver" option from the menu bar, which allows you to add the driver for your device. This is necessary for devices that cannot be recognized by the WinPE environment without their drivers installed, such as RAID drives or certain types of hard drives.
Once the Qiling Partition Master bootable disk is created, you can access your computer and the disk from the USB bootable drive for subsequent disk repair and data recovery operations.
Wrapping Up
To create a UEFI bootable USB on Windows 10, you can use one of four methods: creating a UEFI bootable disk using Windows 10 installation media, utilizing Diskpart, or employing Refus. These methods allow you to create a UEFI bootable disk that can be used to boot your system. (Note: I removed the "still struggling" part as it's not necessary and made the text more concise)
If you need to boot your computer from a USB bootable disk and manage or repair your disk in a WinPE environment, we recommend using Qiling Partition Master to clone a failing hard drive to a new HDD/SSD.
Related Articles
- Lenovo Laptop Running Slow Windows 11/10 | Speed It Up
- How to Wipe External Hard Drive on Windows 10 and Mac Without Recovery
- How to Create and Format exFAT Partitions in Windows 11/10/8/7 (Free Methods)
- 3 Methods for Converting GPT to MBR in Windows Server without Losing Data - Qiling
- How to Fix Windows 11 Startup Repair Not Working | 7 Tips
Resolve Windows 11 startup issues easily with our comprehensive guide, featuring easy solutions and expert tips to fix 'Windows 11 startup repair not working' and get your computer up and running smoothly. - How to Fix Windows 11 Won't Install from USB | 2024 Guide🔥
This article provides eight efficient ways to fix the 'Windows 11 won't install from USB error, along with possible reasons to avoid the error and successfully install Windows 11 from USB.