How to Fix Windows 11 Startup Repair Not Working | 7 Tips
If you're experiencing the frustrating issue of Windows 11 startup repair not working, you're not alone. This problem can be caused by various factors, including corrupted system files, driver issues, or even a failing hard drive. To resolve this issue, you can try running the System File Checker (SFC) tool, which scans and replaces any corrupted system files. You can also try running the Deployment Image Servicing and Management (DISM) tool to check and repair any issues with your system files. Additionally, checking your Event Viewer logs can help identify the root cause of the problem.
Qiling aims to be your guiding light through the startup repair labyrinth, offering seven practical tips to help you overcome this vexing problem. This guide provides invaluable insights to revive your system and get it back on track, equipping you with actionable solutions to effortlessly overcome the startup repair glitch. By the end of this journey, you'll understand the intricacies of the issue and be empowered to revive your system with confidence.
How to Fix Windows 11 Startup Repair Not Working - 7 Tips
Now that we've laid the groundwork, let's move on to the practical solutions to resolve the Windows 11 startup repair glitch. Before we start, make sure you have a reliable computer or smartphone to ensure a smooth troubleshooting experience.
- Way 1: Boot Repair Tool
- Way 2: Disable Automatic Restart
- Way 3: Rebuild BCD (Boot Configuration Data)
- Way 4: Run CHKDSK Commands
- Way 5: Boot into Safe Mode
- Way 6: Run Sfc/Scannow Command
- Way 7: Disable Early Launch Anti-Malware Protection
The solutions to the problem are to be shared with more users on social platforms before going through them, allowing for a wider audience to engage and provide feedback.
Way 1: Boot Repair Tool
The "Windows 11 startup repair not working" issue can be daunting, but tools like Qiling Disk Master can save the day by simplifying the process, serving as your digital ally with many solutions at your fingertips.
With Qiling Disk Master Professional, you can easily fix startup repair problems without needing technical expertise due to its user-friendly interface.
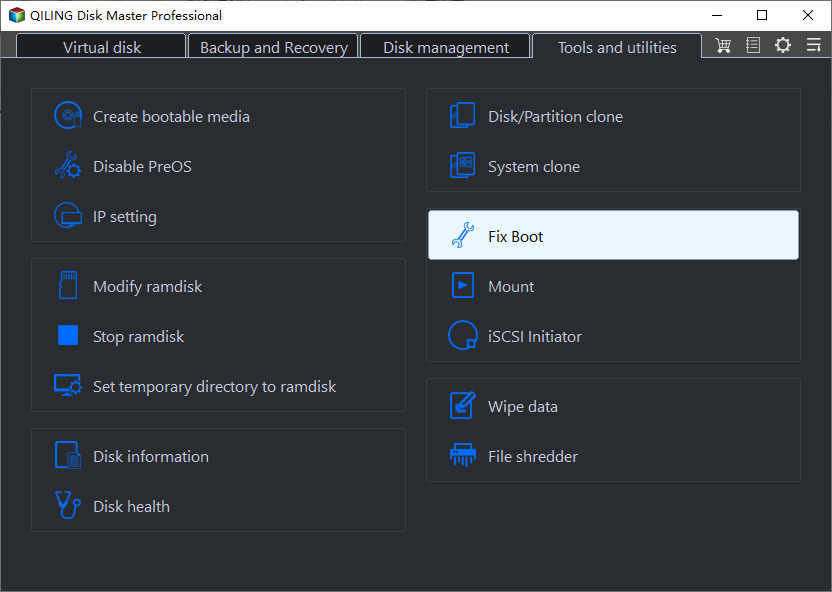
Step 1. After connecting the external drive/USB to your computer, start Qiling Disk Master and go to "Tools", then click "Create bootable media".

Step 2. Insert a USB drive or CD/DVD, then click "Proceed" to start the installation process. You can also burn the Windows ISO file to the storage medium.

Step 3. Connect a bootable drive to a new computer, reboot it by pressing F2/Del to enter the BIOS, set the bootable drive as the boot disk, and exit the BIOS by pressing F10.
Step 4. Boot the computer again and enter the WinPE interface. Then, open Qiling Disk Master and click "Fix Boot" under the "Tools" option.
Step 5: Select the system you want to repair and click "Proceed".
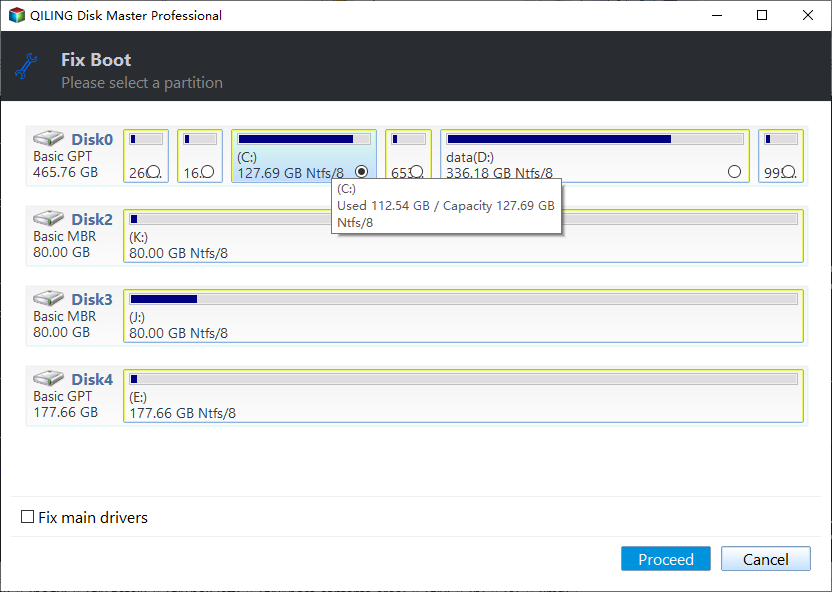
Step 6. Wait a moment, and you will receive an alert that the system has been successfully repaired.
Additional Features of Qiling Disk Master
- Fix Windows 10 Startup Repair Not Working
- Repair Windows 11 and fix corrupted files
- Repair Windows 11 UEFI Bootloader
We highly recommend giving Qiling Disk Master a try, as its effectiveness and user-friendly design make it a standout choice in resolving the "Windows 11 startup repair not working" issue, leading to a hassle-free computing experience.
Way 2: Disable Automatic Restart
To resolve the startup repair issue and break the restart loop, it's essential to disable the automatic restart feature, allowing you to troubleshoot and address the underlying problem. This can be achieved by booting in safe mode, accessing the settings, and turning off the automatic restart option. By gaining control over the system, you can then proceed with the necessary steps to diagnose and resolve the issue, ensuring a smooth and uninterrupted operation of your device.
Follow the steps given below:
Step 1. Restart your computer and hold the F8 key before the Windows logo appears.
Step 2. Select "Advanced Boot Options" from the menu.
Step 3. To disable automatic restart on system failure, use the arrow keys to navigate to the "Disable automatic restart on system failure" option.
Step 4. Press Enter to confirm your selection.
Step 5. Disable Automatic Restart

Turning off automatic restart allows you to observe the error message, which helps identify the root cause of the startup repair failure.
Way 3: Rebuild BCD (Boot Configuration Data)
Rebuilding the BCD can resolve issues related to corrupted or missing boot configuration data, which can cause system malfunction and can be resolved by rebuilding the BCD.
Here are the steps:
Step 1. Boot from the Windows installation media.
Step 2. Choose language preferences and click "Next."
Step 3. To access the Command Prompt in Windows, click on "Repair your computer" from the Windows installation media, select "Troubleshoot", then "Advanced options", and finally "Command Prompt."
Step 4. Open Command Prompt as an administrator.
Step 5. Type the command bootrec /scanos and press Enter.
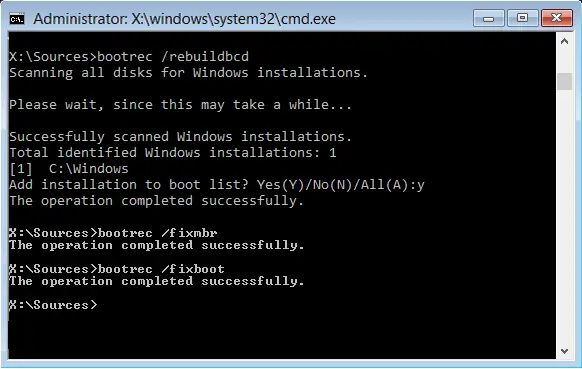
Step 6. After the scan, type the command bootrec /rebuildbcd and press Enter.
Step 7. Follow on-screen instructions to complete the process. Rebuild BCD
Rebuilding BCD ensures that the boot configuration data is accurate and functional, resolving startup repair issues effectively.
Way 4: Run CHKDSK Commands
Corrupted disk sectors can cause startup repair problems, but running CHKDSK commands can help identify and fix these issues, ensuring a stable system boot.
Follow these steps:
Step 1. Boot from the Windows installation media.
Step 2. Navigate to "Command Prompt" in the Advanced options menu.
Step 3. To run a full disk check on the C: drive, type `chkdsk C: /f /r /x` in the Command Prompt and press Enter. This command will initiate a thorough scan of the disk, fixing any errors it finds and recovering any readable information it can from the disk.
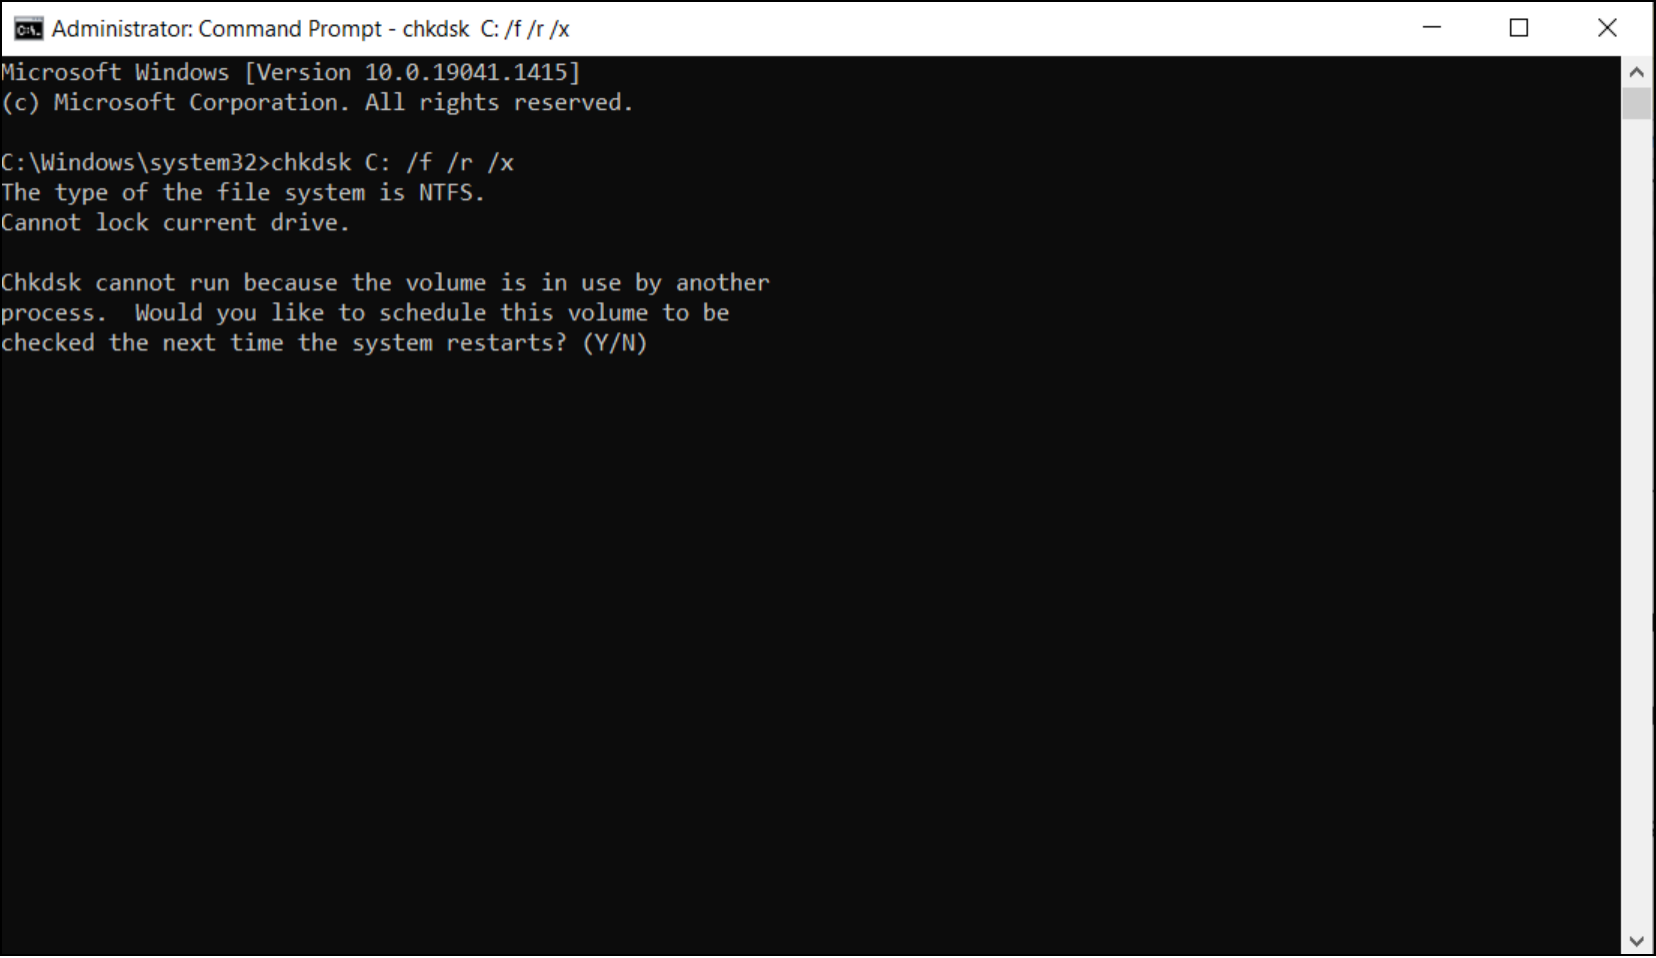
Step 4. Allow CHKDSK to scan and repair your disk.
Running CHKDSK commands checks for disk errors and bad sectors, enhancing overall system performance and resolving startup repair issues. This process may take some time.
Way 5: Boot into Safe Mode
Booting into Safe Mode allows your system to start with essential services, making diagnosing and fixing the "Windows 11 startup repair not working" issue easier.
Follow the steps below and boot into Safe Mode:
Step 1. You should press the "Shift" key and keep it held down until the Windows logo appears on the screen, then release the key. This will boot your computer in Safe Mode.
Step 2. Once the Advanced Startup Options menu appears, select "Troubleshoot."
Step 3. Click "Advanced options" from the Troubleshoot menu.
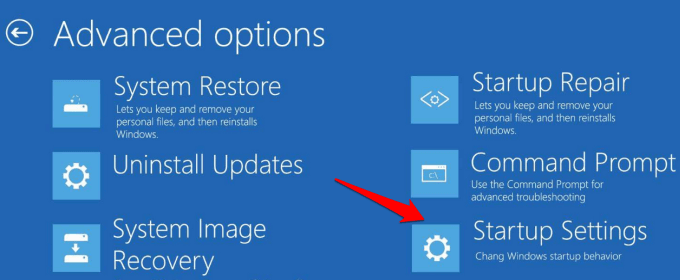
Step 4. Under Advanced options, choose "Startup Settings."
Step 5. Restart your computer, then press F4 to boot into Safe Mode. After your computer restarts, click "Restart" again.
Way 6: Run Sfc/Scannow Command
The System File Checker (sfc/scannow) command can fix corrupted system files that might lead to the startup repair issue.
Follow these steps:
Step 1. Locate "Command Prompt" in the Windows search bar, right-click, and select "Run as administrator."

Step 2. In the Command Prompt box, type `sfc /scannow` and press "Enter" to run the System File Checker, which will scan and repair corrupted system files.
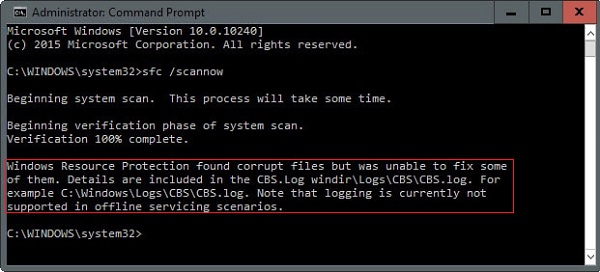
The system will scan and repair any corrupted files automatically.
Way 7: Disable Early Launch Anti-Malware Protection
Certain anti-Malware protections can sometimes conflict with the startup process, causing repair issues. Disabling Early Launch Anti-Malware Protection might resolve the problem.
Follow these steps:
Step 1. Open the Advanced Startup Options menu.
Step 2. Select "Startup Settings" and then click the"Restart" option.
Step 3. To enable Safe Mode via Networking, press the "F5" key after the computer restarts. This will allow you to access the internet while still running in Safe Mode.
Step 4. Once you've entered Safe Mode, turn off the Early Launch Anti-Malware Protection function from the security software settings.
Here are the steps to troubleshoot issues in a straightforward way: Follow a step-by-step guide, use a flowchart to determine the cause, and seek help from technical support specialists if needed. This approach ensures a hassle-free experience and provides extra assistance when required.
Qiling experts offer 24/7 manual services to fix Windows boot errors, BSOD, and boot loops. They provide free evaluation, diagnose, and resolve system boot failures, Windows stop codes, and OS lagging issues with their extensive experience.
- 1. To fix a BSOD error due to a Windows update, restart your computer in Safe Mode, then uninstall the latest update. If that doesn't work, try System Restore to a point before the update.
- 2. To resolve Windows boot errors like "no bootable device found" or BCD file corruption, you can try the following steps: Boot from a Windows installation media or a Linux live USB, and then run the command "bootrec /fixmbr" to repair the master boot record. Next, run "bootrec /fixboot" to repair the boot sector.
- 3. The 0X000_error code on Windows systems can be frustrating, causing OS boot loop issues. To resolve this, you can try running the System File Checker (SFC) tool, which scans and replaces corrupted system files.
Windows startup repair not working? I've can help! If Windows startup repair is not working, it's likely due to a corrupted system file or a hardware issue.

Fix 'Startup Repair cannot repair this computer automatically' in Windows
If you're encountering issues with Startup Repair being unable to automatically repair your computer, this guide provides comprehensive information to help you troubleshoot and resolve the problem.
Why is the Windows 11 Startup Repair not working?
Asking the question, "Why is Windows 11 startup repair not working?" is crucial, as understanding the root causes can provide valuable insights into the complexity of the problem and guide us toward practical solutions. This issue may arise due to various reasons, including corrupted system files, driver issues, or hardware problems, which can be caused by a range of factors such as software updates, malware, or physical damage to the computer. Understanding the underlying causes can help us identify the most effective solutions, such as running system file checks, updating drivers, or performing a clean boot, to resolve the issue and get Windows 11 up and running smoothly.
- Corrupted Windows OS
A corrupted Windows OS can occur due to system crashes, malware, or improper shutdowns, causing system files to become compromised, making it difficult for the computer to initiate repair, resulting in startup repair failure.
- Hardware Failures
Hardware failures can cause malfunctioning hard drives, faulty RAM modules, or damaged motherboard components, hindering the smooth booting of Windows 11 OS, and disrupting the startup repair mechanism.
- Outdated Drivers
Drivers that serve as bridges between your hardware components and the operating system can cause problems with Windows 11 startup repair attempts. When Windows 11 encounters incompatible or obsolete drivers, it struggles to communicate with the hardware, leading to startup repair failure.
- Incorrect BIOS Settings
Incorrect BIOS settings can cause conflicts between hardware and the operating system, leading to persistent startup issues.
By understanding the underlying reasons for the "Windows 11 startup repair not working" issue, you gain valuable insights into the complexities of the problem. This knowledge allows you to tackle the issue head-on, using the appropriate solutions tailored to the specific root cause affecting your system.
Conclusion
Navigating the challenges of "Windows 11 startup repair not working" can be daunting, but with the right knowledge and tools, overcoming these hurdles is achievable. This comprehensive guide has provided step-by-step solutions to revive your system's functionality, from turning off automatic restart and rebuilding BCD to running CHKDSK commands and booting into Safe Mode, offering practical ways to resolve the problem.
As you navigate the world of computers, you'll find that having the right knowledge and confidence can make all the difference. With a solid understanding of how your system works, you'll be able to troubleshoot issues with ease and keep your computer running smoothly. This newfound confidence will have you tackling even the most daunting tech challenges with poise and precision, leaving you with a system that runs as smoothly as you deserve.
FAQs About Windows 11 Startup Repair Not Working
Do you still have lingering questions about resolving the Windows 11 startup repair issue? Here are answers to some of the most commonly asked questions below.
1. How do I enter startup repair?
To enter startup repair on Windows 11, follow these steps:
- Restart your computer.
- Press the F8 key before the Windows logo appears.
- Select "Advanced Boot Options" from the menu.
- Click on "Startup Repair" to initiate the repair process.
2. What to do if automatic repair is not working?
To troubleshoot Windows 11's automatic repair feature, turn off automatic restart on system failure by going to the Settings app, then to Update & Security, and finally to Recovery. From there, toggle off the "Restart automatically if a problem occurs" switch. This will allow you to observe the error message and potentially identify the root cause of the issue.
- Restart your computer.
- Press the F8 key a while before the Windows logo appears.
- Click "Advanced Boot Options" from the menu.
- To disable automatic restart on system failure, use the arrow keys to navigate to the "Disable automatic restart on system failure" option.
- Press Enter to confirm your selection.
3. Can I repair Windows 11 from BIOS?
Repairing Windows 11 directly from BIOS is not possible as BIOS settings are only for system initialization and do not provide repair functionalities. To fix Windows 11 startup issues, try booting into Safe Mode, running the Sfc/Scannow command, or using Qiling Disk Master, which are tailored to specific problems for practical solutions.
Related Articles
- [Solved] My Games Take Forever to Load PC
- CHKDSK /F /R/X Command to Fix Hard Drive Errors Win 10/11
- Low Level Format Tool Download, 2024 Review [Pros & Cons]
- [Fixed] Boot Device Not Found Error in Windows 10/8/7
- Which Command Is Used to Format a Disk Partition as EXT4? Check and Find Answer Here
The command used to format a disk partition as EXT4 is `mkfs.ext4`. This command is used to create a file system on a disk partition, and the `ext4` option specifies the file system type as EXT4. - How to Crack Windows 10 Password - 3 Ways
Discover efficient methods to crack your Windows 10 password quickly and securely. You can learn how to easily crack your Windows password using various methods, allowing you to regain access to your account with minimal hassle.