How to Repair Windows 11 UEFI Bootloader [Full Guide]
UEFI is an interface between the operating system and platform firmware that allows Windows to boot from disk partitions. The Windows UEFI boot loader loads the OS and initializes devices, but if it gets corrupted, you won't be able to boot into Windows unless restored.
To fix the problem of not being able to boot into Windows, one can try pointing to the EFI boot file and copying it to the EFI/Microsoft/Boot directory. This approach can resolve the issue, and various methods to achieve this are discussed in the post.
| Workable Solutions | Step-by-step Troubleshooting |
|---|---|
| If you're experiencing a UEFI boot error in Windows 11, you can try using the Diskpart command to fix the issue. To do this, open the Command Prompt as an administrator and type "Diskpart" to enter the Diskpart command-line utility. Then, type "list disk" to view a list of available disks, and select the one that contains your Windows 11 installation by typing "select disk #". | Navigate to Troubleshoot > Advanced Options > Command Prompt in Windows Recovery Mode to access the Command Prompt.Full steps |
| Fix 2. Repair the computer with Windows install disk/USB | To create a bootable USB drive for Windows, download the Windows Media Creation Tool, which allows you to create a bootable USB drive to install Windows.Full steps |
| Fix 3. Change Boot Mode to UEFI for Windows 11 | Step 1: To access the recovery settings, open the Settings app on your Windows device by pressing the Windows key + I. Then, navigate to the "Options" section and select "Update and Security." From there, click on "Recovery" to access the recovery settings.Full steps |
| To convert a hard drive from MBR to GPT with Qiling Partition Master, follow these steps: First, download and install Qiling Partition Master on your computer. Then, launch the software and select the disk you want to convert from MBR to GPT. Next, click on the "Convert to GPT" button and confirm the action. | Step 1. Prepare a disc or drive, like a USB drive, flash drive, or a CD/DVD disc...Full steps |
For those running an old PC, it's worth noting that UEFI is the modern equivalent of BIOS, offering enhanced security and features.
Use Diskpart to Fix UEFI Boot Error in Windows 11
Since you're unable to boot into Windows, the solution involves using Advanced Recovery, which requires a bootable USB drive created on a separate Windows PC using the Windows Media Creation Tool. To do this, you'll need to set the first boot device to the USB drive in your UEFI or BIOS settings. This will allow you to access the Advanced Recovery options and potentially resolve the issue.
Boot into Recovery
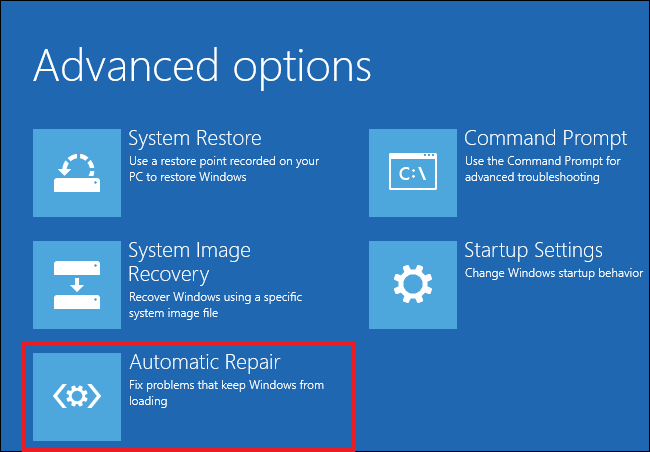
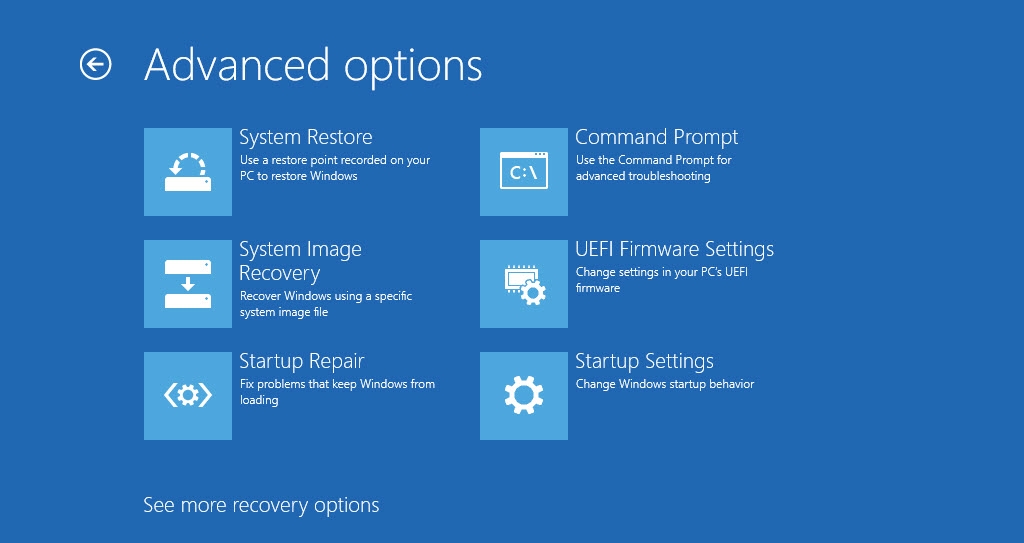
After booting from the USB drive, the process will appear as a regular Windows installation. Click on the "Repair PC" option at the bottom left of the install screen to access the Advanced Recovery feature. From there, navigate to Troubleshoot > Advanced Options > Command Prompt.
Locate EFI Partition
In the command prompt, type the following commands.
- diskpart
- select disk 0
- list vol
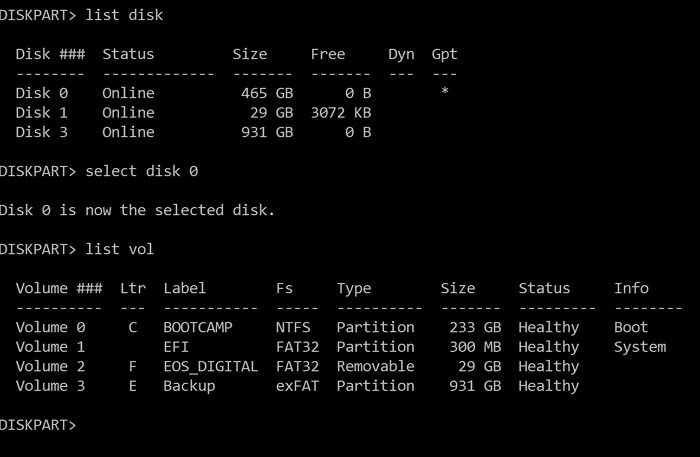
The EFI partition is typically found on the first disk, so the command "Select Disk 0" is used to access it, followed by a list of available partitions or volumes using the "list vol" command.
The script will display a list of partitions, including those that are hidden in File Explorer, and then identify the volume labeled as "EFI".
Assign Drive Letter to EFI Partition
The EFI partition is hidden because it doesn't have a drive letter. Further, if you need to perform any operation, a drive letter needs to be assigned. Execute the following to do so.
Assign Drive letter to EFI Partition Select an Image
- select vol
- assign letter
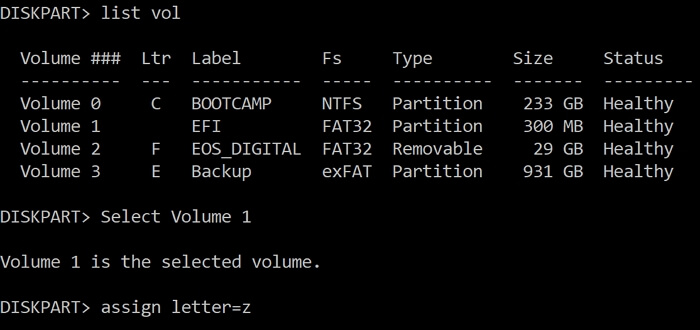
To assign a drive letter to the EFI partition or volume, select the volume or partition, then click on the "Change" button, and finally select a drive letter from the list that is not already assigned.
Type `exit` and press the Enter key to close the Diskpart tool and return to the Command Prompt.
Fix Boot Record
To fix the boot record, go to the EFI partition and run the following commands to repair the boot record.
- cd /d
- bootrec /FixBoot
- ren BCD BCD.bak
- bcdboot C:\Windows /l en-us /s x: /f ALL
- bootrec /rebuildbcd
Now that we have replaced the corrupted BCD file with a new one using the BCDBoot command and then rebuilt it using the bootrec command, everything is in place.
All you need to do now is restart the computer, remove the USB, and let Windows boot normally.
Repair the computer with Windows install disk/USB
Windows has a built-in recovery mode called Advanced Recovery that can automatically repair issues like this.
Create Bootable Media
You can download the Windows Media Creation Tool, which contains a set of tools to help recover your PC in case of crashes, and use it to create a bootable USB drive. Plug in the device and boot your computer using the USB.
Advanced Recovery—Automatic Repair
When the computer boots using the USB, it will display a Windows installation screen. At this point, choose to Repair the PC to boot into Advanced Recovery.
To fix the corrupted EFI Bootloader issue, click on Troubleshoot > Advanced Options > Automatic Repair, which may be able to resolve the problem.
How to Change Boot Mode to UEFI for Windows 11
It is possible that you have a UEFI-supported motherboard, but you are still running on Legacy BIOS mode. Windows 11 will not run on older firmware and needs UEFI. That said, it is rather easy to change the boot mode to UEFI.
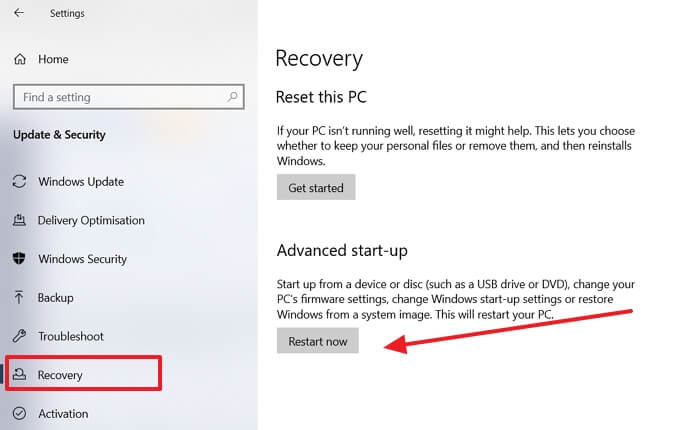
Step 1: Open Settings (Win + I), and navigate to Options > Update and Security > Recovery >Advaned Startup. Click on Restart button.
Step 2:Once you are in Advanced Recovery, click on Troubleshoot > Advanced Options > UEFI Firmware settings.
Step 3: To access the UEFI settings, click on the Restart button, which will take you to the UEFI settings of your motherboard. From there, enable the recommended settings and restart the computer.
Convert from MBR to GPT with Qiling Partition Master
To upgrade to Windows 11, ensure that your Windows partition is GPT-based, not MBR. If you're upgrading, you'll be alerted to this. However, the built-in conversion tool can be problematic as it will format all data. To avoid this, use third-party software.
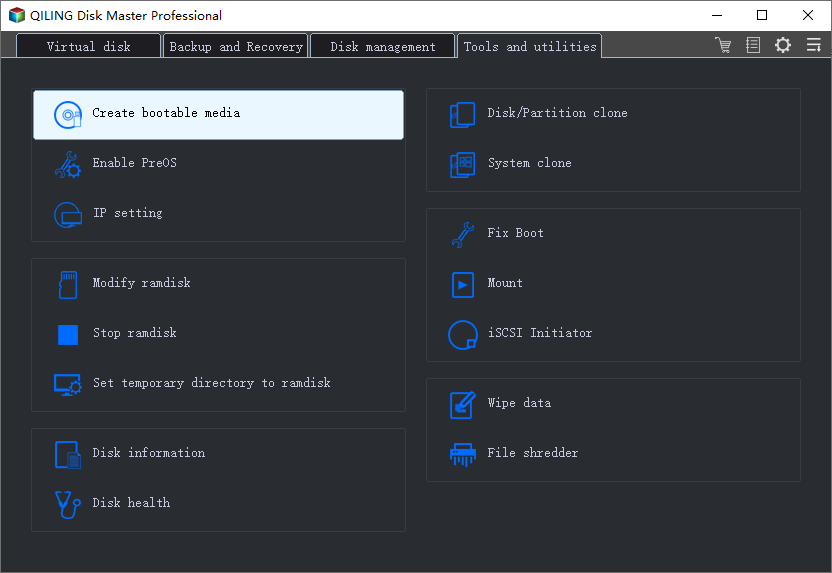
Qiling Partition Master is professional software that helps you manage all operations related to Disk management. It can also help you convert an MBR partition to GPT without data loss. Here are the steps:
Step 1. To create a bootable drive, prepare a disc or drive, such as a USB drive, flash drive, or a CD/DVD disc. Connect the drive to a bootable computer, then launch Qiling Partition Master. In the tool page, find and click on the "Create bootable media" feature.
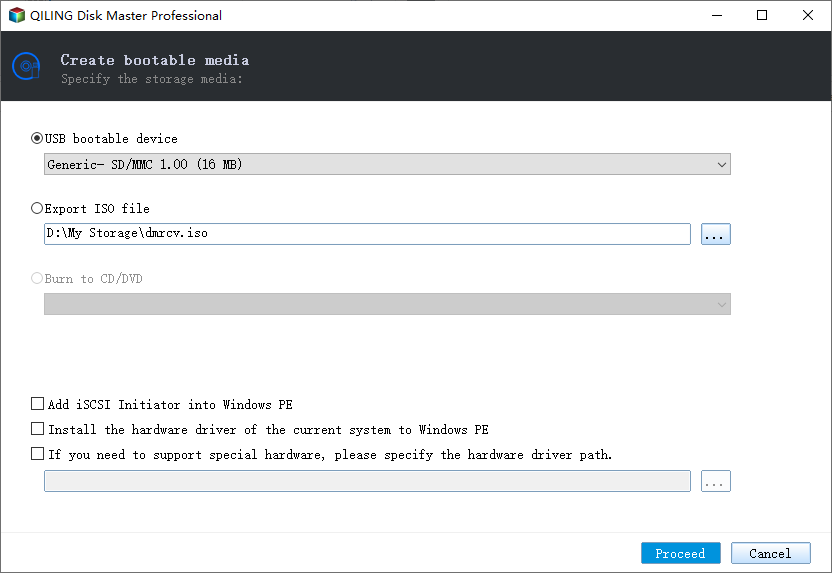
Step 2. Connect a USB device or CD/DVD to the computer, then click "Proceed" based on the device type.
Step 3. Connect the WinPE bootable disk to the computer and restart it. Press F2/Del at the same time to enter the BIOS settings. From there, set the PC to boot from the removable device (the bootable USB disk) or CD-ROM drive (the bootable CD/DVD) instead of the hard drive. Once you've made this change, press F10 to save and exit the BIOS settings.
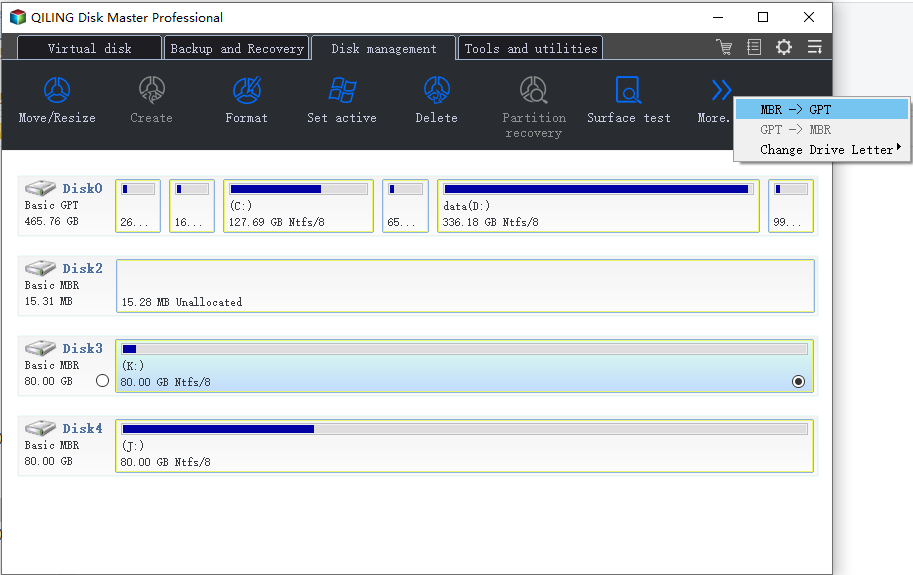
Step 4. Launch Qiling Partition Master, select the MBR disk, click "More..." and choose "MBR -> GPT" to convert the disk from MBR to GPT.
Conclusion
Windows 11 has stricter requirements than its predecessors, and even PCs purchased recently may not meet them. If your PC supports UEFI and GPT but you're unsure how to enable and convert without data loss, using professional software like Qiling Partition Master can make the process easy and quick, but always remember to take a backup first.
Related Articles
- Move Unallocated Space to the Left, Right or End of A Drive Easily
- 2022 Write Protected SD Card Format Software: Erase/Format Write Proteced SD/USB/Pen Drive
- Fix Windows 11 Update Stuck at 0%, 100% on Your Own - Qiling
- Recover/Create EFI Partition Windows 11/10 When EFI Boot Partition Missing
- How to Install Windows 10 on New PC Without Operating System
Are you in possession of a new PC and eager to set up Windows 10? Learn how to install Windows 10 on a new PC without an operating system in this guide. - How to Install Windows 11 From ISO Files - 2 Easy Tips
To install Windows 11 from ISO files efficiently, follow these 2 essential tips. First, ensure you have the latest Windows OS ISO file, which can be downloaded from the official Microsoft website. This will guarantee that you have the most up-to-date version of Windows 11, minimizing the risk of installation issues.