How to Install Windows 11 From ISO Files - 2 Easy Tips
To install Windows 11 using ISO files, which provide unmatched reliability, versatility, and customization, you'll need to prepare beforehand. This involves installing Windows 11 from ISO files, which can be done by following a series of steps that will be outlined in this post from Qiling.
🚩1. Check the compatibility between Windows 11 and your PCs. To ensure your computer is compatible with Windows 11, verify that it meets the following specifications: it must have a 64-bit processor, 4 gigabytes of RAM, and a Trusted Platform Module (TPM) 2.0 chip.
- 64-bit processor with two or more cores and a clock speed of at least 1 GHz.
- 4 GB RAM/TPM version 2.0/Secure Boot enabled.
- 64 GB of storage and a graphics card that supports DirectX 12 are required.
- Active internet connection
For an installation to be successful, these variables are necessary.
🚩2. If you need to download a Windows 11 ISO, you can do so from Microsoft's official website. The process is straightforward and only requires a few clicks. Simply navigate to the website, click on the "Download" button, and select the version of Windows 11 you need. The ISO file will then be downloaded to your computer.
To download Windows 11, go to Microsoft's official website, search for "Download Windows 11 Disk Image (ISO) for x64 devices", select the desired architecture, language, and edition, and choose the ISO file to download.
🚩3. To install Windows 11 on any PC, you need to download an ISO burner to create a bootable USB drive from an ISO file. Qiling Disk Master is a useful tool for handling ISO files and streamlining the installation process, as it can automatically download ISO files, making it a must-have for easy operating system installations.
🚩4. To install Windows 11 on any PC, you'll need a USB drive with the FAT32 format, which is compatible with most computers. You can format a USB to FAT32 by following this link. The USB drive is crucial for the installation process.
To install Windows 11 from ISO, first ensure your hardware is compatible and have the installation media ready. If you don't have internet access, you can install and set up Windows without a network by following this guide.
Tip 1. Install Windows 11 From ISO Using USB
Installing Windows 11 from an ISO file using a USB device offers more flexibility and ease during the installation process. This method works in two stages and provides a convenient way to install Windows 11. To explore how to install Windows 11 from ISO using USB, continue reading.
Stage 1. Burn ISO to a USB
To prepare Windows 11 for installation, burn the ISO file onto a USB device using the Qiling Disk Master Professional tool, which has a Burn ISO Feature that makes the process easy and straightforward, even for beginners. This tool works with multiple versions of Windows and doesn't require a certified USB stick, only a USB drive with at least 13GB.
To burn an ISO file to a USB drive using Qiling Disk Master, go to the official website and download the software, then install it on your computer. Launch the software, select the ISO file you want to burn, choose the correct USB drive from the list of available devices, and click the "Burn" button to start the process.
Step 1. Launch Qiling Disk Master and go to the Tools section. Click "Create bootable media".

Step 2. To transfer files from a USB drive to a computer, select the target USB as the destination and click "Proceed" to execute the operation.

You can burn a Windows 11 ISO to a USB drive using a tool like Rufus or the Windows Media Creation Tool. The process typically involves downloading the ISO file, selecting the USB drive as the destination, and following the prompts to complete the burning process. This can be a convenient way to create a bootable USB drive that can be used to install Windows 11 on a computer.
You don't need technical expertise to use Qiling Disk Master, which can easily install Windows 11 from ISO with a simple download and use.
Stage 2. Install Windows 11 from the Bootable USB
After burning the Windows 11 ISO file onto your USB drive using Qiling Disk Master, you're ready to start the installation process.
Here are the steps:
Step 1. Insert your USB drive and restart your PC.
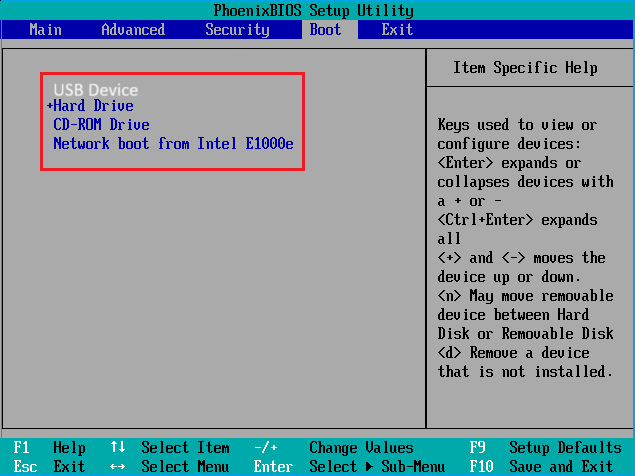
Step 2. To access the boot menu during startup, press a specific key, typically F12, which allows you to select the device from which you want to boot your computer.
Step 3. The USB drive is selected as the boot device, and the system will proceed with the installation process.
Step 4. Follow on-screen instructions to set language, time, and keyboard preferences.
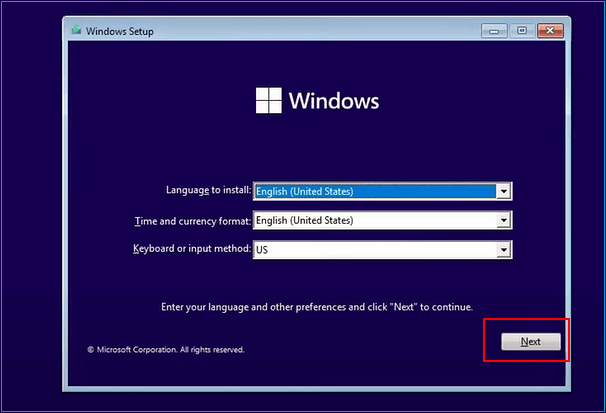
Step 5. Click "Next" and then "Install Now."
Step 6. To activate Windows 11, enter your product key if prompted, or choose to skip for now and activate later.
Step 7. Click "Next" after accepting the license terms.
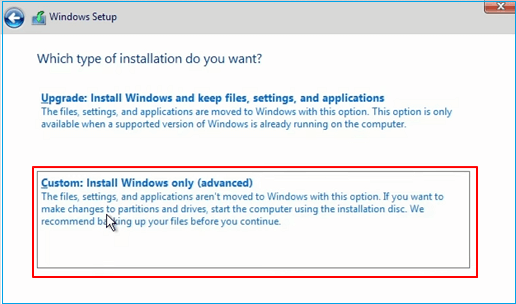
Step 8. Choose "Custom: Install Windows only (advanced)."
Step 9. Select the installation drive and click "Next."
Step 10. The installation begins.
Step 11. Complete setup for your user account and preferences.
Step 12. Installation of Windows 11 is complete. You will soon reach the Windows 11 desktop.
Bonus: Request Manual Service for Using ISO File to Install Windows 11
To install Windows 11 via the ISO image, you can request manual service to install Windows 11, which is expected to simplify the procedure and successfully install Windows 11 on your PC.
Qiling experts offer 24/7 manual services to resolve Windows configuration issues, providing free evaluation and efficiently diagnosing and resolving Windows update errors, installation, and daily OS issues with their decades of experience.
- 1. To fix Windows update errors, try restarting your computer, checking for any conflicting programs, and running the Windows Update Troubleshooter. You can also try running the System File Checker (SFC) and DISM tools to scan and replace corrupted system files.
- 2. To successfully download and install the latest Windows operating system on your PC, follow these steps. Firstly, ensure your PC is compatible with the latest Windows version by checking the system requirements.
- 3. Fixing daily Windows system errors is crucial for a smooth user experience. Issues like drivers not updating, permission problems, and account settings discrepancies can be addressed by running the built-in System File Checker (SFC) and DISM tools to scan and replace corrupted system files. Additionally, checking for and installing the latest Windows updates, as well as updating drivers for hardware devices, can resolve many errors.
Congratulations on installing Windows 11 successfully! You've completed the process and can now enjoy the new features and improvements of Windows 11. If you found this guide helpful, please consider sharing it with others who might need it. This will help them install Windows 11 with ease and confidence.
Tip 2. Directly Mount ISO to Install Windows 11
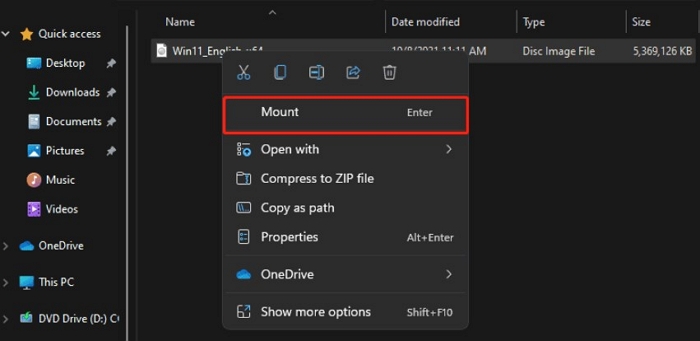
To mount the Windows 11 ISO file for installation, you can follow these steps: You can use the built-in Windows utility, 'File Explorer', to mount the ISO file. To do this, right-click on the ISO file, select 'Open with', and then choose 'File Explorer'.
Step 1. To mount a Windows 11 ISO file, double-click or right-click on the ISO file and select the "Mount" option, making it accessible as a virtual drive.
Step 2. Double-click the setup file, then wait for the setup to prepare.
Step 3. When prompted, select "Not right now" if you want to install updates later.
Step 4. Press "Next."
Step 5. You agree to the licensing terms and notices by selecting "accept".
Step 6. The setup does an update check; click "Next" when finished.
Step 7. When reinstalling Windows, you have the option to keep personal files and applications by default, but you can adjust the settings as needed. However, if you choose to keep nothing, you may risk losing all your data, so it's essential to create a backup beforehand.
Step 8. Press "Install."
Step 9. Windows 11 is now getting installed; please be patient.
Step 10. Now, follow the on-screen directions to finish the installation.
Now that you have updated your system to the latest Windows version, feel free to share this article with your friends to help them upgrade to the safe and feature-rich Windows 11.
You May Also Like:
Conclusion
To achieve optimal performance after installation, it is crucial to stay on top of keeping drivers up to date and the system updated regularly.
Upgrading to Windows 11 with Qiling Disk Master is the preferred approach, offering flexibility and a streamlined installation process. This method empowers you with a reliable and efficient way to install the latest Windows 11, enhancing your system security and providing a top-tier computing experience.
Install Windows 11 Using ISO Files FAQs
Do you have more questions on how to install Windows 11 from ISO files? Here are some frequently asked questions that you must read to clear your doubts.
1. Can I install Windows directly from ISO?
To install Windows 11, right-click on the ISO file, select "Mount", and a virtual disk will be created. Double-click on the disk to view its contents and double-click on setup.exe to start the installation process.
2. How do you install Windows 11 from ISO without a USB?
Step 1. To create a virtual drive for the Windows 11 ISO file, right-click the ISO file and select "Mount" from the context menu, effectively turning it into a virtual drive that can be accessed like a physical one.
Step 2. To start the Windows 11 installation, double-click the virtual disk and run the "setup.exe" file.
3. How do you install Windows from an ISO file without burning it?
Step 1. Locate the ISO file, right-click it, and select "Properties".
Step 2. Select "Change" under "General."
Step 3. To open the ISO file, select "Windows Explorer" from the list of options, and then click "OK" to proceed.
Step 4. Right-click the ISO file and select "Mount."
Related Articles
- How to Corrupt A Flash Drive on Purpose
- Fix 'Invalid Partition Table' Error Dell Computers [100% Working]
- How to Run Micro SD Card Speed Test on Windows 10/11 [2024 New Guide]
- 4TB Drive Only Shows 2TB: Why and How to Solve It Easily?
4Tb drive only shows 2TB? Don't worry, this article will tell you how to restore the full capacity. - Perform Xbox One S Hard Drive Upgrade - Guide with Pictures
To upgrade the hard drive on your Xbox One S, you can replace the existing 500GB or 1TB drive with a larger capacity one, such as a 2TB or 4TB drive. First, purchase a compatible external hard drive or an internal one that matches the Xbox One S's specifications. - How to Run Xbox One SSD Performance Test [Step-by-Step Guide]
Do you want to test your Xbox One SSD performance? Should you upgrade the Xbox One with an SSD? Don't worry; this article gives teaches you to run Xbox One SSD performance efficiently.