7 Easy Ways to Fix Windows 11 Stuck on Boot Screen
Seeing a Windows 11 PC stuck on a boot screen and continuously restarting can be frustrating, and it may start with minor problems and general sluggishness before the boot loop begins.
However, Qiling will walk you through several DIY fixes and ways to solve this issue, as well as potential factors that may have caused it.
The issue of a blank screen or unresponsive monitor after a Windows update can be caused by a faulty OS update, malware attack, or incompatible driver upgrades. This problem can be resolved in two ways: by utilizing Windows' built-in utility features or by using a third-party tool like Qiling Disk Master.
| 🆚Comparison | 🥇Qiling Disk Master | 🥈Window's in-Built Utility |
|---|---|---|
| 🔨Operation Difficulty | Easy | Medium |
| 🚩Target Users | Beginners and Pros | Better for Pros |
| 💻Efficiency | High, professional tool to help with PC boot issues. | Medium, manual processes and commands may lead to other errors and data loss. This can be avoided by using a tool that can automate the process and reduce the risk of human error. |
Use Third-Party Software to Fix Windows 11 Stuck on the Boot Screen
The methods for fixing a Windows 11 stuck-in Boot Screen issue can be challenging to implement, which may lead to device failure. However, third-party tools like the Qiling Disk Master can provide an effective solution. This Windows disk and partition manager can help resolve the issue, and can be downloaded to try various fixes.
Option 1. Apply Boot Repair
To save time and energy, use the "Boot Repair" feature of Qiling Disk Master to fix various Windows startup problems.
All you need to do is as follows:
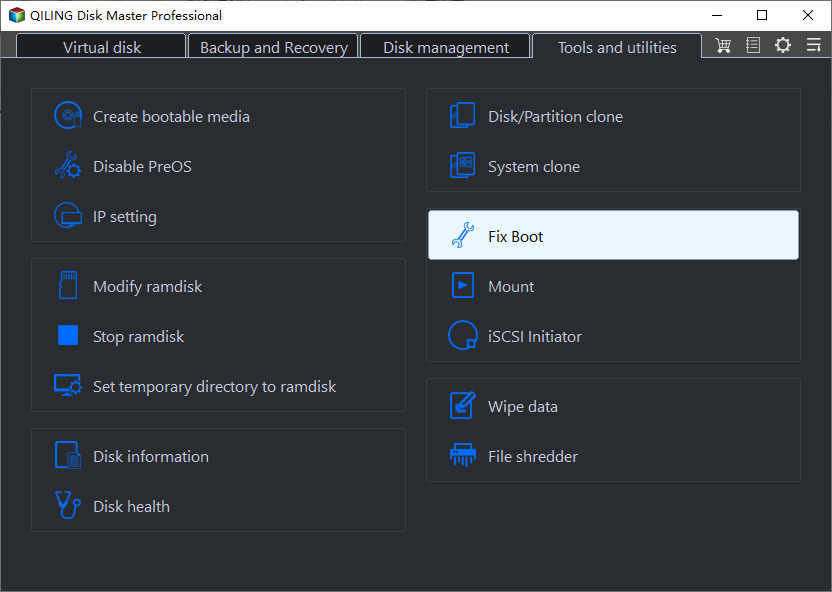
Step 1. After connecting the external drive/USB to your computer, start Qiling Disk Master, go to "Bootable Media," and click "Create bootable media" in the program.

Step 2. Insert a USB drive or CD/DVD, and click "Create" to burn the Windows ISO file to the storage media.

Step 3. Connect a bootable drive to a new computer, reboot by pressing F2/Del, set the drive as the boot disk in BIOS, and exit.
Step 4. Boot the computer again and enter the WinPE interface. From there, open Qiling Disk Master and click on the "Boot Repair" option under the "Toolkit" tab.
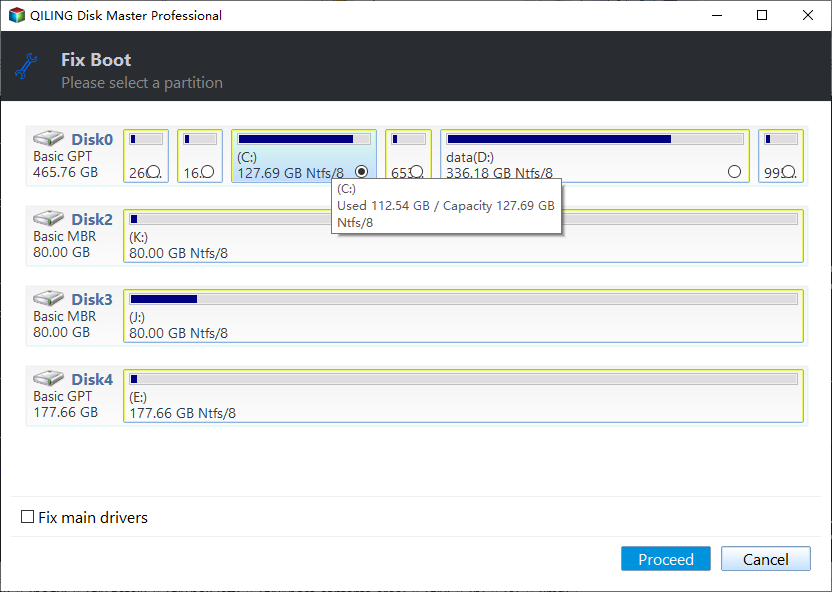
Step 5: Select the system you want to repair and click "Repair."
Step 6. Wait a moment, and you will receive an alert that the system has been successfully repaired. Click "OK" to complete the boot repair process.
Qiling Disk Master also helps resolve issues by checking for disk errors and rebuilding the Master Boot Record (MBR), making it a useful tool for those who don't want to delve into technical details.
Option 2. Check Partition Errors
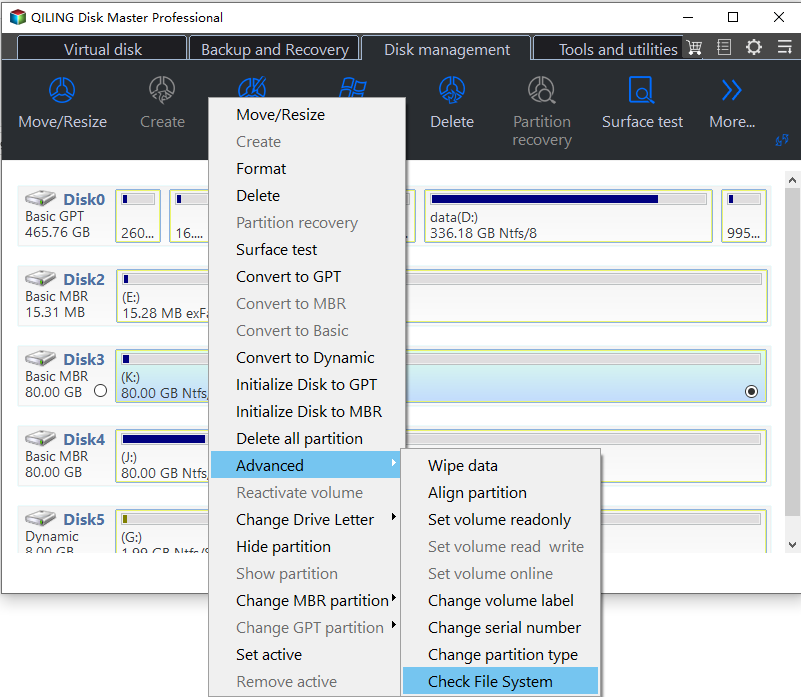
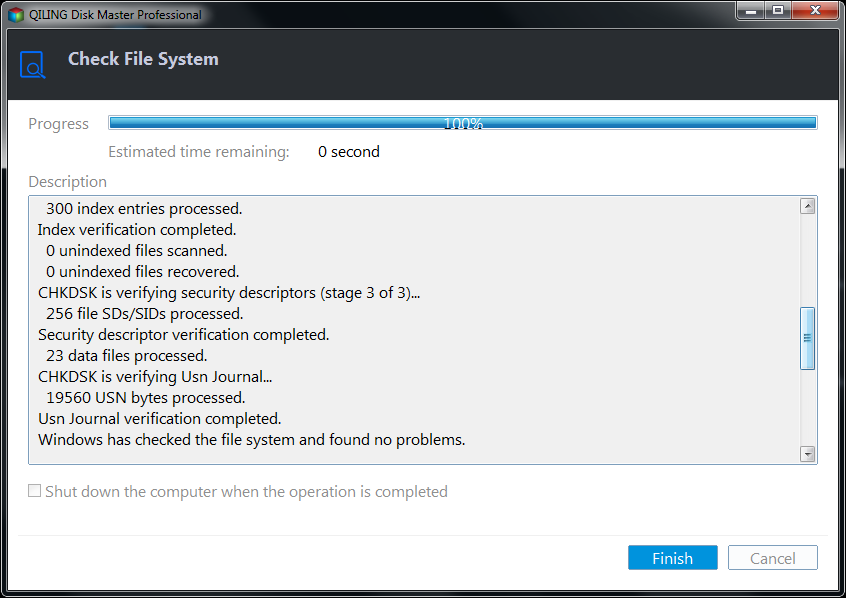
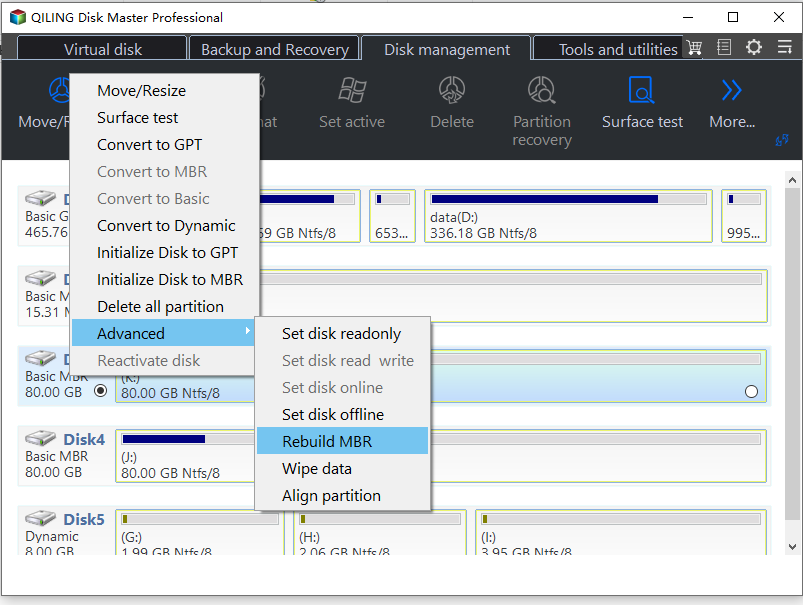
Step 1. Open Qiling Disk Master, locate the disk, right-click the partition, and choose "Advanced" > "Check File System" to check the disk.
Step 2. In the Check File System window, select the "Fix the error on the disk" option and click "Proceed".
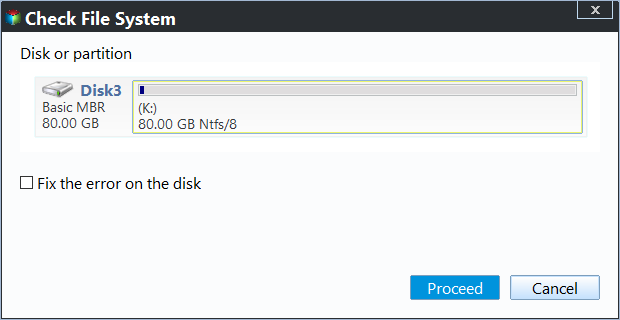
Step 3. The software will start scanning your partition file system on your disk, and once it's done, click "Finish".
Qiling Disk Master can also check for partition errors, besides partition errors, it can also do the following:
Option 3. Rebuild MBR
Step 1. Create a WinPE bootable disk
- Launch Qiling Disk Master, click "Bootable Media" on the toolbar, and select "Create bootable media".
- Click "Next" to finish the process.
Step 2. Boot Qiling Disk Master Bootable USB
- Connect the bootable USB or CD/DVD to your PC.
- To enter the BIOS screen, press F2 or Del when restarting the computer. From there, set the computer to boot from "Removable Devices" or "CD-ROM Drive". Once this is done, Qiling Disk Master will automatically run.
Step 3. Rebuild MBR
- Click "Toolkit" and choose "Rebuild MBR".
- To rebuild the MBR, select the disk you want to work on and choose the type of MBR you want to install (e.g. BIOS or UEFI), then click the "Rebuild" button.
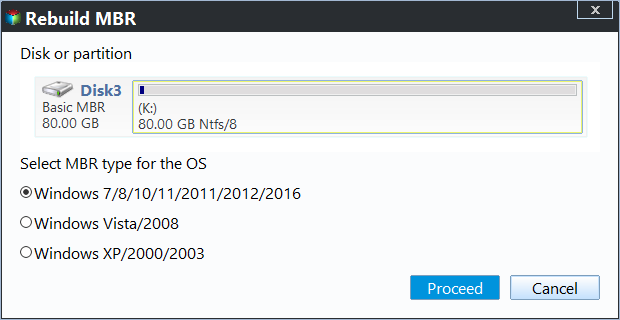
- The MBR was successfully rebuilt on Disk X. "MBR has been successfully rebuilt on Disk X" was displayed.
Rebuilding the Master Boot Record (MBR) can help resolve boot issues on Windows 11 by creating a bootable USB to fix errors that cause the system to get stuck in the boot screen.
7 Fixes for Windows 11 Stuck on Boot Screen
Here are the steps to resolve the issue of Windows 11 being stuck on a boot screen: Ensure a constant power connection, Press the power button for 30 seconds to discharge the system, Press the power button again to turn it on, Try booting in Safe Mode, Run the System File Checker (SFC) and the Deployment Image Servicing and Management (DISM) tools, and try a System Restore. If none of these work, consider resetting Windows 11 to its default settings or seeking professional help.
- Fix 1. Remove All External Devices Connected
- Fix 2. Run an Automatic Repair
- Fix 3. Enter Safe Mode
- Fix 4. Perform Startup Repair
- Fix 5. Perform System Repair with Command Prompt
- Fix 6. Check Disks via Command Prompt
- Fix 7. Go Back to the Previous Build
Next, your hardware should be working correctly!
Read Also:
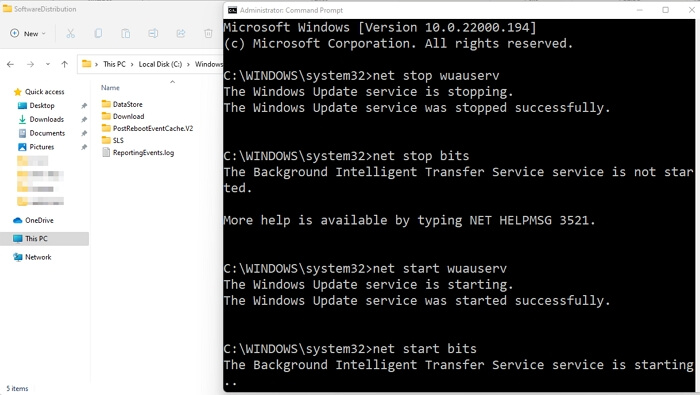
To fix Windows 11 update stuck at 100%, try restarting the update process, check for any corrupted system files, and ensure the update is not paused. You can also try disabling any recently installed software or drivers, as they may be causing the issue.
The Windows 11 update downloading process can get stuck at 100% when upgrading to Windows 11, but there are efficient and quick solutions to fix the error.
Fix 1. Remove All External Devices Connected
When you're experiencing a boot loop, it's possible that a faulty external device or a conflict with an existing peripheral is causing the issue. This could include devices like keyboards, mice, speakers, or disk tapes. Removing or disconnecting any of these external devices might resolve the problem.
🚩See Also: Windows 10 Stuck on Welcome Screen
Fix 2. Run an Automatic Repair
Automatic Repair is a Windows utility that diagnoses PC problems, including Windows 11 getting stuck on the Boot Screen, and notifies the user of the cause, prompting them to fix it.
Step 1. Turn on the computer and simultaneously shut down when you see the Windows logo.
Step 2. The user repeats the process a couple of times until the Automatic Repair Screen utility launches.
Step 3. A dialog box saying "Your PC did not start correctly" is a common error message that typically occurs when Windows fails to load properly. This can be caused by a variety of issues, such as a corrupted system file, a malfunctioning driver, or a problem with the boot process.

Step 4. To launch the Windows 11 Automatic Repair, click "Restart."
The tool can automatically restart your device and fix simple problems it can identify, but if the issue is more complex, it will prompt you to restart in Safe Mode, which can help resolve the problem.
Fix 3. Enter Safe Mode
Safe Mode allows users to continue using Windows with a limited set of files and fundamental drivers, helping to identify if the core settings and drivers are the cause of any issues, as the system functions normally in this mode.
Step 1. To access the Windows Recovery Environment, also known as WinRE, you can reboot your PC multiple times. This will allow you to access the WinRE, which can be used to troubleshoot and fix various Windows issues.
Step 2. Press the Power Button for some seconds until the device switches off, then turn it on again by pressing the button.
Step 3. Keep repeating the same until you can access WinRE.
Step 4. Select Troubleshoot, click Advanced Options, and go to Command Prompt.

Step 5. Type in the following command in the prompt:
bcdedit /set {default} safeboot network
This command lets you launch the safe mode.
Step 6. Wait a few minutes for the OS to boot into Safe Mode fully, then go to Settings and click Windows Update, and finally click Check for Updates.
When Windows updates are released, Safe Mode will automatically download them to your system. However, if you're not familiar with Safe Mode or using commands, it's not recommended to attempt this process.
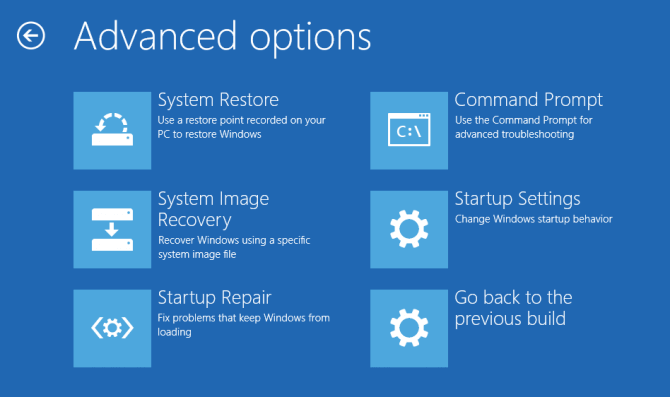
Fix 4. Perform Startup Repair
The feature tool of Windows detects and rectifies any faults that interfere with the overall working of your PC.
Step 1. Load the WinRE as mentioned above.
Step 2. Click Troubleshoot, go to Advanced options, and select Startup Repair.

Step 3. Select the account with administrative privileges and enter the password.
This command runs the Startup Repair Tool to scan and fix the root causes of the Windows 11 loading issue, performing a thorough system scan to resolve the problem.
Fix 5. Perform System Repair with Command Prompt
You can now launch System Repair via the Command Prompt to help resolve the boot loop issue.
Step 1. In Advanced Options, select Command Prompt.
Step 2. Type the following command and press Enter.
bootrec.exe/fixboot
Wait for some time for the Command Prompt to repair your PC.
Read Also: Windows 11 Not Booting
Fix 6. Check Disks via Command Prompt
To troubleshoot Windows 11 boot issues caused by a corrupted disk, you can use the built-in command-line tool, cmd, to check the disk. This involves running certain commands to inspect the disk and identify any problems.
Step 1. Load into the WinRE, as shown earlier.
Step 2. Click Troubleshoot and go for Advanced Options. Choose Command Prompt.
Step 3. The command `chkdsk C: /f /r /x` should be typed and Enter hit. This command runs the Check Disk utility on the C: drive, attempting to fix any errors it finds, scanning for bad sectors, and performing a thorough analysis of the disk, including the boot sector.
To troubleshoot the "Windows 11 stuck on boot screen" issue, you can use the built-in Windows 11 Disk Check tool to scan your PC for any disk issues. Boot into the Windows Recovery Environment (WinRE) and run the Disk Check tool to scan your PC's disks for errors or issues, and attempt to repair them.
Fix 7. Go Back to the Previous Build
The Previous Build feature in Windows 11 restores the operating system to its previous version, effectively uninstalling the most recent update, returning it to the state it was in before the last update was installed.
Step 1. Once you have the sign-in screen, press the Shift+Power button simultaneously.
Step 2. Select Restart.
Step 3. To resolve the issue, click on Troubleshoot, select Advanced Options, and then click on Go back to the Previous Build.
Conclusion
We hope our detailed guide on how to fix Windows 11 Stuck on Boot Screen was helpful in resolving your PC's issue. If you found it useful, we suggest following the steps in the same order mentioned above. This should help you successfully fix your Windows 11 PC that's stuck on the boot screen.
Using Qiling Disk Master can help resolve the issue of multiple boot entries for the same operating system, as it allows you to manage and configure the boot entries without manually editing the registry or boot configuration files. This can save time and effort, especially if you're not familiar with the process or prefer not to deal with it yourself.
If you're struggling with glitches or need help with technical stuff, check out our other articles for more tips and tricks. You can also share this one with others to help spread the knowledge!
Windows 11 Stuck on Boot Screen FAQs
If you still have some questions, this section is for you. We have compiled a list of common yet important questions which might be boggling your mind.
1. Why is Windows 11 stuck on the boot screen?
A boot screen loop can occur due to various reasons, including OS update glitches, malware attacks, outdated drivers, or incompatible external devices.
2. How do I fix Windows 11 stuck on my boot screen?
There are two ways to fix the issue: using Windows' built-in features like System Repair or going back to a previous build, which requires some technical knowledge.
Or, you can opt for a third-To resize a hard drive, use a party tool like Qiling Partition Maker, which can handle the complex process for you. This software can resize partitions without losing data, making it a safe and efficient option.
3. Why is Windows 11 bootable USB stuck on the logo screen?
Windows 11 bootable USB getting stuck on the logo screen is often caused by outdated BIOS or problematic hard drives. To resolve this issue, updating the BIOS and checking for any external peripherals that might be interfering with the boot process can help.
Related Articles
- How to Optimize Windows 11 for Gaming [6 Effective Ways🧰]
- Solved 2024: Unable to Recover Your PC. The System is Too Small
- How to Fix SD Card Saying Full When Empty in Windows 11/10/8/7
- Can't Merge USB Partitions? 2 Proven Fixes Here
- Can I Delete Dynamic Volume on GPT or MBR Disk? Your Guide Here [2024 Tutorial]
To delete a dynamic volume on a GPT or MBR disk, you can use the Disk Management utility built into Windows. First, open the Disk Management tool by searching for it in the Start menu. Then, locate the disk containing the dynamic volume you want to delete and select it. - How to Make Dell Boot from USB on Windows 11/10
If you want to install Windows 11/10 on your Dell computer or Dell XPS, you'll need to boot your device from a USB drive. This process can be a bit worrisome, but rest assured, it's possible to perform a Dell boot from USB, and this article will guide you through the process.