How to Format Read Only Disk to Normal Windows 11
| Workable Solutions | Step-by-step Troubleshooting |
|---|---|
| #1. Remove Disk Write Protection by CMD and Registry Editor | Step 1. Open the start menu. Then type "CMD". Press Enter to continue; Step 2. Now, you have to Type...Full steps |
| #2. Change Read-only Permission on Windows 11 | Step 1: Open File Explorer and locate the USB drive you want to make writable; Step 2: Right-click on the USB...Full steps |
| #3. Format Read-only Disk to Desired File System | Step 1. Run Qiling Partition Master, right-click the hard drive partition you intend to format, and choose "Format"...Full steps |
Disk Shows Read-The disk is showing as read-only because the disk's file system is corrupted, causing Windows to treat the disk as read-only. This can be caused by various factors such as a power outage, a disk error, or a virus. To resolve this issue, you can try running a disk check or a virus scan to identify and fix the problem. If the issue persists, you may need to format the disk and reinstall the operating system.
The problem may be caused by an issue with the file system on the disk, which could be due to errors or corruption in the file system itself.
A problem with one of the drivers associated with the disk could be caused by a corrupted driver or one that was installed incorrectly, leading to issues with the disk.
You can try to resolve a read-only disk problem by formatting it to normal Windows 11. To do this, you can follow the steps in the article to format the disk.
Scenario - Disk Shows Read-Only?
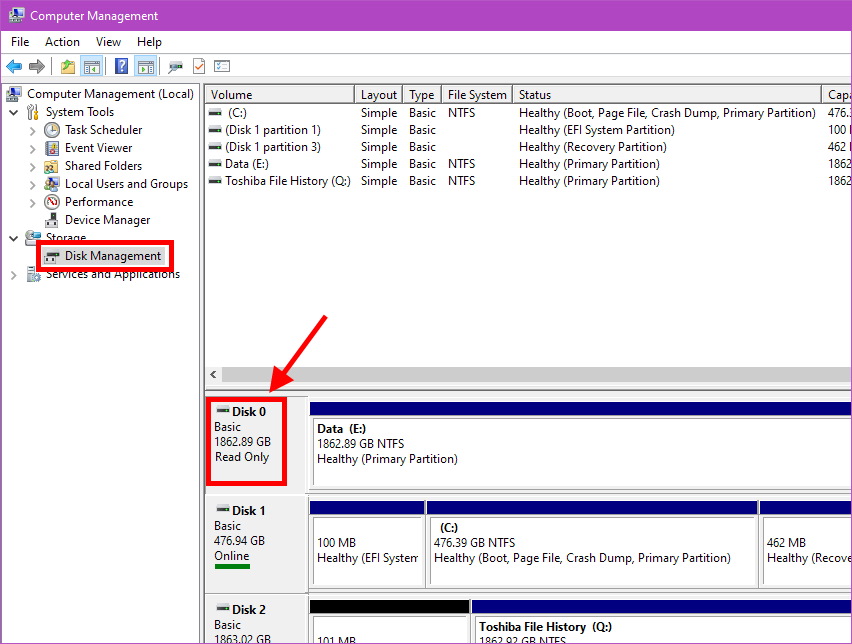
- File permissions:
One of the most common reasons for a disk appearing as read-only is due to file permissions, which can prevent changes to a file or folder set to read-only. To resolve this, you can change the file permissions accordingly.
- Disk corruption:
If the disk is corrupted, it may appear as read-only, requiring a format and reinstallation of software.
- Incorrect file system:
If the file system on the disk is not set up correctly, it can cause the disk to appear as read-only, requiring a file system fix to make changes.
- Virus infection:
A virus infection can cause a disk to appear as a read-only medium, requiring a virus scan and removal to make changes.
- Hardware failure:
If there is a hardware failure with the disk, it may appear as read-only, requiring a disk replacement to make changes.
How to Change Read-only USB on Windows 11?

We know that "Read Only Disk" can be frustrating for you. But here is how you can solve it. Check out these 3 best methods to format a read-only Disk to a standard Windows 11 Disk.
#1. Remove Disk Write Protection by CMD and Registry Editor
Step 1. Open the start menu. Then type "CMD". Press Enter to continue.
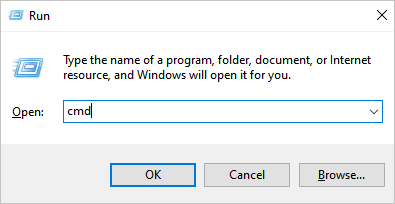
Step 2.To access the Command Prompt, you need to type "command Diskpart" and hit Enter, which will open a new command window.
Step 3. Here you have to type "list disk". Press enter button. Here make sure your storage device is listed.
Step 4. Now, type the command "select disk x" and hit Enter.
Step 5. Next, press Enter at the "attributes disk clear read-only". Again, press the Enter button.
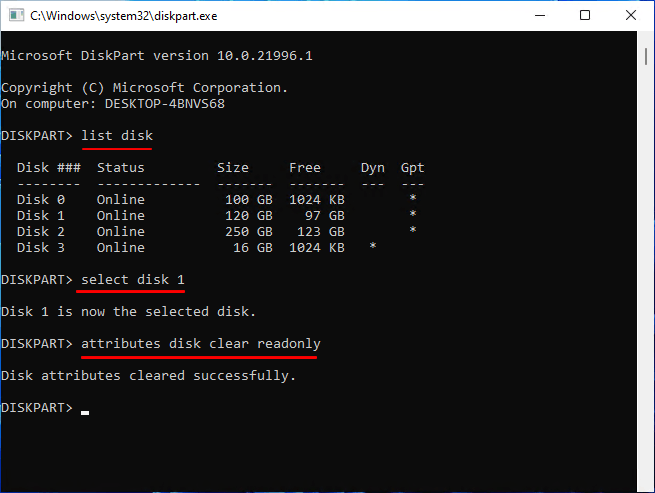
You successfully removed the read-only attribute. You can now exit the DiskPart utility.
#2. Change Read-only Permission on Windows 11
To change a read-only USB drive to writable in Windows 11, follow these simple steps:
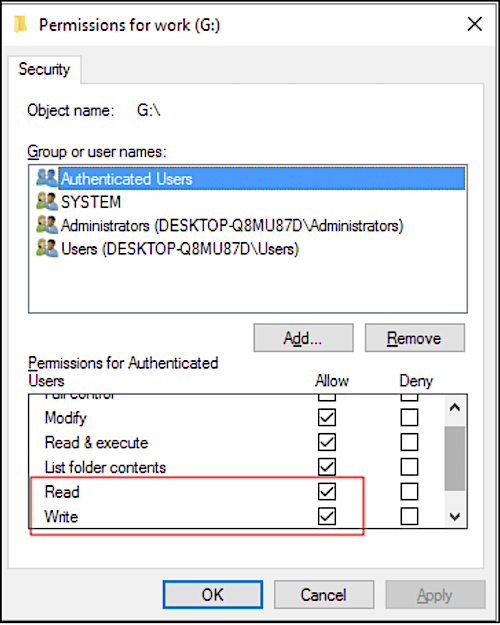
Step 1:To make a USB drive writable, open File Explorer, navigate to the USB drive you want to make writable, and right-click on it.
Step 2:Right-click on the USB drive and select "Properties" from the menu.
Step 3:To edit security settings, click on the "Security" tab and then click on the "Edit" button.
Step 4: To give full control to a user, find their username in the Group or user names section and check the box next to Full Control.
Step 5:To make a USB drive writable, select it in File Explorer, click on "Properties", click on "Security", click on "Edit", click on "Apply", and then click on "OK". Then, click on "Apply" and then "OK" again. The USB drive should now be writable. Close File Explorer and safely remove your USB drive from your computer.
#3. Format Read-only Disk to Desired File System
Storage devices like USB drives, SD cards, and Hard Disk Drives are often preformatted, making it difficult to format them again. As a result, you can't write new data on them, leaving you with the option of purchasing a new device.
You may get a read-only error when trying to access your storage device, but you can avoid buying a new one by using the Qiling Partition Master tool.
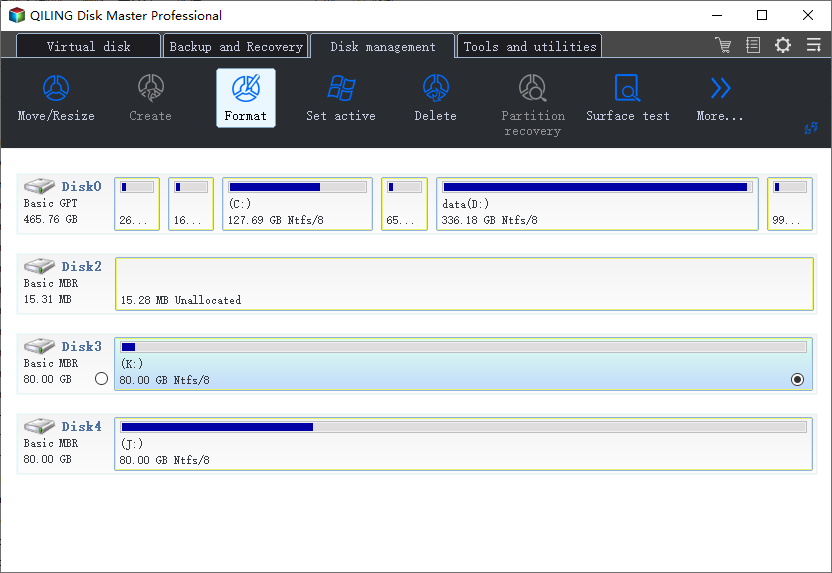
Step 1. Run Qiling Partition Master, right-click the hard drive partition you intend to format and choose "Format".
Step 2. In a new window, specify the partition label, file system (NTFS, FAT32, EXT2, EXT3, EXT4, or exFAT), and cluster size for the partition to be formatted, and then click Proceed.
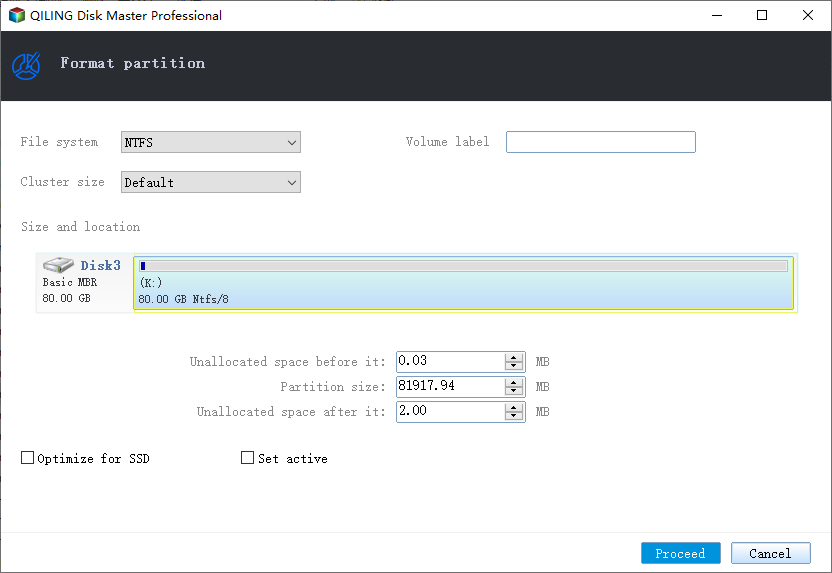
Step 3. The computer will then start to format the partition on your hard drive, which may take a few minutes. Be patient and do not interrupt the process.
This software allows you to reformat your disk to any format, including FAT16/32, NTFS, and EXT2/3/4. It's a great tool to have, especially if you need to format a read-only disk to the Windows 11 standard. So, download it today and get the job done!
The choice between NTFS and exFAT for an external hard drive depends on the operating system and compatibility. NTFS is a more advanced file system that is compatible with Windows, but may not be compatible with older Mac systems. exFAT, on the other hand, is a more universal file system that is compatible with both Windows and Mac systems, but may not be compatible with older Windows systems.
Here is a snippet of what this software can do:
- Format SD card
- Resize partition
- Reformat Windows 11
- Wipe hard disk data
Conclusion
Formatting a read-only disk to a standard Windows 11 disk is not as tough as it seems. The Qiling Partition Manager software makes it even easier by allowing you to deal with the "Disk read-only" error in a practical and user-friendly way. By downloading this software, you can say goodbye to such errors and have a smooth experience with your disk.
Related Articles
- All You Should Know About Erase | How to Securely Erase Your SSD Information
- How to Format Hard Drive Windows Server
- Is exFAT The Same As FAT32 Format? Everything You Need to Know
- How to Convert Dynamic Disk to Basic Disk in Windows 11
- Step-by-Step: Use DiskPart Convert MBR in Windows 11, 10, 8, 7
To use Diskpart to convert MBR in Windows 11, 10, 8, 7, you can follow the instructions in this article to learn how to do it. - How to Convert RAW to FAT32 Using CMD with Ease?
Here we show how to convert RAW to FAT32 using CMD for your reference. Then you can easily change RAW micro SD card, memory card, USB flash drive or USB flash drive to FAT32 file system when necessary.
Products
Articles & Tutorials
- Data Recovery
- Data Backup
- File Recovery
- File Backup
- System Backup and Restore
- Disk and Partition Clone
- Technical articles
- Mobile articles
- Disk Master Help
- Windows Data Recovery Tutorials
- Windows Secure Delete Tutorials
- Windows Partition Management Tutorials
- Windows File Backup and Restore Tutorials
- Windows System Backup and Restore Tutorials
- Windows Disk Backup and Restore Tutorials
- Windows Clone Tutorials