MBR Four Primary Partition Limit: Cannot Create More
Quick Navigation:
- Why MBR Stops at Four
- Read the Current Layout
- Convert to GPT or Use a Logical Drive
- Make Room With Qiling Disk Master
- Frequently Asked Questions
You open Disk Management to add another volume, and New Partition is grayed out while the disk still shows free space. On an MBR disk that is expected behavior. The old partition table has room for four entries, and an extended partition occupies one of them, so a disk with three primaries and one extended container is full even when the container itself holds free space. This guide explains the limit, how to read your own layout, and the two legal ways past it without losing data.
Why MBR Stops at Four
The MBR partition table is a 64-byte structure in the first sector of the disk. Each entry is 16 bytes, which leaves room for exactly four. That is a limit written into the format from the era of small disks, not a Windows policy, so no amount of free space changes it. Every operating system that reads an MBR disk sees the same four slots and no more.
The extended partition was the workaround. One of the four entries can be marked as a container, and inside it the disk stores a chain of logical partitions without a practical limit. The cost is that the container consumes a slot of its own, so the usual arrangement is three primaries plus one extended partition that holds as many logical drives as the user needs.
This is why the symptoms look inconsistent. A disk with four primaries cannot accept a fifth entry at all. A disk with three primaries and an extended partition can still create volumes, but only inside the container, and only when the unallocated space sits inside it rather than outside. The count of primaries, not the amount of free space, is what decides the menu state.
Read the Current Layout
Open Disk Management and look at the color bands under the disk. Dark blue is a primary partition, light blue is a logical drive inside the extended partition, green is unallocated space, and the extended container is drawn around its logical drives. Count the primaries first, then look at where the free space actually sits. The label of each band appears when you hover over it, which helps when several partitions look alike.
The position of the free space decides your options. Free space outside the extended container cannot become a logical drive, and free space inside the container cannot become a fifth primary. Moving a partition is sometimes the only way to place free space where it can be used, and moving data is a risk, so it needs a backup before the first drag.
Check the disk style while you are there. If the disk is already GPT, the four-entry limit does not apply and the grayed-out menu has a different cause, such as free space lying at the end of the disk instead of next to the volume you are trying to extend. Reading the style first prevents a conversion you did not need.
Convert to GPT or Use a Logical Drive
On a machine that boots in UEFI mode, converting the disk to GPT is the cleaner answer. GPT allows 128 partitions by default, has no extended container, and removes the limit permanently. The conversion rewrites the partition table, so back up first, confirm the firmware mode, and keep the image until the new layout has booted at least once. A style change is not reversible by an undo command, only by another conversion.
On a machine that must stay in Legacy mode, keep the MBR disk and work inside the extended partition. Shrink or move an existing volume so that free space lands inside the container, then create a logical drive there. The four-entry table stays as it is, and the new volume is fully usable for files, programs, and backups. Nothing else on the disk has to move for that to work.
Do not delete a primary partition just to free a slot unless you hold a current image of it. A slot costs nothing, while the data on that partition may be the only copy you have. Both routes above reach a working volume without that loss, and the GPT route also removes the problem for good. A current image also makes the conversion itself a reversible step.
Make Room With Qiling Disk Master
Qiling Disk Master shows the layout in one map, takes a full image of the disk, and performs the conversion or the new volume as a preview before anything is written. The sequence is fixed for a reason: the image has to exist before the table changes, and the change is applied only after you have seen what it will do to the entry count and the partition sizes.
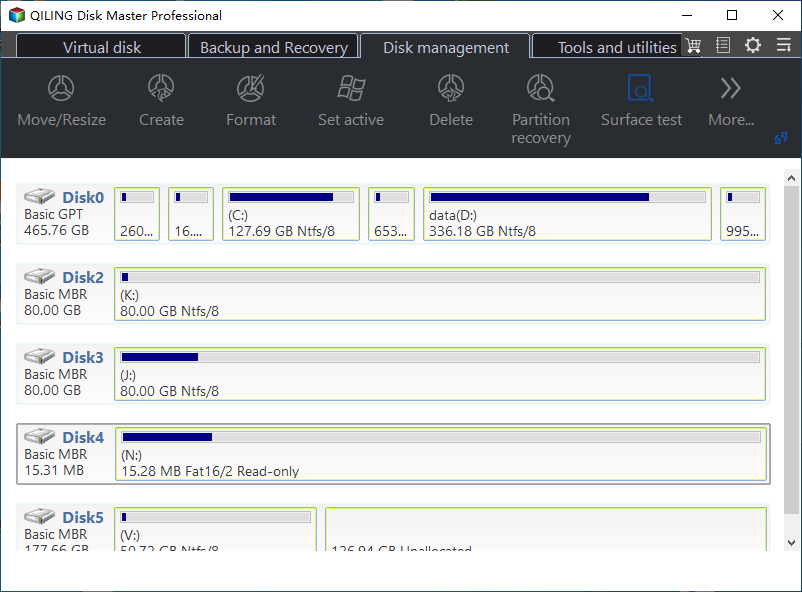
Step 1. Read the Partition Layout
Open the Disk Management tab and read the map: how many primary entries the disk uses, whether an extended container is present, and where the unallocated space sits. That view settles whether the disk is full at the table level or merely has free space in the wrong place. It also shows whether an extended container already absorbs the free space.
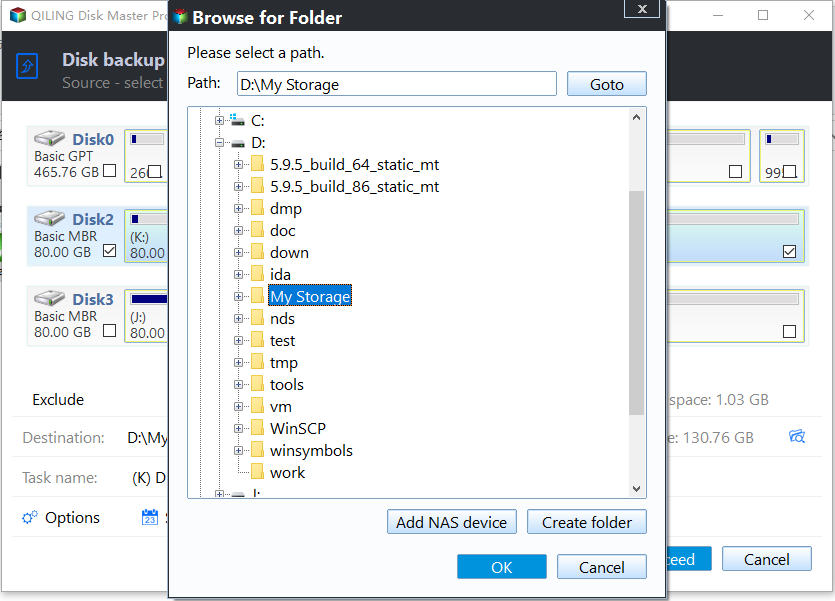
Step 2. Back Up the Whole Disk
On the Backup and Recovery tab, open Disk/Partition Backup, tick the whole disk, and choose a destination on another drive. Review the task in the preview, click Proceed, and wait for the completion message. Keep the image until the new layout has booted and the new volume has been written to. The image must be complete before the partition table is touched.
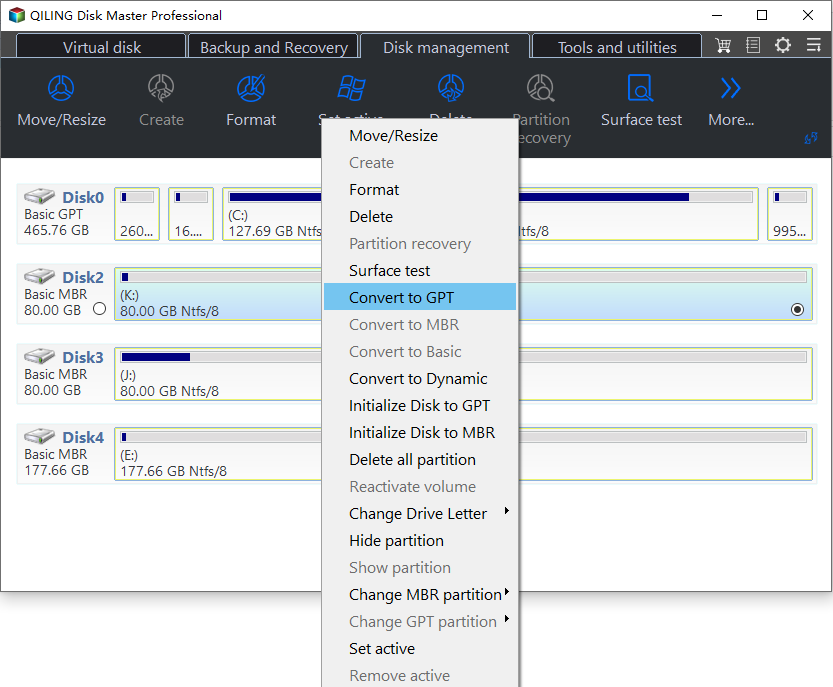
Step 3. Convert the Style or Create the Volume
On a UEFI machine, right-click the disk and choose the conversion to GPT; on a Legacy machine, create a partition inside the extended container instead. Read the preview, confirm the entry count and the sizes, then click Proceed. Restart afterwards and check that the disk shows the layout you intended before adding data to it. The preview is the only point where a wrong choice can still be cancelled.
Frequently Asked Questions
Can I create a fifth partition without converting?
Not as a primary. You can create logical drives inside the extended partition, and those are not counted among the four entries. The disk keeps its MBR style and the new volumes work like any other.
Will converting to GPT break my Windows install?
Only if the firmware still starts in Legacy mode. Switch the boot mode to UEFI after the conversion, and keep the image from Step 2 in case the boot entry needs repair afterwards.
Why is Extend Volume grayed out with free space available?
The free space must be unallocated and immediately to the right of the volume. Space outside the extended container, or on a different disk, cannot be used to extend that volume.
Related Articles
- How to Create More Than 4 Partitions on One Disk
- The Disk Already Contains the Maximum Number of Partitions
- Convert a Primary Partition to Logical
- Convert MBR to GPT Without Reinstalling Windows
- What Is GPT and How Does It Differ From MBR
Products
Articles & Tutorials
- Data Recovery
- Data Backup
- File Recovery
- File Backup
- System Backup and Restore
- Disk and Partition Clone
- Technical articles
- Mobile articles
- Disk Master Help
- Windows Data Recovery Tutorials
- Windows Secure Delete Tutorials
- Windows Partition Management Tutorials
- Windows File Backup and Restore Tutorials
- Windows System Backup and Restore Tutorials
- Windows Disk Backup and Restore Tutorials
- Windows Clone Tutorials