Partition and Format a Disk on Windows Server Core
Quick Navigation:
- What Server Core Leaves Out
- Initialize the Disk
- Create, Format, and Mount
- Use Qiling When There Is a Desktop
- Frequently Asked Questions
A new disk on Server Core arrives with no wizard and no Explorer to open. The work is the same as on a full installation, but every step runs from PowerShell or diskpart, and each one has to be checked before the next.
What Server Core Leaves Out
Note: Every command in this guide is built into Windows PowerShell or diskpart. None of them is a feature of Qiling Disk Master, which requires a graphical shell and is covered in the last section.
Server Core installs the storage stack without the graphical shell. Disk Management, Explorer, and the Settings app are absent, so a new LUN or a replaced data disk has to be prepared from a command line.
Two options cover the gap. You can run the Disk Management snap-in from a Windows client against the server with diskmgmt.msc /computer=servername, or you can stay on the server and work through the same four steps in PowerShell: Get-Disk to inspect the disk, Initialize-Disk to write a partition table, New-Partition to create the volume, and Format-Volume to put a file system on it.
Windows Admin Center is a third option and is useful when several servers need the same treatment. All three paths act on the same disk objects, so the result is identical.
Initialize the Disk
Run Get-Disk and read the PartitionStyle column. A disk that has never been used reports RAW, and it cannot hold partitions until it is initialized. Also check the operational status: a disk that shows Offline must be brought online first with Set-Disk -Number 1 -IsOffline $false.
Choose GPT unless the disk is going to be read by an old system. Any disk larger than 2 TB must be GPT, and GPT is the expected layout on current firmware. The command is Initialize-Disk -Number 1 -PartitionStyle GPT.
Initialization writes a partition table only. It does not erase the rest of the disk, but it does make any previous layout unusable, so confirm the disk is empty or expendable before you run it.
Create, Format, and Mount
Create a partition that uses the whole disk with New-Partition -DiskNumber 1 -UseMaximumSize -AssignDriveLetter, then format it with Format-Volume -DriveLetter E -FileSystem NTFS -NewFileSystemLabel Data -Confirm:$false. The default allocation unit is 4 KB, which suits general files; a large backup or media volume may benefit from 64 KB.
If you prefer diskpart, the sequence is select disk 1, clean, convert gpt, create partition primary, format fs=ntfs quick label=Data, and assign letter=E. Run clean only on a disk you intend to erase completely.
A drive letter is not mandatory. Many administrators mount data volumes as a folder such as C:\Data with Add-PartitionAccessPath, which keeps the volume reachable even when letters are reassigned. Verify the result with Get-Volume, which should show the new drive letter, the NTFS file system, and the full capacity, and with Get-Partition, which should list a single partition covering the whole disk. Do this before you copy any data.
Use Qiling When There Is a Desktop
Qiling Disk Master needs a graphical shell, so it belongs on a Server installation with Desktop Experience rather than on Server Core itself. On such a server it replaces the missing wizards: it can create a partition in unallocated space, set the label and file system before writing, and prepare a disk layout that diskpart would need several commands to reproduce.
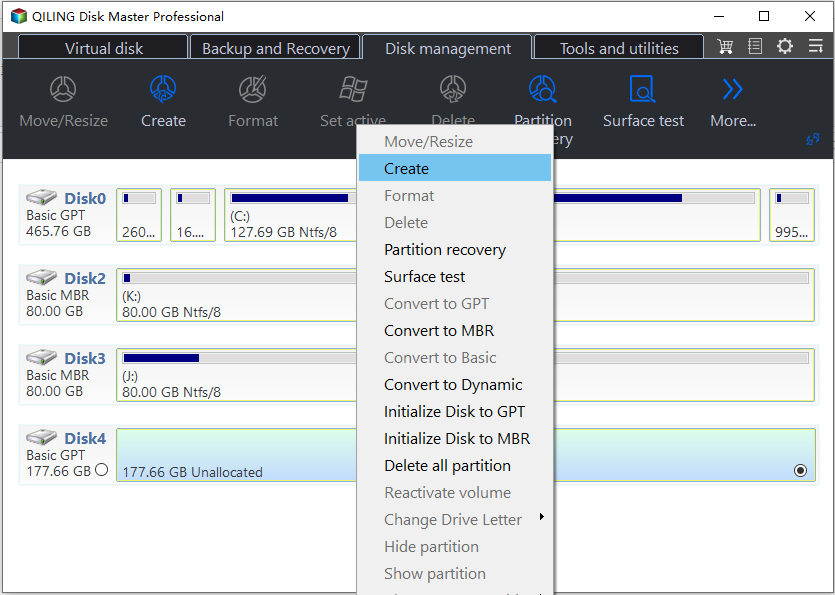
Step 1. Select the Unallocated Space
Right-click the unallocated area on the target disk and choose Create Partition. Confirm the disk number against the number shown in Disk Management; the free space on a freshly initialized disk is the only unallocated region.
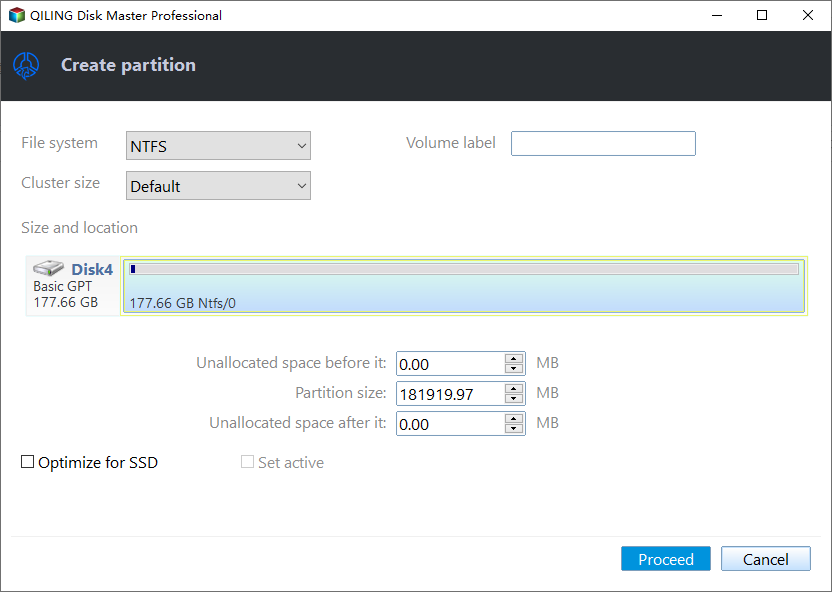
Step 2. Set Size, Label, and File System
Set the size, choose NTFS, and enter a volume label that identifies the data. Leave the drive letter unassigned if the volume will be mounted as a folder.
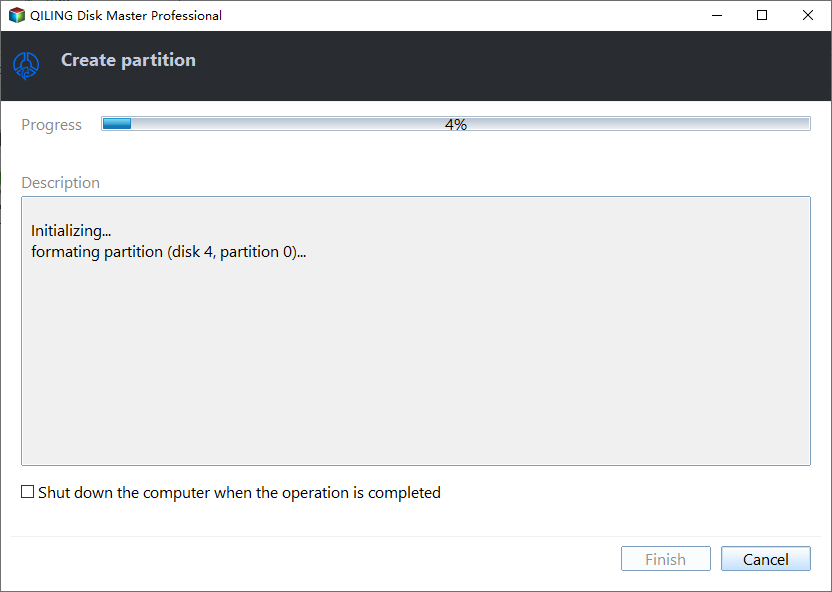
Step 3. Preview, Proceed, and Verify
Review the preview and click Proceed. Then confirm the new volume in Disk Management and write a test file to it before any service starts using the disk.
Frequently Asked Questions
Can I run Disk Management on Server Core?
Not locally. Run the snap-in from a client with diskmgmt.msc /computer=servername, or use PowerShell and diskpart on the server.
Does Initialize-Disk erase my data?
It replaces the partition table, so an existing layout becomes unusable. The file data underneath is not overwritten at that moment, which is why a recovery tool can still scan the disk.
Which file system should a data volume use?
NTFS is the safe default and can be moved between Windows systems. ReFS suits large volumes that benefit from integrity streams, but it cannot be read by older releases.
Why does the new disk show no media?
The controller or the LUN has not presented the capacity yet. Rescan storage and check the array mapping before you initialize anything.
If formatting stops with a cluster size error, read fix the cluster size wrong format error.
Related Articles
- Create New Partition in Windows Server
- What Is Diskpart? Guide to Diskpart Commands
- Extend a Cluster Shared Volume Without Taking It Offline
- Windows Server 2025 Partition Management Guide
Products
Articles & Tutorials
- Data Recovery
- Data Backup
- File Recovery
- File Backup
- System Backup and Restore
- Disk and Partition Clone
- Technical articles
- Mobile articles
- Disk Master Help
- Windows Data Recovery Tutorials
- Windows Secure Delete Tutorials
- Windows Partition Management Tutorials
- Windows File Backup and Restore Tutorials
- Windows System Backup and Restore Tutorials
- Windows Disk Backup and Restore Tutorials
- Windows Clone Tutorials