SanDisk Format Tool & Repair Tool Free Download
If you're unable to access or visit your data on storage devices, there are several common issues that may arise, regardless of the brand.
Here, we have categorized the usual problems that occurred on SanDisk USB flash drives, pen drives, micro SD cards, SDHC cards, and SDXC cards, into two groups with corresponding solutions, using SanDisk as an example.
These problems can be solved by either formatting the disk using a reliable SanDisk format tool or manually repairing the device with a SanDisk repair tool.
Common Issues with SanDisk Cards and Flash Drives
Check which category your problem falls into, and then follow the respective guide to get your SanDisk or other brands of devices working again.
| Category 1. Need a SanDisk Format Tool | Category 2. Need a SanDisk Repair Tool |
|---|---|
|
|
If your problem is with a device such as an internal hard drive, external hard drive, USB, memory SD card, you can use SanDisk format tools or repair tools to fix the issue, following the provided tutorials for a step-by-step guide.
Part 1. SanDisk Format Tool Free Download and Format the Disk
When facing SanDisk problems, download SanDisk format tools for help. Four formatting tools are available, including SanDisk Format Tool, SanDisk SSD Format Tool, SanDisk Secure Erase Tool, and SanDisk SSD Secure Erase Tool. These tools can assist with formatting SanDisk devices.
- #1. Qiling Partition Master
- #2. Windows File Explorer
- #3. Windows Disk Management
- #4. CMD - Windows DiskPart Command Prompt
#1. Format SanDisk Device using Qiling Partition Master
Before attempting to recover data from a device, make sure to back up any accessible data to another location first. If you're unable to access the device, format it and then use reliable data recovery software to retrieve all lost files.
We recommend trying Qiling Partition Master Free Edition, a free partition manager that allows you to perform more advanced operations besides formatting, making it a suitable alternative to Windows built-in tools.
- Pros: 100% free formatting, formatting 64GB, 128GB, 256GB, and larger storage devices to FAT32, converting FAT32 to NTFS, cloning, and partitioning storage devices, etc. can be done with this software.
- Cons: Doesn't work on macOS.
- Supported Format: NTFS, FAT32, FAT16, Ext4/Ext3/Ext2, exFAT, etc.
- Best for: All levels of users - beginners, experienced and professional users
Guide: 4-Step Format a Sandisk Drive in Windows
Connect your SanDisk drive or removable device to your PC, then follow the steps to format it easily.
Step 1. To format a partition on an external hard drive, USB, or SD card, launch Qiling Partition Master, right-click the partition you want to format, and select the "Format" option from the context menu.
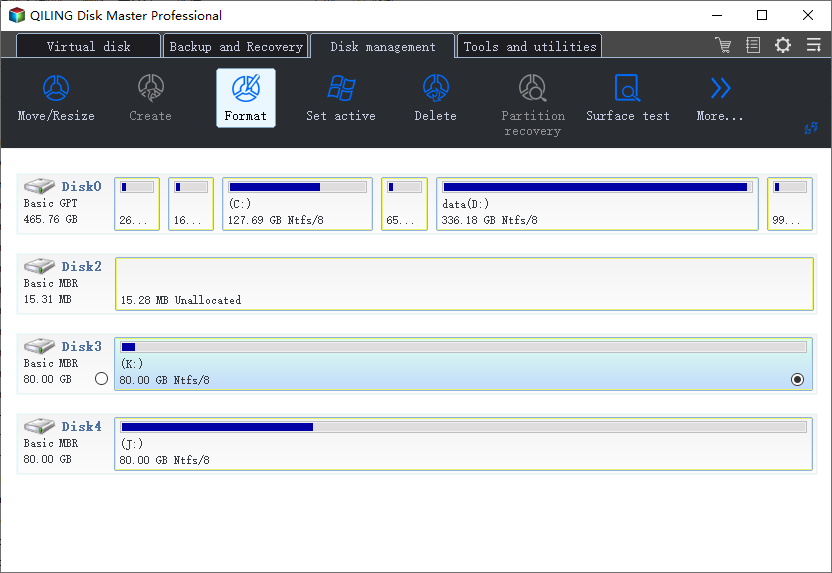
Step 2. Assign a new partition label, file system (NTFS, FAT32, EXT2, EXT3, EXT4, exFAT), and cluster size to the selected partition. Then click "OK".
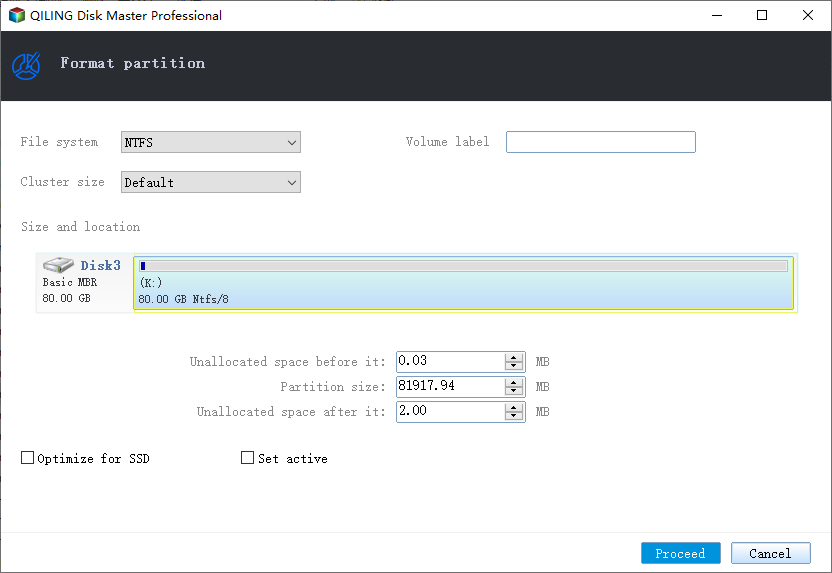
Step 3. Click "OK" to start formatting your external hard drive/USB/SD card in the Warning window.
#2. Format SanDisk Device using File Explorer
You don't need to download Windows File Explorer as it's a built-in tool in Windows, and you can use it to format your external devices like SanDisk.
- Pros: 100% free
- Cons: Cannot format 64GB or bigger USB, SD card to FAT32;
- Supported Format: NTFS, FAT/FAT32, exFAT
- Best for: Window beginners
Tutorial: 4-Step to Format SanDisk Device
Step 1.To format a SanDisk device, first connect it to your PC. Next, open Windows File Explorer, navigate to the SanDisk device, right-click on it, and select the "Format" option. This will erase all data on the device and prepare it for new files.
Step 2. To rename the drive, right-click on it in File Explorer, select "Rename," and type in the new name. Then, to reset its file system to FAT32 or exFAT, you'll need to format the drive. You can do this by right-clicking on the drive in File Explorer, selecting "Format," and choosing the desired file system from the options.
Step 3. Click "Start" to begin the formatting.
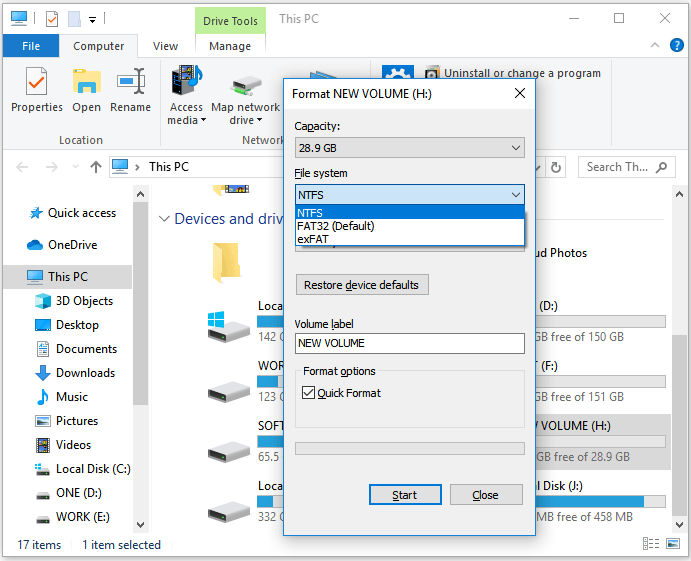
Step 4. When the formatting process is complete, click "OK" and close File Explorer.
#3. Format SanDisk using Windows Disk Management
Windows Disk Management is a built-in tool on Windows computers that allows users to format or change the file system of a device without the need for any additional downloads or installations, similar to how File Explorer works.
- Pros: ①. 100% free; ②. Partition SanDisk or other brands of devices;
- Cons: Cannot format 64GB or bigger device to FAT32;
- Supported Format: NTFS, FAT/FAT32, exFAT;
- Best for: Experienced users
How-to Guide: 4-Step to Format SanDisk Device
Step 1. Connect your SanDisk device to PC, right-click "This PC" or "My Computer" and choose "Manage".
Step 2. Go to "Disk Management".
Step 3. Right-click the SanDisk hard drive partition and choose "Format".
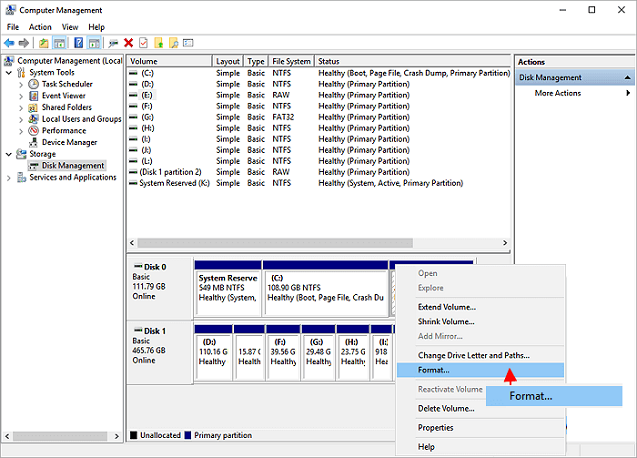
Step 4. Set the volume label, select the file system, and click "OK" to start formatting the drive.
When the formatting process completes, exit Disk Management.
#4. Format SanDisk using Windows DiskPart Command Prompt
Windows DiskPart is a command-line utility that allows you to manage and manipulate disk partitions, including formatting a SanDisk device. It can be accessed directly from the Windows Command Prompt, eliminating the need to download or install any additional software. This tool can also be used to resolve various disk-related issues on your device.
- Pros: 100% free and can perform tasks beyond formatting, such as converting a disk to GPT.
- Cons:1. Complex concepts are often difficult for beginners to understand. 2. Any incorrect operation can lead to severe consequences.
- Supported Format: NTFS, FAT/FAT32, exFAT;
- Best for: Professional or advanced users
Step-by-Step Guide: Format SanDisk Device using DiskPart
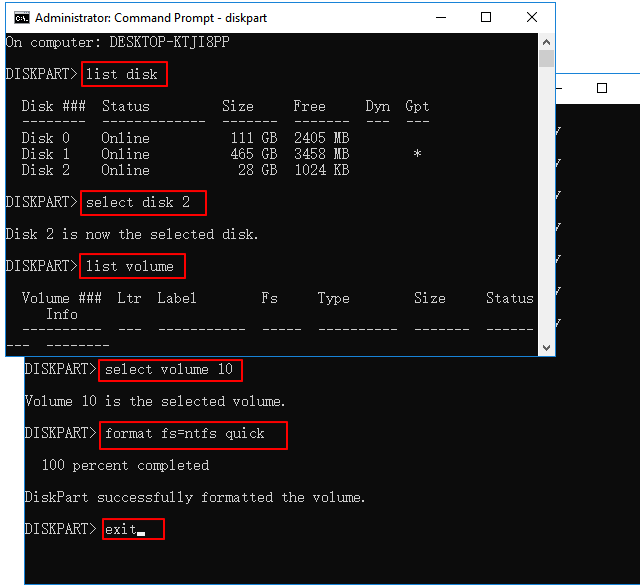
Step 1. Keep your SanDisk device connected to your PC. Type "cmd" in the Search box, right-click Command Prompt and select "Open as Administrator".
Step 2. Type diskpart in Command Prompt and hit Enter.
Step 3. 1. List disk
Make sure you enter the right command each time.
- list disk
- select disk 2 (Replace 2 with your SanDisk disk number)
- list volume
- select volume 10
- format fs=ntfs quick 1. If you need to format a hard drive partition to FAT32 or other file systems, replace ntfs with fat32, exfat, etc. in the command.
Step 4. 1. In the command window, type `exit` and press Enter to close the command window.
Part 2. SanDisk Repair Tool Free Download
For situations where a simple disk formatting won't suffice, more advanced operations are required, like using SanDisk repair tools to address the issues on your device.
Here, we also collected several SanDisk repair tools for you to pick up and apply to repair corrupted, unreadable and even write-protected SanDisk devices, including SanDisk Recovery Software, SanDisk Repair Tool, SanDisk Formatter, SanDisk Unlock Tool, and SanDisk Data Recovery Software.
- #1. Qiling CleanGenius + Qiling Partition Master Free Edition
- #2. CMD - Windows DiskPart Command Line
- #3. File Explorer + Disk Error Checking
- #4. Registry Editor
To repair different SanDisk device errors, you'll need to use the respective SanDisk repair tools, as the solutions for various cases are distinct. The process will involve using different tools for each case, and we'll guide you through the steps to repair errors on SanDisk devices in the following guide.
Case 1. Repair a Write-protected SanDisk SD Card or Flash Drive
When a SanDisk card, USB, or other storage devices become write-protected, you can't directly format them to remove the write protection.
If an SD card or USB becomes write-protected, you can try to unlock it by toggling its switch. However, if that doesn't work, you can try to fix a write-protected SanDisk drive using alternative methods.
Method 1. Fix Write-Protected SanDisk Device using Qiling CleanGenius and Qiling Partition Master
To remove write protection from a SanDisk device, connect it to your computer. Then, go to the Disk Management tool on your computer (available in Windows) or the Disk Utility tool (for Macs). In the Disk Management tool, right-click on the SanDisk device and select "Change Drive Letter and Paths" or "Properties." In the Properties window, look for the "Read-only" or "Write-protected" checkbox and uncheck it.
If you're not tech-savvy, don't worry! There are graphical-based solutions to help you remove write-protection from your hard drives, USB drives, and even SD cards, making it easy to access and use them without needing to navigate through command lines.
Qiling CleanGenius is a tool that helps fix issues on drives without requiring command-line knowledge.
Here's an easy-Here's a brief guide on how to use this tool:
Step 1: DOWNLOAD and install Qiling CleanGenius (free) on your computer.
Step 2: Run Qiling CleanGenius on your PC, select Optimization and choose the Write Protection mode.
Step 3: Select the device that is write-protected and click Disable to remove the protection.
When you've removed write protection from the device, you can apply Qiling Partition Master's Format feature to make the device usable again. You can refer to the formatting tutorial in Part 1 for guidance.
Method 2. Remove Write Protection from SanDisk Device using CMD
Remember to connect the write-1. Connect your protected SanDisk device to your computer. 2.
Step 1.To open Command Prompt as Administrator, press the Windows key + R to open the Run dialog box, then type "cmd" and press Enter. This will open the Command Prompt. To open it as Administrator, right-click on the Command Prompt icon and select "Run as Administrator".
Step 2. Type diskpart and hit Enter.
Step 3. Type the following command lines and hit Enter each time:
- list disk
- select disk #1. Download and install the SanDisk Secure Access software. 2.
- attributes disk clear readonly
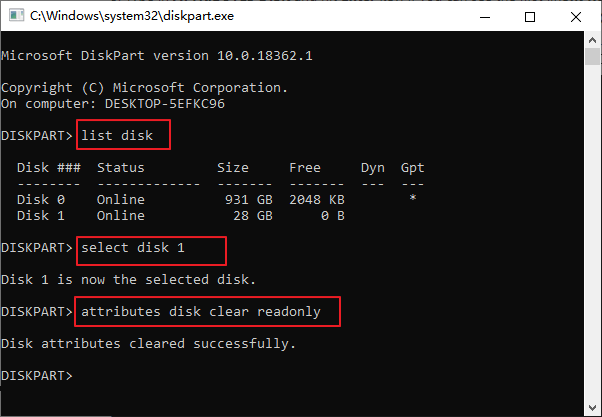
Step 4. Type exit and hit Enter to close DiskPart.
Method 3. Remove Write Protection from SanDisk using Registry Editor
If you're a Windows beginner, it's recommended to revert to Method 1 and use Qiling CleanGenius for assistance. While Registry Editor can effectively remove write protection errors, it's not suitable for those new to Windows, making Method 1 a safer and more beginner-friendly option.
To avoid device malfunction on your computer, carefully follow the steps to remove the SanDisk device write protection error. Any false operation may cause issues, so proceed with caution. .
Step 1. Type Regedit in the search box and hit Enter.
When you see the Registry Editor displayed at the top of the list, click "Yes" to open it.
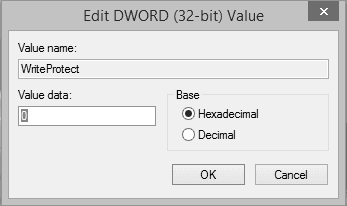
Step 2. And then navigate to the following key: Computer\HKEY_LOCAL_MACHINE\SYSTEM\CurrentControlSet\Control\StorageDevicePolicies
Step 3. Double-click on the WriteProtect value in the right-hand pane of Registry Editor.
Change the Value data from 1 to 0 and click "OK" to save the change.
After this, close Registry and restart your computer.
Case 2. Repair Corrupted, Unreadable SanDisk Device on Windows PC
When a SanDisk storage device is not detected or becomes inaccessible on a Windows PC, it's often due to a file system error, bad sector, or internal errors. To resolve this issue, you can try using a reliable SanDisk repair tool to help fix the problem.
Method 1. Use Free Partition Manager - Qiling Partition Master
Qiling Partition Master Free Edition has a feature called Check File System that allows you to fix file system errors, soft bad sectors, and some internal errors that prevent access to a device on a Windows PC.
Here are the steps:
Method 2. Run Disk Error Checking in File Explorer
Step 1. Open File Explorer, right-click the SanDisk device and choose "Properties".
Step 2. Under the Tools tab, click the Check button under the Error-checking section on the menu.
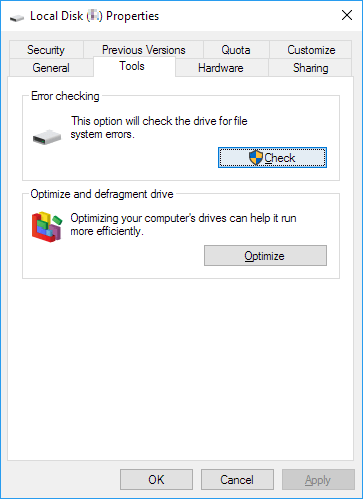
Step 3. To troubleshoot issues with your computer, you can choose to "Scan drive" to scan for errors, and if errors are found, you can then click "Repair drive" to fix them.
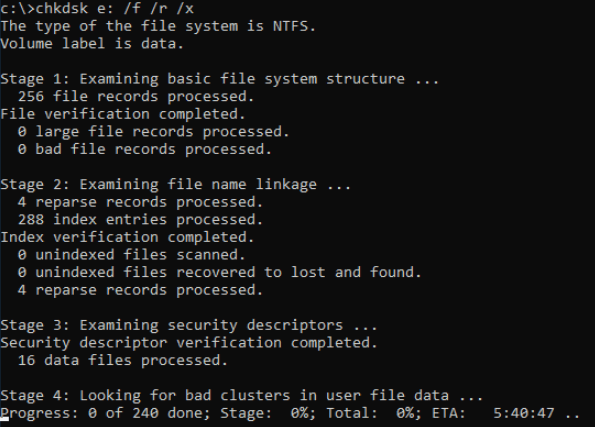
Method 3. Run CHKDSK Command to Repair SanDisk Drive Error
CHKDSK is a command that can repair internal device errors on all brands of storage devices, including SanDisk devices. To run the command and repair a corrupted SanDisk device, follow the steps carefully.
Step 1. Type cmd in the Search box.
Step 2. Right-click "Command Prompt" and choose "Run as administrator".
Step 3. Enter the following command: chkdsk E: /f /r /x
1. Insert the SanDisk recovery drive into the computer.
Bonus Tip: SanDisk Offical Resolution - Repair using Registry
A corrupt registry entry can prevent a SanDisk product from being detected by a computer. Removing the registry keys created during installation can resolve the issue by allowing the computer to fully reinstall the device.
Step 1. Back up the registry
1. Unplug the SanDisk device from the USB port.
2. Run regedit.
- To access the registry editor in Windows XP, go to the "Start" menu, click on "Run", type in "regedit" and then click "OK".
- To edit the registry in Windows 7, 8, and Vista, click the Start button, type "regedit" in the search box, and then press Enter.
- To open the registry editor in Windows 10, type "regedit" in the search field at the bottom right of the screen, and then select "Regedit - Run Command" from the search results.
3. From the registry menu, choose "File" > "Export".
4. Name the file SNDK.reg and save it to your desktop.
If you encounter problems after editing the registry, you can resolve them by restoring a backup of the original settings. To do this, follow steps 1-3, but this time choose File > Import. Select the SNDK.reg file you created earlier, let it import, and then restart your PC.
Step 2. Remove SanDisk info from the registry
Be cautious when deleting registry keys, as it can cause system malfunctions and booting issues. Only delete keys that include VID_0781, which are specific to SanDisk devices, to avoid any potential problems.
1. From the registry menu, click "Edit" and choose "Find".
2. Type in VID_0781 and click "Find" Next.
3. Once the search finishes, right-click the highlighted registry key and delete it.
4. Press the F3 key to find the next registry key that includes the text "VID_0781".
5. Right-click the highlighted registry key and select "delete".
6. I'm happy to help you with that! However, I need a bit more context to provide a more accurate response.
Under Windows 7, 8, and Vista, some registry keys may be protected and cannot be deleted, so simply skip over these keys if you receive a message that the key cannot be deleted.
7. Once all registry keys containing VID_0781 have been deleted, reboot your computer.
8. Plug the device into the computer after it's finished rebooting, and it will be reinstalled.
If you have trouble completing the process, there is another way that you can try to fix a USB flash drive not showing up in the file explorer by trying to run a disk check and repair on the drive. This can be done by right-clicking on the drive in file explorer, selecting properties, and then clicking on the tools tab.
Wrapping Up
If you format or repair your SanDisk device, you may lose some files. Fortunately, reliable data recovery software can help you recover them. If you need a detailed tutorial, please refer to the "Restore Formatted Files" guide for assistance.
We've identified the symptoms of SanDisk storage devices not working properly on Windows PCs, which we've grouped into two categories. To resolve these issues, you can use the SanDisk format tool or the SanDisk repair tool to get your device working again.
For Windows beginners, we recommend using Qiling Partition Master and Qiling CleanGenius to format and repair problematic SanDisk memory cards, SD cards, USB drives, external hard drives, and even internal hard drives.
Related Articles
- How to Format Read Only Disk to Normal Windows 11
- 2022 Magic Wester Digital (WD) Partition Manager Software Free Download
- Format to FAT32 for USB or External Hard Drive in Windows 10
- How to Convert Simple Volume to Primary Partition