Can I Format the System Partition? How to Fix System Partition is Not Allowed to Be Formatted
Overview of System Partition
The system partition, where boot files like BCD, bootmgr, and boot.ini reside, cannot be formatted while Windows is running, as it's necessary for the operating system to boot. Formatting it would delete all files, including the OS, and render the machine unbootable. Users are therefore prevented from formatting the system partition. As a result, an error message may appear, stating that the system partition cannot be formatted.
You can format the system partition while Windows is not working, such as in WinPE or on another PC, by attaching the system disc as a secondary drive. Alternatively, you can try formatting the system partition using other methods that don't involve unplugging and plugging hard disks.
Method 1. Format System Partition With Qiling Partition Master
Qiling Partition Master is an efficient format tool that simplifies the process of formatting a hard drive partition. As a partition manager, it allows users to better manage their hard drives and partitions, and can perform various tasks such as formatting, creating, resizing, transferring, combining, and cloning partitions.
To format the system partition, you'll need to create a bootable disk, boot your computer from it, and then proceed with formatting the system partition.
The following process may help you format the system partition. Read further to know more.
1. Create a Windows Bootable Media with Qiling Partition Master
Step 1. To create a bootable disk of Qiling Partition Master, prepare a storage media like a USB drive or CD/DVD disc, and correctly connect it to your computer.
Step 2. Launch Qiling Partition Master, find the "Create bootable media" feature on the tools page, and click on it.
Step 3. You can choose to use a USB or CD/DVD drive when it's available, or save the ISO file to a local drive to burn it to a storage media later. Once you've made your choice, click the "Proceed" button to start the process.
After the process finishes, you'll have a Qiling Partition Master WinPE bootable disk that you can use to manage your hard disks and partitions, even if your computer fails to boot normally.
To add a RAID driver in a WinPE environment, start by clicking on "Add Driver" from the menu bar. This allows you to add the driver for your device, which is crucial for recognizing specific devices like RAID or certain hard disk models that might not be detected without their respective drivers installed.
2. Boot the Computer from the Bootable Media
Step 1. To access the BIOS, restart your computer and press the F2 key (or F8 or Delete, depending on your computer model) repeatedly until you enter the BIOS setup page.
Step 2. To boot a computer from a USB/CD/DVD, go to the BIOS settings, select the boot device, and choose the USB/CD/DVD as the primary boot device. Save the changes and exit the BIOS settings.
3. Format the C Drive Using Qiling Partition Master
After the startup, your computer will boot into a system with Qiling Partition Master installed, allowing you to format the system partition, which is now accessible for formatting.
Step 1. Right-click the hard drive partition and choose the "Format" option.
Step 2. In the new window, set the Partition label, File system, and Cluster size for the partition, then click "Proceed".
Step 3. You'll see a warning window. Click "OK" to proceed with formatting the hard drive partition.
Method 2. Format System Partition Using Windows Installation Disc
You can format the C drive using the installation disc for Windows 10, Windows 8, Windows 7, or Windows Vista, following the steps provided.
Step 1.Insert the Windows Installation Disc into the computer's optical hard drive and start the computer. Follow the on-screen instructions that appear after the CD is recognized.
Step 2. Click "Next" after selecting the language you want to use.
Step 3.To install the Windows Subsystem for Linux, select the "Install Now" option and wait for it to complete. This process is not the same as installing a full Windows operating system, but rather a feature that allows you to run Linux distributions on your Windows machine.
Step 4. Select "Next" after accepting the terms and conditions.
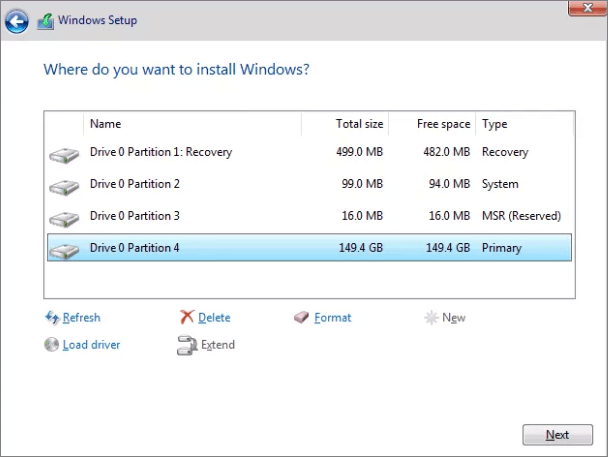
Step 5.Select Custom (advanced) from the drop-down menu, and you'll get a list of all installed drives. Then, choose "Drive settings (advanced)" from the drop-down menu and click on "Next."
Step 6.The user selects "Format" from the drop-down menu, and Windows initiates the formatting operation on the hard drive.
Windows 11 supports both Master Boot Record (MBR) and GUID Partition Table (GPT) disk partitions. However, if you're planning to install Windows 11, it's recommended to use GPT partitioning. This is because GPT allows for larger disk sizes and more partitions than MBR.
To update to Windows 11, you need to check your partition style and potentially convert from MBR to GPT. First, check your partition style by running the command "wmic diskdrive get status" in Command Prompt.
Conclusion
With the methods above, you can format the system partition without hassle. However, we still hope you think twice before making the decision. If your purpose is to leave room for a new OS installation, it's unnecessary to do so, as the format will occur during the OS installation on the disk that already has an OS.
Related Articles
- The Local Device Name Is Already in Use
- Running [Bootrec /fixboot] Returned Error 'Access is denied' - FIX 2022
- Unable to Change Letter or Assign Drive Letter to D/E/F/G
- exFAT Converter: How to Convert exFAT to NTFS/FAT/FAT32
- Windows 11 Boot Repair [Step by Step Guide with Pictures]
Windows 11 boot issues are a common problem for users who have recently updated their systems. If you're experiencing this issue, - this guide can help. We'll provide multiple practical solutions to help you apply Windows 11 boot repair and get your system up and running smoothly again. - Top 7 Windows 11 Password Reset Tools - Checklist
Forgetting your Windows 11 password can be frustrating, but there are tools to help you reset it. This guide highlights the top 7 Windows 11 password reset tools that can assist you in regaining access to your account.