Windows 11 26H2 ISO Mount Leaves No Drive Letter
Quick Navigation:
- What the 26H2 ISO Mount Changes
- Find the Volume That Has No Letter
- Assign a Letter or Dismount the Image
- Manage the Volume with Qiling Disk Master
- Frequently Asked Questions
The ISO mounter in Windows 11 version 26H2 attaches an image as a virtual disk instead of opening it as a folder. When the letter pool is short, or the image holds more than one partition, a volume can end up attached and healthy but with no path in File Explorer. This page shows where that volume hides and how to give it a letter or remove it cleanly.
What the 26H2 ISO Mount Changes
In version 26H2 the built-in mounter attaches an image as a virtual disk. Every partition inside the image becomes a volume, and Windows takes a letter for each one from the free letter pool rather than presenting the image as a single folder.
Two things go wrong around that change. An image that contains more than one partition can take several letters at once, and a machine with mapped network drives, a card reader, and a USB disk may have no letter left to give. The virtual disk also is not always detached when Explorer closes, so a mount from an earlier session can sit in the background with no window to eject it from.
The volume stays healthy in that state. It is simply unreachable, because a volume without a letter has no path. Nothing has been deleted, which matters if you were about to run a recovery tool against it.
Find the Volume That Has No Letter
Right-click Start and open Disk Management. The map at the bottom of the window shows a mounted image as a separate disk with a small capacity, and its volume row shows a label and a file system but an empty letter column.
Settings > System > Storage > Disks & volumes shows the same device in a friendlier form. Match the listed capacity with the size of the ISO file; when they agree, the volume belongs to the image rather than to a physical disk.
Look for more than one. Leftover mounts from earlier sessions are common after a forced restart, and each one holds a letter that a newly plugged USB drive would otherwise receive.
Assign a Letter or Dismount the Image
If you still need the content, right-click the volume, choose Change Drive Letter and Paths, and add a letter that no network mapping uses. A mapped drive keeps its letter while disconnected and will block the assignment.
If you have finished with the image, eject it instead. Right-click the virtual drive in Explorer and choose Eject, or use Dismount in Disk Management. Ejecting releases the letter at once and stops the mount from returning after the next restart.
When no letter is free, disconnect an idle USB device or unmap an unused share first. Letters A and B are best left alone, because Windows still treats them as removable drive letters.
Manage the Volume with Qiling Disk Master
Qiling Disk Master lists every volume, mounted images included, on one map, and it can assign a letter without walking through nested Windows dialogs. That matters when the volume has no path and therefore no right-click entry in Explorer.
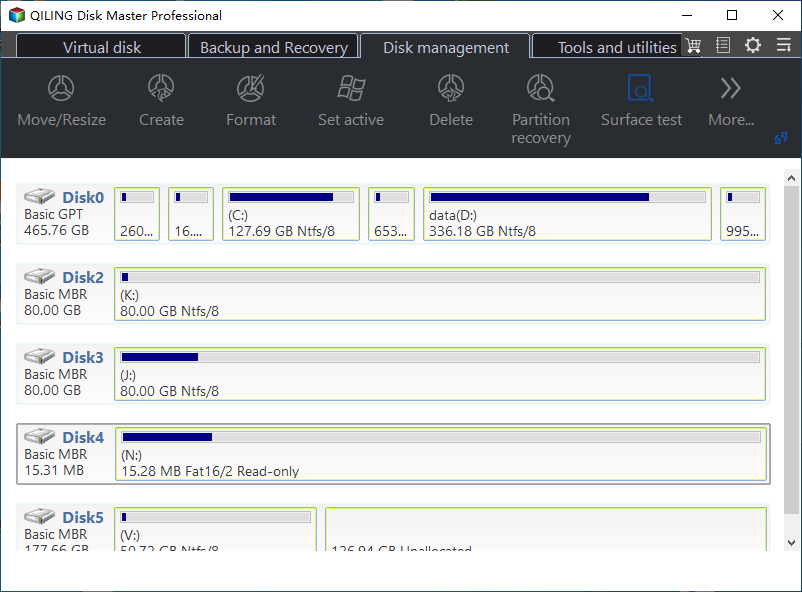
Step 1. Find the Mounted Image on the Disk Map
Open the program and compare each disk with Disk Management. The mounted image is the short one with a small capacity and no letter in front of its volume label, while a physical disk shows its model name and size.
Step 2. Choose Change Drive Letter
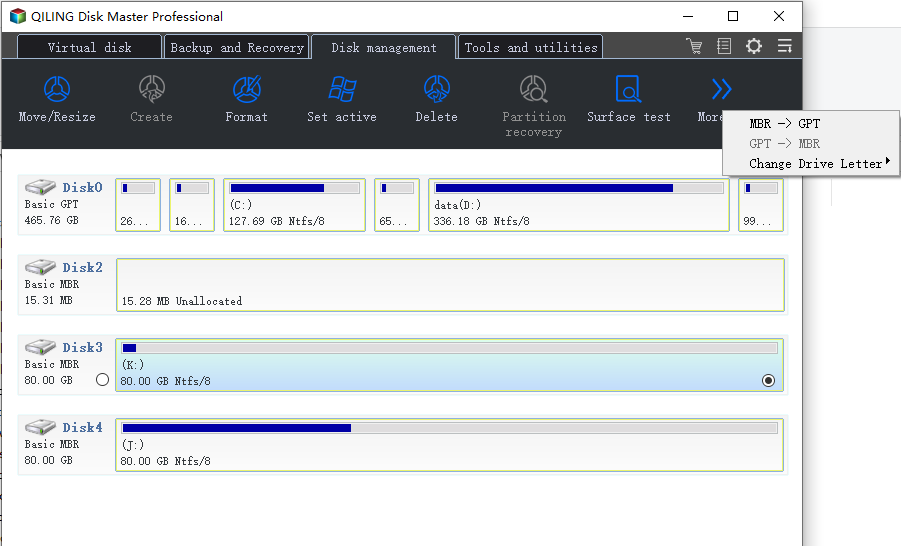
Select the volume that has no letter, open the More menu, and choose Change Drive Letter. The same command is available when you right-click the volume.
Step 3. Pick a Letter and Confirm
Select a letter that no mapped share is using and click OK. The letter is applied immediately, and the volume appears in Explorer as soon as the dialog closes. If the image is one you have finished with, eject it instead, because a read-only ISO volume cannot be formatted in place.
Frequently Asked Questions
Why does the ISO appear in Disk Management but not in File Explorer?
Because the volume attached without a drive letter. A volume needs a letter, or a mounted folder path, before Explorer can display it.
Is it safe to eject an image that another program still has open?
Close the program first. Ejecting removes the volume under any open handle, and the application normally reports a read error.
Will the mount come back after a restart?
It should not, once you eject it. If it does, check for a virtual drive tool or a sign-in script that attaches the image automatically.
Can I lose data by removing the letter?
No. Removing a letter only removes the path. The content of the image is untouched, and you can add a letter again at any time.
For the general procedure behind letter assignment, see how to assign a drive letter in Windows.
Related Articles
- Assign a Drive Letter in Windows
- BitLocker Drive Unlocked but No Drive Letter
- All Options Grayed Out in Disk Management
- Drive Letter Conflict After a Windows 11 Update
- VHD or VHDX Will Not Mount on Windows 11
Products
Articles & Tutorials
- Data Recovery
- Data Backup
- File Recovery
- File Backup
- System Backup and Restore
- Disk and Partition Clone
- Technical articles
- Mobile articles
- Disk Master Help
- Windows Data Recovery Tutorials
- Windows Secure Delete Tutorials
- Windows Partition Management Tutorials
- Windows File Backup and Restore Tutorials
- Windows System Backup and Restore Tutorials
- Windows Disk Backup and Restore Tutorials
- Windows Clone Tutorials