How to Export Data from SQL Server to Excel Automatically
To automate the process of exporting data from SQL Server to Excel, you can use SQL Server Integration Services (SSIS) or SQL Server Agent. One approach is to create a package in SSIS that connects to your SQL Server, executes the desired query, and exports the results to an Excel file. You can then schedule this package to run automatically using SQL Server Agent, which will run the package at specified intervals, such as daily or weekly. This way, you can automate the process and avoid manual intervention.
If you're facing the issue of exporting SQL Server data to Excel, don't worry! There are two possible ways to help you achieve this automatically, which are covered on this page.
Two Ways to Export Data from SQL Server to Excel
To export data from SQL Server to Excel, you can use the SQL Server Import and Export Wizard and Data Connection Wizard in Excel. These tools allow you to easily transfer data from SQL Server to Excel, making it a convenient option for data analysis and visualization.
Solution 1. Use the SQL Server Import and Export Wizard
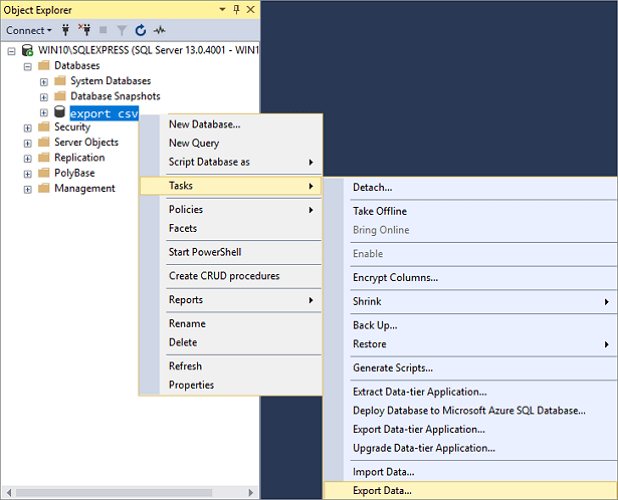
1. Open SQL Server Management Studio and connect to the database.
2. Go to "Object Explorer", find the server database you want to export to Excel, right-click on it and choose "Tasks" > "Export Data" to export table data in SQL. The SQL Server Import and Export Wizard welcome window will then pop up.
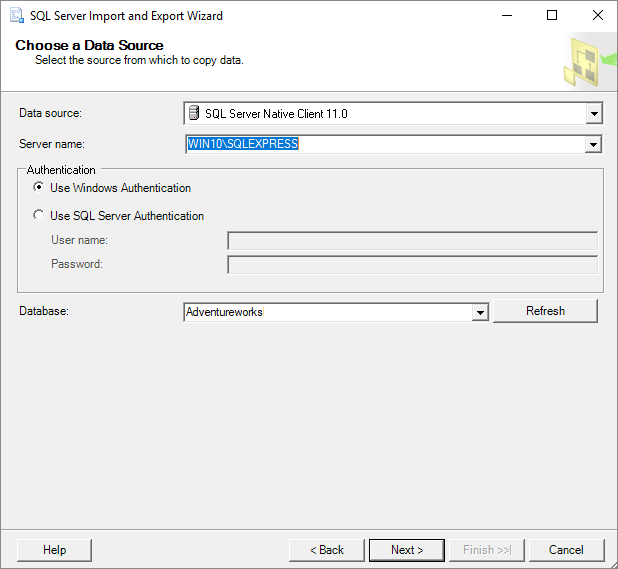
3. To copy data from a SQL Server database, first click on the Data source drop-down button to select the data source, then choose "SQL Server Native Client 11.0" from the list. Next, select a SQL Server instance from the Server name drop-down box, choose authentication, and select a database from the Database drop-down box. Finally, click the "Next" button to proceed.
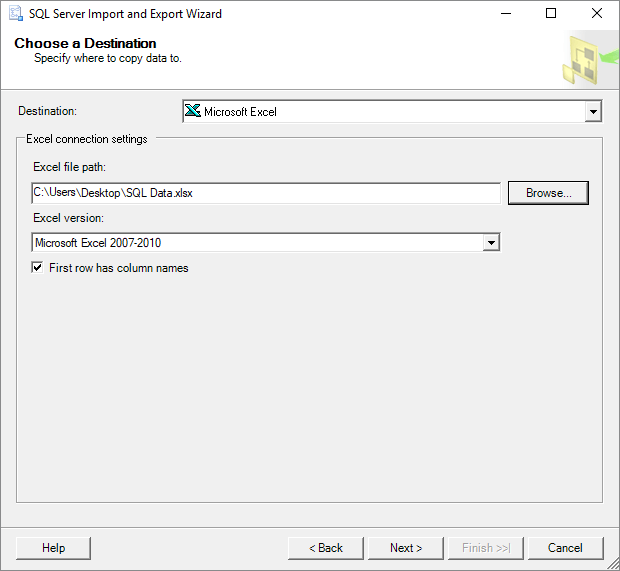
4. To export data from SQL Server to Excel, navigate to the "Choose a Destination" window. Select Microsoft Excel as the destination, specify the Excel file path and version, and click "Next" to proceed.
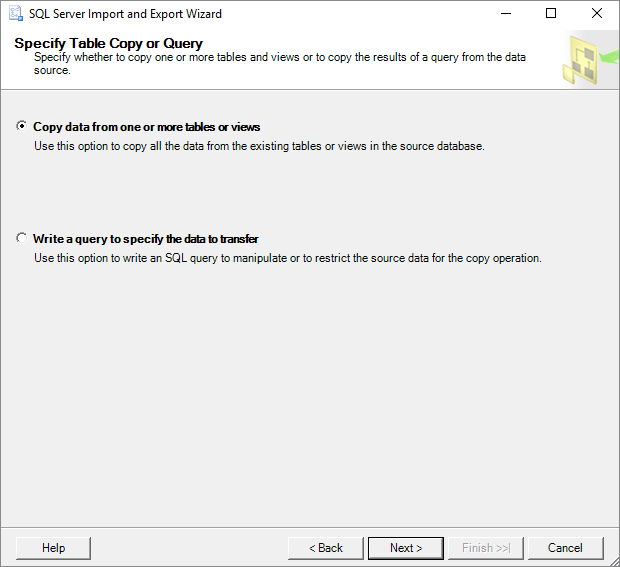
5. On the Specify Table Copy or Query screen, select "Copy data from one or more tables or views" and click "Next".
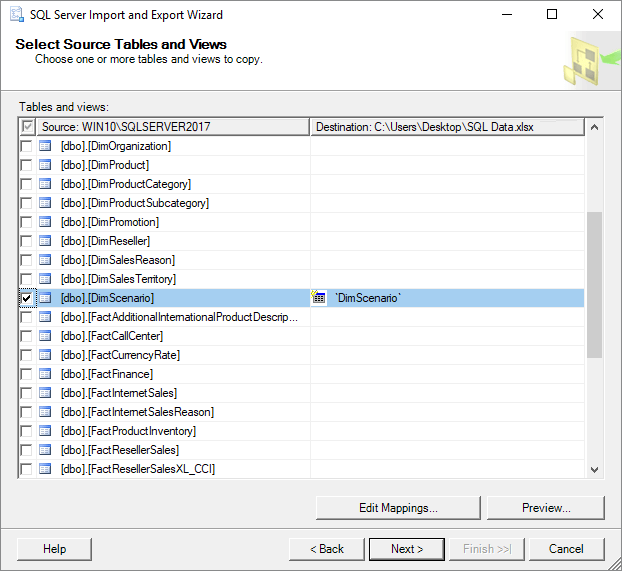
6. In the "Select Source Table and Views" window, you can choose one or more tables and views to export SQL Server data to Excel, then click "Preview" to see the data that will be generated and click "Next" to proceed.
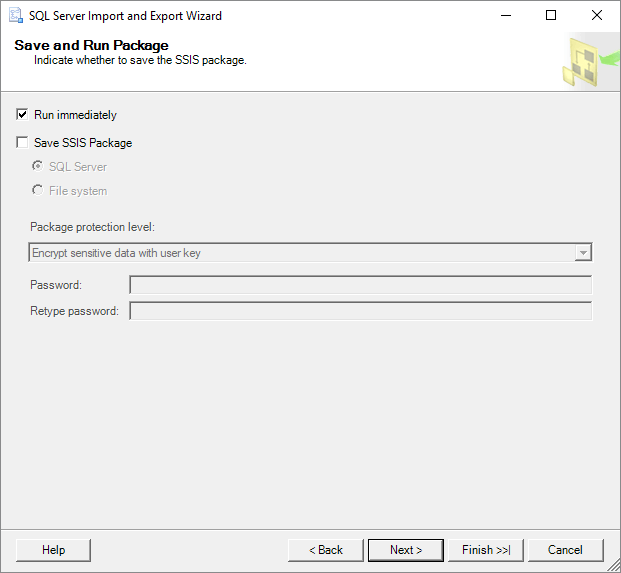
7. On the "Save and Run Package" window, select the "Run immediately" option and click the "Next" button.
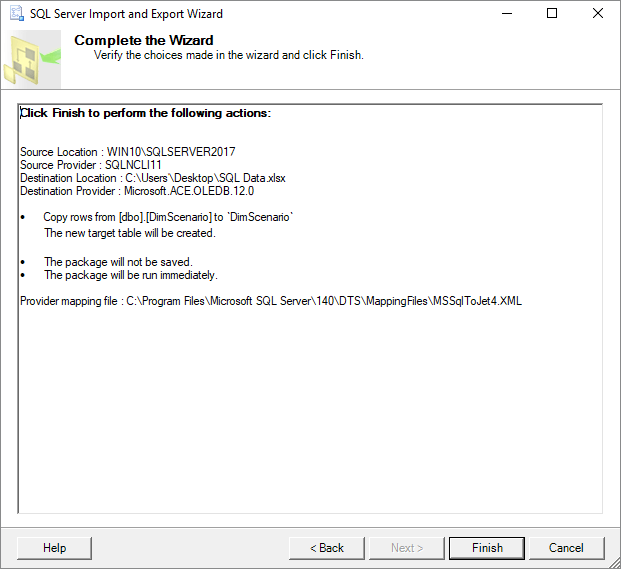
8. On the "Complete" Wizard window, you can review all settings before exporting your SQL database to Excel. If everything looks correct, click "Finish" to proceed with the export process.
9. When the exporting process is complete, click the "Report" drop-down button.

10. You can save the report in various file formats, including Excel, by selecting "Save Report to File..." and choosing Excel as the target format.
How to Repair SQL Server Database
SQL Server Management Studio (SSMS) offers the Import and Export Wizard feature to export data from one data source to another, including exporting SQL to Excel. This feature can also be used to export SQL Server database to CSV, among other data sources.
Step 1. To stop the SQL Service, follow these steps: Open the Task Manager, navigate to the Services tab, locate the SQL Service, right-click on it, and select "Stop" from the context menu. Alternatively, you can open the SQL Server Manager Console, navigate to the SQL Server instance, right-click on it, and select "Stop" from the context menu.
Step 2. Run Qiling MS SQL Recovery, click "Browse" or "Search" to choose the corrupted database location, then click "Repair" to start analyzing the database.
Step 3. When the scan is complete, select the files you want to repair and click "Export" to save the repaired files to a new location.
Step 4. To enable the SQL service, you can select the option to export the repaired files to a database, which will then generate SQL scripts.
Solution 2. Using the Data Connection Wizard in Excel
Another way to export data from SQL Server to an Excel file is to use the Data Connection Wizard dialog in Excel, which allows you to select the data source, choose the data to export, and specify the Excel file to save the data to.
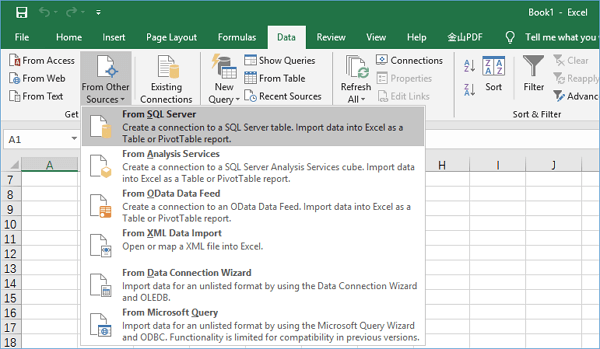
To export SQL Server data into an Excel file, launch Excel, open the desired Excel file, and navigate to the "Data" tab on the toolbar. From there, select "From Other Sources" and choose "From SQL Server" to initiate the data export process.
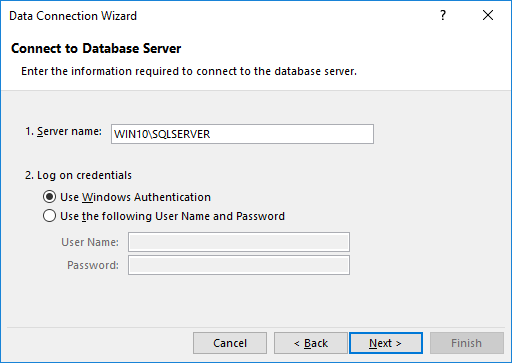
2. The "Data Connection Wizard" window will pop up. To export data from a SQL Server instance, you need to specify the instance name and use Windows Authentication for the connection credentials.
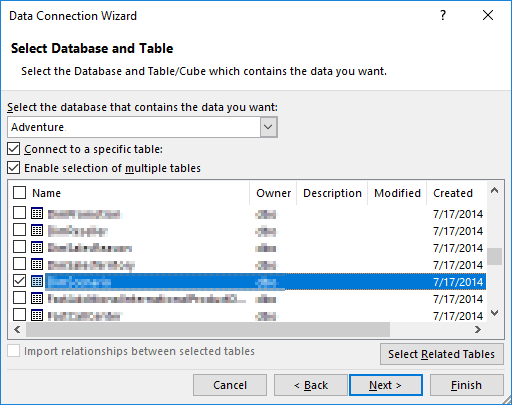
3. Choose the database from which the data will be exported. Click the "Next" button to proceed. On the next window, leave everything as it is and press the "Finish" button.
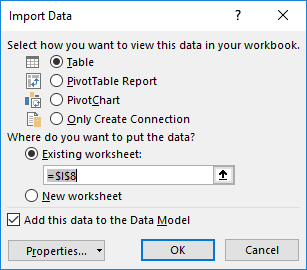
4. In the Import Data dialog, choose "Table" and "Existing worksheet" as the screenshot shows. Press the "OK" button. The SQL Server data will be exported to an Excel file after this.
Related Articles
- SQL to XML | How to Export Data from SQL Server to XML
- SQL Database Restore Failed Database Is in Use
- [Solved] SQL Server Error 3013/3266: Backup Database Is Terminating Abnormally
- How to Export MS SQL Server Database to CSV File
- How to Format Flash Drive Using CMD
This article covers two parts: how to format flash drive using CMD and how to recover formatted data from flash drive using CMD. Check them to restore USB flash drive using command prompt now! - How to Format SD Card for GoPro Hero 4/5 Sesssion
Don't know how to format SD card for GoPro hero 5 or hero 4 session? This article walks you through the whole process for how to format SD card for GoPro Hero 5 Black, Hero5 Session, Hero4 Sesson and Hero Session.