External Hard Drive Can be Detected But Not Opening
Issue: My External Hard Drive Is Recognized But Won't Open
The external hard drive is not being recognized by the computer, and it appears as an unknown device in the Device Manager.
If your external hard drive is detected but won't open, it's possible that the drive's file system is corrupted or the drive is failing. To safely retrieve your files without formatting the drive, you can try using data recovery software such as Deep Data Recovery, Recuva, or Disk Drill. These tools can scan the drive and recover your files, even if the drive is no longer accessible. Be sure to stop using the drive immediately to prevent further data loss. If the issue persists, consider seeking professional help from a data recovery service.
The "external hard drive detected but cannot open" error is often discussed, and its causes are distinct from those of an unrecognized external hard drive. Symptoms of this issue include an external hard drive or other storage device becoming inaccessible, often with the drive being detected but unable to be opened or accessed.
- Access denied
- File system error
- The storage device driver is outdated
- Device not formatted error
- Unsupported file system
- The request failed due to a fatal device hardware error
- Unknown disk not initialized
If you're experiencing issues with your older device, such as freezing, crashing, or data loss, you can try following the guides in Part 1 to restore and extract data from the device first. Once you've done that, you can refer to Part 2 for specific solutions to address the issues you're facing.
Users may experience issues with a new external hard drive, such as it not being accessible, and may need to initialize the device to resolve the problem.
Part 1. Restore Data from Not Opening External Hard Drive (Only 3 Steps)
You can access saved data on the external hard drive that's not opening on your Windows computer using professional data recovery software like Deep Data Recovery, which enables you to access data on an inaccessible storage device.
Qiling External Hard Drive Data Recovery
- Recover lost documents, photos, audio, music, emails, and more from external hard drives with ease.
- Need to recover files from a corrupted USB drive, emptied recycle bin, memory card, SD card, digital camera, or camcorder? Don't worry, there are ways to retrieve your lost data.
- Data recovery from inaccessible, corrupted, or damaged external hard drives can be achieved through various methods, including using specialized software, hardware tools, or seeking professional assistance. Some common techniques involve running a disk check or repair, using data recovery software such as Deep Data Recovery, or employing hardware tools like a data recovery USB drive or a specialized data recovery machine.
With this tool, you can easily scan and recover data from an inaccessible hard drive in just 3 simple steps.
Step 1. Connect your external hard drive to your computer using a correct USB cable, then run Deep Data Recovery and choose the file types you want to recover, clicking "Next" to begin the process.

Step 2.You can view your external disk in the next window under External drives, where you'll see it listed among popular brands like WD, Seagate, Toshiba, LaCie, SanDisk, and Samsung.
Select the external hard drive and then click the "Scan" button.

Step 3. As soon as the scan process starts, the software will find and display lost and deleted data, organizing it in a clear and easy-to-navigate format. You can quickly locate the target files or folders by file type or search for specific files using the search box with an exact file name.

Step 4. You can preview the files found by Deep Data Recovery's scanning algorithms, select the desired files, and click "Recover". To avoid overwriting the original data, it's recommended to save the recovered files to a different drive than the original Seagate drive.
After resolving the issue with the external hard drive not showing up in File Explorer, move on to Part 2 to find an effective solution to make it accessible again on Windows 10, 8, or 7.
Part 2. Fix external hard drive won't open error (4 methods)
Here are the 4 reliable methods to solve the external hard drive detected but not showing up error and make your device work perfectly again:
Method 1. Gain administrator permission (3-4 minutes)
Applies to: remove device inaccessible issue without access permission
The process of getting access permission on Windows 10 and 8 is similar, but differs slightly on Windows 7 and older OS.
Step 1.To access an external hard drive that's not showing up on your computer, open "This PC" (also known as "Computer" or "My Computer"), right-click on the external hard drive, and select "Properties".
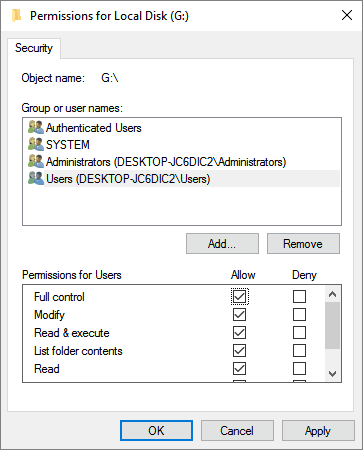
Step 2. To edit your username, go to the Security section, click "Edit", and select your username from the dropdown list under "Group or username".
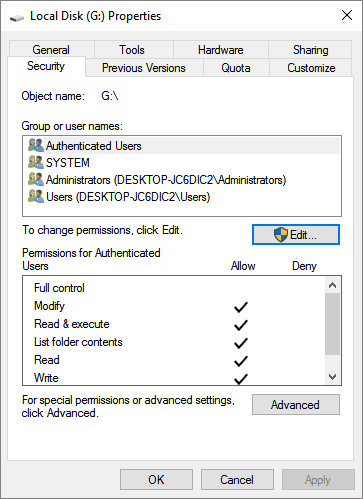
Step 3. To enable all permissions, select all boxes under the Allow column, click "OK" to confirm the changes, and then click "Apply" to save the modifications.
Reboot the PC and reconnect the external hard drive to your PC if necessary.
You May Also Interest In:
If you're dealing with a similar hard drive issue, you can try these fixes directly to resolve the problem.
How to Fix Hard Drive Not Showing Up in Windows
If your hard drive is not showing up in File Explorer or Disk Management, try restarting your computer, checking the drive for physical damage, and ensuring it's properly connected. If the issue persists, run the Check Disk utility, update your drivers, and check for BIOS updates. If the drive is still not detected, consider using a third-party disk recovery software to scan and recover data from the unmounted drive.
Method 2. Update the external hard drive driver (3-5 minutes)
Applies to: resolve device driver outdated, not opening issue
If you're unable to access your external hard drive on Windows 10, don't worry, this method is also worth trying.
Step 1. Connect the external hard drive to the PC.
Step 2. Right-click on the This PC/My Computer icon, select Manage, and then go to Device Manager.
Step 3.To update the disk driver, expand the Disk drives section, find and right-click on the external hard drive, and select the "Update driver" option.
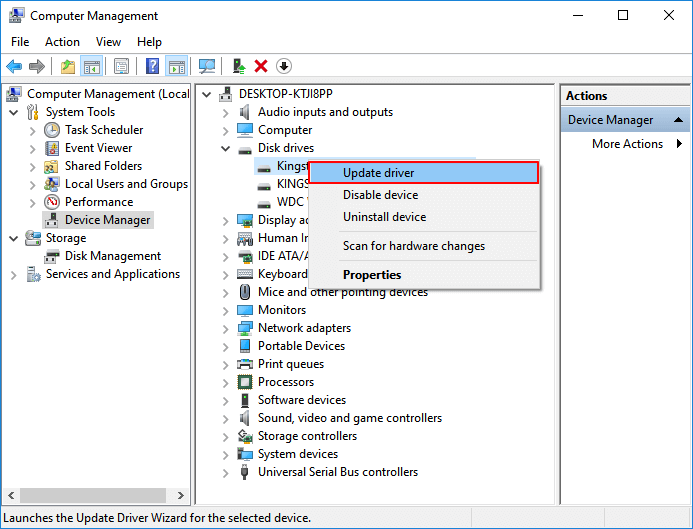
Step 4. Select "Search automatically for updated driver software" and wait patiently till the process completes.
Reboot the PC, then reconnect the device if the system requires it.
Method 3. Check and fix file system errors (4-5 minutes)
To resolve issues with a device that won't open due to corrupted file system or existing errors, you can try running a system file checker, checking for disk errors, and running a system restore point to revert to a previous working state. Additionally, you can try booting in safe mode, running a virus scan, and checking for any hardware issues that might be causing the problem.
To resolve file system errors on your device, you can either use disk error checking tools or execute a cmd command to check and fix existing file system errors.
Note: Running chkdsk can potentially fix file system errors, but it may also result in total data loss. To avoid this, perform data recovery beforehand, and then proceed with the CMD method.
Here is the example of using the CMD command to fix file system errors:
Step 1. To open the Command Prompt, press the Windows key + R to open the Run dialog, type "cmd" in the box, and then press Enter. This will open the Command Prompt window where you can execute various system commands.
Step 2. Type diskpart and click OK to bring it up.
Step 3. To troubleshoot an external hard drive that won't open, type the command `chkdsk G: /f /r /x` and press Enter, replacing "G" with the correct drive letter of the external hard drive. This command runs a disk check on the drive, forcing a check ( /f ), reading the drive sector by sector ( /r ), and exiting without restarting the system ( /x ).
Exit the command prompt, safely eject your external hard drive, wait a few seconds, then try reconnecting it and see if it opens normally.
If you're not comfortable using the command line, you can use a one-click alternative tool called Qiling CleanGenius to fix file system errors on your hard drive. This tool allows you to quickly and easily resolve the issue without having to navigate the command line.
Step 1. Download Qiling CleanGenius on your computer for free.
Step 2. Run the software. Click "Optimization" on the left panel, and then choose "File Showing".
Step 3.To resolve a file system error on a drive, go to the "Choose drive" option, select the drive with the error, check the "Check and fix file system error" option, and then click "Execute".
Step 4. After the Qiling CleanGenius completes the repairing process, you can click on the "here" link to view the result.
Method 4. Format external hard drive, change the file system to NTFS
Applies to: resolve unsupported, unrecognized file system causing device inaccessible
NTFS and FAT32 are the default file systems for external hard drives and USB devices, but if the operating system doesn't support a specific file system, the device may not open.
To resolve the issue, you can format the device to NTFS or FAT32 using disk management or a free format tool like Partition Master Free. This can be done in just 3 steps, making it easy to change the external hard drive file system and get it working again.
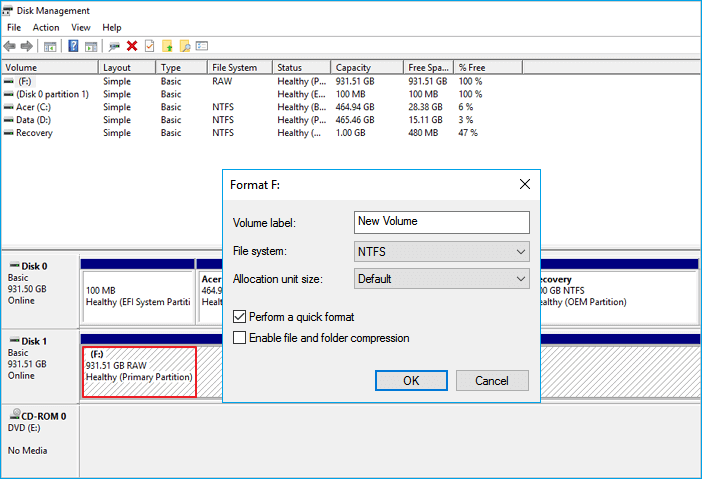
Step 1. Right-click the hard drive partition and choose the "Format" option.
Step 2. Set the Partition label, File system, and Cluster size for the partition in the new window.
Step 3. Click the "Proceed" button to start formatting the hard drive partition.
Step 4. You can see a warning window, click "Yes" to continue.
To reuse an external hard drive after it has been disconnected, simply unplug it, wait for the formatting process to complete, and then replug it to save files again.
The Bottom Line
To avoid the issue of an external hard drive being detectable but not opening, it's recommended to update the disk driver in a timely manner, fix file system errors, and use a file system that's adaptable to storage devices. This can be achieved by using the "safely remove" method to unplug the external hard drive, ensuring a safe and seamless experience.
Don't panic if you encounter the issue of an external hard drive that is detected but not opening. Instead, use the data recovery software to restore and export valuable files first. Then, you can try the four methods below to make your device usable again.
Related Articles
- Fix Hard Drive Not Detected/Recognized in BIOS Without Losing Data
- Recover Data from WD My Passport Hard Drive
- Fix Micro SD Card Not Detected in PC, Android Mobile Phone or 3DS
- How to Recover Deleted Recordings on Sky Q and Sky Plus Box
- Lexar Image Rescue 5 Is Not Available – Download Alternatives
Lexar Image Rescue 5 is no longer available. If you want to recover files, you need to find and download Lexar image rescue alternatives. - Memory Card Recovery Free Download - Recover Lost Data
If you want to perform memory card recover to recover lost or deleted photos, videos, documents, pictures and more, try the 6 steps to recover memory card.