DIY Solutions | Fix/Repair Corrupted USB Drive Without Formatting
Overview of Corrupted USB Drive Repair
A USB flash drive, also known as a pen drive or hard drive, is a portable storage device that allows users to carry their data anywhere and use it with various devices. However, due to frequent use, this convenience can sometimes lead to issues, such as the USB drive becoming corrupt.
90% of USB users can resolve common issues themselves, which typically fall into one of the following categories:
- If a USB flash drive won't show up in File Explorer on Windows 10/8.1/8/7, try these steps: First, ensure the drive is properly connected and recognized by the computer. Check the Device Manager to see if the drive is listed under "Disk drives" or "Other devices.
- Windows detects the USB flash drive but it won't open, saying the drive is not accessible, likely due to a corrupted file system or a driver issue. A possible solution is to run the built-in Check Disk utility (chkdsk) on the drive to scan for errors and fix any issues.
- Windows asks you to format the removable disk before you can use it when double-clicking on the drive, prompting you to initialize the disk first.
- Other unfamiliar errors like RAW, no media, etc.
If Windows detects your USB drive but you're unable to access its files, or if it doesn't detect your USB drive at all, there are different solutions for each issue type. The first scenario involves checking the drive's file system, running a disk check, and ensuring the drive is properly ejected and reconnected. The second scenario involves checking the USB drive's physical connection, updating the USB drive's drivers, and using the built-in 'Disk Management' tool to initialize the drive.
Case 1. The USB Device Can Be Recognized
If your USB can still be detected by your computer, you can try to fix the issue using the native Windows tool, CMD, or a third-party fixing tool, which will allow you to access your USB.
Method 1. Repair USB Errors with a Manual Repair Service
Get reliable and powerful USB repair services to fix corrupted SanDisk, Kingston, Sony, Seagate, or Western Digital USB flash drives with ease.
Consult with Qiling data recovery experts for a one-on-one manual recovery service, which includes a free diagnosis followed by a range of services offered thereafter.
- To fix errors and restore data from various storage devices, including HDD, SSD, external hard drives, and USB flash drives, as well as from all RAID levels, you can use specialized software and tools. These tools can help recover data from corrupted or damaged storage devices, and also provide options to repair or rebuild RAID configurations.
- If a partition cannot be restored by data recovery software, it's likely due to physical damage to the storage device. In this case, you may need to use specialized software or hardware tools to recover the data.
- Fix disks that cannot be read or accessed because of bad sectors
- Fix disks that become GPT protected partitions
- Wipe data, unformat hard drive, Install/uninstall software or driver, etc.
Method 2. Windows Utility - Check and Fix the Error on the Damaged USB
If your flash drive is not physically broken, your computer should recognize it and assign it a drive letter, but if it doesn't, follow these methods to check and fix logical errors on your USB without losing any data.
Step 1. Connect the USB to your PC
Step 2. Go to My Computer/This PC and then the USB Drive.
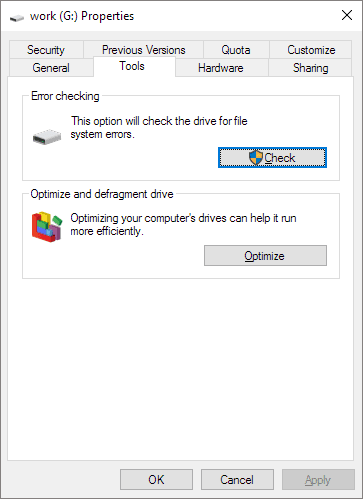
Step 3. Right-click the USB drive and select Properties.
Step 4. Click on the Tools tab.
Step 5. Click the Check button.
Step 6: Let the scan process complete, then close the scan window.
Step 7: To safely remove the USB flash drive, right-click its icon on the desktop, select "Eject", and then physically remove the drive from the USB port.
Method 3. CHKDSK CMD - Fix Corrupted File System Error on USB
To troubleshoot a problem, you can follow a systematic approach by identifying the issue, researching possible causes, and testing solutions. This process involves gathering information about the problem, analyzing the symptoms, and considering potential solutions.
- Warning
- Running chkdsk may fix file system errors, but it can also result in total data loss. To avoid this, perform data recovery in advance and then proceed with the CMD method.
Step 1: Insert your USB flash drive or pen drive into your computer's USB port.
Step 2: To open Command Prompt, go to the Start menu and type "cmd" in the search box, which will display Command Prompt in the search results.
Step 3: To fix a damaged USB drive, right-click Command Prompt, select "Run as administrator", type "chkdsk /X /f G:", replacing G with the USB's drive letter, and press Enter. This will initiate a chkdsk operation to repair the damaged drive.
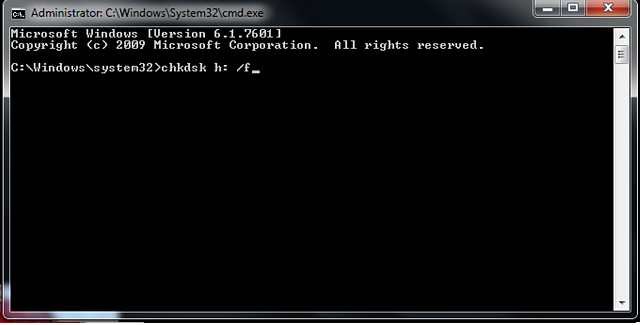
This command checks and fixes the file system on a flash drive, making it accessible again if it was previously corrupted. If successful, it displays "Windows has made corrections to the file system" in the command window.
Method 4. Third-party Fixing Tool - Repair Corrupted File System Error on USB
Qiling CleanGenius is a user-friendly computer fixing tool that is both safe and lightweight, making it the perfect alternative to the CHKDSK command. With just one click, this tool allows you to easily fix damaged file systems, providing a hassle-free solution for common PC problems.
Step 1. DOWNLOAD Qiling CleanGenius on your computer and complete the installation.
Step 2. Run the software. Click "Optimization", and then choose "File Showing".
Step 3. Select the drive with a corrupted file system. Tick the "Check and fix file system error" option and click "Execute".
Step 4. Wait the tool performs the repairing task. After that, click the "here" button to check the drive.
Bonus Tip: Recover Data from Inaccessible or Unreadable USB Drive
After fixing the logical error on the pen drive, you can scan the device to see if any data was lost. Qiling file recovery software can search for and recover any lost files on the device.
- Recommendation
- Data recovery tools can recover deleted, formatted, and inaccessible data in various data loss situations, including accidental deletion, hardware failure, and software corruption. These tools can retrieve data from different storage devices, such as hard drives, solid-state drives, USB drives, and memory cards, and can handle different file systems, including FAT, NTFS, and HFS.
- Recover lost data with ease, including photos, audio, music, and emails, from any storage device with a safe and complete recovery process.
- You can recover data from various devices and media, including the recycle bin, hard drive, memory card, flash drive, digital camera, and camcorder. This allows you to retrieve lost or deleted files and photos, giving you a second chance to access important information.
The program is designed to recover data from USB drives in various loss scenarios, and you can start with the free version to retrieve your data. If you need additional features, you can consider upgrading to the pro version.
Step 1. Select file types
To start the Deep Data Recovery process in Windows 11/10/8/7, launch the program, select the desired file types, and click "Next" to initiate the recovery process.

Step 2. Choose the USB drive to scan
Launch Deep Data Recovery and select the USB drive where you lost important files. Click "Scan" to initiate the recovery process.

Step 3. Check and preview USB drive data
After the scanning process is complete, you can efficiently find a particular type of file by utilizing the Filter feature and the Search option, both of which are designed to streamline your search process.

Step 4. Restore flash drive data
After finding lost USB drive files, click "Recover" to restore them and save them to a safe location on your PC, not on the USB drive.
You May Also Like:
Case 2. Windows Cannot Recognize the Corrupted USB Drive
If your USB drive is physically damaged and can't be detected or recognized, try reinstalling the USB drivers to see if that fixes the issue. Alternatively, you can attempt to repair the damaged USB drive yourself.
Method 1. Reinstall USB drive
Many strange USB issues are often caused by a corrupted driver, which can be resolved by reinstalling a new driver. To do this, follow the necessary steps to install a fresh driver, which should resolve the issue.
Step 1: Press the Windows key + X on your keyboard and select Device Manager from the menu. This will open the Device Manager window, where you can view and manage your computer's hardware devices.
Step 2: To remove a disk drive, expand Disk drives, right-click the name of your removable disk, and select Uninstall.
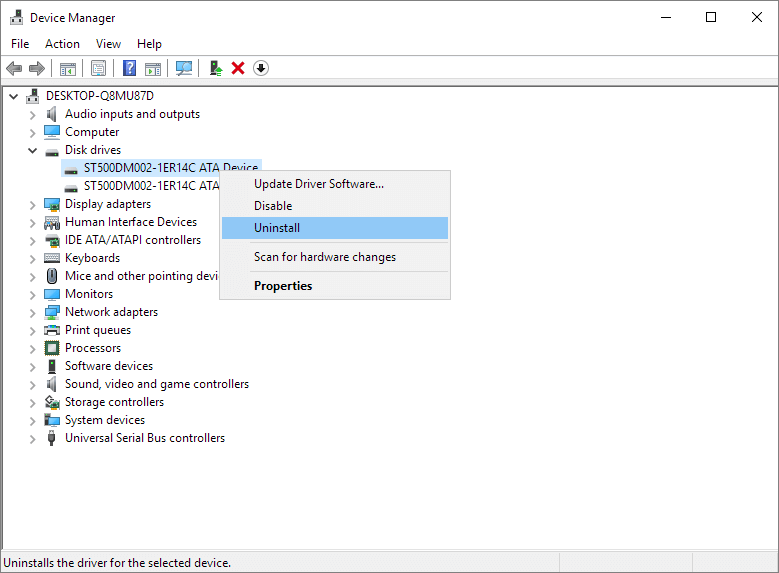
Step 3: Select OK and disconnect the USB drive from your computer.
Step 4: To get your USB drive working on Windows, simply restart your computer, then plug in your USB drive. Windows will automatically detect and install the necessary drivers, allowing you to use your USB drive as needed.
Method 2. Manually Repair the USB Drive
Here are a few things you should know before attempting to fix a broken USB drive by yourself:
- Repairing a flash drive is unlikely to be successful unless you have professional experience in repairing physically damaged flash drives.
- If the flash drive's internal storage is damaged, it's likely that the only way to fix it is to take it to a professional repair service. They will have the necessary tools and expertise to diagnose and repair the damage.
- Data recovery prices range from $20 to $850, depending on the extent of damage to the drive and the type of recovery needed.
If you decide to give this a try, follow these instructions:
Preparations:
- Soldering iron with solder and flux
- An old USB cable
- Wire cutters/strippers
- A small flathead screwdriver
- A magnifying glass or jeweler's loop
Once you have these required items, follow the following steps to start repairing your broken USB drive.
Step 1: Remove the casing of the flash drive using your flathead screwdriver.
Step 2: If the PCB (the green circuit board) itself is damaged or the solder pads are lifted, it's best to seek the help of a professional.
If the USB connector has broken away without damaging the circuit board or solder pads, the repair can continue.
Step 3: Place the flash drive on a hard surface with the connector end facing toward you and the solder pads facing up.
Step 4: Cut one end off of the USB cable using wire cutters, making sure to cut the USB end if the flash drive cable is an adapter.
Step 5: To fix a USB cable, you need to expose a small section of its internal wires. This can be done by stripping away a section of the cable's outer insulation, typically about 0.25 inch (0.6 cm), to reveal the four wires inside. This process allows you to access the individual wires and make any necessary repairs or connections.
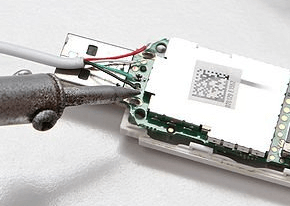
Step 6: Take your time to securely solder each of the four wires to the four solder pads on the flash drive, as a loose connection can make the drive inoperable.
Step 7: Plug the other end of the USB cable into a computer, fitting it into one of the rectangular slots on your computer's housing.
Step 8: If your USB drive is not recognizable by the computer, try to open it by right-clicking on the drive in File Explorer and selecting "Open in File Explorer" or "Open as an administrator". If this doesn't work, try using a USB drive recovery software to scan the drive for recoverable files. If the files are still missing, you may need to contact a professional data recovery service for assistance.
Related Articles
- Repair Not Working SanDisk Memory Card without Losing Data
- [5 Ways] How to Remove Write Protection from USB in Windows
- [Solved] USB Drive Detected But not Accessible
- How to Fix Seagate External Hard Drive Not Working in Windows/Mac
- How to Recover Files After Factory Reset/System Restore Windows 10
If you reinstall Windows 10, you risk losing some or all of your files, but there are ways to recover them. A factory reset or system restore can wipe out your data, but you can still retrieve your files using a guide that outlines the steps to take. - How to Recover Files after Reset Windows 10
If you've performed a factory reset on your Windows 10 device and lost important files, don't worry - you can recover them. This article provides guidance on how to recover files after a Windows 10 reset, helping you prevent data loss and get back to your normal workflow.