Top 6 Ways to Fix Windows 10 WHEA Uncorrectable Error
How to Fix WHEA Uncorrectable Error in Windows 10/11
The Windows 10 WHEA uncorrectable error is a stop code displayed during the blue screen crash, typically caused by a failing hard drive, defective memory, improperly seated CPU, or other hardware issues, and can be resolved by following the fast channel to WHEA uncorrectable error fixes.
| Workable Solutions | Step-by-step Troubleshooting |
|---|---|
| Fix 1. Use Windows Repair Services | Locate the side panel latch or thumb screws for some models. Pull latch releasing...Full steps |
| Fix 2. Reset the Memory | Locate the side panel latch or thumb screws for some models. Pull latch releasing...Full steps |
| Fix 3. Fix MBR & System File | Boot from the original installation DVD (or the recovery USB)...Full steps |
| Fix 4. Fix BCD Error | Enter Command Prompt as mentioned in Fix 2, and type the following commands...Full steps |
| Fix 5. Troubleshoot Driver Issue | Reboot your PC, press F8, or shift + F8 to Enter Safe Mode. Click Troubleshoot...Full steps |
| Fix 6. Repair with Installation Disc | Insert CD/DVD into DVD-ROM or connected external DVD drive...Full steps |
Precautions: Recover Data When WHEA Uncorrectable Error Occurs
If you encounter a WHEA_UNCORRECTABLE_ERROR on Windows 10, it's likely due to a hardware issue. Reinstalling Windows 10 may be necessary, which could result in data loss. To prevent this, consider using data recovery software like Qiling to recover your data before reinstalling Windows. This software allows you to boot into your system with a WinPE bootable disk, helping you access and recover your data despite the error.
Deep Data Recovery
- Recover deleted files, formatted/inaccessible data in different data loss situations.
- Recover photos, audio, music, and emails from any storage effectively, safely, and completely, using a reliable and user-friendly tool.
- Recover permanently deleted files from computers in Windows 10
Rescue your essential files with the step-by-step guide now:
Step 1. Create a bootable disk
Before creating a bootable disk, back up any important data on the USB to another device, as the process will erase the existing data. To create a bootable disk, use Deep Data Recovery WinPE Edition.
Connect a USB drive to your PC, then launch Deep Data Recovery WinPE Edition. Select the USB drive and click "Create" to create a bootable disk from it.
Step 2. Boot from the bootable USB
Connect a bootable disk to a PC that won't boot, then change the computer's boot sequence in the BIOS settings, typically by pressing F2 at startup to access and adjust the settings. This often resolves the issue when the PC is restarted.
To boot the PC from a device other than the hard drive, press "F10" to save and exit and set the boot order to "Removable Devices" or "CD-ROM Drive".
Step 3. Select file types
When booting from a USB, you can run Deep Data Recovery from the WinPE bootable disk. Select the desired file types and proceed by clicking "Next" to initiate the recovery process.

Step 4. Recover data from a hard drive that won't boot
Select the drive you want to scan to find all your lost files.

Click "Scan" to start the scanning process.
After scanning, you can preview all recoverable files, select the targeted files, and click the "Recover" button to restore your files. It's recommended to save all recovered data to another place to avoid data overwriting. This will ensure that you can recover your important files successfully.

What Is WHEA Uncorrectable Error in Windows 11/10/8.1/8/7
A WHEA uncorrectable error typically occurs when a PC shuts down suddenly to prevent data loss, affecting not only Windows 10 but also Windows 8 machines. This error is usually accompanied by a shutdown to protect the system, and the symptom is often displayed on the screen.
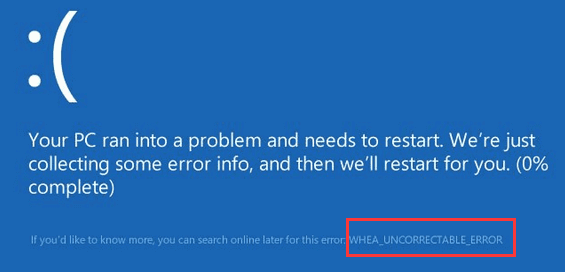
When a WHEA_UNCORRECTABLE_ERROR occurs, your PC will display the message "Your PC ran into a problem and needs to restart", indicating potential issues such as an overclocked CPU, driver conflicts, hardware problems, or corrupted system files. In severe cases, the problem may be so critical that you're unable to access your PC. In such situations, your priority should be to either recover data from the unbootable PC or resolve the issue itself, and this article aims to provide assistance with both options.
What Are the Causes of the WHEA Uncorrectable Error
The WHEA uncorrectable error, a type of BSOD error, is typically caused by one of the following reasons:
- BCD error
- MBR or system file error
- Driver issue of hardware
- Faulty hard drive, or Processor
- Low CPU voltage or overheating hard drive/CPU
Now that you know the reasons behind WHEA uncorrectable errors in Windows 11/10/8.1/8/7, you can try these effective solutions to fix the issue and recover your data. These solutions can help you troubleshoot and resolve the problem, ensuring your system runs smoothly again.
Fix 1. Solve WHEA Uncorrectable Error with Windows Repair Services
To solve a WHEA uncorrectable error, the most efficient method is to use manual Windows repair services. Qiling's professional technical team can assist in resolving various system startup issues, including system failure, blue screens, and black screens.
Consult with Qiling data recovery experts for one-on-one manual recovery service, which includes a FREE diagnosis. After the diagnosis, we could offer the following services:
- Fix Windows boot issues, including BSOD
- Fix Windows error and configure Windows environment
- Restore the system when it fails to boot
- Optimize Windows computer to make it run quickly
If want to try to fix the issue by yourself, take the following methods.
Fix 2. Reset and Install Memory/RAM (Manual Fix)
Reseating the memory involves removing the memory module from its DIMM slot and correctly placing it back into position. This is typically the first step in diagnosing and potentially resolving issues such as a green screen, blue screen, or abnormally long boot times. By following the steps to reseat and install memory, you can troubleshoot a range of common problems.
Step 1. To access the side panel of a computer case, you need to locate the side panel latch or thumb screws, depending on the model of your case. The side panel latch is usually a small metal or plastic clip that holds the panel in place, while thumb screws are small screws that can be easily removed with a screwdriver.
Step 2. To remove the side panel, you need to pull the latch, release it, remove the panel, and set it aside.
Step 3. Locate Memory. Gently release the clips that hold the RAM in place (one on each side) do this for all available memory modules.
Step 4. Carefully remove each memory module from the computer and replace them into the DIMM slots located on the motherboard. Make sure to align the notches on the memory module with the tabs on the DIMM slot and gently push the module into the slot until it clicks into place.
Step 5. Press firmly on each side of the memory module until the retaining clips click back into place.
Also Read: How to Fix Windows 10 Green Screen of Death?
Once the memory is securely placed back into the DIMM slots, you can power on the PC to test if reseating the RAM resolved the problem. If the PC boots with no issues, you've successfully fixed the problem.
You can learn these things in this video before you try Fix 2, Fix 3, or Fix 4:
- Fix MBR and system file
- Fix BCD error
- Fix driver issue
Fix 3. Fix MBR and System File Error
If Fix 1 fails, you can repair the Master Boot Record (MBR) or system file to fix the WHEA_uncorrectable_error. To do this, you'll need to boot your computer with a Windows installation DVD, which you can create using the Windows Media Creation Tool if you don't have one. Once booted, you can use the Command Prompt to fix the MBR.
Step 1. Boot from the original installation DVD (or the recovery USB)
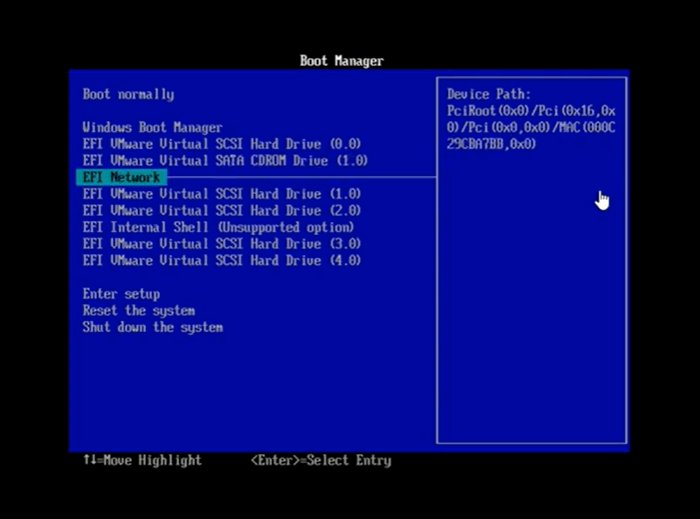
Step 2. At the Welcome screen, click "Repair your computer" on the lower-left corner.
Step 3. Choose Troubleshoot > Advanced Options > Command Prompt

Step 4. When the Command Prompt loads, type the following commands and press Enter after each:
- Bootrec.exe/fixmbr
- Bootrec.exe/fixboot
- Bootrec.exe/rebuildbcd
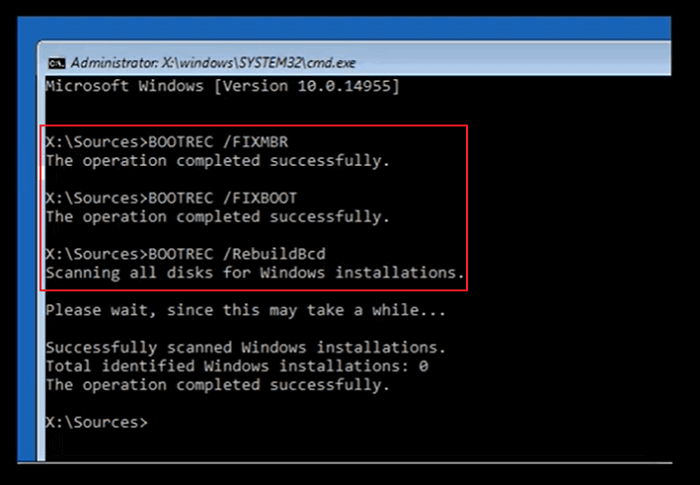
Step 5. When it completes, exit the Command Prompt window, eject the DVD, and restart the computer.
Fix 4. Fix BCD Error
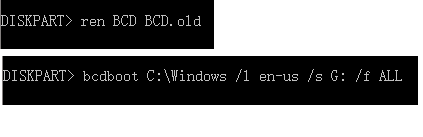
To fix the WHEA uncorrectable error, you can enter Command Prompt as mentioned in Fix 2, and follow the steps below, which also help to fix the BCD error.
Step 1. Type each command line and hit Enter each time:
- ren BCD BCD.old
- bcdboot C:\Windows /1 en-us /s G: /f ALL
Note: c:\ is the drive where Windows 11/10/8.1/8 is installed on.
Step 2. Type exit in Command Prompt when the process completes and then restart your PC.
Fix 5. Troubleshoot Driver Issue
Corrupt, damaged, or outdated device drivers can cause various blue screen errors, including WHEA_UNCORRECTABLE_ERROR. Checking and updating your drivers may resolve the issue.
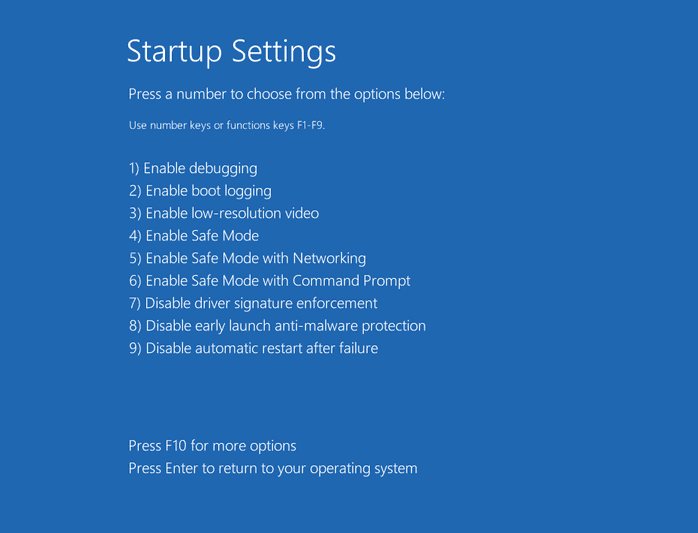
Step 1. To enter Safe Mode, you should reboot your PC and press the F8 key, or Shift + F8, to access a menu where you can select Safe Mode. If neither of these keys work, you'll need to check your PC's manual or contact the manufacturer for the correct key to press.
Step 2. Click "Troubleshoot > Advanced Options > Startup Settings > Restart".
Step 3. To open Device Manager in Safe Mode, press the Windows key + R, type devmgmt.msc, and press Enter.
Step 4. If you notice any yellow or red signs on your device, update the corresponding driver. After updating, restart your device and check if the WHEA uncorrectable error still persists. If it does, proceed with further troubleshooting steps.
Fix 6. Repair the Error with Installation Disc
If your computer still fails to boot after receiving the error, you can try creating a Windows 11/10/8/7 repair disc to repair the system error. To do this, you'll need a healthy and bootable PC. This will allow you to troubleshoot and fix the issue.
Step 1. Insert CD/DVD into DVD-ROM or connected external DVD drive.
Step 2. Click "Control Panel" on the computer screen, then click "Backup and Restore (Windows 7)".
Step 3. To create a system repair disc, click on "Create a system repair disc" from the left column, which will open the repair disc creation window. From there, follow the on-screen instructions to complete the process.

Step 4. Connect the disc to the PC, restart, and boot from the DVD. You may need to enable booting from a CD/DVD in your BIOS settings. If you encounter a WHEA_uncorrectable_error, try restarting with the disc connected.
Step 5. On the "Install Windows" screen, select the desired language, time, and keyboard settings, and click "Next".
Step 6. On the next screen, click "Repair Your Computer". Do not click "Install now". Then, click "Next", and select "Startup Repair" or whichever option you wish to apply.
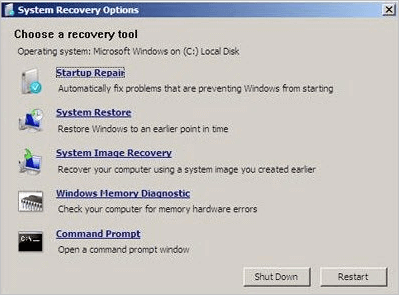
After completing the steps, boot your computer normally and verify if the WHEA error has been resolved. If the issue persists, restore your system using the repair disc, following the on-screen instructions. If the error still exists, select "System Restore" and follow the on-screen steps.
System Restore: Restore the Windows system to an earlier point in time if Windows 11/10/8/7 starts but something has changed since a recent installation or update. This option allows you to pick a restore point based on the date and time, starting with the most recent, and may lose recent program changes but not your data.
Conclusion
Encountering a WHEA uncorrectable error or other blue/green screen error can be frustrating. Fortunately, the fixes mentioned above can resolve the issue, but it's essential to carefully recover any lost files due to the BSOD and address the WHEA UNCORRECTABLE ERROR. If you continue to experience problems, please contact us as soon as possible.
Related Articles
- How to Recover Deleted Files from CD, CD-RW, DVD & DVD-RW
- Email Password Recovery: How to Recover Gmail Account and Password
- Top 10 Best SSD Recovery Software Windows and Mac 2022
- Btrfs Recovery Software: Recover Deleted/Lost Files from Btrfs Drives Synology/QNAP
- How to Recover Deleted Files from External Hard Drive Free
You will learn 6 effective methods and how to recover deleted files from external hard drive step by step. Besides, this article also include the possible reasons, disk problem signs and protection tips. - How to Recover Deleted Files from Voice Recorders & Voice Recorder Apps?
How to recover deleted files from voice recorders? Get corresponding ways to recover deleted voice recordings from Olympus/Song voice recorders or apps on this page.