[SOLVED] Hard Drive/External Hard Drive Only Shows Half Capacity
Full solutions to restore a hard drive or external hard drive's full capacity:
| Workable Solutions | Step-by-step Troubleshooting |
|---|---|
| Fix 1. Scan and remove virus | If you have anti-virus software installed, run...Full steps |
| Fix 2. Convert MBR to GPT | Download and launch Qiling Partition Master...Full steps |
| Fix 3. Create New Volumes | Disk Management, right-click unallocated space...Full steps |
| Fix 4. Show Hidden Partition | In Disk Management, right-click the New Volume...Full steps |
| For More Fixes | Add unallocated space to partition and recover...Full steps |
You can fix issues like a storage device showing as 0 bytes available, a storage device not showing up in File Explorer, or a storage device being recognized but not accessible. To do this, you can try running the built-in Windows troubleshooter, checking the device for malware, running a disk cleanup, and checking the disk for errors.
- 1tb hdd only showing 500GB
- 500GB hard drive shows only 130gb of space
- 1TB hard drive only shows 127GB
- external hard drive only showing 32GB
- hard drive only shows 4GB
- 4TB hdd shows only 2TB
If you're facing an issue where your device is not utilizing all the available space on your hard drive, SSD, or external hard drive, you can resolve this problem by following a specific solution and steps to maximize your storage capacity.
Causes of Hard Drive Shows Half or Partial Capacity
A hard drive, whether it's a traditional HDD or a newer SSD, is crucial for reading and writing data. The bigger the hard drive, the less likely you are to encounter low disk space warnings, allowing you to install programs, games, and save large files, documents, movies, and music without worrying about running out of space.
The issue of a hard drive not showing its correct size, often referred to as a "capacity discrepancy," is a common problem that can be frustrating for users. This issue can occur due to various reasons, such as incorrect formatting, partitioning errors, or issues with the hard drive's firmware. In some cases, the hard drive may be showing only half its capacity because it's being used as a secondary drive, and the primary drive is taking up the remaining space. To resolve this issue, users can try reformatting the hard drive, checking for any disk errors, or using a disk management tool to re-partition the drive.
The hard drive showing wrong size issue can occur due to various reasons, including incorrect partition table information, corrupted file system, or outdated disk management software. This can lead to discrepancies between the actual and reported hard drive sizes, causing frustration for users.
- Virus or malware infection
- The hard drive, SSD, or external hard drive is using Master Boot Record (MBR) style.
- Files invisible
- Partition deleted or lost, showing unallocated
Recover Data First Before Fixing HDD Shows Half Capacity Issue
This tool scans and restores all existing available data on the hard drive, SSD, or external hard drive that shows half or only partial space in a Windows PC, allowing users to recover their lost data.
If you've saved valuable data on a hard drive, SSD, or external hard drive with only half or partial space visible, take action to scan and restore all data to a secure device first. If you need to recover files, download and install Deep Data Recovery.
It's a hard disk data recovery software that specializes in recovering data after deletion, formatting, or virus infection from any type of storage device, regardless of its capacity, showing only partial, full, or complete data.
Step-by-Step Guide:
Step 1. Select file types and click "Next" to start
Launch Deep Data Recovery, select file types, and click "Next" to initiate the recovery process.

Step 2. Select and scan the lost partition
Select "Lost Partition" and click "Scan" to search for all the lost data. If there are many lost partitions, you can identify them through their partition size.
Note: Since the Windows system doesn't support the Linux file system, the Ext2 or Ext3 partition will be recognized as lost partition with no drive letter in the software. If you want to recover data from Ext2/Ext3 partition, you can follow these steps.

Step 3. Filter the scanned results
You can filter scanned files by category, such as Pictures, Videos, Documents, Audio, and Others, or search for a specific file by name in the top right corner.

Step 4. Preview and recover data from the lost partition
Before recovering the files, you can preview them to ensure they are the correct data. Select all the files you need and then click "Recover" to restore them.
6 Fixes to Reclaim Full Size of Hard Drive That Shows Only Half or Partial Capacity
Now that you know the reasons behind the issue, you can feel a sense of relief as we're about to share the corresponding solutions with you.
Method 1. Remove Virus That Makes Hard Disk Showing Wrong Size
A virus infection can cause a hard drive or solid-state drive to not show its full capacity, making it appear smaller than it actually is. To fix this issue, you can try using a virus removal tool or a disk cleanup software to remove any malicious programs that may be taking up space on the drive.
If your hard drive is infected with a virus or malware, it can consume storage space, making it appear as though your drive has only half or partial capacity. To resolve this issue, running antivirus software can help keep your drive clean and safe, freeing up storage space and restoring your hard drive to its full capacity.
Step 1. To check virus or malware infection
If you have anti-Install anti-virus software on your PC, then run it for the first time. If you don't have one, download and install Avast or AVG.
Step 2. To keep your problematic HDD, SSD, or external hard drive connected to your PC correctly, ensure that the drive is securely fastened to the PC case using screws, and the power cable is properly connected to a working power source. Also, make sure the data cable (SATA or USB) is securely connected to the PC's motherboard or a working USB port.
Step 3. Run antivirus software to scan your device and clear up the existing virus, malware.
For those without the necessary software, an alternative solution is to refer to a linked page that provides instructions on how to use the Command Prompt (cmd) to remove a virus in Windows 10, 8.1, 8, or 7.
Method 2. Convert MBR to GPT to Restore Full Capcity of Large HDD/SSD
To fix a large hard drive, SSD, or external hard drive that only shows half or partial capacity due to MBR limitation, you can use a tool to convert the MBR to GPT, which allows larger drive sizes. This process involves backing up your data, booting from a live USB or CD, and using a command-line tool like `gdisk` or `fdisk` to convert the drive's partition table.
The disk may not show its full capacity due to the limitations of the Master Boot Record (MBR) partition style. MBR is only compatible with disks up to 2TB in size and allows for a maximum of 4 partitions, which can restrict the total storage capacity.
If you have a large-capacity hard drive that's over 2TB and initialized to MBR, you'll only be able to use 2TB of it. To make the most of the unused space, you need to convert it to GPT.
Qiling Partition Master is a tool that allows users to convert their hard drive between MBR (Master Boot Record) and GPT (GUID Partition Table) formats without losing any data. This process is easy and reliable.
Step 1. Download and launch Qiling Partition Master on your Windows computer.
Step 2. To convert an MBR disk to GPT, click on the disk you want to convert, click "More" and select "Convert to GPT".
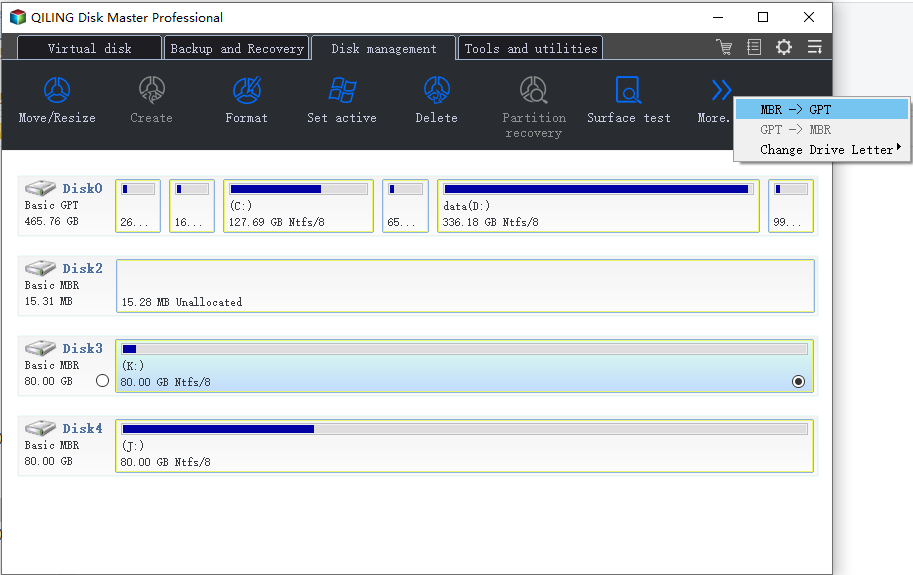
Once the MBR to GPT conversion process completes, your HDD, SSD, or external hard drive will regain its full size.
Method 3. Create New Volume to Make Use of Unallocted Space on Disk
Applies to: Make use of unallocated space If your computer's hard drive or solid-state drive (SSD) is showing only half or partial space, it's likely due to a formatting issue or a problem with the drive's partitioning. This can be caused by a software glitch, a power outage during a write operation, or a faulty drive.
The hard drive showing half capacity is likely due to unallocated space on the other half, which can be utilized by creating new simple volumes on the disk. This allows for the full use of the unused space, effectively making the entire hard drive capacity available.
Step 1. To open the Disk Management tool in Windows, press the Windows key + R to open the Run dialog box, type "diskmgmt.msc" and press Enter. This will open the Disk Management tool, where you can view and manage your disk drives.
Step 2. On the disk map, check if the hard drive partition displays as Unallocated.
If yes, you can create a new simple volume on the unallocated space with the continuing steps.
Step 3. Right-click on the unallocated space and select "New Simple Volume".

Step 4. Set a new drive letter, file system and size for the new volume.
Step 5. Follow the onscreen instruction guidelines to finish the process.
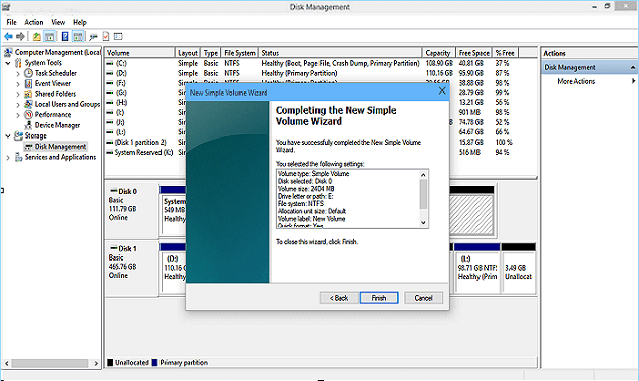
If you need to create more partitions with the unallocated space, repeat the process until you've used all the unallocated space on the target disk. This will allow you to utilize the full capacity of the disk again.
Method 4. Show Hidden Partition That Makes Disk Showsing Wrong Size
If your hard drive or solid state drive (SSD) is showing the wrong capacity on Windows 10, 8, or 7, it could be due to a hidden partition. To fix this issue, you can try running the built-in Disk Cleanup tool, checking for and removing any unnecessary system files, and checking the disk for errors.
When part of your disk space is hidden or partitioned, Windows File Explorer may not display the full disk capacity.
The way to fix this issue is to unhide or show hidden partition on computer with the following steps:
Step 1. Keep your target disk is connected to PC correctly and open Disk Management.
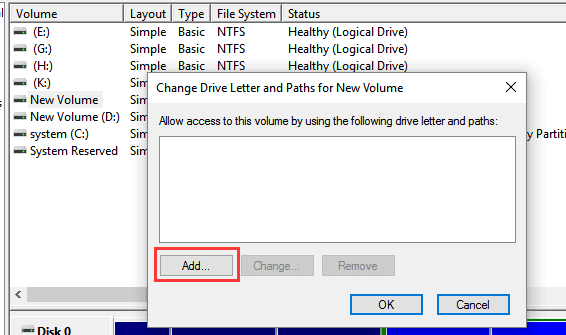
Step 2. Right-click the partition named as New Volume, which has no drive letter, and select "Change Drive Letter and Paths for New Volume".
Step 3. Click "Add" to assign a new drive letter for the partition to make visible in Windows File Explorer.
- For example, you can assign the drive letter F for the hidden partition and click "OK".
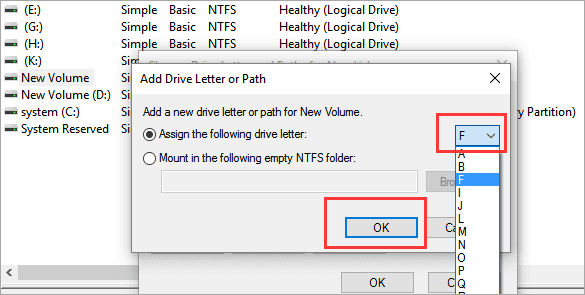
After restarting your PC, when you reopen File Explorer, you'll be able to view and access the previously hidden partitions on your disk.
Method 5. Add Unallocated Space to A Neighbor or Non-adjacent Partition
This feature allows you to make full use of unallocated space on a hard drive or external hard drive by adding it to a neighboring or non-adjacent partition, effectively utilizing the unused space.
When there is unused space on your disk or external hard drive, you may not see its full capacity on your computer, instead only half or partial space is visible.
In this case, you can either try to create new simple volumes as recommended in Method 3 or try the tips below to add unallocated space to other existing partitions that are adjacent or non-adjacent.
#1. Add Unallocated Space to A Neighbor Partition
If the unallocated space is located behind an existing partition, you can use Disk Management to add the unallocated space to the neighbor partition, effectively extending its size.
Step 1. To free up space on your computer, open the Disk Management tool, which is usually found in the Control Panel or by typing "diskmgmt.msc" in the Run dialog box.
Step 2. Right-click on the neighbor partition that you want to extend, and choose "Extend Volume" to continue.
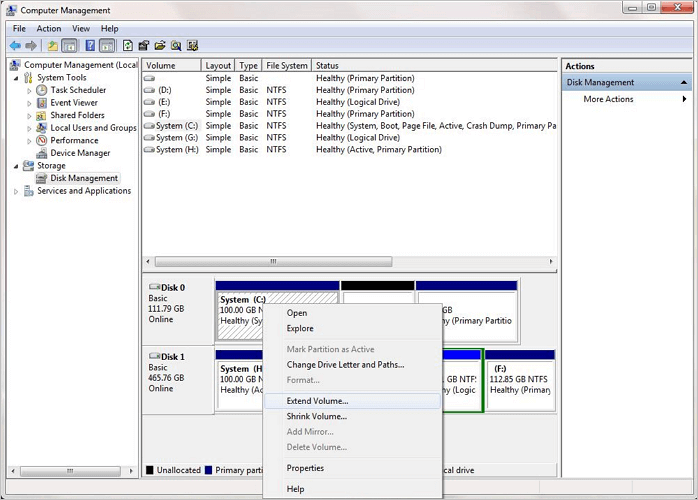
Step 3.The target partition is resized to fit the new size, and the process continues with the next step.
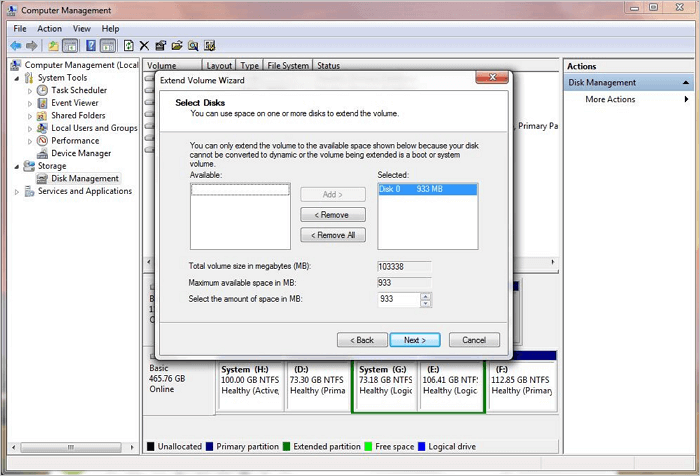
Step 4. Click "Finish" to complete the process.
#2. Add Unallocated Space to Non-adjacent Partition
If you want to add unallocated space to a non-adjacent partition, you can use Qiling Partition Master's Resize/Move feature to help with the process.
You can easily expand a partition by moving the unallocated space next to it, making the process simple and efficient.
Step 1. Locate the Target Partition.
To extend a partition, first locate the target partition and select "Resize/Move".

Step 2. Extend the Target Partition.
To add unallocated space to your current partition, drag the partition panel to the right or left, depending on the desired direction, and then click "Proceed" to confirm the operation.

Extra Option: Get Space from Another Drive
If there is not enough unallocated space on your disk, right-click on a big partition with enough free space, select "Resize/Move".
To extend the target partition, select the partition you want to extend at the "Allocate space to" column.
Step 3. Execute Operations to Extend Partition.
Drag the target partition dots into the unallocated space and click "Proceed" to keep all the changes.
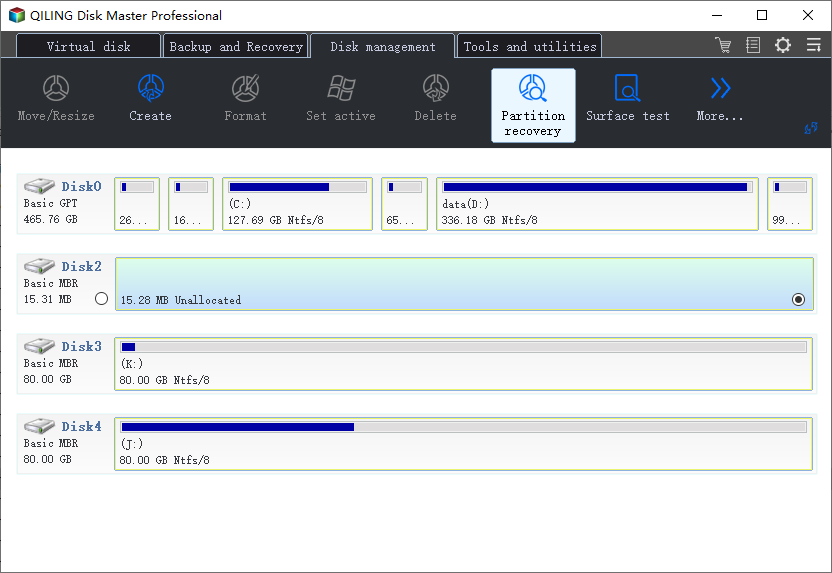
Method 6. Perform Partition Recovery and Restore Full Disk Capacity
To fix a hard drive or SSD that only shows partial space as a partition gets deleted or lost, you can try using a data recovery software to scan the drive and recover any lost partitions. Additionally, you can use a disk management tool to check for any issues with the drive's partition table and attempt to rebuild or reassign the drive letters.
When some partitions on your disk get deleted or lost, it can lead to a situation where you only see a partial storage space on your Windows PC, rather than the full capacity of the disk.
To recover full capacity and data on your disk without losing any information, you can either use Deep Data Recovery to restore data and create new partitions on the unallocated space, or run a reliable partition recovery software to bring back all lost, deleted, even hidden partitions with data.
Qiling Partition Recovery can recover lost, deleted, or hidden partitions and their data, making it seem like the partition was never lost.
Step 1: Run Qiling Partition Recovery on your PC.
Select the disk or device where you lost partition(s), click "Scan" to continue.
Step 2: Wait for the scanning process to complete.
Let the program scan selected disk and find the lost partition(s) to recover the lost data.
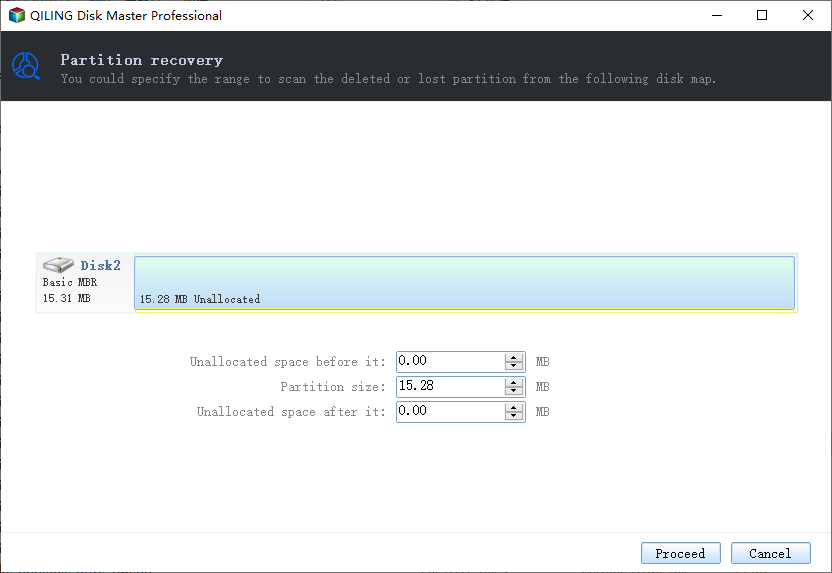
Step 3: Preview and restore lost partition(s).
Preview the content of the lost partition, click "OK" and then click "Proceed" to start restoring the lost partition.
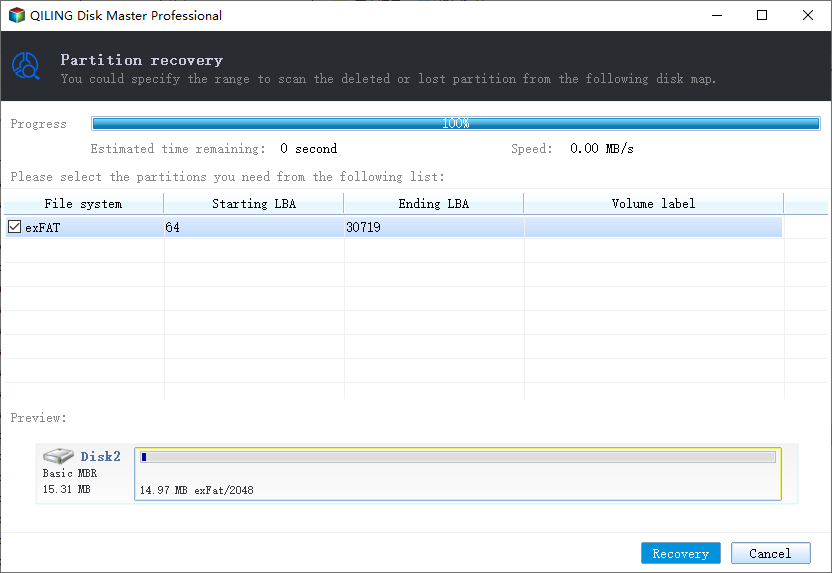
Step 4: Click "Recover" to finish the partition recovery process.
If the program warns you that there is a conflict, back up the listed partition with essential data to an external hard drive first, then execute the final operation to restore your lost partition.
Conclusion
When a hard drive, SSD, or external hard drive shows only half or partial capacity on your computer, it's often due to a compatibility issue or a formatting problem. This can occur when the drive is not recognized by the operating system or when the drive's file system is not compatible with the host system. In some cases, the drive may have been formatted with a different file system, such as exFAT, which is not recognized by the host system, resulting in a partial capacity display. To resolve this issue, you can try reformatting the drive with a compatible file system, such as NTFS, or using a different USB port or interface.
You can use data recovery software to scan and restore data from the missing space first. Then, try the proper fix based on the cause, such as removing viruses, converting the disk from MBR to GPT, recovering deleted partitions, showing hidden partitions, creating a new volume on unallocated space, or adding unallocated space to an existing partition.
To maximize your disk space, it's essential to regularly back up your valuable data and run virus cleaner software to keep your device clean and safe. This ensures that your important files are secure and your device is free from malware.
Related Articles
- 3+ Solutions: Cannot Format Raw Drive Error in 2022
- Seagate 4TB External Hard Drive PS4/Xbox One [Full Guide in 2022]
- Fix and Restore External Hard Drive Shows Only 32GB to Full Capacity
- Fix External Hard Drive Not Initialized, I/O Device Error
- Top 9 Data Recovery Services Near Me in Los Angeles, CA
this guide will guide you to find the top 9 best data recovery services near you in Los Angeles, CA. We will offer detailed information about each store. Keep reading to find out! - The Top 10 Data Recovery Services Near Me in New York City
Data recovery services are widely available in New York City. These nearby businesses can help you recover practically any digital data that was unintentionally lost, erased, or corrupted. We offer a list of recovery services and their phone numbers for your convenience.