FIX: HDD/SSD Unknown Device in Device Manager Windows 10/8/7
Here, you'll find four ways to fix an unknown device and powerful hard drive recovery software to recover inaccessible data.
| Workable Solutions | Step-by-step Troubleshooting |
|---|---|
| Fix 1. Disable selective suspend setting | Open Control Panel, click "Power Options"...Full steps |
| Fix 2. Uninstall or update driver | In Device Manager, find and uninstall "Unknown device"...Full steps |
| Fix 3. Reinstall USB controllers | In Device Manager, expand and uninstall "Universal Serial Bus Controllers"...Full steps |
| Fix 4. Update chipset drivers | Find the name of your computer motherboard, visit the manufacturer's site...Full steps |
| Recover data from unknown drive | To recover data from HDD or SSD, Run Qiling recovery software > Scan and recover data...Full steps |
Why Hard Drive Shows as Unknown Device
An "unknown device" is a device name listed in the Windows Device Manager for any device Windows can't identify or doesn't have the drivers to identify.
When a storage device is recognized by Windows as "Unknown Device" in Device Manager, it shows up as "Disk Unknown Not Initialized" in Disk Management, making it unreadable and inaccessible, along with any data it may contain.
"Unknown device" is a common issue that many users experience, and several reasons may contribute to this problem.
- Insufficient power supply because USB selective suspend setting is enabled.
- The driver issues are related to the internal/external storage drive, USB controllers, or the computer motherboard that is currently loaded.
The "Unknown Device" error is a common issue that many people face. It can occur with internal hard drives, HDDs, SSDs, or external USB flash drives. To resolve this issue, follow the troubleshooting steps, which should help you overcome the problem.
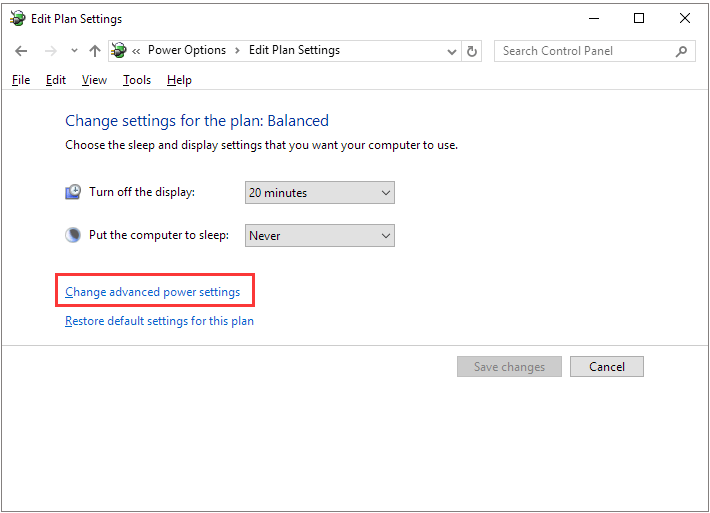
Fix 1. Disable USB Selective SuspendSetting to Fix Unknown Device
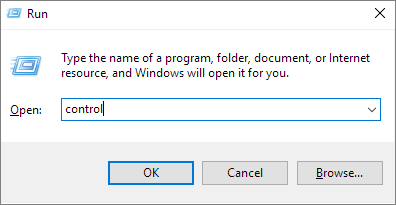
Step 1.To open the Windows Control Panel in Windows 10/8.1/8/7, press the Windows key + R to open the Run dialog box, type "control" and press Enter. This will open the Control Panel.
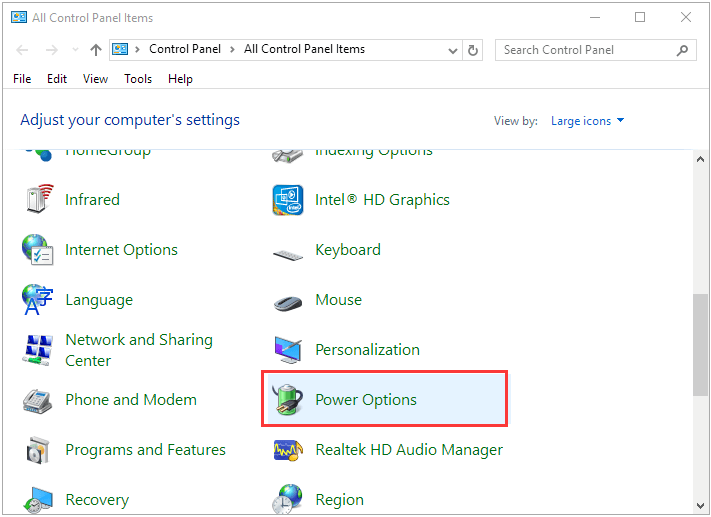
Step 2. Find "Power Options" and click it.
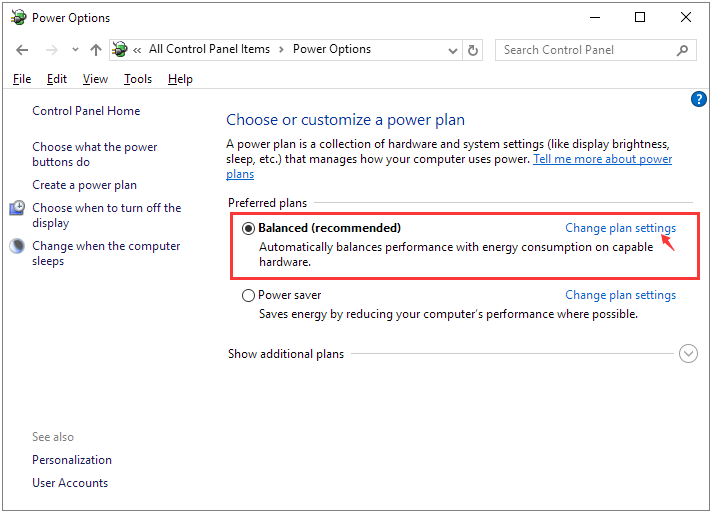
Step 3. In your own power plan, click "Change plan settings".
Step 4. Click "Change advanced power settings".
Step 5. To disable the USB selective suspend setting, go to USB settings and click on USB selective suspend setting, then click on the setting and change the default "Enabled" to "Disabled".
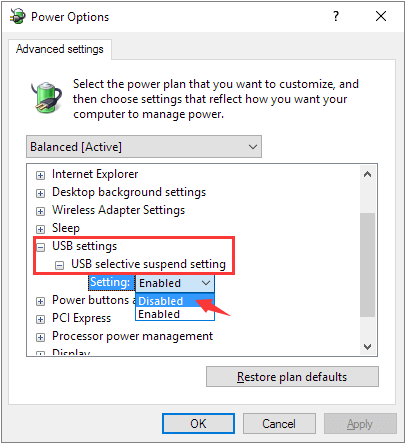
Step 6. Click "Apply" to save changes.
Fix 2. Uninstall and Update the Hard Drive Driver
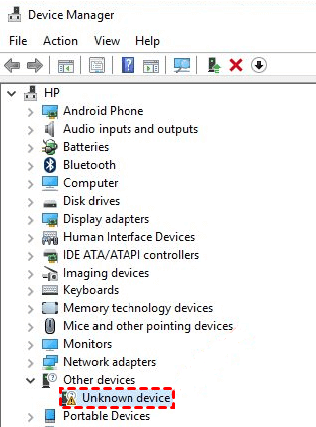
Step 1: In the Device Manager, navigate to the hard drive showing "Unknown device", which is usually listed under "Other devices".
Step 2. Right-click on it and choose "Uninstall".
Step 3. After the hard drive is uninstalled, unplug the external drive.
Step 4. After a while, reconnect it to the computer.
Step 5. Windows will automatically install and load the driver, then go check if the USB drive shows up in Windows Explorer.
Fix 3. Reinstall USB controllers
Step 1. In Device Manager, expand "Universal Serial Bus Controllers".
Step 2. Right-click on the unknown USB Device and select "Uninstall". Wait until it completes.
Step 3. To resolve the issue, restart your computer, and once it's back on, the USB controllers should automatically install. After that, check if the USB drive appears in Windows Explorer.
Fix 4. Update the Motherboard Chipset Drivers
Step 1. In your computer's documentation, find the name of the motherboard manufacturer, as this information is crucial for finding a matched driver. This will help ensure that the driver you install is compatible with your system, preventing potential issues or conflicts. By knowing the manufacturer, you can search for the correct driver and avoid any potential problems that might arise from using an incompatible driver.
Step 2. To find the correct driver for your motherboard, visit the manufacturer's support website or reach out to a support specialist for assistance.
How to Recover Data from Unknown Device HDD/SSD/USB Hard Drive
To restore data from the unknown device, you have two options. You can either fix the device so that Windows can read it again, following the steps mentioned earlier, or send the disk drive to a nearby data recovery company to have professionals perform a manual hard drive data recovery.
Deep Data Recovery can help recover data from a hard drive, offering a dependable, powerful, and easy-to-use solution for data recovery. Its popularity stems from features such as its ability to recover data from various types of storage devices, including hard drives, solid-state drives, and USB drives, as well as its user-friendly interface that makes it accessible to both technical and non-technical users. Additionally, it supports recovery of various file types, including documents, photos, videos, and more, making it a versatile tool for data recovery needs. Overall, Deep Data Recovery is a reliable and efficient solution for recovering data from a hard drive, making it a worthwhile option to consider.
- If you've emptied the Recycle Bin, don't worry - there are still ways to recover deleted files. You can use data recovery software like Deep Data Recovery, Recuva, or Disk Drill to scan your device for deleted files.
- The software can recover over 1000 types of files, including photos, videos, documents, emails, and more.
- Repair corrupted files during data recovery on Windows 11/10/8/7
When you lose access to a local hard drive or an external USB drive, you can run software to scan and display all the hard drive data for you. The steps are straightforward: run the software, which will then scan and display all the data on the hard drive, allowing you to access and recover your lost data.
Step 1. Select file types and click "Next" to start
Launch Deep Data Recovery, select the desired file types, and click "Next" to initiate the recovery process.

Step 2. Scan the SSD
To recover lost data from the SSD, select the drive where the data was lost, then click the "Scan" button. This will initiate the scanning process, allowing you to recover your lost files.

Step 3. View the results
When the scanning finishes, find lost SSD data by using the "Filter" and "Search" options to check the "Deleted Files" and "Other Lost Files" folders.

Step 4. Recover SSD files
To recover lost SSD files, select the desired data and click the "Recover" button. This will initiate the recovery process and allow you to retrieve your lost files.
Related Articles
- 2 Fixes to Resolve Memory SD Card Says Full But No Files On It Error
- How to Recover (Permanently) Deleted Files from Google Drive [5 Proven Ways]
- Memory Card Unlocker: How to Unlock SD Card Without Losing Data
- [SOLVED] USB Keeps Disconnecting and Reconnecting Windows 11/10
- 2 Proven Ways to Recover Civilization VI Game Save
If you've lost Civilization VI game data, there are two ways to recover it. You can try recovering lost game data with Civilization VI's autosave feature, or use Qiling game data recovery software to restore your game saves. To get back your lost game data, simply follow the steps outlined in the text to see if either of these methods work for you. - How to Recover Data from 2TB External Hard Drive in Windows 11/10/8/7
about large amounts of data recovery. Here, we come up with a DIY recovery solution - Qiling data recovery software. It helps you recover data from a 2TB external hard drive or internal hard drive with simple steps. You can get this hard drive recovery software by clicking the download button.