How to Fix Hitachi Hard Drive Not Working/Recognized
Hitachi Touro Desk Pro Does Not Work in Windows 10
The Hitachi Touro Desk Pro drive is not being recognized or accessed, but the standard Hitachi Touro Desk drive is working fine. This suggests a potential issue with the Pro drive's compatibility or firmware, which may need to be addressed by the manufacturer or a technical expert.
Hitachi does not have drivers that I can download so the compatibility mode suggested in another thread will not work. Can someone look into this or offer a suggestion that actually works?"
If your Hitachi hard drive is connected but not working on your computer, you can easily fix the issue with these tested and effective solutions. Whether you're experiencing a problem with your drive being recognized or just not functioning properly, there are steps you can take to get it up and running again. By following these solutions, you can resolve your Hitachi hard drive not working/recognized problem and get back to using your device with ease.
- 1. Check Hitachi in Disk Management
- 2. Initialize/Create a New Partition
- 3. Uninstall and Re-install the Driver
- 4. Format Hitachi Hard Drive
- 5. Change Hitachi Drive Letter
First Aid - Recover Data When Hitachi Hard Drive Not Working
Before starting, it's recommended to restore data from the Hitachi hard drive first, as the operations may cause data loss. To ensure safe recovery, use reliable hard drive data recovery software like Deep Data Recovery to bring back all your lost files immediately.
Qiling Hard Drive Data Recovery Software
- Recover lost or deleted files, documents, photos, audio, music, emails and more easily with various data recovery tools and techniques. These tools can help restore accidentally deleted files, recover files from formatted or corrupted storage devices, and even retrieve data from damaged or broken devices.
- You can recover files from a formatted hard drive, emptied recycle bin, memory card, flash drive, digital camera, and camcorder using specialized software. These tools can scan the device and retrieve deleted or formatted files, including photos, videos, documents, and other data.
- Data recovery services can help recover lost data in various situations, including sudden deletion, formatting, hard drive corruption, virus attacks, and system crashes. These services can assist in retrieving important files and information that were lost due to unexpected events, minimizing the impact on daily operations and productivity.
Step 1. Launch Deep Data Recovery, select the desired file types, and click "Next" to initiate the recovery process.

Step 2. Select the drive where you lost your data, and click "Scan".

Step 3. Use "Filter" or "Search" to find the lost files when the scan completes.

Step 4. Select the files you want to recover and click "Recover". Then, browse to a secure location to save them.
How to Fix Fix Hitachi Hard Drive Not Working/Recognized
After restoring data from your hard drive, you can try the following solutions to fix a Hitachi external or internal hard drive that's not working or detected.
Method 1. Check Hitachi in Disk Management
If your Hitachi external hard drive isn't showing up in File Explorer, check the disk in Disk Management first. If it appears in Disk Management but not in This PC, you can easily resolve the issue with a few simple steps.
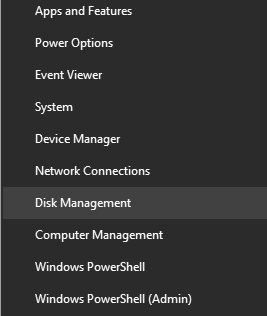
Step 1. Right-click the start (win logo), and select "Disk Management".
Step 2. To find your Hitachi hard disk, browse the drive list on your computer. This will allow you to locate and identify the Hitachi hard disk among other storage devices connected to your system.
If the Hitachi is shown as unallocated/not initialized/offline in Disk Management, the error can be easily fixed by following Method 2. However, if the disk is not visible in Disk Management, additional steps are required to resolve the issue.
Method 2. Initialize/Create a New External Drive
If your Hitachi hard drive is showing as unallocated, not initialized, or offline, you can easily resolve the issue by initializing it and creating a new volume. Follow these steps:
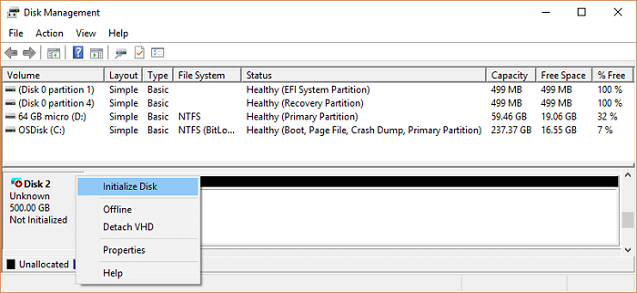
Step 1. In Disk Management, right-click the Hitachi hard disk and select "Initialize Disk" to proceed.
Step 2. Select the disk you want to use for the installation and choose MBR or GPT as its partition style. Then, click "OK" to start the process.
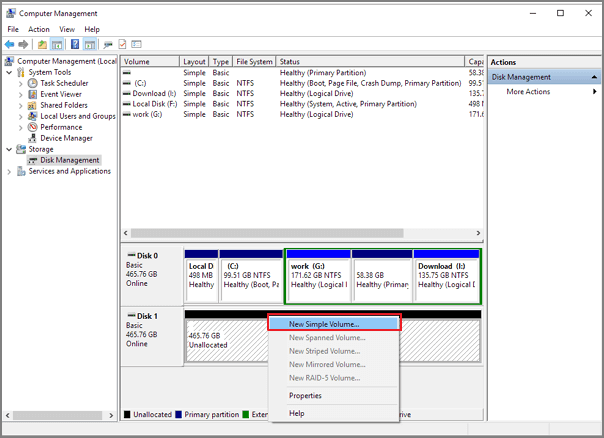
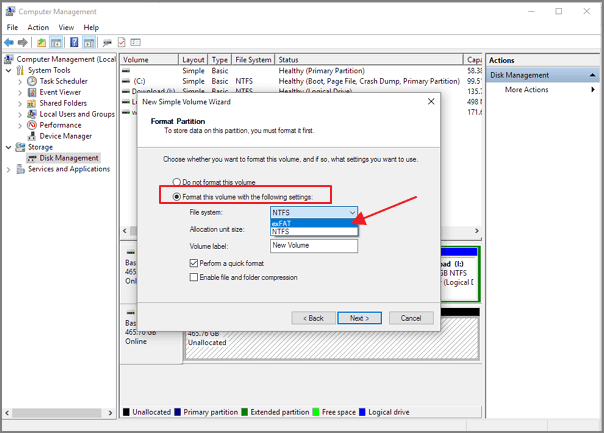
Step 3. Right-click on the unallocated space on your new drive and select "New Simple Volume...".
Step 4. Set the volume size, drive letter, and file system to the new hard drive, then click "Finish" once the process is complete.
Method 3. Uninstall and Re-install Hitachi Hard Drive Driver
If your hard drive is not detected on either the device manager or the disk management, you just need to uninstall and update the Hitachi drive driver and try again. Here are the detailed steps.
Step 1. Connect the not working Hitachi external hard disk to PC.
Step 2. To access the Device Manager, type "device manager" in the search box and click on "Device Manager" on the menu.
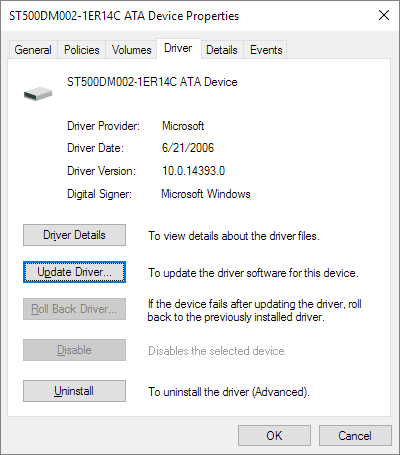
Step 3. Expand disk drivers and right-click on your device, select "Properties".
Step 4. Under the "Driver" tab, you can first try with "Update Driver" and click "OK" to see if it resolves the issue. If not, you can then try to "Browse my computer for driver software" and select the driver from the downloaded folder to install it.
Step 5. If updating the driver fails, try uninstalling and then reinstalling the driver to see if that resolves the issue.
Method 4. Format RAW Hitachi External Hard Drive to NTFS
If your Hitachi hard drive isn't being recognized by Windows 10/8/7, it's likely due to an incompatible file system. To resolve this, you'll need to format the drive to a compatible file system, such as FAT32, exFAT, or NTFS, which are explained in more detail here: differences between FAT32, exFAT, and NTFS.
Step 1. Connect the Hitachi hard drive to your PC and go to the "Disk Management" section.
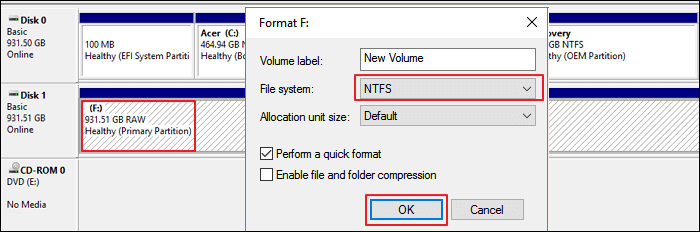
Step 2. Right-click on the not working drive and select "Format".
Step 3. To format the drive, set the volume label, select NTFS as the file system, and check the box for "Quick Format" before clicking "OK" to initiate the formatting process.
Method 5. Change Hitachi Drive Letter to Fix the Error
If your Hitachi hard drive isn't showing up in This PC, it's likely because it doesn't have a drive letter. To fix this, you'll need to assign a drive letter through Disk Management, which should make it appear in This PC.
Step 1. Connect the Hitachi hard drive to your computer, then open the "Disk Management" tool to proceed with the process.
Step 2. Right-click the Hitachi hard disk and choose "Change Drive Letter and Paths...".
Step 3. Set a new drive letter to the disk by clicking on "Change" and selecting a new drive letter from the dropdown menu, then click "OK" to confirm.

Conclusion
Most of the Hitachi external hard disk not detected problems can be fixed with the suggested solutions, but if the issue is caused by a physical error such as a broken USB port or damaged disk, they won't work. In such cases, you may need to consider replacing the drive. However, for other issues, running Qiling Partition Master, a professional disk management tool, can help you manage your disk and resolve the problem.
Related Articles
- Best Online Data Recovery Tool for File Recovery [in 2022]
- Recover Files and Data Deleted by CCleaner [Updated 2022]
- SD Card Not Showing Up or Working in Windows 10/8/7
- How to Recover Lost Data after Disk MBR to GPT Conversion
- 6 Ways to Recover Deleted Snapchat Memories in 2023
Keep calm even if you lose Snapchat memories. This post provides six practical ways to restore deleted Snapchat memories. Follow the steps below and download Snapchat data recovery software to restore the wanted data as soon as possible. - How to Recover Deleted VHD and VHDX Files in Windows 10/11
This how-to article offers users a feasible solution to recover deleted, damaged, or corrupted .vhd and .vhdx files created on a virtual hard disk as system image files. Follow the steps below to recover deleted or corrupted VHD/VHDX files.