How to Disable BitLocker Encryption ( & BitLocker Service) in Windows 10 | Qiling Data Recovery Tips
BitLocker in Windows 10
BitLocker is a powerful tool that adds an extra layer of security to your device, securing data with a confidential password. It's essential for companies and workplaces connected to public networks, but may not be necessary for personal use. If you've enabled BitLocker on your Windows 10 device, you may wonder if you can disable it.
BitLocker is a device encryption feature available on Windows 10 Pro, Enterprise, and Education editions, but not on Windows 10 Home.
To encrypt only files or folders on your computer, you should use a file encryption program, as BitLocker is designed to protect data by providing encryption for entire volumes.
How to Disable BitLocker Encryption on A Single Partition (6 Ways)
Windows 10 allows you to turn off BitLocker on a drive in various places, and the following paths are all effective to reach:
- 1. Control Panel
- 2. Settings
- 3. Command Prompt
- 4. PowerShell
- 5. Group Policy Editor
- 6. Windows Services
Way 1. Turn off BitLocker via Windows 10 Control Panel
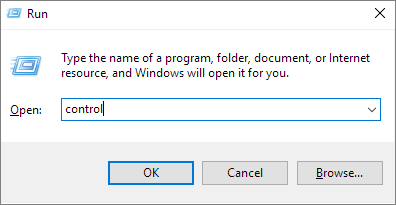
Step 1. To quickly open the Control Panel in Windows 10, press the Windows key and the R key simultaneously, then type "control" or "control panel" in the Run dialog box and click "OK".
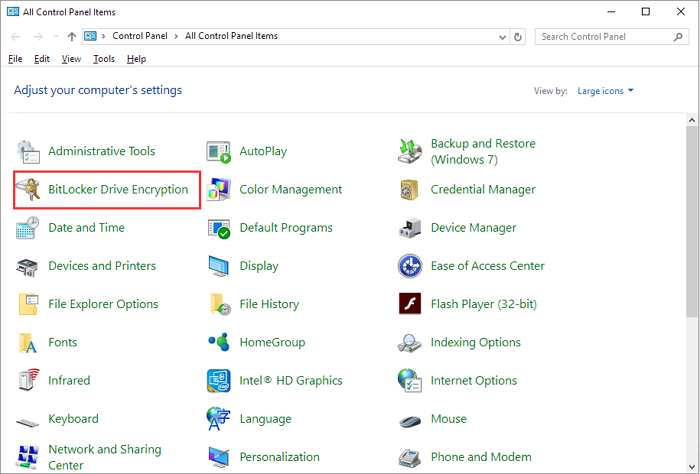
Step 2. Click BitLocker Drive Encryption to open a new window.
Step 3. To turn off BitLocker, navigate to the drive partitions, find the target partition with a BitLocker icon (X: BitLocker on), and click the "Turn off BitLocker" option by expanding the down-arrow area.

Way 2. Turn off BitLocker via Windows 10 Settings
Step 1. To open the Windows 10 Settings window, press the Windows + I keys simultaneously. This will open the Settings window, where you can access various system settings and make changes as needed.
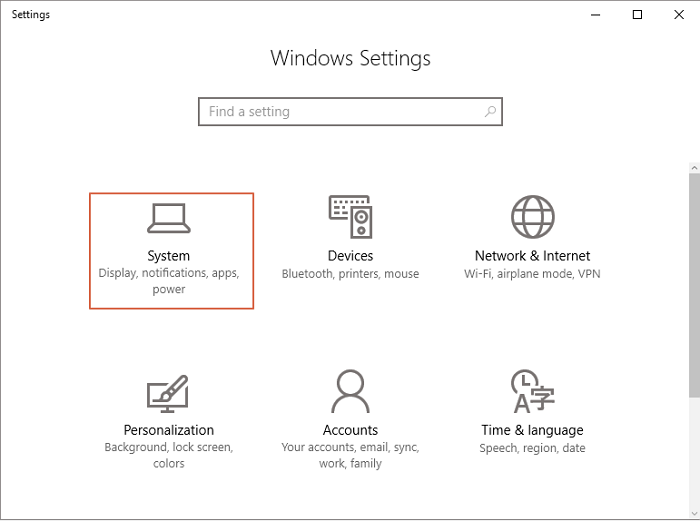
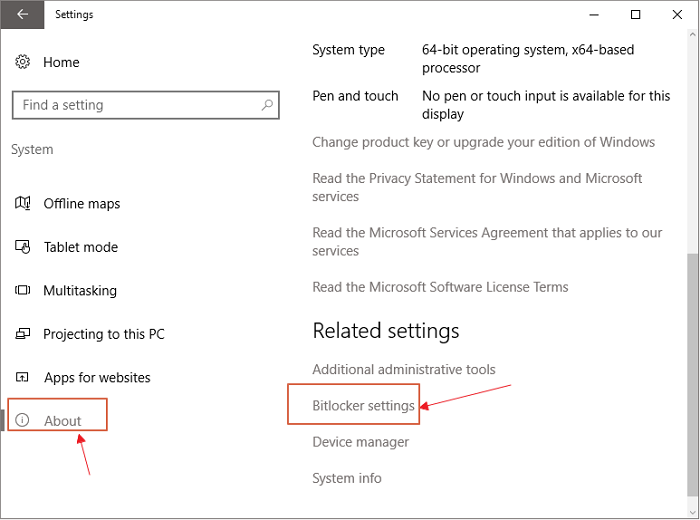
Step 2. Click the System option.
Step 3. To access BitLocker settings, select the "About" option at the bottom left corner of the screen, and then click on "BitLocker settings" on the right side of the window.
Step 4. To unlock a BitLocker encrypted drive, follow the same procedure as in Way 1, which involves opening the BitLocker Drive Encryption window and selecting the encrypted drive to unlock it.
Way 3. Turn off BitLocker via Windows 10 Command Prompt
The manual solution provided in the Windows 10 Control Panel and Settings can help suspend BitLocker protection on a hard drive, doing the same as the Command Prompt guide provided for those who prefer tackling issues in the Windows Command Prompt.
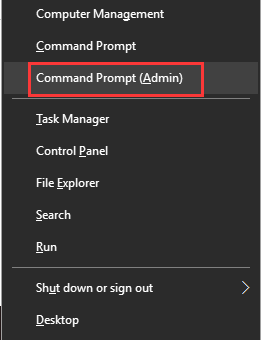
Step 1. To open the Command Prompt with administrator privileges, you can press the Windows key + X to open the Quick Links menu, then click on Command Prompt (Admin) from the menu. This will open a new Command Prompt window with elevated privileges, allowing you to run commands that require administrative access.
Step 2. Enter the command line and hit Enter, replacing X with your correct drive letter: `manage-bde -status X:`
manage-bde -off X:
Way 4. Turn off BitLocker via Windows 10 PowerShell
If you're looking to remove BitLocker protection from your drive, you have a few options. For those who are comfortable with command line interfaces, you can use the command method to achieve this. However, for those who are not familiar with commands, the other two methods may be more suitable.
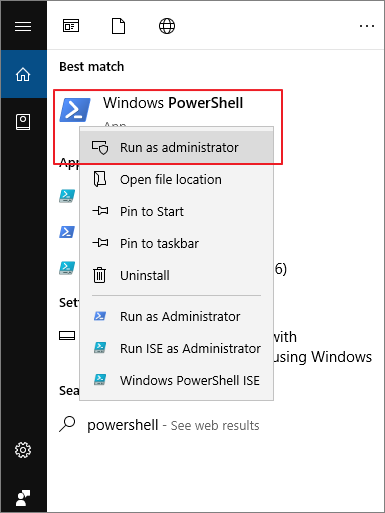
Step 1. To run PowerShell as administrator in Windows, simply type "powershell" in the Windows Search bar (Windows + S), right-click on the result, and select "Run as administrator" from the context menu.
Step 2. Enter the below command line and hit Enter. X: represents a drive letter under BitLocker encryption. So, replace it with your own. Do not omit the quotation mark.
Disable-BitLocker -MountPoint "X:"
Step 3. To turn off BitLocker for multiple drives on your computer, you need to run a different command line for each drive, which involves typing "manage-bde -off" followed by the drive letter (e.g.
$BLV = Get-BitLockerVolume
Disable-BitLocker -MountPoint $BLV
Way 5. Turn off BitLocker via Windows 10 Local Group Policy Editor
Windows Local Group Policy Editor is a complicated method to manage BitLocker drives, but it's still a valid option among the five solutions available.
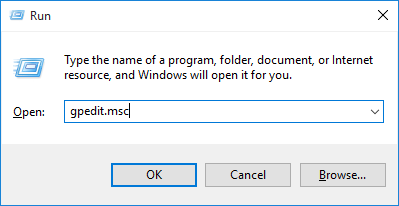
Step 1. To access the Group Policy Editor in Windows, you can either type "group policy" in the Windows Search bar or open it directly in the Run box by pressing Windows + R and typing "gpedit.msc" followed by Enter. This will open the Group Policy Editor, allowing you to manage and configure various settings and policies on your system.
Step 2. To disable BitLocker, open the Local Group Policy Editor and navigate through the path: Computer Configuration -> Administrative Templates -> Windows Components -> BitLocker Drive Encryption -> BitLocker Configuration -> Operating System Drives, then click on the "Enabled" option and select "Disabled" from the dropdown menu to disable BitLocker.
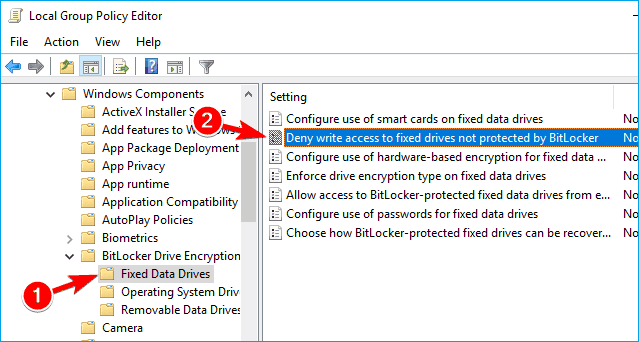
- Computer Configuration -> Administrative Templates -> Windows Components – > BitLocker Drive Encryption -> Fixed Data Drives
- Stay here and then select the Deny write access to fixed drives not protected by BitLocker option and double click on it
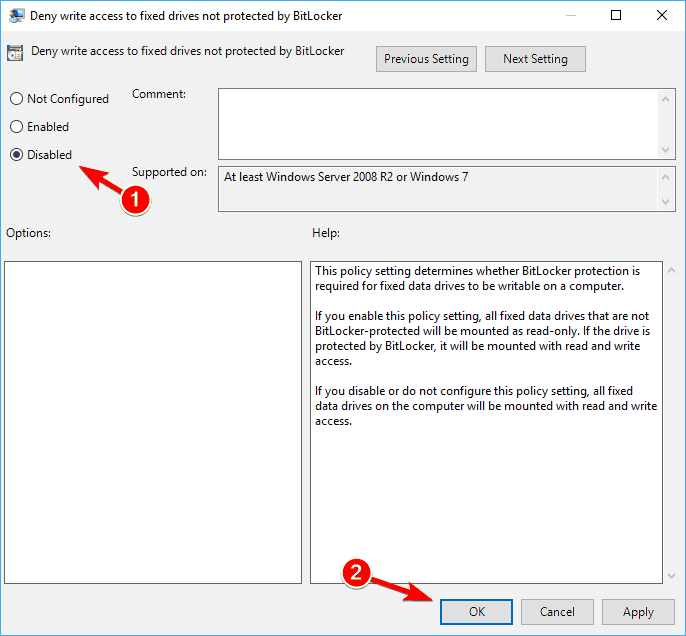
- To remove BitLocker protection from the drive, click either the "Not Configured" or "Disabled" option, then apply and confirm the changes.
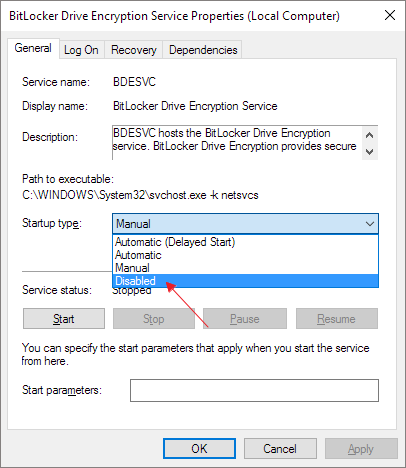
Way 6. Turn off BitLocker via Windows Services
To disable the BitLocker service permanently, open the Services window, scroll down to the BitLocker service, right-click on it, and select "Properties". In the Properties window, set the Startup type to "Disabled" and click "OK" to save the changes. This will prevent the BitLocker service from running automatically when Windows starts.
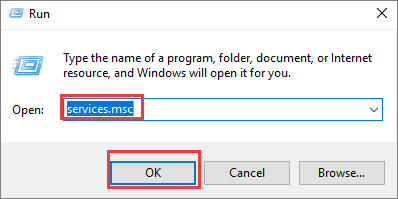
Step 1. To open the Services window, press the Windows key + R to open the Run dialog box, type "services.msc" in the text field, and then press the Enter key. This will open the Services window where you can view and manage the running services on your computer.
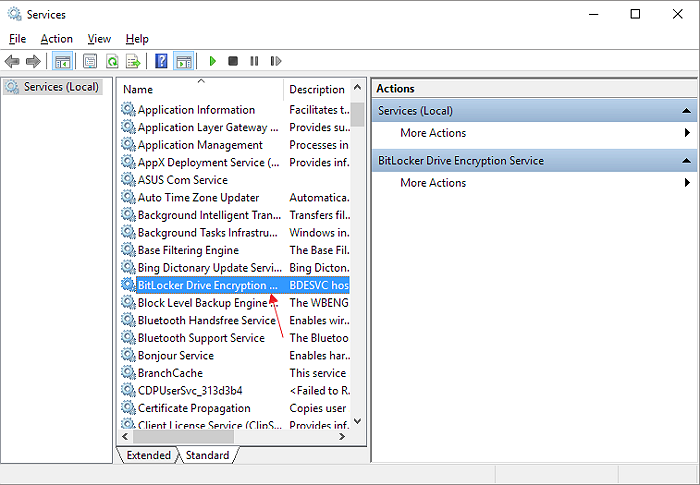
Step 2. To access the BitLocker Drive Encryption Service, go to the "Name" tab and double-click on the "BitLocker Drive Encryption Service" option.
Step 3. Select Disabled from the Startup type list, click Apply, and then click OK to save changes.
Bonus Tip#1: How to Recover Data from BitLocker Encrypted Hard Drive
BitLocker may provide an additional layer of data protection, but it can't safeguard against external damage that could corrupt or remove encrypted data. Even if a hard drive is secured with a password, it's still vulnerable to viruses, bad sectors, and other common issues like a RAW file system or being unrecognized by a computer, ultimately putting the data at risk.
If a BitLocker encrypted hard drive experiences issues, Deep Data Recovery software can be used to recover encrypted data, supporting recovery from BitLocker protected hard drives, external HDDs, and USB flash drives.
Step 1. Select file types and click "Next" to start
Launch Deep Data Recovery software, select desired file types, and click "Next" to initiate the recovery process.

Step 2. Choose the encrypted drive to scan
You will see the BitLocker encrypted drive displayed there.

When you click on the encrypted partition, a pop-up window will remind you to enter a password to unlock it. Input the key and click the "Scan" button to look for lost files.
Note: If you forget the key, you can try using the "Try Automatically Decrypt" option, which might help decrypt the drive. However, this method may not work, and if it fails, the program will be unable to scan the drive.
Step 3. Select and preview scanned files
The software initiates a quick scan for deleted files and an advanced scan for more lost files. Once complete, you can apply the "Filter" feature or click "Search files or folders" to quickly find the lost files.

Step 4. Recover lost files from BitLocker encrypted hard drive
After previewing the file, click the "Recover" button to restore deleted or lost files from a BitLocker encrypted partition on Windows.
Bonus Tip #2. How to Manage BitLocker Partition by Resize/Move
You may want a bigger BitLocker drive partition to store large multimedia files, and Qiling Partition Master can help by adding free space from other partitions to the BitLocker one.
Step 1. To unlock Bitlocker, select the Bitlocker partition and choose the "Unlock" option, then enter your password.
Step 2. Click the Bitlocker partition and select the "Resize/Move" option.

Step 3. To resize BitLocker, drag the mouse cursor towards the unallocated space to shrink or extend it. This action will dynamically adjust the size of the BitLocker container.

Step 4. To begin the partitioning or resizing process of the Bitlocker drive, click the "Proceed" button. This initiates the necessary steps to modify the drive's partition structure, allowing for adjustments in size or configuration as needed.
Related Articles
- 6 Fixes for Excel File Keeps Closing Automatically | Excel File Recovery Tips
- OneDrive Recycle Bin Retention | Recover Deleted Files in OneDrive
- 4 Ways to Fix Windows Update Stuck at 0%
- How to Recover Formatted Files with Free Format Recovery Software
- 3 Ways to Change/Find Kik Usernames
If you've forgotten your Kik username, there is a solution! There are easy ways to change it, which you can find in this article. Additionally, if you've lost important messages, Qiling MobiSaver is a recommended tool to help you recover them. - Downgrade macOS/Mac OS X without Losing Data (Big Sur/Catalina Applicable)
If you're not a fan of the latest macOS, you can downgrade to a previous version without losing your data. This article provides two methods to revert back to macOS Catalina, Mojave, High Sierra, Sierra, El Capitan, or even Yosemite on your Mac.