Mac Photo Recovery: How to Recover Deleted Photos on Mac
How to recover deleted photos on Mac
- 1. Open Photos.
- 2. Select Albums from the column on the left, and double-click Recently Deleted (in older versions of Photos you'll find Recently Deleted along the top).
- 3. You'll see thumbnails of deleted photos and videos with a caption showing how long they've been deleted.
Quick Access to Photo Recovery on Mac
You can easily recover lost Mac photos or pictures using one of the 5 effective methods outlined on this page. Whether you have a backup or not, restoring Mac photos is a straightforward process. Simply choose a Mac picture recovery solution that suits your situation.
- Method 1. Recover Permanently Deleted Pictures on Mac (Recommended)
- Method 2. Restore Deleted Pictures Mac Using the Photos App (Within 30 Days)
- Method 3. How to Retrieve Deleted Files from Mac Trash
- Method 4. Recover Deleted Photos on Mac with Time Machine (Don't Empty It)
- Method 5. Recover Deleted Mac Photos from iCloud
If you've deleted pictures from your Mac hard drive or other storage media, they're gone for good. However, you can still recover them with the help of the best Mac data recovery software, which can help you recover deleted pictures on Mac. For more information on how to recover your photos, check out the first method.
Method 1. Recover Permanently Deleted Pictures on Mac
Support macOS 10.15 ~ 10.9
You can recover deleted photos from a Mac hard drive using a tool like Deep Data Recovery for Mac, which can restore images in various formats, including JPEG, PNG, GIF, TIFF/TIF, BMP, PSD, ORF, RAF, MRW, and RAW.
How to recover deleted photos on Mac:
You can use this software to restore deleted photos or pictures from your Mac hard drive or external storage devices, such as a USB, SD card, or external hard drive, on your own.
Step 1. Launch Deep Data Recovery. Select file types and click "Next" to start the recovery process.

Step 2. Hover the mouse over the system drive where the Photos Library is, and click "Scan" to initiate the scan process.

Step 3. After the scan is complete, click on "Photos" in Quick Access and all your lost photos will be listed here.

Step 4. To recover deleted photos on Mac, double-click on the photo to preview it, select the correct one, and then click "Recover" to save it to a secure location.
This Mac picture recovery software fully supports Mac HFS+/FAT/NTFS/NTFS5 file system on macOS and Mac OS X, and can help solve various problems such as recovering deleted or lost pictures from Mac hard drive, external hard drive, USB drive, memory card, etc.
- If you've accidentally deleted photos, music files, or other multimedia data, there are ways to recover them. You can try using data recovery software or services that specialize in restoring lost files, or take your device to a professional repair shop for assistance.
- Recover recently deleted photo with original name and path.
- You can recover Mac data from various storage devices, including SD cards, Compact Flash cards, USB memory sticks, PC hard drives, and more, using specialized software or professional data recovery services. These tools can help retrieve lost, deleted, or corrupted files from the devices, even if they've been formatted or had their operating systems reinstalled.
- You can restore photos from partitions that have been lost, overwritten, or damaged by a virus on a Mac hard drive.
Also read: How to Recover Permanently Deleted Photos on iPhone
Method 2. How to Recover Deleted Photos on Mac Using the Photos App
If you accidentally deleted photos or images in the Photos app on Mac, don't worry, as the app saves deleted items in the Recently Deleted album for 30 days, allowing you to recover them.
You can directly recover the deleted photos from the Photos App:
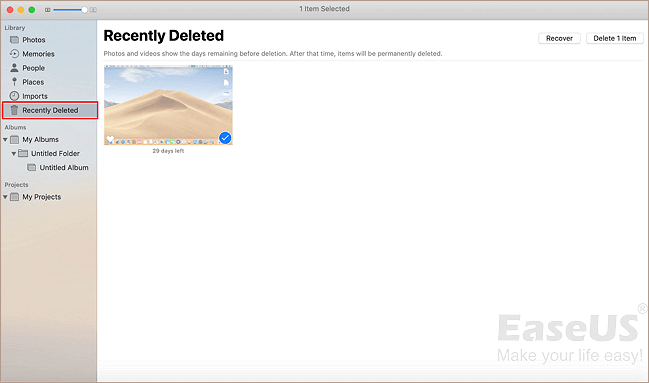
Step 1. Open Photos.
Step 2. In the left column, select Albums, then double-click on "Recently Deleted" (in older versions of Photos, "Recently Deleted" can be found along the top).
Step 3. You'll see thumbnails of photos and videos you've deleted, with a caption showing how long they've got left, and you can select the ones you want to recover.
Step 4. Click the "Recover" button at the top right corner, or if you're sure you won't need the deleted files, click "Delete All" to free up space.

Then you can go back to the original album in Photos to check and use the recovered photos again.
Method 3. How to Retrieve Deleted Files from Mac Trash
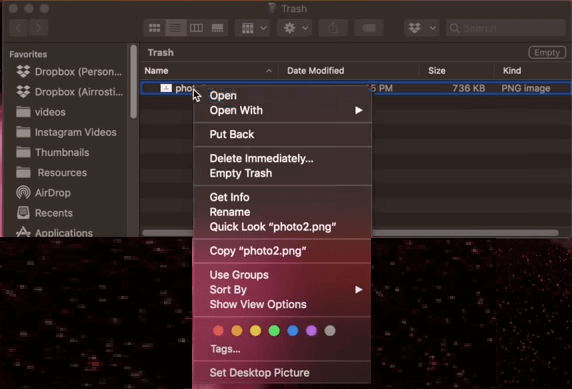
If you deleted or removed photos from your Mac hard drive or desktop to the Trash, you can easily restore them by undoing the empty Trash action.
Step 1. To view all deleted files, open the Trash Bin icon on your desktop. This will display a list of all the files that have been deleted.
Step 2. To recover deleted photos on a Mac, find the images you want to recover, drag them to the desktop or right-click on them and select the "put back" option, which will return the files to their original location.
Method 4. Recover Deleted Photos on Mac with Time Machine
If you've backed up your deleted photos with Time Machine, you're in luck! Your photos, images, and pictures are safe, and you can easily restore them by following these steps.
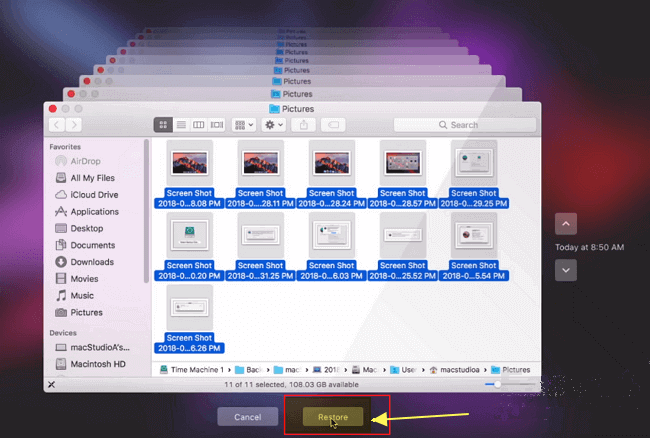
Step 1. To access your Time Machine backup, connect the backup disk to your Mac. You can then click the "Time Machine" icon in the Status menu or open the Time Machine application from the Finder.

Step 2. To find the date of your last photo backup on a Mac, navigate to the bottom right corner of the screen and scroll through the Timeline to locate the date when you performed a backup of your photos. This will allow you to identify the most recent backup date.
You can also click the up arrow next to the Time Machine window to find the right backup version, and double-click a photo or picture to check if they are your lost photos.

Step 3. Select the desired photos and click "Restore" to retrieve the old versions of overwritten files.
Method 5. Restore Deleted Mac Photos from iCloud
iCloud serves as a central hub for many people's digital lives, storing various information such as calendars and photos. The iCloud Photo Library feature allows users to save and sync their images across all their devices, whether taken with an iDevice, uploaded from a Mac using a memory card, or accessed from any connected device. This enables users to view their photos from anywhere, making it a convenient and seamless experience.
Steps to restore Mac photos from iCloud:
Step 1. To access iCloud.com, open any web browser on your device, such as Safari, Google Chrome, or Mozilla Firefox. If you haven't already, sign in with your Apple ID and password to access your iCloud account.
Step 2. Click "Photos". Then, click "Albums" at the top.
Step 3. Click the Recently Deleted album.
Step 4. Select the photos you want to restore and click "Recover".

Additional Tips - Reasons Leading to Mac Photo Loss
Mac images can be lost due to various reasons, including accidental deletion, formatting of the storage device, or corruption of the file system. They can also be lost when upgrading or restoring the Mac to its factory settings, or when replacing the storage device. Additionally, images can be lost if they are not properly backed up, or if the backup is corrupted or incomplete.
| Causes | Details |
|---|---|
| Careless deletion | Directly drag files to the Trash and restart Mac. |
| False operation | Permanently delete files on a Mac by using the "Option + Command + Delete" hotkeys. |
| Virus attack | Your Mac was infected with a virus. |
| Formatting hard drives | Unexpected formatting happens during Mac device installation, system update, and other system-related processes. |
| Other accidents | A sudden power-off or software failure occurs during the writing process. |
How to Avoid Mac Photo or Data Loss
Creating a Mac backup is the easiest way to protect your data from loss, and macOS's built-in Time Machine utility can handle backups automatically, making it a great option for keeping your files safe.
Back up Mac data with Time Machine:
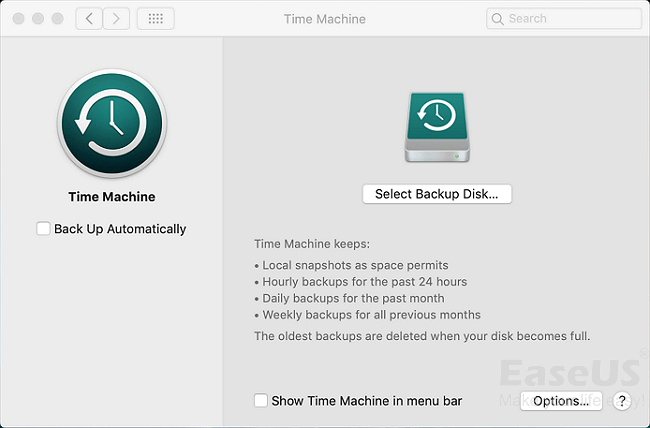
Step 1. Connect an external hard drive to your computer or MacBook
Step 2. Go to System Preferences, then click on Time Machine, and select the backup disk.
Step 3. Select the location where you want to save the Time Machine backups, and click "Use disk".
Step 4. To set Time Machine to back up everything on your Mac automatically, simply tick the "Back Up Automatically" option.
Also Read: How to Backup Mac without Time Machine
Conclusion
To recover deleted photos from the Photos App, Trash bin, Time Machine, or Mac hard drive/storage devices, you can try the five solutions above. Alternatively, having a backup of your essential data can prevent data loss due to accidental deletion or other reasons. If you don't have a backup, a Mac data recovery tool like Qiling can be a helpful option.
Related Articles
- Recover Deleted iPhoto Library and Photos on Mac 2022
- Full Guide: Easily Format Text on Mac without Making Mistakes
- [Mac Guideline] How to Format SD Card on Mac
- Multiple Choices - Fix macOS Can't Repair the Disk
- Word Recovery for Unsaved, Deleted, and Corrupted Word Documents [Professional Guide]
If your Word documents are deleted, unsaved, or corrupted, there's hope for recovery. Start reading now to learn how to retrieve your lost Word documents. - 6 Fixes for Xbox One Won't Turn On Issue
Many reasons can cause an Xbox One to not turn on, including hardware issues, software problems, and power supply issues. To troubleshoot, check the power cord and outlet, and ensure the console is properly plugged in.