4 Ways for How to Stop Windows 10 Update 2021
Quick Navigation:
- Part 1. How to Disable Windows 10 Update Service
- Part 2. Stop Windows 10 Update by Changing Settings of the Group Policy Editor
- Part 3. Stop Windows 10 Update by Set up Network Connection
- Part 4. How to Use Registry to Change Windows 10 Updates
It is annoying that your Windows 10 asks you to update Windows 10 regularly. And Windows 10 update not always meet your requirements and satisfy you. The fact is, you can disable Windows 10 update automatically. When you need to update, you can do it manually. Here in the following, we're going to discuss 4 ways for how to stop Windows 10 update. Before getting down to the task, to keep your files safe, you can try QILING Disk Master to back up your Windows 10 PC first.
It's annoying that when you're busy, a pop-up asking you to update Windows 10. What's worse, when you shut down a computer, it reminds you of the update first before it carries out the computer shut down. Sometimes, it really a wastes of time. Anyway, check out the 4 ways below to learn how to stop Windows 10 update permanently or automatically.
Part 1. How to Disable Windows 10 Update Service
The simplest and direct way to stop Windows 10 update is by disabling the Windows 10 Update service. People who do not know much about computer techniques can make use of this way as well.
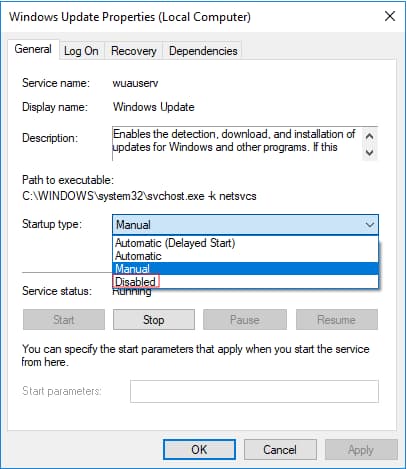
1. Press the Windows key at the bottom left and the R key at the same time.
2. Type in services.msc in the search box and press Enter to stop Windows 10 update permanently.
3. Scroll down and find Windows Update. Double-click on it.
4. Under the General tab, select "Disabled" in the Startup column drop-down list. Apply the change and confirm it.
This way is the direct way that many people can apply. Besides the clear way to stop Windows 10 update, there are some other workarounds as well. Check out the details below.
Part 2. Stop Windows 10 Update by Changing Settings of the Group Policy Editor
1. Press the Windows key and R key to enable the search box.
2. Type in gpedit.msc and click OK.
3. Navigate to Computer Configuration > Administrative Templates > Windows Components > Windows Update.
4. Double-click Configure Automatic Updates and select Disable in the left panel. Apply it and click OK to confirm.
Please note that this way only works on Windows 10 Professional, Enterprise, and Education versions. For Home Edition, please try the way mentioned in Part 1, Part 3, and Part 4.
Part 3. Stop Windows 10 Update by Set up Network Connection
You know, since the update package is quite big and it takes time and a stable network for the Windows 10 update. Generally, only with Wifi connected, it is able to update Windows automatically. In this case, you can set up the Network Connection to stop Windows 10 update automatically.
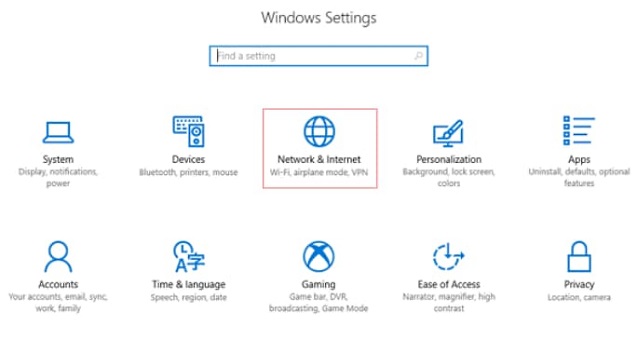
1. Click the Windows button at the bottom left panel and click Settings (the gear icon on the left panel).
2. Click the Network & Internet.
3. Click WLAN in the left panel and click the name of the Wifi.
4. Switch the option Set as metered connection to ON.
Part 4. How to Use Registry to Change Windows 10 Updates
Before starting to stop Windows 10 update in Windows 10, let me make it clear that it is risky to edit the registry. If you do not have any experience of doing so, I suggest you try the above mentioned 3 ways, not this way. To be on the safe side, try QILING Disk Master to backup the whole system drive first. If anything unexpected happens, you can restore it with the backup.
Your Effective Backup Software for Windows
- Has three backup modes: system backup, file backup, and drive back up, to easily and safely backup data
- Supports automatic backup of files from hard disk and other external hard drives as well as in-built drives
- Support backup files in Windows 10 and 7 as well as Windows 8, XP, and Vista, among others
- The best backup tool with a clone feature
Step 1. Download and install the software on your computer.
Step 2. Launch the Windows 10 system backup software and click "System Backup". You can also back up important files or folders, as well as other hard drives.
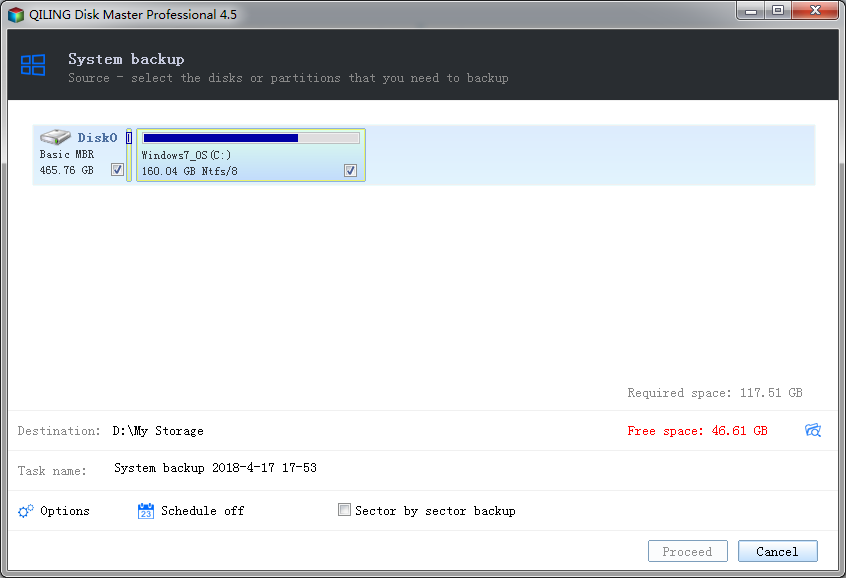
Step 3. Customize the location where to save the backup file or schedule the backup. After then click "Proceed" to back up the system of your Windows 10.
Here are the steps for how to edit Registry to stop Windows 10 update automatically.
1. Press the Windows and R keys simultaneously. Later, type regedit and click OK, looking for the path: HKEY_LOCAL_MACHINE\SOFTWARE\Policies\Microsoft\Windows. I mean find the final folder named as Windows.
2. Right-click on the folder and navigate to New > Key. Name the new key WindowsUpdate and press Enter.
3. Right-click on the newly created key, then select New > Key. Name the new key AU and press Enter.
4. In the place where the newest key is, right-click and select New > DWORD(32-bit) Value.
5. New the key as AUOptions and press Enter. Click to open the new key and change its value to 2, for Notify for download and notify for install.
6. Click Ok and close the Registry editing panel.
To be honest, it's a torturous process, right? lol
Related Articles
- Windows 10 Backup - How to Backup Windows 10 to OneDrive
- How to Transfer Windows 10 to SSD
- How to Clone HDD to SSD in Windows 10
- What Is RTOS? Real-Time Operating System Explained
RTOS or real-time operating system is used in many different types of computers and machinery. In this article, we'll define its basics, benefits and key features. - What Is SMTP? Everything You Need to Know about Simple Mail Transfer Protocol
SMTP is one of the key protocls in emailing systems today. So, what exactly is it and how does it work? This article will help you answer these questions and explore the key traits of SMTP. - What Is the SysWOW64 Folder? SysWOW64 vs System32
Are you wondering what SysWOW64 Folder is on your Windows PC? Then follow this easy guide to learn about it, check if it's a virus, and you can safely delete the folder without breaking it.