How to Backup Windows 10 to QNAP NAS (2 Simple Ways)👍
This post shows how to back up Windows 10 to a QNAP NAS using two practical methods.
An Overview of QNAP NAS & Benefits of Saving Windows on It
NAS stands for Network Attached Storage. It is used to store, manage, and share data across a network, allowing authorized users to access files and collaborate from different devices.
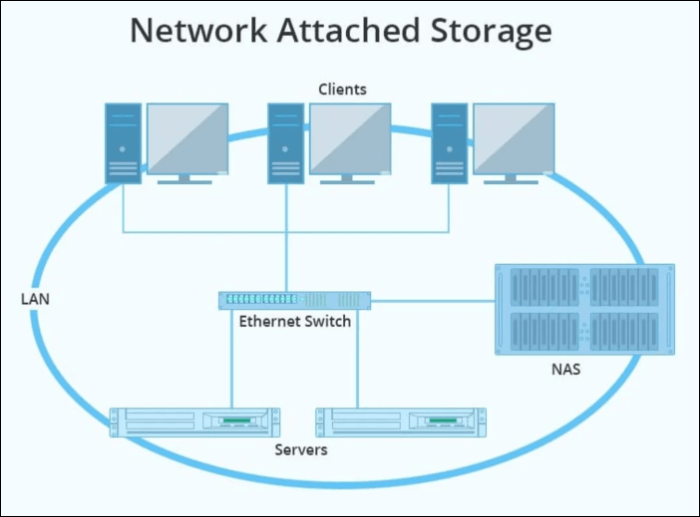
QNAP is a leading NAS provider based in Taiwan, offering flexible and scalable storage systems for home and business users. To protect against hardware failure, malware, and accidental data loss, it is a good idea to create a Windows 10 backup on QNAP NAS.
Benefits of Saving Windows on QNAP NAS:
- Data Storage Capacity and Backup
- Easy Remote Access
- Collaborative Environment
- Centralized Storage
- Data Redundancy and Security
What to Prepare Before Backing Windows 10 to NAS
To prepare your system to back up Windows 10 using a QNAP Network-Attached Storage (NAS) device, you need to ensure your NAS device is connected to your network and has a compatible operating system, such as QTS or QuTS, installed. You should also install the QNAP Windows Backup Agent on your Windows 10 machine, which allows the NAS device to communicate with the computer and initiate backups. Additionally, you may need to configure your NAS device's settings to allow it to receive and store backups from your Windows 10 machine.
- Acquire and Set up your NAS: Set up your QNAP NAS by following the manufacturer's instructions, which typically include downloading and installing the QTS operating system, setting up the network, and configuring the device for your specific needs.
- Install NAS Management: To manage and control storage on a Network-Attached Storage (NAS) device, service providers often create a software or web interface that allows users to connect their PC to the NAS. This enables users to access, manage, and control the storage on their NAS from their PC.
- Connect the system and NAS: To access your NAS, create a NAS account, then open File Explorer and navigate to the Network section. If your NAS device is listed, connect to it. If it's not listed, you can connect using the NAS's network path, such as \NAS_name or \NAS_IP_address.
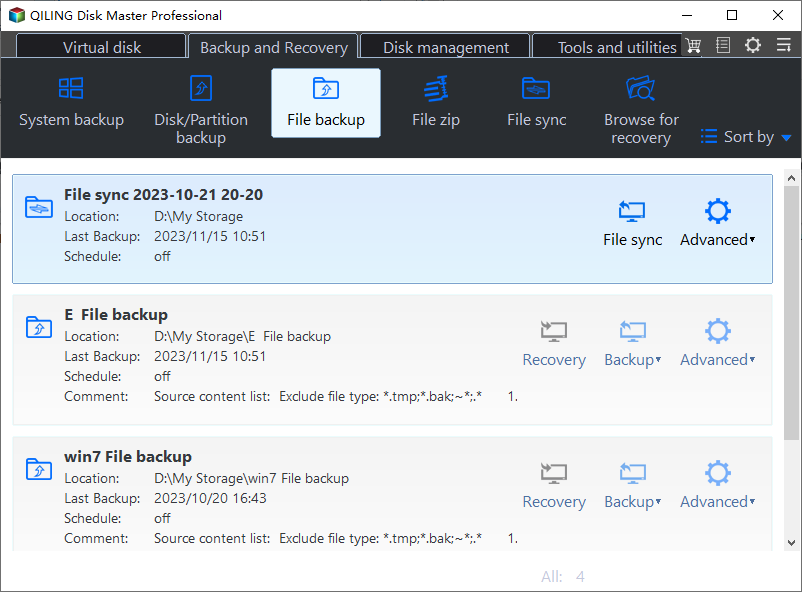
- Choose Backup Software: To back up your data, you can use professional backup software like Qiling Disk Master to configure and monitor backups.
- Internet Connection: To ensure a smooth process, make sure you have a reliable internet and power supply.
Do remember to share it with your fans if it is useful:
Back-Up Windows 10 to QNAP NAS with Various Methods
To back up Windows 10 to QNAP NAS, there are two ways to do so using professional software and the Windows built-in tool. One method involves using professional software such as Qiling Disk Master to create a backup of the Windows 10 system to the QNAP NAS.
- Method 1. Backup Windows 10 to QNAP NAS via Qiling Disk Master🔥
- Method 2. Backup Windows 10 to QNAP NAS with Backup and Restore
Method 1. Backup Windows 10 to QNAP NAS via Qiling Disk Master
Windows built-in tools may be enough for basic requirements, but advanced backup needs often require more flexible software. Qiling Disk Master provides complete and secure backup options for saving Windows 10 data to a QNAP NAS.
With Qiling Disk Master, you can safely back up your Windows system to a QNAP NAS backup server and recover easily, thanks to its advanced and intelligent backup solutions. This makes it a perfect solution for all your backup needs, and you can try the trial version to see its features for yourself.
| 🔬Advanced Backup Solutions | The software saves space and time by only backing up the used storage of the system. |
| 🌩️Fast backup and recovery | You can take advantage of the ability to create backups of the entire system, providing an added layer of security and peace of mind. This feature allows you to safeguard your data and settings, ensuring that you can restore your system to its previous state in case of any issues or unexpected events.back up a partition or a drive to your NAS. |
| 🔑Security Zone | Qiling is a software that enables you to create a secure zone on your NAS, isolating your files from external threats and keeping them inaccessible to unauthorized access. |
| 🗳️Excellent Cloning options | You can clone your entire system and hard disk with great cloning options to keep copies of your system in case of emergencies, allowing you to quickly restore your system to a previous state if needed. |
🪜Here is the step-by-step guide to back up Windows 10 to QNAP NAS:
Step 1. Launch Qiling Disk Master and choose the "Backup and recovery" tab page.

Step 2. To initiate a system backup, navigate to the available categories and select the "System backup" option.
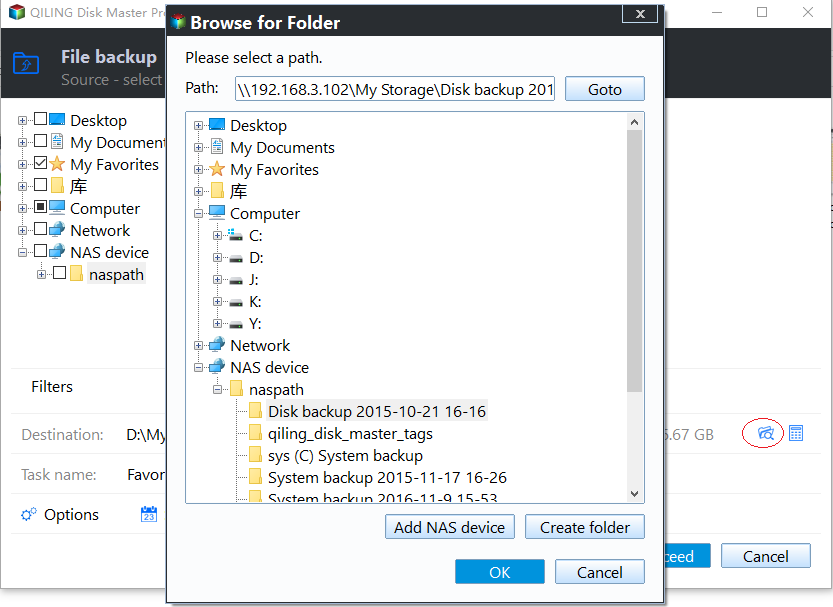
Step 3. The system partition will be automatically selected, you only need to select the location.

Step 4. You can save a system backup file to your local drive, cloud storage, or network-attached storage (NAS) for safekeeping, or even connect an external hard drive to store the backup files.
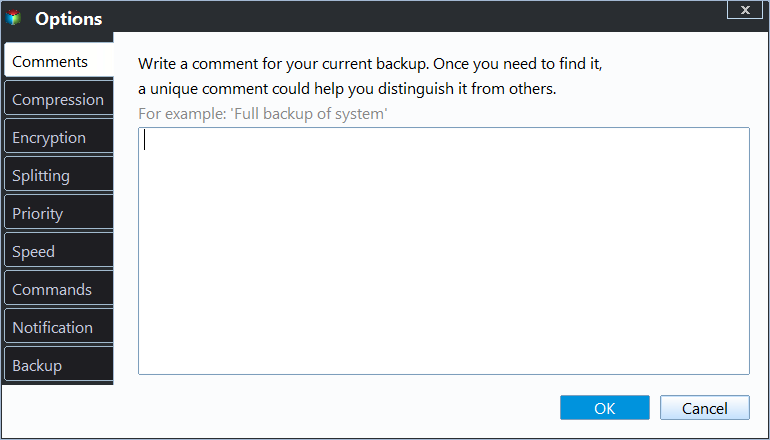
Step 5. You can customize the settings in "Options" at the left bottom, then click "Proceed" to start the process.
After completing the backup process, users can access the backup status, restore, open, or erase the backup by clicking on the backup task on the left panel.
Method 2. Backup Windows 10 to QNAP NAS with Backup and Restore
Windows provides a built-in Backup and Restore tool that can create system images and save them on your QNAP NAS.
👍Pros of Using Backup and Restore:
- The tool is built-in and free.
- You can easily create a full system image, including the operating system and complete data.
- Allows making backups for NAS devices and shared network folders.
- You can schedule backups and recover them with ease.
⛔Cons of Using Backup and Restore:
- Limited features.
- Creating a full system backup consumes a large space.
- Consume more time while creating and restoring them.
- Hardware dependency makes it an unreliable option.
The article discusses the importance of a good night's sleep for overall health and well-being. It highlights the consequences of sleep deprivation, including impaired cognitive function, increased risk of chronic diseases, and a weakened immune system.
🪜Here's how you can backup Windows 10 to QNAP NAS:
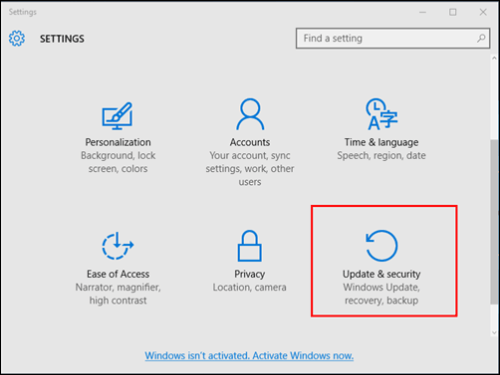
Step 1: Open Settings and click on Update & Security.
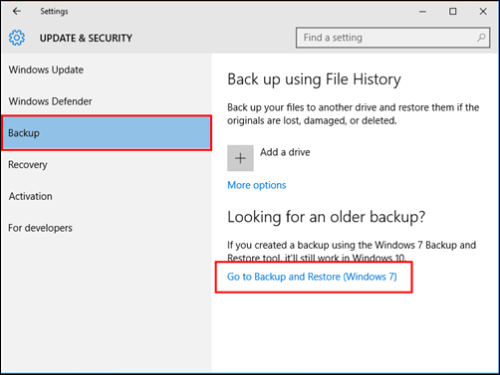
Step 2: Navigate to the Backup section and click on Go to Backup and Restore (Windows 7).
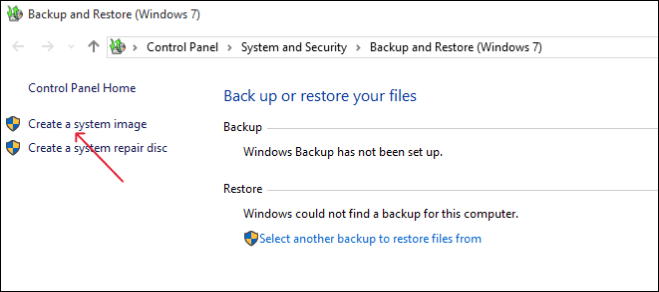
Step 3: Click on Create a system image.
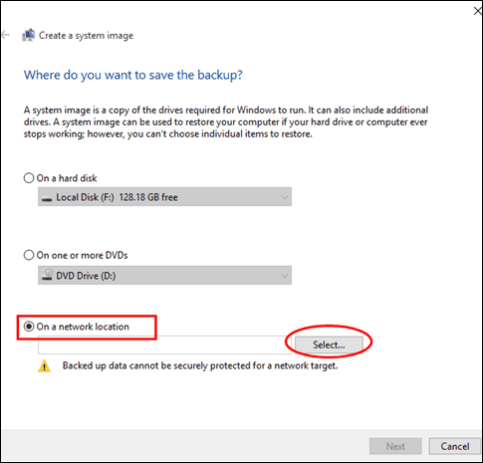
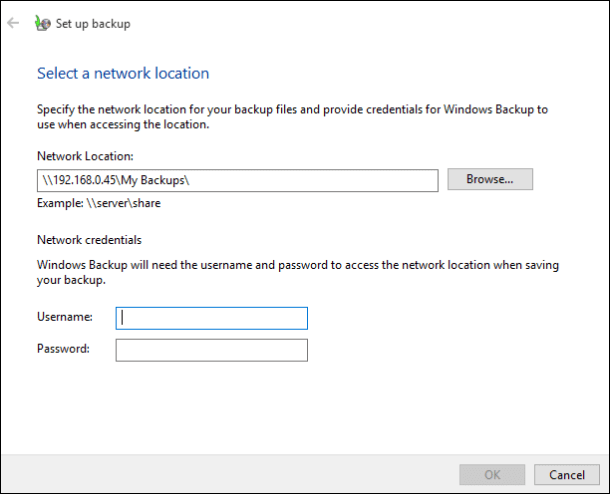
Step 4: Choose a location to save the backup on your network. Click on the "Select" button.
Step 5: Enter the path to the shared folder on your QNAP NAS in the format \\QNAP_NAS_IP_address\shared folder name, using the Browse feature to find it. Additionally, enter the username and password for the NAS credentials and click OK.
Step 6: Select the system image and drive you want to backup, click Next, initiate the process by clicking Start Backup, and verify your files in the QNAP NAS server after completion.
You may also be interested in:

[All-in-One] Create Windows 11 Backup to NAS (Network drive)
A Network Attached Storage (NAS) device, also known as a network hard drive, is an emerging network-based storage solution. In the context of data protection, selecting a safe and secure backup location is crucial. This article will explore the possibility of backing up Windows 11, including files and systems, to a NAS.

The Concluding Thoughts
If you're dealing with large amounts of data, a NAS device like QNAP is a great tool for storing and managing everything, and using their storage solutions can be a trusted way to keep your data safe. To backup your Windows 10 to a QNAP NAS, you can use either of the two methods mentioned, but keep in mind that the built-in tool can be useful for basic requirements, but it takes up a lot of space for full system images.
In cases where a system becomes corrupted or outdated, using a tool like Qiling Disk Master can help save space and recovery time. Additionally, creating bootable media allows for starting the system without reinstallation during emergencies. This approach can be more efficient than a full reinstallation.
FAQs on How to Backup Windows 10 to QNAP NAS
Here are common questions about backing up Windows 10 to QNAP NAS:
1. How do I connect my QNAP NAS to Windows 10?
- To access your QNAP NAS from your local network, use File Explorer to connect to it.
- To find the NAS IP, access its management interface or check the device list on your router. This will allow you to locate the NAS's IP address, which is necessary for further configuration or troubleshooting.
- Access the NAS Shared folders using the NAS IP Address.
- Map the network drive to access the shared folders.
- To access your QNAP NAS on Windows 10, you'll need to authenticate your credentials. This typically involves entering your QNAP login credentials, which usually include a username and password.
2. Can QNAP NAS read NTFS?
QNAP NAS devices can read NTFS file systems, among other file systems like EXT3, EXT4, and FAT32.
3. How to set up NAS on Windows 10?
- Set up the NAS device and configure your local network.
- Start your NAS and configure the security and storage options.
- Add your accounts and set up folders and volumes.
- Set up the computers on the local network, and NAS is ready to use.
Related Articles
- How to Clone Hard Drive in Windows 7 32 Bit or 64 Bit to Another Hard Drive
- How to Backup Specific Folders Windows 10 (Quick & Easy)
- How to Backup and Restore Windows 8/8.1 System [SOLVED]
- Why Is Windows 11 Backup Not Working on Your PC? Check the Causes and Fixes Here Instantly
- How to Move World of Warcraft to Another Drive/Computer
If you need to transfer World of Warcraft to a new computer or move it to a different hard drive or solid-state drive (SSD) due to insufficient space, you can use Qiling Disk Master to migrate the application to a new location or computer at once. - How to Move Zoom to Another Drive in Windows 10
This article discuss ways in which you can move the Zoom application to another drive using the right tool without having to reinstall it all over.