How to Backup Files and Settings in Windows 8.1? 2022 Complete Guide
If you're looking for a complete guide to backing up Windows 8.1 files and settings, this page provides three reliable solutions to help you do so with ease.
How Do I Backup My Windows 8.1 Files and Settings? 3 Reliable Methods
Windows 8.1 has a built-in backup utility similar to Windows 7 and Windows 10/11.
Windows 8.1 has two backup tools: Windows Backup and Restore and Windows File History, allowing users to back up files and settings with a few clicks.
Aside from these two built-In addition to Windows built-in backup utilities, you can also consider third-party Windows backup software like Qiling Backup Home for assistance.
Windows 8.1 File and Settings Backup Solutions Comparison
Here are the methods to back up Windows 8.1 files and settings in one paragraph:
The main differences between alkaline, nickel-cadmium (Ni-Cd), and nickel-metal hydride (NiMH) batteries lie in their composition, performance, and environmental impact. Alkaline batteries are the most common and inexpensive type, offering a moderate lifespan and decent performance in low-drain devices. Ni-Cd batteries, on the other hand, have a higher energy density and longer lifespan, but are more expensive and contain toxic cadmium, making them less environmentally friendly.
| Comparison | Pros | Cons |
|---|---|---|
| Qiling Backup |
|
|
| Backup and Restore |
|
|
| File History |
|
|
The table shows that Qiling Backup Home, a third-party backup software, outperforms Windows Backup and Restore in file and system backup on Windows PCs, while Windows Backup and Restore is more effective than File History in backing up files and settings in Windows 8.1.
- If you're a Windows beginner or seeking a hassle-free way to back up your files and settings, Qiling Backup is a great option to consider. It allows you to efficiently back up your Windows files and settings together, making it a convenient solution for those who want a simple and effective backup process.
- If you're an experienced Windows user, Backup and Restore Windows 8.1 can help you protect your files and settings on your computer.
To back up files and settings in Windows 8.1, you can use the built-in File History feature. This feature automatically backs up your files to an external drive or network location. To set it up, go to Control Panel, then select "System and Security" and click on "Backup settings.
#1. Backup Files and Settings in Windows 8.1 with Qiling Backup
Duration: 5-30 minutes
Tool: Qiling Backup, an empty external hard drive
Qiling Backup allows you to back up files and settings on Windows 8.1 by simply connecting an external hard drive, and then following two tutorials to instantly backup files and settings.
Guide 1: Back Up Files in Windows 8.1
Step 1. Click the "File backup" button to initiate a backup.

Step 2. On the left, you'll see a list of local and network files. You can then expand the directory to select which files to back up.

Step 3. The process of selecting a location to store the backup involves following on-screen instructions. This typically involves navigating through a file browser or directory tree to choose a specific folder or drive where the backup will be saved.

Step 4. To encrypt the backup with a password, click on the "Options" button in the "Backup Options" section. This allows for various customizations to be made to the backup process.

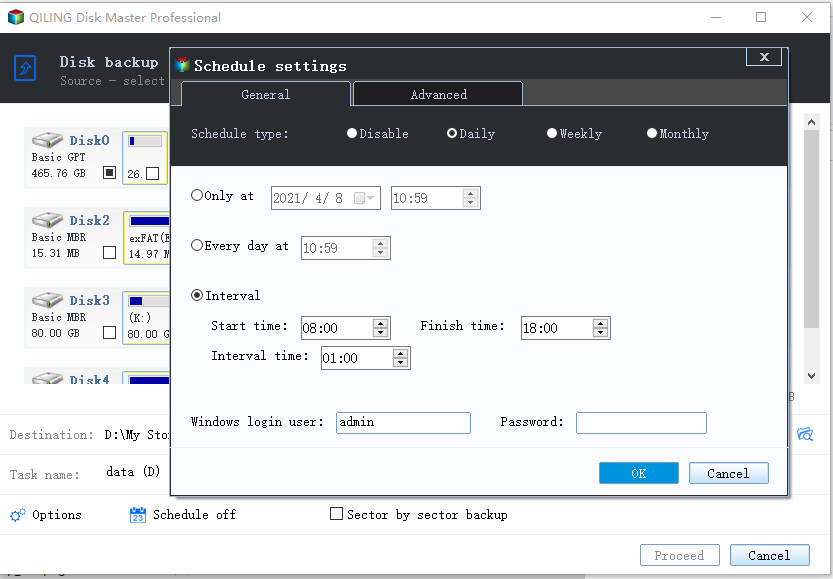
To set up a backup schedule and initiate a backup at a specific event, go to "Backup Scheme" and choose the desired backup schedule. From there, you can select the event that will trigger the backup, such as a daily or weekly schedule, and customize the settings to suit your needs.

Step 5. You may save the backup to a local disk, Qiling's online service, or a NAS.

Step 6. Qiling Backup allows customers to back up their data to both a third-party cloud drive and its own cloud drive.
To back up data to a third-party cloud drive, select Local Drive, navigate down to add Cloud Device, add your account, and log in.
Step 7. To start the backup process, click "Proceed". Once the backup is complete, it will be displayed as a card on the left-hand panel, where you can further manage the backup job by right-clicking it.

Guide 2: Back Up Settings in Windows 8.1
Note that Settings is mostly related to Windows operating systems, so you'll need to back up the OS with settings together. To do this, follow the steps to back up your Windows OS with settings, which will ensure that all your settings and preferences are preserved during the backup process.
Step 1. To start the system backup, click the "System backup" button on the main page.

Step 2. Qiling Backup will automatically select your system partition, and you only need to select the backup destination.

Step 3. You can save the backup file to either your local drive or a network-attached storage (NAS) device.

Step 4. After completing the backup process, you can verify the backup status, restore, access, or remove the backup by selecting the backup task on the left-hand side.
Alongside backing up files and settings on a Windows computer, Windows 8.1 users can also apply Qiling Backup Home to protect their data.
- Clone HDD to SSD
- Backup OneDrive to external drive
- Create Windows recovery USB
- Clone PC to new PC, and more.
#2. Backup Files and Settings in Windows 8.1 with Backup and Restore
Duration: 5-30 minutes
Tool: Backup and Restore (Windows 7), local C drive
To use Windows Backup and Restore, save the backup image on an external hard drive if your C drive is running out of space. Connect the external hard drive to your PC and follow the steps to start the backup. This will ensure that your backup image is saved on the external drive, rather than taking up space on your local C drive.
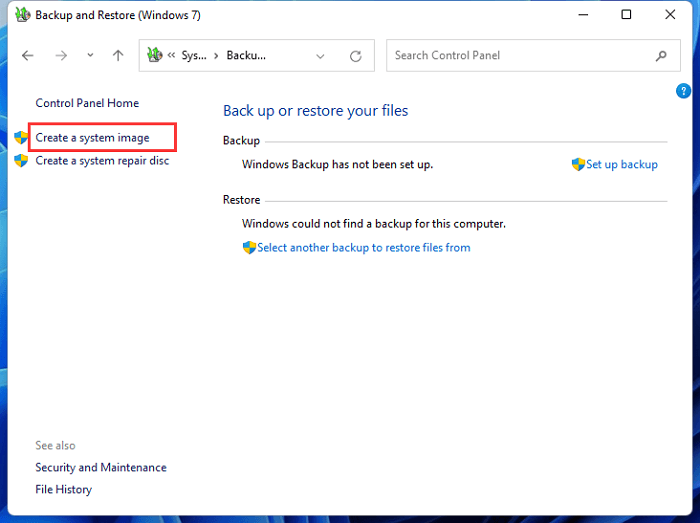
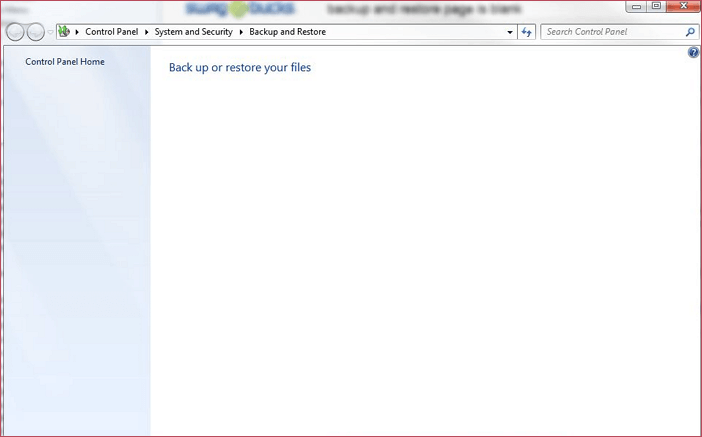
Step 1. To access the Backup and Restore (Windows 7) feature, go to the Control Panel and click on "System and Security", then select "Backup and Restore (Windows 7)".
Step 2. Click the "Create a system image" button, and then click "Set up backup" on the right side of the window.
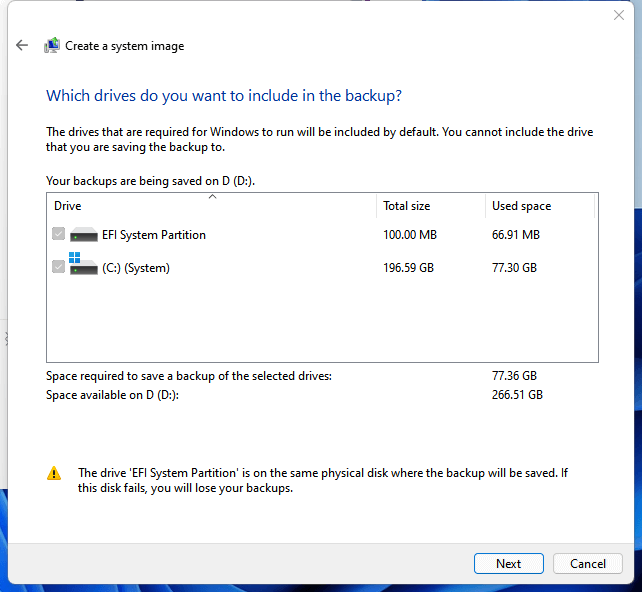
Step 3. Select the drive you want to save your backup on, whether it's a local drive or an external hard drive, and click "Next" to proceed.
Step 4. To create a backup of files and settings on Windows 8.1, select the "Create a system image" option and click "Next" to continue. This will allow you to create a backup of your entire system, including files and settings.
If you select the C drive, Windows Backup and Restore will automatically back up all files, settings, and even the OS on the C drive to the target drive.
Step 5. To back up your computer, click on the "Backup" tab, select the files and folders you want to include in the backup, and then click "Start backup" to initiate the backup process. Once initiated, the backup process will automatically copy the selected files and folders to the designated backup location, which can be a local drive, external hard drive, or cloud storage service.
Windows Backup and Restore can only backup files and systems on the C drive, but Qiling Backup offers more flexible options for selectively backing up data on non-system drives.
If Windows Backup and Restore isn't working properly on your computer, don't worry, I've can help. Follow this guide and you'll be able to get it up and running smoothly.
Windows 7 Backup and Restore Not Working with Blank Screen
If Windows Backup and Restore is showing a blank screen or not working, don't worry, we've can help. This issue can occur due to various reasons, but don't worry, we'll explain why and provide practical solutions to get you back on track. Just keep reading!
#3. Backup Files in Windows 8.1 with File History
Duration: 5-20 minutes
Tool: Windows File History
File History is a utility in Windows that takes incremental backups of files and folders on a Windows computer, unlike Windows Backup and Restore. If you only need to back up files in Windows 8.1, follow these steps for assistance.
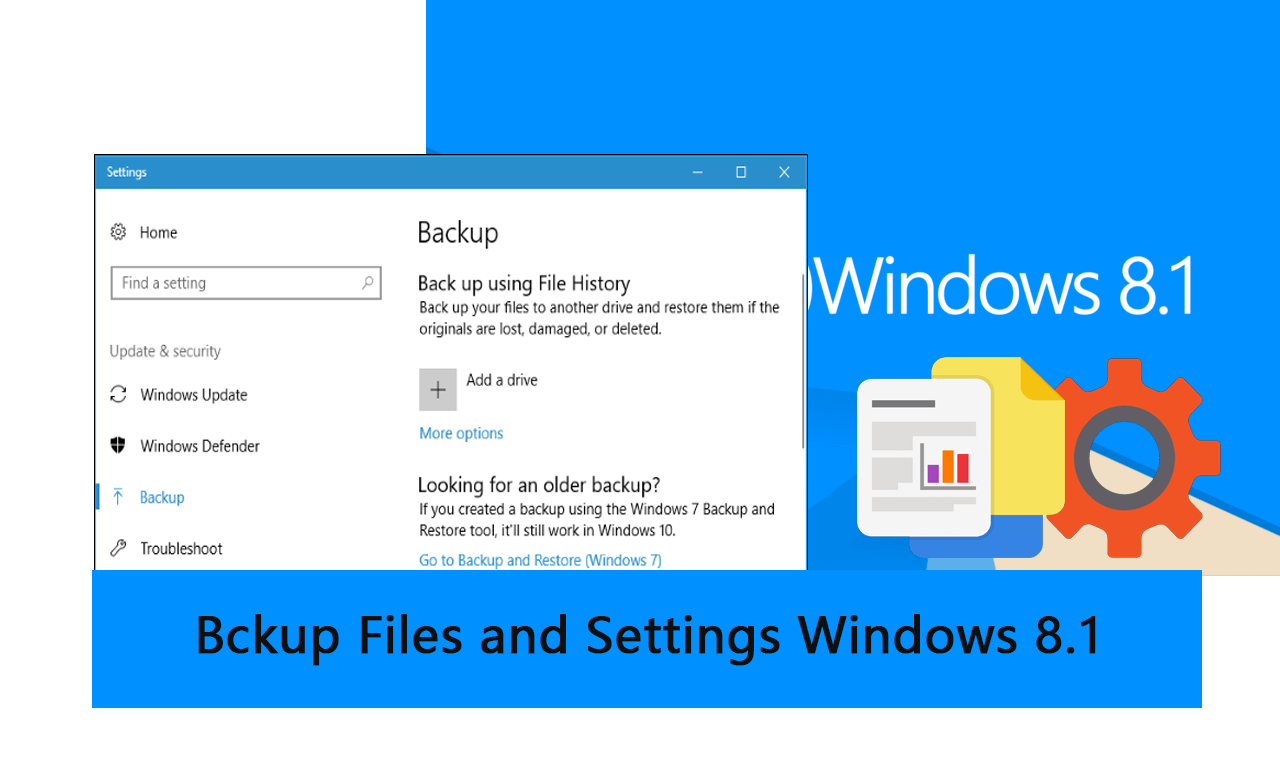
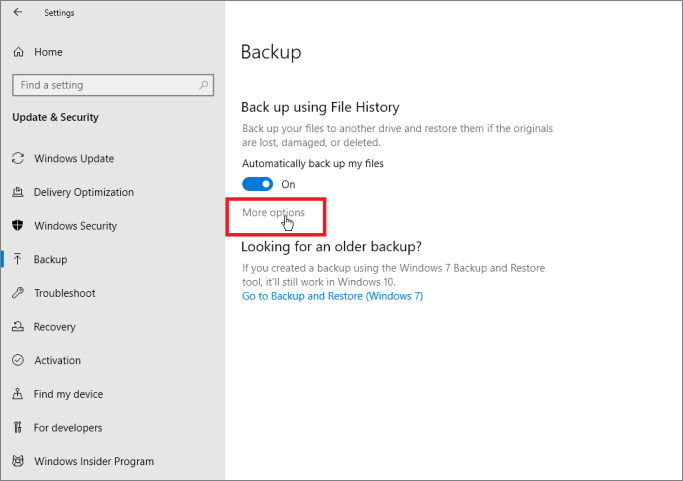
Step 1. To access the File History settings, go to Settings, click on "Update & Security", then select "Backup" from the menu. From there, click on "More options" located under the "Back up using the File History" section.
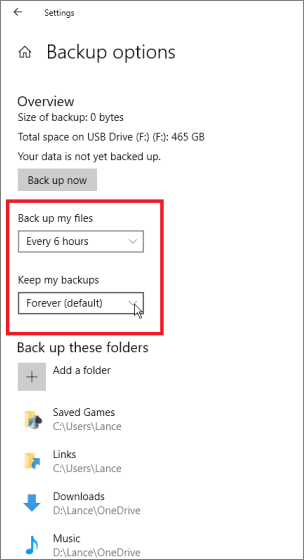
Step 2. To set a scheduled backup plan for your files, go to the "Back up file files" section and set the frequency to your desired interval, such as hours, days, weeks, or months.
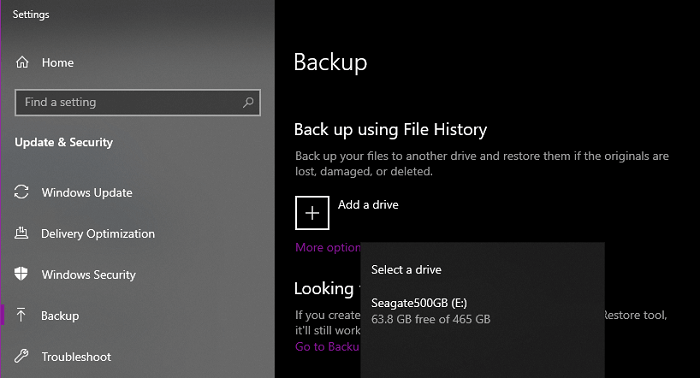
Step 3. Once you've enabled File History, go back to File History and click "Add a drive", then select the drive you want to save file backups on your computer.
Step 4. To backup files on the C drive, select the files and folders you want to backup, such as the Downloads folder, Documents, Videos, etc. Then, click "OK" to start the backup process.
If you haven't set up File History to backup files on your computer, you'll need to follow a detailed process to do so.
Beginners Guide: How to Use File History Windows 10
This guide provides a comprehensive overview of how to use File History in Windows 10, including how it works and setting it up. File History is also compatible with Windows 8.1/8 and Windows 11 users, making it a useful tool for anyone looking to back up their files. The guide covers the setup process, allowing users to take advantage of this feature and keep their files safe.

To Wrap Up
On this page, we present 3 reliable solutions to fully backup files and settings in Windows 8.1, with third-party backup software - Qiling Backup - being a suitable option for beginners that simplifies the process in just a few clicks.
If you're looking for a built-in backup tool, we recommend using Windows Backup and Restore. This option covers more files and allows for backing up files, settings, and even the OS at once, making it a more comprehensive choice compared to File History.
FAQs About Backup Files and Settings in Windows 8.1
Here in this part, we also covered some hot questions related to Windows 8.1 files and settings backup. If you are interested, follow and learn the answers here:
1. How to backup files in Windows 8?
In Windows 8.1, you can either use backup software like Qiling Backup for assistance or turn to File History to create a file backup.
To backup files with Qiling Backup, you'll need to:
- Launch Qiling Backup, select Files.
- Select the files you want to backup and choose the target drive to save the backup.
- Click "OK" to start the backup.
- To backup files with File History:
- To back up your computer, click "Start" and then navigate to Settings. From there, select Update & Security, followed by Backup.
- To initiate a backup, select the "Add a drive" option to specify the destination for the backup and choose the files you wish to include in the backup.
2. How to back up the Windows 8.1 system image?
To create a system image backup of your Windows 8.1 computer, you can use the built-in Windows Backup and Restore feature. This will allow you to create a complete backup of your system, including the operating system, installed programs, and personal files, which can be used to restore your computer to a previous state in case of a problem or disaster.
- Go to Control Panel, click "Backup and Restore (Windows 7)".
- Click "Create a system image", and "Set up backup".
- Choose the drive you want to save your backup on, and click "Next".
- Select C drive to include for creating a system image.
- Then click "Start backup".
3. How do I transfer files from my computer to an external hard drive Windows 8?
Here are the 2 ways to transfer files from a computer to an external hard drive in one paragraph:
- Manually copying and paste files from a computer to an external hard drive involves physically transferring files from the computer's storage to the external hard drive using the computer's operating system. This process can be time-consuming and labor-intensive, especially for large file collections. It requires the user to navigate through the computer's file system, select files to copy, and then paste them to the external hard drive, which can be prone to errors and data loss if not done correctly.
- To simplify the backup process, use a backup software like Qiling Backup to back up all files at once and store the backup on an external hard drive.
Related Articles
- Fix "Recovery Drive Please Wait" [Step-by-Step Guide]
- Boot Drive vs Recovery Drive: Are They the Same Thing?
- [99%'s Choice] How to Backup Entire Hard Drive Windows 10
- Top 5 Best Open Source Cloning Software in 2022 [100% Free & Clone Your Disk Anytime]
- Windows 10 File History vs Backup: Which One Works for Me?
Here is an overall comparison between Windows 10 File History vs backup from third party. By reading through, you can decide which backup plan works for you, and follow the guide to create your own backups of important files, folders, opreating system restore points and anything you wish to protect. - How Do I Create and Use Windows Restore Point in Windows 10/8/7 [Beginners' Guide]
What is Windows Restore Point? How to create and make use of it on a computer? On this page, you'll learn everything about Windows Restore Point. If you are looking for a simple guide, follow this page to create a system restore point and protect your system with it anytime.