Backup Options in Windows 10: Which Is The Best Choice?
Backup Your Windows 10 Computer - Best Data Protection Solution
Backing up data is a crucial aspect of computer maintenance, and opinions on what to back up vary. Some advocate for backing up everything, while others suggest focusing on specific files and folders. Regardless of one's approach, having a backup plan is essential, especially for Windows 10 users, to ensure data protection and peace of mind.
In Windows 10, there are several backup options available, each with its own set of pros and cons. To help you decide which one is best for you, we'll compare them side by side in this article. By the end, you'll know which backup option suits your needs.
1. Comprehensive Backup Option - Qiling Backup
When backing up your computer, it's recommended to create a full backup that includes important files, the system, disks, and partitions. A built-in backup tool may not be sufficient, so a comprehensive third-party backup tool is a better option. Qiling Backup is a suitable choice for this purpose.
What Can Qiling Backup Protect?
One of the biggest concerns for users when choosing backup software is what types of data the software can back up and whether a single software can be used to create a full backup. Qiling Backup is fully competent to backup the entire hard drive and computer, making it a reliable choice for users who want a comprehensive backup solution.
Qiling Backup is an all-in-one backup tool that supports backing up various types of data, including files and folders, systems, disks and partitions, and emails, making it a comprehensive solution for covering all essential information on a computer.
How Much Do You Pay for Qiling Backup?
Users consider cost a significant factor when choosing backup software, as free built-in backup utilities can often satisfy basic backup needs. However, a comprehensive backup tool like Qiling Backup can be had for zero cost, making it a viable option for those seeking a reliable backup solution.
Qiling Backup offers a free version with full, incremental, and differential backup capabilities, allowing users to save backup files to an external drive, cloud drive, or NAS, providing more options than Windows' built-in backup features and at no cost.
The Paid version of Qiling Backup offers advanced features such as cloning the system, transferring the system to another PC, and backing up files to a cloud drive, among others. For more details about the differences between the Free and Paid versions, you can refer to this link below.
This article compares the features of Qiling Backup's Free and Home versions, allowing you to decide which one best meets your needs.
How to Create a Backup withQiling Backup?
Qiling Backup is a user-friendly software that allows users to easily create backups with a clear and simple interface, accompanied by a detailed on-screen wizard that guides them through the process, making it easy to use even for first-time users.
You can download Qiling Backup for free from the button below and see how easy it is to create a backup with it.
Step 1.Launch Qiling Backup and select the "System Backup" option on the home page to initiate a system backup.

Step 2.The system partition will be automatically selected, you only need to select the location for installation.

Step 3.You can save the backup file to your local drive, cloud storage, or network-attached storage (NAS), or even connect an external hard drive to store system backup files.

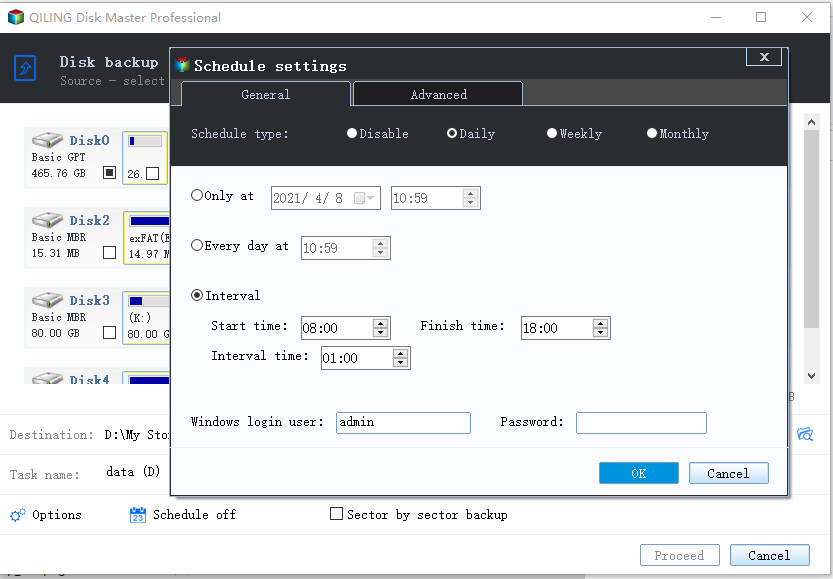
Step 4.To customize the settings, go to the left bottom and click on "Options". Then, click "Proceed" to start the process.
After finishing the backup process, you can check the backup status, recover, open, or delete the backup by right-clicking the backup task on the left.
2. Built-in FileBackup Option - File History
File History, a backup feature, was first introduced in Windows 8 and remains available in Windows 10. It allows users to restore files that are lost, corrupted, or accidentally deleted by automatically backing up files on a regular basis, with the option to manually create backups at any time.
File History allows users to back up content from their Desktop, Documents, Pictures, Videos, and Music folders. In Windows 8, 8.1, and 10, users can customize this backup by adding new folders, but in Windows 11, this customization option is no longer available. Additionally, File History also backs up OneDrive files on your PC, making it a suitable choice if you want to back up from OneDrive to your PC.
Pros:
- Easy to set up and use
- Runs in the background automatically
- Can backup files to an external drive or network location
- Can backup OneDrive files on your PC
Cons:
- The system only backs up certain types of files by default, but users can add other types of files to the backup list.
- Requires an external drive or network location for backup storage
How to Setup and Use File History
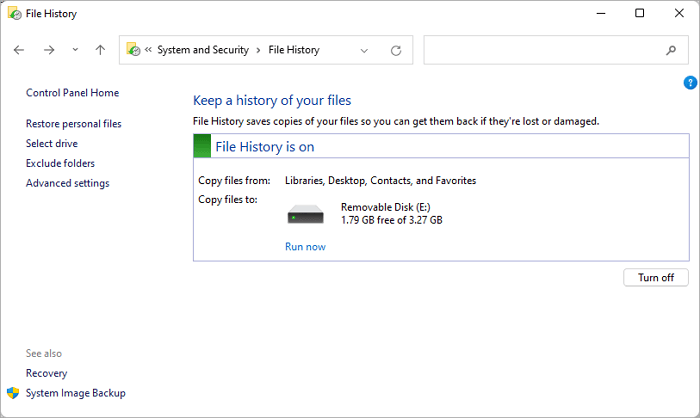
To set up File History, go to Control Panel > System and Security > File History, then select an external drive or network location to save the backup files, and finally, choose what types of files to back up. This will automatically save a copy of your files at the selected location, allowing you to easily recover them in case of data loss or system crashes.
Step 1. Access File History in Control Panel > System and Security.
Step 2. Connect your backup drive to your computer, and click the 'Turn on' button to enable File History.
Step 3. To select or add a drive as the File History backup drive, you can follow these steps: Go to Settings > Update & Security > Backup, then click on the "Add a drive" button. This will allow you to choose a drive to use for File History backups.
Step 4. Once File History is enabled, it will automatically start the first backup. You can adjust the backup schedule in the Advanced settings.
3. Built-in System Image Backup Option - Backup and Restore (Windows 7)
File History focuses on protecting computer files, but a system image is necessary for a full backup, which can help recover the system or boot the computer in case of a crash or boot issue. Backup and Restore, a feature introduced in Windows 7 and still available in Windows 10 as "Backup and Restore (Windows 7)", can create a system image in addition to backing up files.
Pros:
- You can back up everything on your computer, including your system, files, and settings, to prevent data loss in case of a hardware failure, software corruption, or other issues. This can be done using an external hard drive, cloud storage, or a backup software.
- Allows you to create a system image backup
Cons:
- The feature is only available in Windows 7, 8.1, and 10 Home and Pro editions, but not in the Windows 10 Home S edition.
How to Create a System Image Backup with Backup and Restore (Windows 7)
To create a system image backup with Backup and Restore (Windows 7), follow these steps: First, ensure you have enough free space on your hard drive to store the backup image, then open Backup and Restore by going to Start > Control Panel > System and Security > Backup and Restore. Next, click on "Create a system image" and select the drive you want to use for the backup, followed by the location where you want to save the backup image.
Step 1. Go to the Control Panel, then click on System and Security, and select Backup and Restore (Windows 7).
Step 2. Click the Create a system image link on the left panel.
Step 3. Choose where you want to save the backup, and then click Next.
Step 4. Select what you want to backup, and then click Next.
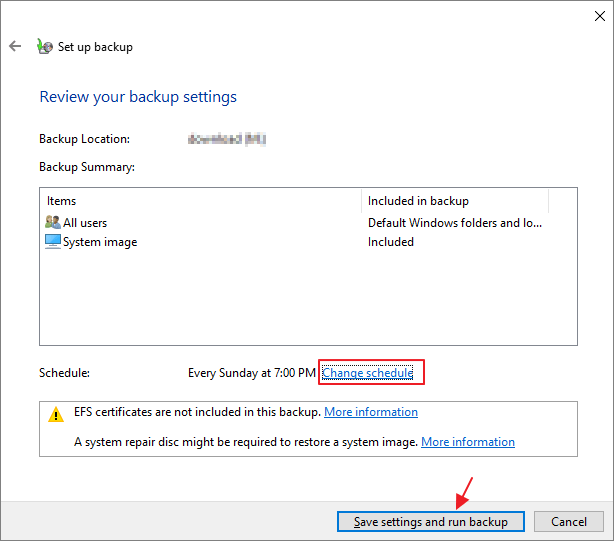
Step 5. Review your backup settings, and then click Start backup.
4. Cloud Backup Option - OneDrive
OneDrive is a cloud backup service that comes with most Microsoft accounts, offering 5GB of free backup storage. This allows users to backup their files to the cloud and access them from anywhere, with additional storage available for a monthly fee.
Pros:
- Offers free backup storage with a Microsoft account
- Allows you to backup files from multiple devices
Cons:
- Paid storage can be expensive
- 5GB of free storage may not be enough for some users who need more space to store their files, photos, and other data.
How to Backup Files to OneDrive
Backing up files to OneDrive is a straightforward process. Simply follow these steps to get started.
Step 1. Go to the OneDrive website, and sign in with your Microsoft account.
Step 2. Click the Upload files button.
Step 3. To initiate the backup process, select the files you wish to backup and click the "Open" button.
Your files will be uploaded to OneDrive, making them accessible from anywhere for viewing or downloading.
Comparison: Which One is the Best Backup Option in Windows 10?
Now that we've explored all the backup options in Windows 10, it's time to compare them and determine which one is the best.
Windows 10 offers several backup options, including File History, System Image Backup, and Windows Backup. File History allows users to back up their files to an external drive, while System Image Backup creates a full system image, including the operating system, programs, and data.
| Comparison | Pros | Cons |
|---|---|---|
| Qiling Backup |
|
Third-party backup software |
| File History |
|
The feature is only available in Windows 10 Home and Pro editions, but not in the Home S edition. |
| Backup and Restore |
|
The Windows 7/8.1/10 Home and Pro editions, but not the Home Single Language edition, have access to this feature. |
| OneDrive | Offers free backup storage with a Microsoft account |
|
Qiling Backup is the top choice for Windows 10, offering extensive backup options and available in all editions, including the latest Windows 11. Backup and Restore (Windows 7) is a close second, but only available in Home and Pro editions of Windows 10.
FAQs
1.What options are available for backup?
Several backup options are available, such as backing up to an external drive, the cloud, or a network drive.
2.What types of backup are available in Windows 10?
On Windows 10, there are various backup options available, including full, incremental, and differential backups. Users can utilize Backup and Restore (Windows 7) to create a full backup of their computer, while File History provides incremental backups. Alternatively, Qiling Backup, an all-in-one backup utility, allows users to create all three types of backups, offering flexibility and convenience.
Conclusion
In Windows 10, there are several backup options to choose from, each catering to different needs. For those who only need to back up files, File History or OneDrive may suffice. However, if you want to back up your entire system, Backup and Restore (Windows 7) or Qiling Backup are more suitable options.
Related Articles
- [99%'s Choice] How to Backup Entire Hard Drive Windows 10
- How to Clone GPT Disk to SSD in Windows Without Boot Failure
- How to Backup A Folder in Windows 7 | Step-by-Step Guide
- How to Clone RAID Disk Safely and Easily
- How to Backup SD Card to Dropbox [PC & Android]🔥
Dropbox is a leading cloud storage service that allows users to save and backup their data. This article provides a convenient guide for users who want to backup their SD card data from Android and PC to Dropbox storage. - How to Backup Windows 10 to QNAP NAS (2 Simple Ways)👍
You can backup Windows 10 to QNAP NAS using two methods. This post will outline these methods for performing a Windows 10 System Backup to QNAP NAS.