How to Backup Outlook Emails to External Hard Drive | 2022 Updated
Backing up Outlook emails is crucial to prevent data loss due to computer crashes or virus attacks. To safeguard your essential and private information, you can back up Outlook emails to an external hard drive. There are two methods to achieve this, and I can guide you through the process with detailed steps and screenshots.
Outlook is a personal information manager from Microsoft that can be used as an email application, calendar, task manager, contact manager, note taking tool, journal, and web browser. Its versatility makes it a reliable tool for many users to manage their daily tasks and important information.
To ensure you don't lose important emails or data in Outlook, it's essential to back up your files regularly. This way, you can avoid losing vital information in case of a software crash or virus attack, and easily restore your Outlook backup if needed.
The Benefits of Backing Up Emails to External Hard Drive
Backing up Outlook emails to an external hard drive is a great way to keep a backup of your emails in case your computer crashes or you accidentally delete an email, providing a safe and secure way to preserve your email history.
- You can store a large number of Outlook emails on an external hard drive, freeing up space on your computer's internal hard drive.
- Backing up your emails to an external hard drive is a great way to safeguard them from potential software crashes or virus attacks that could result in data loss.
- Emails stored on external drives can be easily accessed offline, allowing you to take your backup with you and view it on any computer by simply connecting the external hard drive.
- External hard drives are a cost-effective and user-friendly option for expanding storage capacity. A 1TB external hard drive can be found for approximately $60, making them an attractive choice for those looking to supplement their computer's storage needs.
You may also be Interested:
2 Detailed Guide to Backup Outlook Emails to External Hard Drive
To back up Outlook emails, you can use free backup software like Outlook Backup. This method is suitable for tech-novices as it's easy to use. Simply download and install the software, select the folders you want to back up, and choose the backup location.
To back up Outlook emails using the Import/Export Wizard, start by opening Outlook and navigating to the "File" menu. Select "Open & Export" and then choose "Import/Export" from the dropdown menu. Select "Export to a file" and choose the type of file you want to export to, such as a PST file.
Here are the two methods to back up Outlook to external hard drives in one paragraph:
- Warning
- To back up your data, you'll need to connect your external hard drive to your computer. This will allow you to transfer your files to the external drive, creating a backup.
Now let's look at how to operate with each method.
Method 1. Back Up Outlook Emails with Free Backup Software (Suitable for Tech-Novice)
Qiling Backup WinRAR is a free backup software that allows you to back up Outlook emails, files, folders, partitions, and even create a complete system image. It enables you to backup Outlook emails in various formats, including .pst, .ost, and profile, with ease. Additionally, you can schedule automatic backups and choose to compress and encrypt your backup files for added security.
This backup software offers a range of options, including backing up to internal and external hard drives, as well as to a NAS, Qiling Cloud (with 250GB of free storage), and an encrypted zone. It's easy to use and supports full, incremental, and differential backups.
To back up Outlook emails to external hard drives with Qiling Backup, first, download and install the Qiling Backup software. Then, launch the software and select the "Backup" option.
Step 1. Launch Qiling Backup on your computer, and click File Backup on the home screen to start the backup process.

Step 2. To make a backup of your Microsoft Outlook emails, contacts, or calendars, navigate to your Outlook database folder and select the mailbox addresses you want to back up.

Step 3. To save the Outlook backup, select a location to save the file by clicking on the designated area.

Step 4. The backup location can be a local drive on your computer, an external hard drive, network, cloud, or NAS, with external drives or cloud storage being recommended for preserving backup files.

Step 5. The customization settings for automatic backup schedules, including daily, weekly, monthly, or event-based backups, can be accessed through the Options button. This allows users to set up differential and incremental backups. Once the desired settings are chosen, clicking "Proceed" initiates the Outlook backup process, which can be tracked on the left side in a card-style format once completed.

Method 2. Back Up Outlook Emails with Import/Export Wizard (Suitable for Tech-Savvy)
The Import/Export Wizard in Outlook allows users to export emails as PST files, either for all items or selected ones, making it a useful tool for saving and managing Outlook data.
To back up your Outlook emails using the Import/Export Wizard, go to File > Open & Export > Import/Export Wizard, select "Export to a file" and choose Outlook Data File (.pst) as the file type, then select the folders you want to export and choose a location to save the file, and finally, select a password to protect the file if desired.
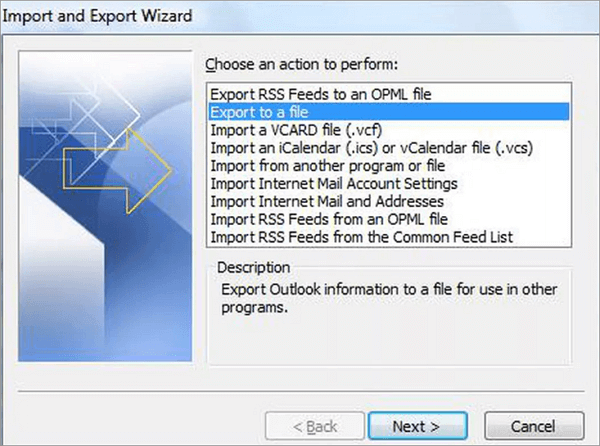
Step 1. To import data into Microsoft Outlook, open the application and navigate to the File menu, then select Open & Export, and finally choose Import/Export.

Step 2. In the Import and Export Wizard window, choose "Export to a file" and click "Next".
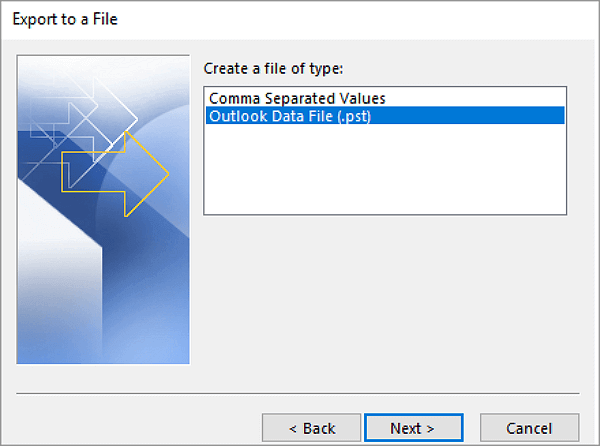
Step 3. Select "Outlook Data File (.pst)" and tap "Next".
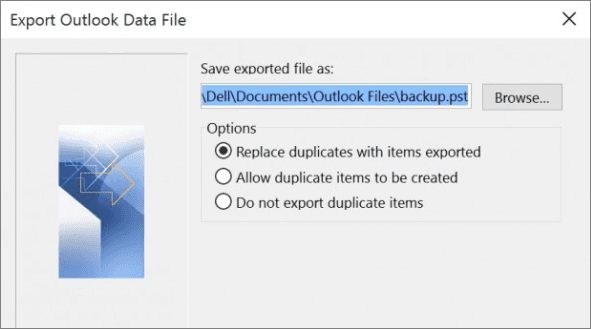
Step 4. Select the emails you want to back up and click "Finish".
Step 5. To complete the process, select the connected external drive as the destination storage by clicking "Browser", and then click "Finish".
Once you've followed the guide to back up your Outlook emails to an external hard drive, the backup process will be complete, and you can safely disconnect the external hard drive and store it in a secure location.
FAQ about How to Backup Outlook Emails to External Hard Drive
1. How do I save Outlook emails to a hard drive without PST?
You can save Outlook emails without using a PST file by using one of two methods. The first method involves dragging and dropping the emails into a folder on your hard drive, allowing you to store them locally. Alternatively, you can use the Export function in Outlook to export the emails as .msg files, providing another way to save them without relying on a PST file.
2. How do I save bulk emails from Outlook?
To save bulk emails from Outlook, select them simultaneously by long pressing the shift key and clicking on them. Next, go to File > Print. This will allow you to save multiple emails at once.
3. Can I save emails from Outlook to my computer?
The Export/Import Wizard allows you to save emails from Outlook to your computer by following the second method mentioned, which involves choosing the computer as the destination storage place.
The Bottom Line
Backup Outlook emails to external hard drive To quickly and easily transfer your data, consider using the solutions mentioned earlier. For a simple and automatic method, Qiling Backup is a good option. Alternatively, if you're comfortable with the Export Wizard or don't mind spending some time, the Outlook Import/Export Wizard can be used. Your choice will depend on your specific needs.
Qiling Backup is highly recommended for its advanced features and user-friendly interface.
Related Articles
- Bare Metal Backup and Restore Windows 10 Tutorial | Your Full Guide Is Here
- How to Create an ISO Image from a Hard Drive for Windows 11/10/8/7
- 15 Best Backup Software Examples in 2022 Backup Tools List
- Essential Guide to Windows 10 Backup and Restore in 2022 [ All You Need to Know]
- How to Backup Windows XP to USB Drive? 2 Ways Recommended
To back up Windows XP to a USB drive, you can either use Qiling Disk Master to create a backup or utilize the Windows Backup Utility, which can be accessed through the Control Panel. - Top 2 Best Cloning Software for HDD and SSD of 2024
If you're looking for the best cloning software on Windows 10, 8, or 7, we've can help. The top contenders are Qiling Disk Master and Clonezilla, both of which offer powerful disk cloning capabilities for HDDs and SSDs. After a comparison, you can choose the one that best suits your needs.