How to Create a Schedule to Backup User Files[Step-by-Step Guide]
User files can be protected by scheduling backups, which can be especially useful in case of computer failure. This process can also save time and effort compared to manual backups. There are three ways to create a schedule for backing up user files, which are discussed in more detail in this article.
The Importance of Backing Up User Files
User files, also known as folders, are used to store specific user accounts on a computer, containing all the user's settings, preferences, and application data.
Windows user files are stored in the C:\Users\(username) folder, which is vulnerable to computer failures. To protect against data loss, it's crucial to back up user files, providing an extra layer of protection for your data.
Creating a scheduled backup for user files has numerous benefits, including the ability to recover lost or corrupted data, protect against hardware failures, and ensure business continuity in case of unexpected events. By automating the backup process, users can rest assured that their critical files are safely stored and can be easily restored in case of an emergency.
- Scheduled automatic backups take the hassle out of manual operations.
- Save time and energy by having your computer create backups for you automatically.
- Scheduled backups are safer because they're less likely to be accessed by unauthorized individuals, as they're typically stored on a separate device or in the cloud, making them more secure.
A Thorough Comparison of Three User Files Scheule Backup Methods
Windows provides two built-Backup and Restore and File History, two built-in features in Windows, allow you to schedule backups for user files. However, they have limitations and differ in some ways. For a more flexible user files schedule backup, we recommend using a third-party tool called Qiling Backup.
The three utilities, electricity, gas, and water, are essential services that provide energy, fuel, and hydration to households and businesses. The table provides a comprehensive comparison of these services, highlighting their differences in terms of cost, usage, and safety features.
| Comparison | Qiling Backup | Backup and Restore | File History |
|---|---|---|---|
| Compatible system | Windows 7/8/10/11 | Windows 7/10/11 | Windows 8/10/11 |
| Backup source |
|
|
|
| Backup destination |
|
|
|
| Backup type |
|
|
|
| Step-by-step guide | Create a Schedule to Backup User Files with Qiling Backup | To create a schedule to backup user files with Backup and Restore, follow these steps: First, open the Backup and Restore control panel applet. Then, click on the "Set up backup" button to create a new backup job. | Create a Schedule to Backup User Files with File History |
Here are some other functions for Qiling Backup:
- Schedule backup: automatically create full/incremental/differential backup at a scheduled time.
- Backup to image: Create a disk image of the specified partitions or disks and save it to a safe location.
- Clone disk or partition: Upgrading the system disk, migrating the OS to an SSD, or copying data from one disk to another can be done without reinstalling Windows.
- Create rescue media: To create a bootable disc of Qiling Backup, you can follow these steps: Insert a blank CD/DVD into the disc drive, download the Qiling Backup software, and run it. The software will guide you to create a bootable disc.
- WinPE Bootable Disk: To create a bootable WinPE environment on USB or CD/DVD, you can use the Windows Assessment and Deployment Kit (ADK) or a third-party tool like Rufus. This allows you to create a self-contained environment that can be used to restore a system or recover data when a computer fails to boot.
- Security Zone Backup: Save backup files to a separate, inaccessible partition, often referred to as a "security zone", to protect them from malware or ransomware attacks. This ensures that even if the main system is compromised, the backup files remain safe and can be easily restored.
- 250 GB of free Cloud backup: Qiling provides 250 GB of free cloud storage, allowing users to securely store backup files in the cloud, which is considered more secure than storing them locally.
Step-by-Step Guide to Create a User Files Schedule Backup
Method 1. Create a Schedule to Backup User Files with Qiling Backup
Applied system: Windows 7/8/10/11
Step 1. When you first use Qiling Backup to back up files, click on the "File backup" option on the home screen to select the types of files you want to back up, such as pictures, videos, documents, and more.

Step 2. Select the files, folders or directories you want to back up, following the paths to locate them.

Step 3. To ensure you don't lose your important data, you can choose a location to save and retain the backup, such as an external hard drive or a cloud storage service like Google Drive or Dropbox. This will allow you to access your backup from anywhere and ensure it's safely stored in case of a device failure or other issue.

Step 4. Qiling Backup allows users to save backup files to a variety of devices, including local hard drives, external USB drives, SD cards, network drives, and NAS drives, as well as Qiling's own cloud drive. We recommend choosing the cloud drive for saving important backups due to its greater accessibility, flexibility, and safety.

Step 5. To set up an automatic and intelligent backup schedule for the next file backup task, go to the "Options" setting. There, you can customize the backup process by encrypting confidential files, compressing the backup image size, or specifying the exact time for the next backup to start, allowing for a tailored backup scheme.

Customize an advanced and automatic backup task here:

Step 6. Click "Proceed" to start the file backup process, which will display the completed backup files in a card style on the left area.

Method 2. Create a Schedule to Backup User Files with Backup and Restore
Applied system: Windows 7/10/11
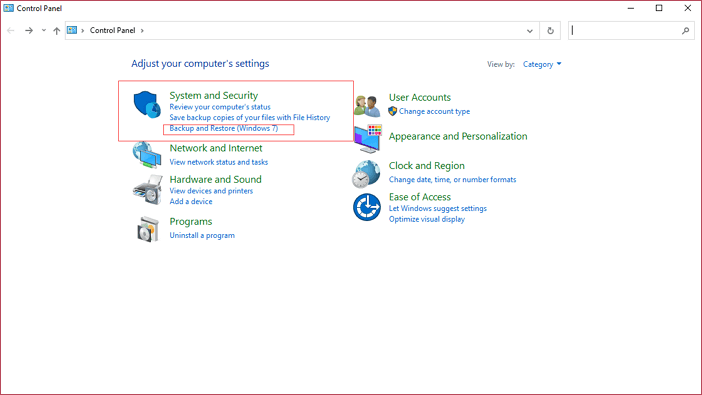
Step 1. Click on the Start menu, type "backup" and select Backup and Restore from the list, or go to the Control Panel to find Backup and Restore.
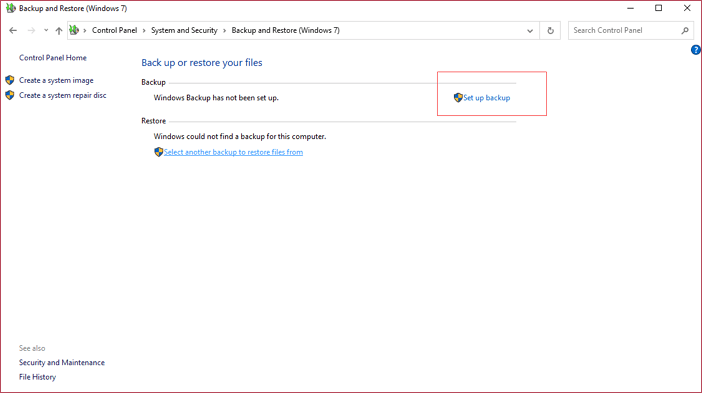
Step 2. Click "Set up backup".
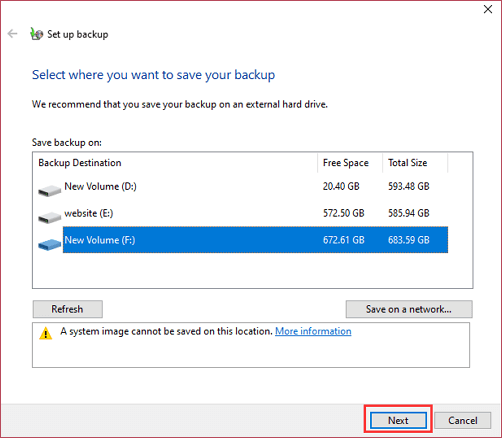
Step 3. Choose a destination place to save your backup and tap Next.
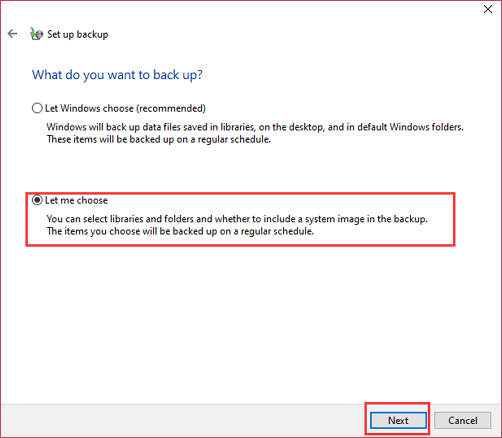
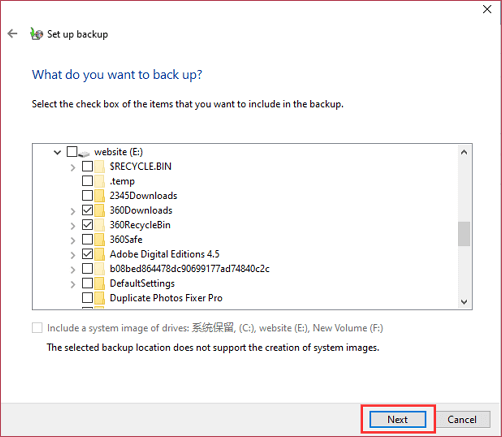
Step 4. Check the "Let me choose" option, then click Next.
Step 5. Find the files you want to back up, select them, and click Next.
Step 6. To customize your schedule backup plan, click on the "Change schedule" option, allowing you to tailor it to your specific needs.
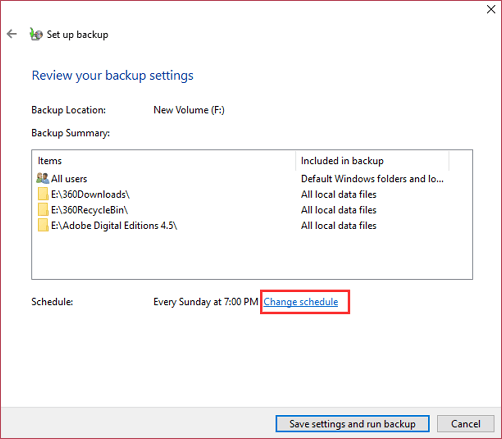
Here you are supposed to set how often, what days, and what time to back up.

Method 3. Create a Schedule to Backup User Files with File History
Applied system: Windows 8/10/11
- Notice:
- To back up user files using File History, an external hard drive must be connected to the computer, and the frequency of scheduled backups is less than the previous methods.
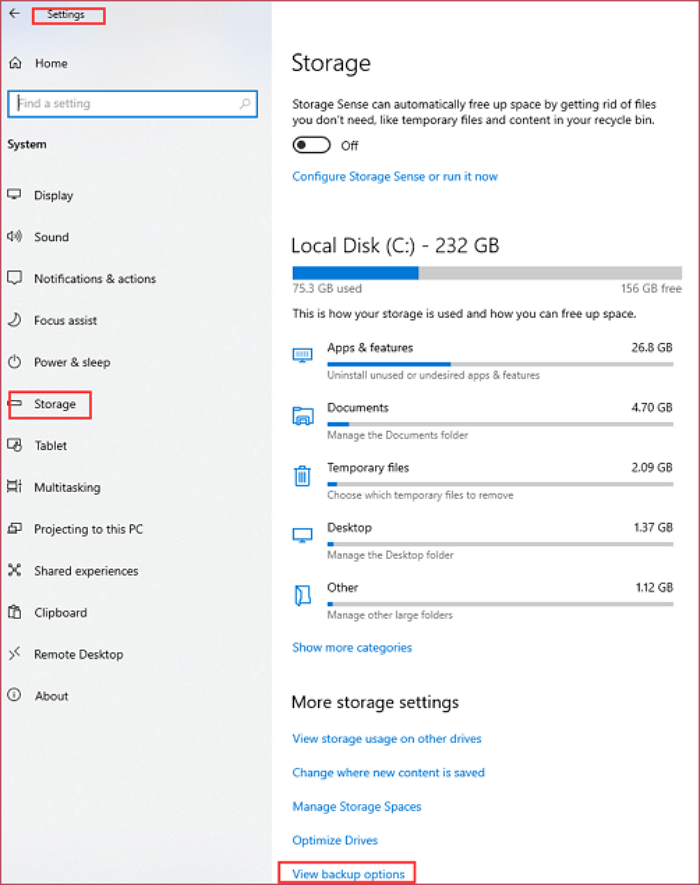
Step 1. To find the File History, go to Settings, then click on Storage, and finally select View backup options.
Step 2. To start backing up your data, click the "Add a drive" button to select a location to save your backup. This will activate the switch bar, indicating that the backup process is underway.
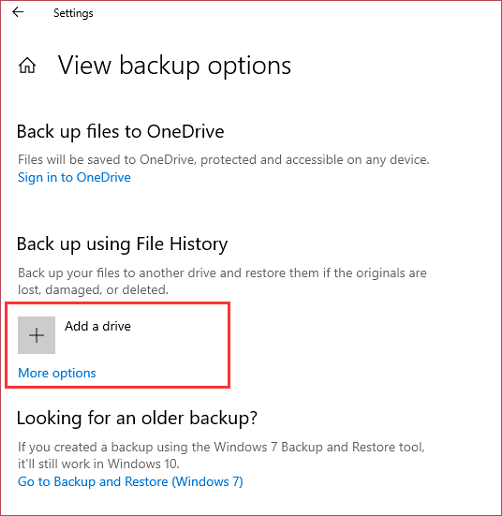
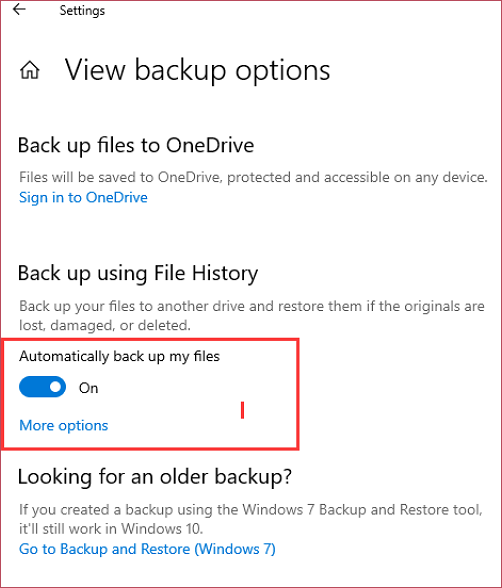
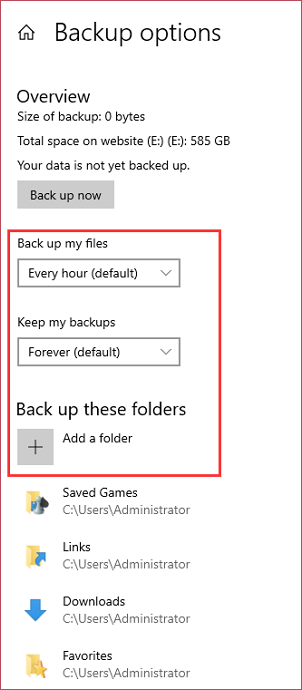
Step 3. To select the user files you want to backup, click on the "More options" button and then click "Add a folder."
- Tip
- The default backup frequency is hourly and the last backup time is set to forever, allowing for customization as needed.
Wrapping Up
By using Qiling Backup, Backup and Restore, and File History, you can successfully create a schedule to backup user files. We highly recommend using Qiling Backup as it is more flexible and comprehensive, offering additional features such as cloning, creating rescue media, and creating a bootable WinPE environment, making it an ideal choice for backing up user files.
If you have any other questions or suggestions, please don't hesitate to reach out to us. We're here to help and look forward to hearing from you.
Create Schedule Backup for User Files FAQ
1. How do I use Task Scheduler to backup files
To automate file backups using Task Scheduler, create a new task with a desired name. Set the frequency for the task to run, such as daily or weekly. Next, add an action to backup files using the copy command line or Xcopy, specifying the source and destination folders. Finally, create a second action to delete the original files, ensuring they are removed after the backup is complete. This process ensures a regular and secure backup of important files.
2. What is the best backup schedule?
There is no one-The ideal backup schedule varies depending on your specific needs and usage. However, a general recommendation is to perform backups at least once a week, with additional backups after any significant changes or updates to your data. This can include daily backups for critical systems or applications, or monthly backups for less frequently used data. It's also a good idea to maintain a backup history of at least 30 days, in case you need to recover data from a previous point in time.
- Daily backup for files that are frequently changed
- Weekly backup for files that are less frequently changed
- Monthly backup for files that are rarely changed
3. Does Windows 10 have an automatic backup?
Yes. Windows 10 has two built-To automatically backup files, you can use Windows Backup and Restore and File History tools. These tools allow you to create a schedule for automatic backups. For more information, please refer to the step-by-step guide provided above.
4. What is the 3-2-1 rule for backups?
The 3-2-1 rule is a guideline for creating backups, where you should have at least three copies of your data on two different media, with one copy kept off-site, such as on an external hard drive and in the cloud. This ensures that if one copy is lost or corrupted, you still have two other copies to fall back on.
Related Articles
- [Tutorial] How to Backup Excel File Automatically in 2 Tested Approaches
- Backup HDD with Bad Sectors [Detailed Guides]
- Backup Data to Tape with Tape Backup Software
- Download Crucial Data Transfer Software to Migrate SSD Data and OS
- Free Download Qiling Backup Full Crack + Serial/Keygen
This article is about Qiling Backup full crack download, where we'll introduce its features and guide you on how to get the latest version for free on Windows 10/8/7. - Top 5 HDD to SSD Cloning Software for Windows 11/10 in 2022
Find reliable HDD to SSD cloning software for Windows 11 or 10. Clone your old hard drive to an SSD without reinstalling Windows.