[8 Fixes] How to Fix Windows 10 File Sharing Not Working After Update 1803/1809/1903
Windows 10 File Sharing feature allows users to quickly share files with computers inside their local network, but many users have encountered issues after updating to versions 1803, 1809, or 1903, resulting in Windows 10 file sharing not working. To resolve this, there are 8 feasible ways to fix the issue, making file sharing convenient and safe once again.
| Reasons for Network Sharing not Working | Workable Solutions |
|---|---|
| Case 1. File Sharing Misuse (Easiest) | 1. Enable File Sharing Properly 2. Turn Password Protection Off |
| Case 2. Computer Adaption Problems | 1. Add a Windows Credential 2. Disable IPv6 3. Change File Sharing Connection 4. Disable Antivirus |
| Case 3. Windows Update Problems | 1. Enable the SMB 1.0/CIFS Support 2. Update Windows to the latest version |
| Case 4. Fail to resolve the problem by 8 fixes | Use File Sharing alternative - Qiling Disk Master |
P.S. If the file sharing not working problem occurs, restarting your computer may be a good initial step if the issue is related to the associated service not starting. If this doesn't resolve the issue, further troubleshooting methods can be explored.
About Fixing Windows 10 Network Sharing Not Working
When computer network issues occur, computers may not discover each other, users may be unable to access shared files or folders, or shared folders may not be visible.
If you're experiencing issues with Windows 10 file sharing, it's essential to resolve the problem immediately. Fortunately, there are 8 effective methods to troubleshoot the issue, and if all else fails, you can use Qiling Disk Master, a PC data transfer tool, as a workaround. Once you've fixed the file sharing issue, you can also explore file sharing between Windows 7 and Windows 10.
1. Enable and Use File Sharing Properly
To successfully enable file sharing, it's essential to correctly set up sharing settings, and also share data in the right way. This can be achieved by following a series of steps.
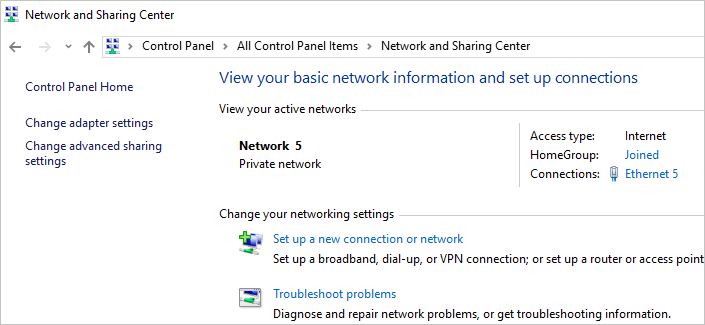
Step 1. To access the advanced sharing settings, you can click on "Start" and then select "Control Panel". From there, navigate to "Network and Sharing Center" and click on it.
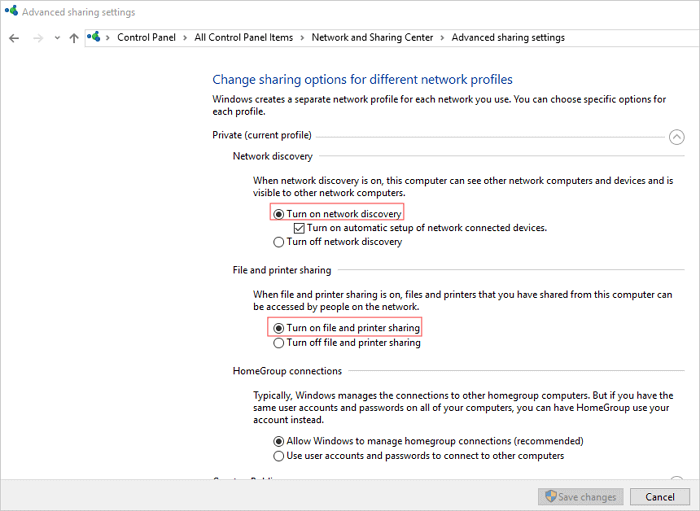
Step 2. To turn on network discovery and file and printer sharing, go to the Private profile, check the boxes next to "Turn on network discovery" and "Turn on file and printer sharing", then click "Save changes" to confirm the changes.
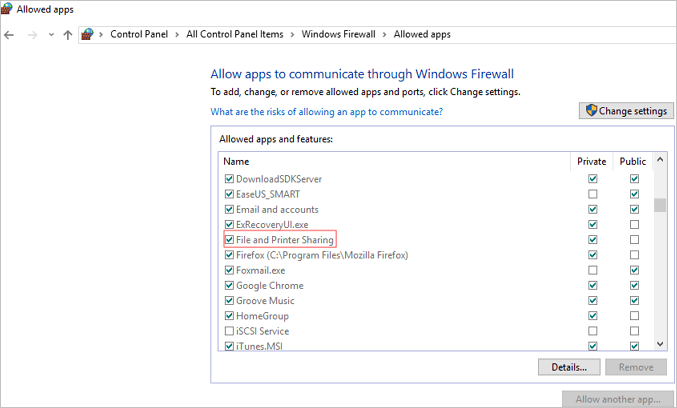
To ensure the problem can be resolved, allow File and Printer Sharing in Windows Firewall settings.
Step 1. To access the Windows Firewall settings, click on the "Start" button, then select "Control Panel". From the Control Panel, choose "Windows Firewall" and then click on "Allow a program through Windows Firewall".
Step 2. To enable file and printer sharing, open the Control Panel and select "Network and Internet" or "Network and Sharing Center". Click on "Change advanced sharing settings" and then select the checkbox next to "File and Printer Sharing". Click "OK" to save the changes.
If the above steps don't resolve the problem, you can also disable Windows Defender temporarily to see if that resolves the issue.
How to share files exactly
Step 1.Right-click on the file you want to share, click Properties, then Sharing, and finally Advanced Sharing.
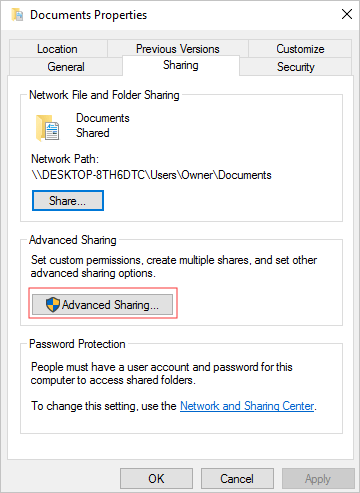
Step 2. To share a folder, select "Share this folder", click "Apply" and "OK". You can also set file permissions using the "Permissions" option.
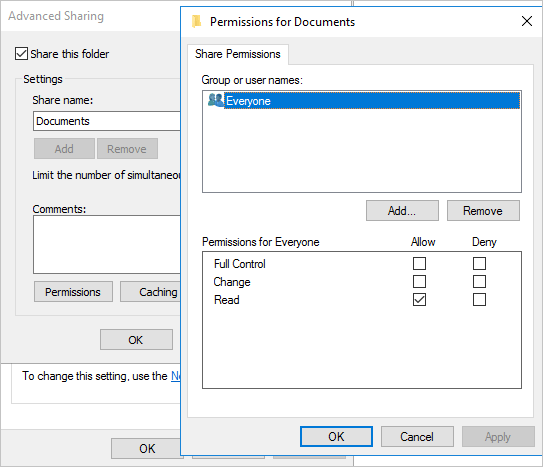
To make a folder accessible to all users in your local network, follow these steps: first, right-click on the folder and select "Properties" to open the Properties window. Then, in the Properties window, click on the "Sharing" tab and select "Share" to share the folder with everyone in the local network. If you want to share with specific users, click the "Share" button in this step to select.
2. Turn Password Protection off
When Password protected sharing is enabled, file sharing may fail because other users need to have a user account on your PC or know your username and password. To resolve this issue, try disabling Password protected sharing.
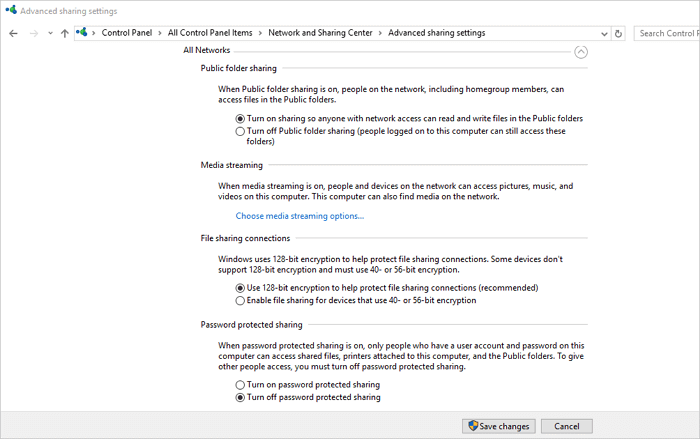
Step 1. Go to the Control Panel, then Network and Sharing Center, and finally Change advanced sharing settings.
Step 2. Under All Networks, turn off password protected sharing and save changes.
3. Add a Windows Credential
If you're unable to access a specific folder when connecting to a remote server computer for file sharing, you can try adding a credential to resolve the issue. To do this, you'll need to know the network address, username, and password of the remote computer or server. By providing this information, you should be able to successfully access the folder.
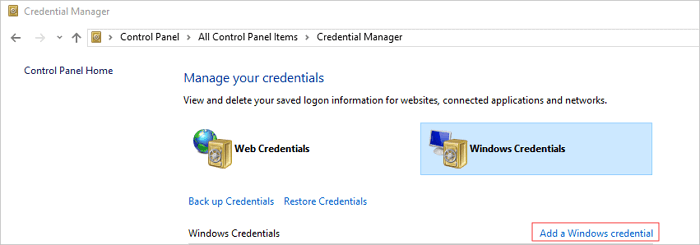
Step 1. Open "Control Panel", and click on "Credentials Manager".
Step 2. Click the "Add a Windows credential" button to select Windows Credentials and add a new credential.
Enter the target computer's IP address in the Internet or network address and enter User name and Password respectively. This will hopefully resolve the problem with File sharing.
4. Disable IPv6
Disabling IPv6 on your computer may resolve file sharing issues, so it's worth trying.
Step 1. Open "Control Panel" and click on "Network and Sharing Center".
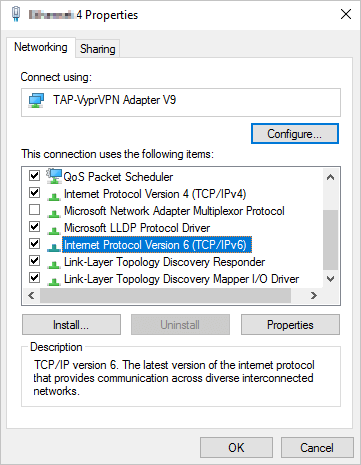
Step 2. To change the adapter settings, click on "Change adapter settings" and then double-click on the active Network Adapter in the Internet Connection window.
Step 3. To resolve the issue, click on "Properties" and disable Internet Protocol Version 6 by unchecking it, then click "OK" and restart your computer to see if the problem persists.
5. Change File Sharing Connections
Windows uses 128-To ensure secure file sharing connections, it's necessary to switch between 128-bit encryption and 40- or 56-bit encryption, depending on the device's capabilities, as some devices may not support 128-bit encryption. This allows for secure file sharing even on devices that don't support the higher level of encryption.
Step 1. To access the advanced sharing settings, open the Control Panel, click on "Network and Sharing Center", and then select "Change advanced sharing settings".
Step 2. To access file sharing connections, go to the "All Networks" section and look for "File sharing connections". You can try both 120-bit encryption and 40- or 56-bit encryption options.
6. Disable Antivirus on your PC
To resolve Windows file sharing issues, try temporarily disabling your antivirus software and see if it resolves the problem. Additionally, consider upgrading your antivirus to its latest version. This may help resolve the issue.
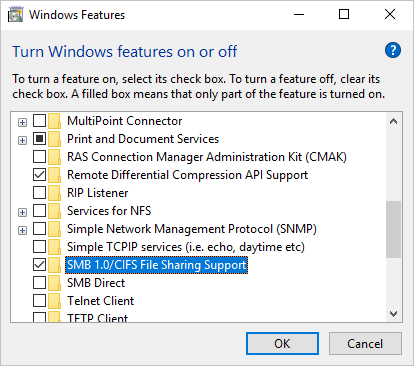
7. Enable the SMB 1.0/CIFS File Sharing Support
The recent Windows 10 update may have disabled the SMB feature necessary for file sharing, but you can fix this by enabling SMB 1.0 in the Windows Features window.
Step 1. Open the "Control Panel". Click on "Programs and Features".
Step 2. To enable SMB 1.0/CIFS File Sharing Support on Windows, click "Turn Windows features on or off" at the left pane, scroll down to find and check the "SMB 1.0/CIFS File Sharing Support" feature, click "OK", and then reboot the computer.
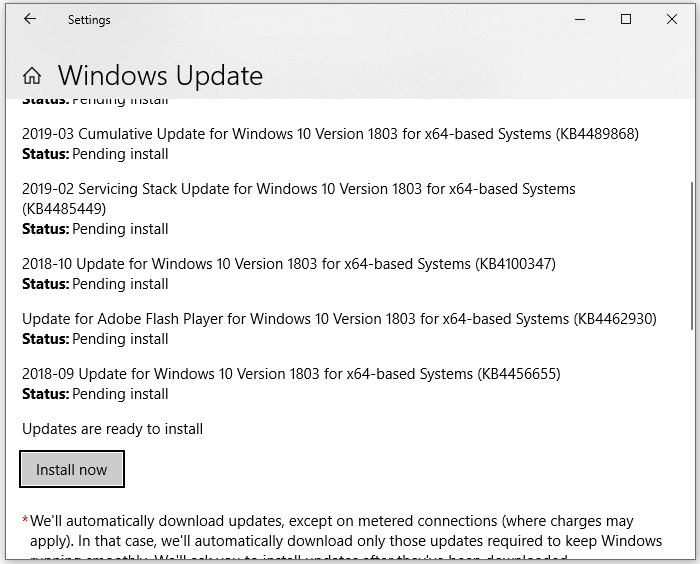
8. Update Windows to the Latest Version
Windows 10 files sharing not working may be due to bugs in the update, but the latest versions have resolved this issue. Upgrading to the latest Windows version may resolve the problem.
Step 1. To check for Windows updates, open the Settings app on your Windows PC, navigate to Update & security, and click on the Check for updates button to see if a new version of Windows is available.
Step 2. If there is an update available, install it right away and restart your computer afterwards.
We've provided all possible solutions to fix the Windows 10 file sharing not working issue, which can be done directly on the Windows computer. Hopefully, these solutions have helped you resolve the issue and share files between two computers again.
If you've tried various methods to transfer PC data, but none have worked, don't get discouraged. Instead, consider using a reliable alternative to Windows 10's file sharing feature to complete the data transfer. This option may provide a solution to your problem.
How to Transfer Data from One PC to Another with File Sharing Alternative in Windows 10
Windows 10 file sharing can be affected by various factors, making it difficult to resolve issues in a timely manner. To ensure a smooth and successful PC data transfer, consider using Qiling Disk Master, a user-friendly file sharing software that enables one-click data transfer from one PC to another. With Qiling Disk Master, you can transfer data, applications, and account settings using one of three easy transfer methods.
- PC to PC Transfer: Connect two Windows laptops/PCs by the network, and move your files, apps & accounts off the old PC to a new one wirelessly
- Backup & Restore: You can transfer files, folders, or software from your old computer to your new one by making images of them and then transferring those images to the new computer. This process also serves as a backup of your important data, ensuring that it is safely transferred and preserved.
- App Migration:To resolve low disk space issues, you can move installed software to another drive locally. This involves relocating the software installation directories to the new drive, effectively freeing up space on the original drive.
Now, download and use PC file transfer as an effective workaround to fix Windows 10 file sharing not working problem.
Step 1. Launch Qiling Disk Master on your source and target computers, and connect both PCs via the internet.
1. At the "PC to PC" section, click "PC to PC" to proceed.
2. Select your target computer via its device name, then enter its account password or verification code, and choose the transfer direction. Click "Connect" to proceed.
You can check the verification code on the right top of the main screen on the target computer.
Step 2. To transfer data via the internet, select the categories of "Applications", "Files", and "Accounts" that you wish to transfer. This will ensure that your desired data is included in the transfer process.
If you want to transfer data selectively, click "Edit" under each category and choose the specific items you want to transfer.
Step 3. To transfer your apps, files, and accounts from one computer to another, click the "Transfer" option, which initiates the process over the internet.
Windows 10 Network Sharing Not Working FAQ
1. How to enable File Sharing properly?
- To enable file and printer sharing on your computer, navigate to the Control Panel, then select the "Network and Sharing Center" and click on "Advanced sharing settings". From there, choose the option to "Turn on network discovery" and also "Turn on file and printer sharing" under the "Private (current profile)" section.
- To change Windows firewall settings, go to Start, then Control Panel, then Windows Firewall, then Allow a program through Windows Firewall, and finally select File and Printer Sharing.
2. How do I fix Network Sharing Not Working?
8 workable solutions are recommended to fix Windows 10 sharing not working due to file sharing misuse, computer adoption problem, Windows update, and more.
- 1. Enable and Use File Sharing Properly
- 2. Turn Password Protection Off
- 3. Add a Windows Credential
- 4. Disable IPv6
- 5. Change File Sharing Connections
- 6. Disable Antivirus on Your PC
- 7. Enable the SMB 1.0/CIFS File Sharing Support
- 8. Update Windows to the Latest Version
Related Articles
- Fix Kernel Security Check Failure Error in Windows 10/8/7
- How to Change the Read/Write Permission on a Flash Disk/Memory Card
- How to Stop Windows 10 Deleting Files Automatically
- Fix Dropbox Not Syncing Error in Windows 10 [2022]
- (Step-by-step Guide) How to Install Windows 10 on Hard Drive for Another Computer
Learn how to install Windows 10 on a hard drive for another computer. Use universal restore, cloning, or installation media safely. - How to Move Files to External Hard Drive Without Copying - 2 Alternative Ways
Are you tired of wasting time manually copying and pasting data to an external hard drive? This post shows you how to move files to external hard drive without copying them, saving you time and effort.