Fix Windows 10/11 Won't Boot: 8 Proven Solutions (2026)
Few things are more frustrating than pressing the power button and seeing your PC stuck on a black screen, a blue screen, or an endless loading loop. When Windows won't boot, you could lose access to important files and applications. But before you panic or resort to a clean install, try the solutions in this guide—most boot failures can be fixed without losing data.
Whether your PC shows a black screen, a "Boot Device Not Found" error, or enters Automatic Repair loop, this guide walks you through 8 proven solutions to get Windows 10 or Windows 11 booting again.
PAGE CONTENT
- Common Reasons Why Windows Won't Boot
- Solution 1: Check Hardware Connections
- Solution 2: Run Startup Repair
- Solution 3: Fix Boot Configuration with bootrec
- Solution 4: Repair BCD with bcdboot
- Solution 5: Run System Restore
- Solution 6: Fix MBR or Rebuild EFI Partition
- Solution 7: Check Disk Errors and System Files
- Solution 8: Back Up Data and Reset Windows
- FAQs About Windows Boot Failures
Common Reasons Why Windows Won't Boot
Windows boot failures can be caused by software or hardware issues. Common causes include:
- Corrupted boot configuration data (BCD) or Master Boot Record (MBR)
- Damaged system files after a failed Windows update
- Missing or corrupted EFI System Partition (on UEFI systems)
- A failing or disconnected hard drive/SSD
- Incorrect BIOS boot order or boot mode (UEFI vs Legacy)
- Malware or ransomware that damaged the boot sector
- Recently installed hardware or drivers that conflict with the boot process
The solution depends on the symptom. The steps below cover the most common scenarios.
Solution 1: Check Hardware Connections
Before trying software fixes, make sure the issue is not caused by a loose connection or faulty hardware.
- Check power: Ensure the power cable is securely connected and the power supply is working. For laptops, make sure the battery is charged or the AC adapter is connected.
- Check display: If you hear fans but see no display, connect an external monitor to rule out a display issue. Try the brightness keys.
- Check internal connections: If comfortable, open the case and ensure the SATA/M.2 data and power cables are firmly connected to the drive and motherboard.
- Check boot order: Enter BIOS (press Del, F2, F10, or F12 during startup) and make sure the Windows drive is set as the first boot device.
- Disconnect external devices: Unplug all USB drives, external hard drives, and peripherals, then try booting again. A faulty external device can interfere with the boot process.
Solution 2: Run Startup Repair
Startup Repair is a built-in Windows tool that can automatically diagnose and fix common boot problems.
Step 1. If Windows fails to boot twice in a row, it will automatically enter the Automatic Repair screen. If not, use a Windows installation USB to boot, then click "Repair your computer".
Step 2. Go to Troubleshoot > Advanced options > Startup Repair.
Step 3. Select your Windows account and enter your password.
Step 4. Startup Repair will diagnose and attempt to fix the boot issue. This may take several minutes.
Step 5. When finished, restart your PC and check if Windows boots normally.
Solution 3: Fix Boot Configuration with bootrec
If Startup Repair fails, use the bootrec tool to repair the Master Boot Record (MBR), boot sector, and Boot Configuration Data (BCD).
Step 1. From the Advanced options screen, select Command Prompt.
Step 2. Run the following commands one by one, pressing Enter after each:
bootrec /fixmbr
bootrec /fixboot
bootrec /scanos
bootrec /rebuildbcd
Step 3. When asked to add the installation to the boot list, type Y and press Enter.
Step 4. Type exit and press Enter, then restart your PC.
If bootrec /fixboot returns "Access is denied", see Solution 4 for an alternative using bcdboot.
Solution 4: Repair BCD with bcdboot
If bootrec fails to rebuild the BCD, use bcdboot to recreate the boot files from a working Windows installation.
Step 1. Open Command Prompt from Advanced options.
Step 2. Type diskpart and press Enter.
Step 3. Run the following commands to find your Windows drive letter:
list vol
Step 4. Look for the volume with "Windows" in the label or with your Windows installation. Note its drive letter (e.g., C: or D:).
Step 5. Type exit to leave diskpart.
Step 6. Run the bcdboot command, replacing C: with your actual Windows drive letter:
bcdboot C:\Windows /s C: /f ALL
Step 7. Restart your PC.
Solution 5: Run System Restore
If the boot failure started after a recent change (Windows update, driver install, software install), System Restore can revert Windows to an earlier working state.
Step 1. From the Advanced options screen, select System Restore.
Step 2. Select your Windows account and enter your password.
Step 3. Choose a restore point from before the boot issue started. Click "Next".
Step 4. Click "Finish" to start the restore process. Your PC will restart and revert to the selected restore point.
- Note
- System Restore will not delete your personal files, but it will remove apps, drivers, and updates installed after the restore point was created.
Solution 6: Fix MBR or Rebuild EFI Partition
On Legacy BIOS (MBR) systems, a corrupted MBR can prevent booting. On UEFI systems, a missing or corrupted EFI System Partition (ESP) is a common cause.
Fix MBR (Legacy BIOS)
Open Command Prompt and run:
bootrec /fixmbr
bootrec /fixboot
bootrec /rebuildbcd
Rebuild EFI Partition (UEFI)
Step 1. Open Command Prompt from Advanced options.
Step 2. Run diskpart to assign a drive letter to the EFI partition:
diskpart
list disk
select disk X (replace X with your system disk)
list vol
select vol Y (replace Y with the EFI partition, usually FAT32, ~100MB)
assign letter=Z
exit
Step 3. Rebuild the EFI boot files:
bcdboot C:\Windows /s Z: /f UEFI
Step 4. Restart your PC.
Solution 7: Check Disk Errors and System Files
Disk errors or corrupted system files can also prevent Windows from booting. Use CHKDSK and SFC from Command Prompt.
Step 1. Open Command Prompt from Advanced options.
Step 2. Run CHKDSK to check and repair disk errors (replace C: with your Windows drive):
chkdsk C: /f /r
Step 3. Run SFC to repair corrupted system files:
sfc /scannow /offbootdir=C:\ /offwindir=C:\Windows
Step 4. Restart your PC after the scans complete.
Solution 8: Back Up Data and Reset Windows
If none of the above solutions work, protect the data on the system disk before resetting or reinstalling Windows. The Qiling Disk Copy feature can clone the entire unbootable disk, including Windows, applications, settings, and personal files, to another HDD or SSD from WinPE.
Prepare another working Windows PC, an empty USB drive for the bootable media, and a destination HDD or SSD with enough capacity for the source disk. Back up the destination disk first because the cloning process will erase it.
Stage 1: Create a Qiling WinPE Bootable USB
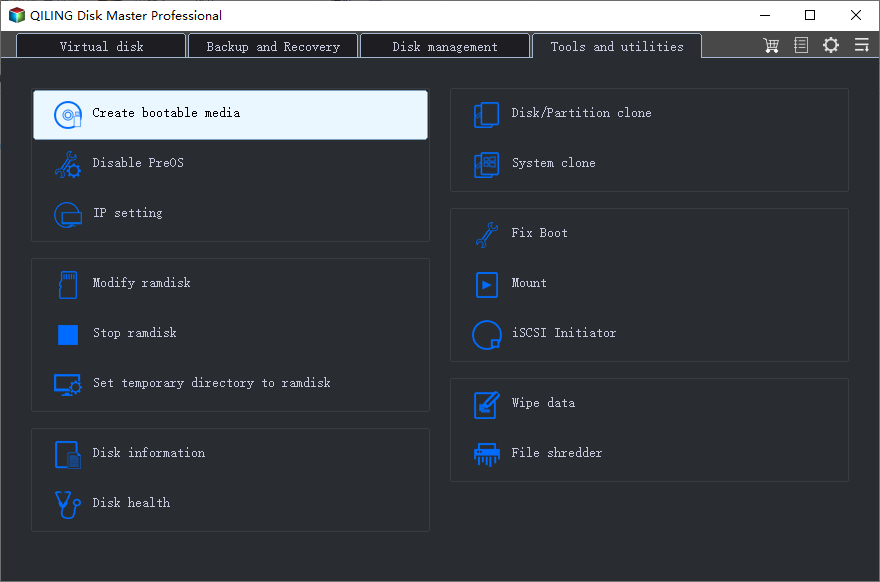
Step 1. Install and open Qiling Disk Master on the working PC. Connect the empty USB drive, open Tools, and select Create bootable media.
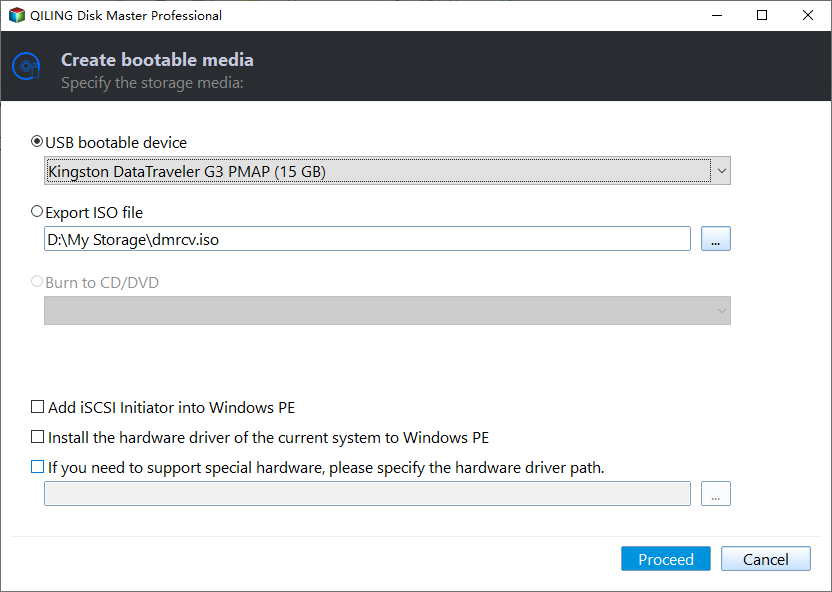
Step 2. Select the connected USB drive as the bootable media destination. Check the drive letter and capacity carefully because the USB drive will be formatted.
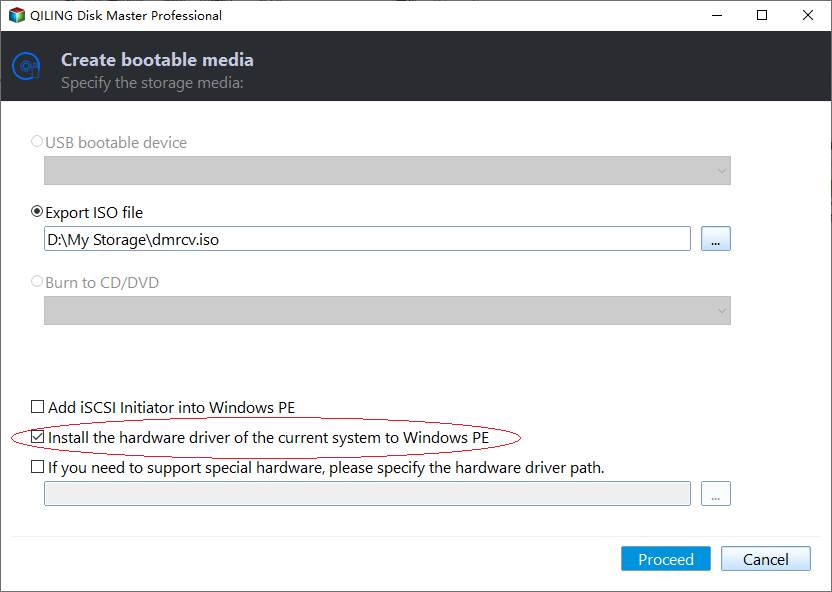
Step 3. If the unbootable computer uses RAID, a storage controller, or a network adapter that WinPE may not recognize, add the required driver before creating the media. Otherwise, continue with the default drivers.
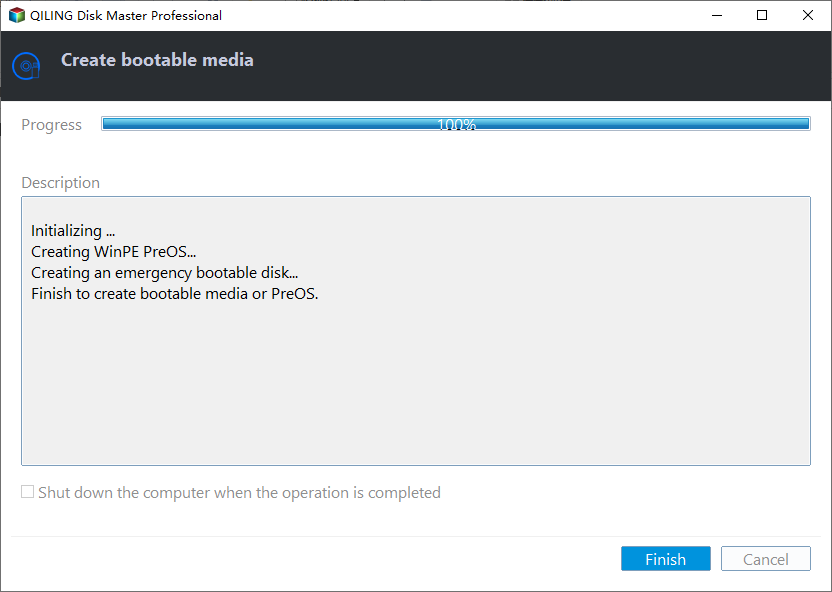
Step 4. Click Proceed to create the bootable USB. Wait for the completion message, then safely eject the USB drive.
Stage 2: Start the Unbootable PC from the USB
Step 1. Connect the Qiling bootable USB and the destination HDD or SSD to the unbootable computer. Keep the original Windows disk connected.
Step 2. Turn on the computer and repeatedly press its boot-menu key, commonly F12, F11, Esc, or F9. Select the Qiling USB drive. If the USB is not listed, enter BIOS/UEFI setup and move it to the first boot position.
Step 3. Wait for Qiling Disk Master to open in WinPE. Confirm that both the original system disk and the destination disk appear with the expected model and capacity. If the source disk is missing, restart and add the correct storage-controller driver to the bootable media.
Stage 3: Clone the Unbootable Windows Disk with Qiling Disk Copy
Step 1. On the Qiling tools page, select Disk clone. Use disk clone rather than partition clone so the Windows partitions and required boot partitions are copied together.

Step 2. Select the original Windows disk as the source disk. Verify it by model, capacity, partition layout, and the location of the Windows partition before continuing.

Step 3. Select the connected HDD or SSD as the destination disk. Do not select the USB drive used to start WinPE.

Step 4. Review the destination layout. Choose automatic fitting when cloning to a drive of a different size, or edit the partition layout when you need to allocate the extra space manually. Enable SSD optimization when the destination is an SSD.

Step 5. Check the source and destination one final time, then click Proceed.
Step 6. Read the warning that all partitions and data on the destination disk will be overwritten. Recheck the disk model and capacity, then confirm only when the correct destination is selected. Keep the computer connected to power and do not disconnect either disk while data is being copied.
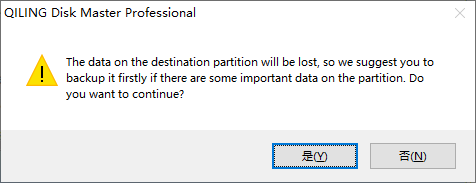
Step 7. When Qiling reports that the clone is complete, shut down the computer. Disconnect the old disk or set the cloned disk as the first boot device, then start the PC and confirm that Windows and important files are accessible.

After the cloned disk and files have been verified, you can return to Windows Recovery Environment on the original PC and select Troubleshoot > Reset this PC. Choose Keep my files to preserve personal files or Remove everything for a clean reset, then follow the on-screen instructions.
FAQs About Windows Boot Failures
What should I do if Windows 10 won't boot?
Start by checking hardware connections and the boot order in BIOS. Then try Startup Repair, followed by bootrec commands to fix the MBR and BCD. If those fail, use System Restore or run CHKDSK/SFC scans.
How do I fix a black screen with no display on boot?
Check the display connection and try an external monitor. If the PC powers on but shows nothing, it could be a display, GPU, or RAM issue. Try reseating the RAM and GPU. If the PC is under warranty, contact the manufacturer.
Can I recover my files if Windows won't boot?
Yes. You can recover files by connecting the drive to another PC, using a Linux live USB, or using Qiling's WinPE bootable media to access and back up your files before resetting Windows.
What is the difference between MBR and GPT boot repair?
MBR (Legacy BIOS) systems use bootrec to fix the Master Boot Record. GPT (UEFI) systems use the EFI System Partition (ESP) and bcdboot to rebuild boot files. Check your BIOS boot mode to determine which method to use.
Will resetting Windows delete my files?
If you choose "Keep my files", Windows will be reinstalled but your personal files will be preserved. If you choose "Remove everything", all files and apps will be deleted. Always back up before resetting.
Conclusion
When Windows won't boot, there are many fixes to try before resorting to a clean install. Start with hardware checks and Startup Repair, then move on to bootrec/bcdboot commands, System Restore, and disk/System File scans. If all else fails, back up your data with Qiling's bootable media and reset Windows while keeping your files. In most cases, one of these solutions will get your PC booting again without data loss.
For a reliable backup solution that can save you from future boot disasters, consider Qiling Backup to create regular system images.
Related Articles
- Windows 10 Won't Boot? Here's How to Fix It
- Windows 11 Is Not Booting? Here's How to Fix
- Windows 10 Won't Boot After Update? Fix It Now
- Fix DRIVER_POWER_STATE_FAILURE BSOD (0x0000009F)
- 3 Ways | How to Reinstall Windows 10 Without CD
Learn 3 ways to reinstall Windows 10 without a CD: Reset this PC, create installation USB, or use system image recovery. Back up first with Qiling Backup to avoid data loss. - How to Clone a Failing Hard Drive in Windows 10 Without Data Loss
If your hard drive is failing and Windows won't boot, learn how to clone it to a new HDD or SSD and recover your data with sector-by-sector cloning.
Products
Articles & Tutorials
- Data Recovery
- Data Backup
- File Recovery
- File Backup
- System Backup and Restore
- Disk and Partition Clone
- Technical articles
- Mobile articles
- Disk Master Help
- Windows Data Recovery Tutorials
- Windows Secure Delete Tutorials
- Windows Partition Management Tutorials
- Windows File Backup and Restore Tutorials
- Windows System Backup and Restore Tutorials
- Windows Disk Backup and Restore Tutorials
- Windows Clone Tutorials