How to Create A File History Backup? Full Guide About File History
What Is File History?
Windows File History is a continuous data protection feature that automatically backs up personal files to an external hard drive or network. It saves copies of files in the Documents, Pictures, Music, Videos, and Desktop folders, and also syncs OneDrive files for offline access on your PC. This feature replaced Shadow Copy as the primary backup tool in Windows 8.
File History is used to back up personal files, not a complete system image, saving copies to an external HDD or network, but not files encrypted with EFS.
How to Backup Windows 8/10/11 Files via File History
File History is available from Windows 8 to Windows 11, and is the utility Microsoft recommends for backing up files, even for Windows 10/11 users. This guide provides detailed steps for backing up files on the three types of Windows systems, and you can follow the steps according to your Windows version.
Access File History
Due to the different versions of the Windows system, there are some differences in access and operation. But don't worry, I'll present the steps as separate listings.
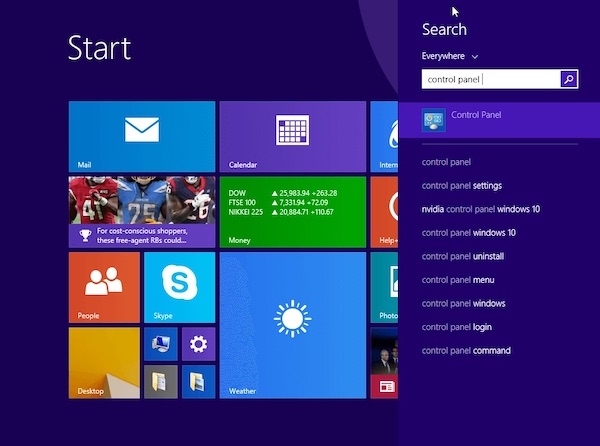
For Windows 8
To access the File History settings, click on the magnifying glass icon to open the search bar, type in "Control Panel," and select the "Control Panel" result. Then, click on "System and Security" and choose "File History" from the options.
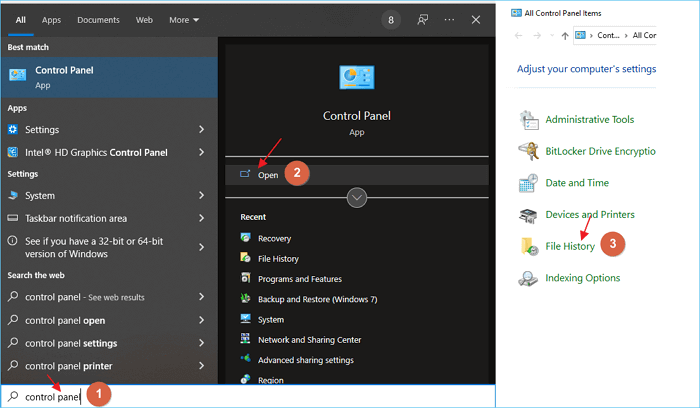
For Windows 10
To enable File History, click Start, search for "Control Panel," click Open, and then choose File History.
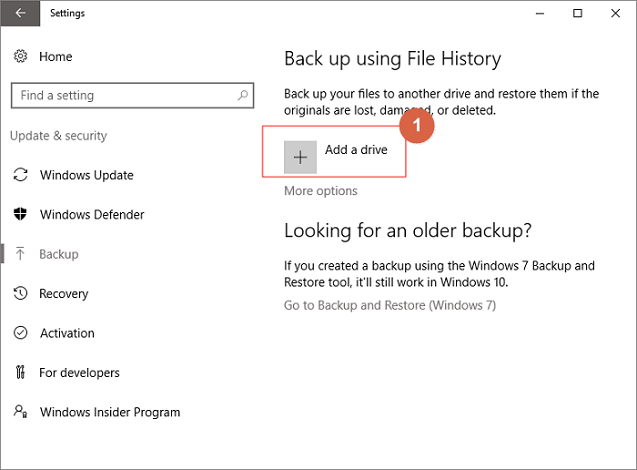
For Windows 11
To access the backup settings on your computer, go to the Start menu and select the "Settings" option. From there, click on "Update & Security" and then select the "Backup" option.
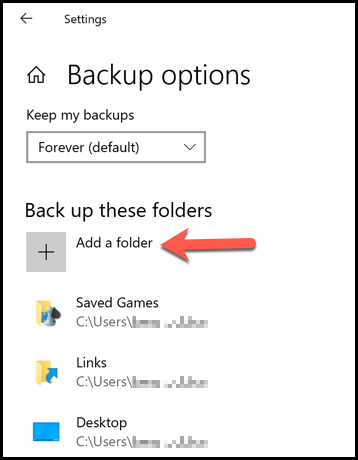
Set up File History
To set up a backup system, first click the "Turn On" button to enable File History, then select an external drive or network location for backups, and finally, add the specific folders you want to protect.
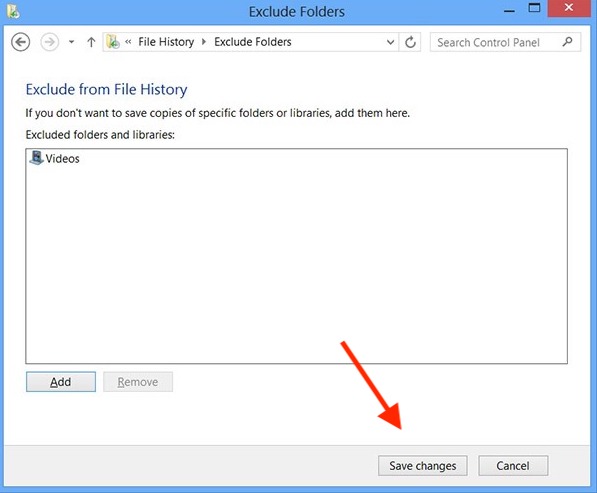
Configure File History Settings
For Windows 8, after adding the folders, you can also exclude certain folders or add new folders by following similar operations.
To get more options in Windows 11 File History, you can click on the Start button, search for "File History," and select the "File History" app. Then, click on the "Back up using File History" button, and follow the on-screen instructions to set up your backup.
Step 1. Rack the Backup page with the above method
Step 2. After turning on Automatically back up my files, you can click More options.
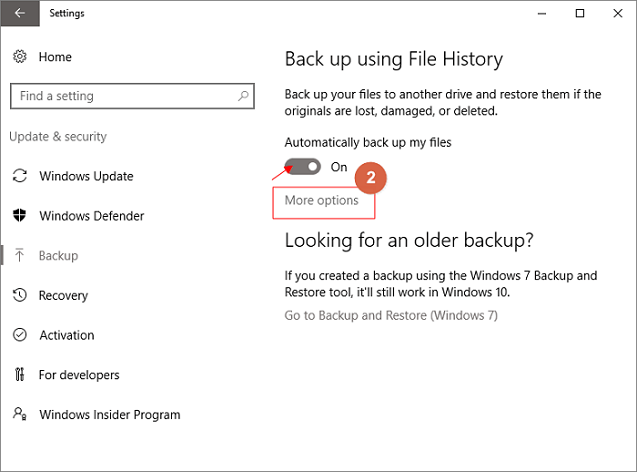
Step 3. On this page, set the backup frequency and retention period.

After completing all the steps, review that everything is properly selected, and then initiate the backup process by clicking "Start Backup" or "Back up now".
Advanced File Backup Software - Qiling Backup
While File Backup does a good job of protecting personal files, it's not a comprehensive backup solution as it doesn't safeguard the entire system or installed programs. This means you'll still need to find another advanced backup software to protect against emergencies like system crashes, in addition to backing up your files.
Qiling Backup is recommended as the advanced free backup software due to its superior features compared to File History. Unlike File History, Qiling Backup provides users with more options, offering a more comprehensive backup solution.
- Besides backing up files, flexible backup types are also available for disk, system, and even external hard drives.
- The files can be backed up to multiple destinations, including NAS, Google Drive, Qiling cloud, and more.
To back up files on your computer with Qiling Backup, follow these steps. First, download and install Qiling Backup on your computer.
Step 1. To begin the backup process, click the File backup button.

Step 3. In the top tree view of the screen, both local and network files are displayed, allowing you to expand directories to select the files you want to back up.

Step 4. Please follow the on-screen guidance and select the desired location for storing the backup.

Step 4. To ensure your backup is secure, encrypt it and set a schedule by clicking on Options in Backup Options.

You can also choose to start the backup at a certain time in Backup Scheme by clicking Options, where you can find many other customizable options to explore.

Step 5. You can store your backup file on your computer, in Qiling's cloud service, or on a network-attached storage device (NAS) for safekeeping.

Step 6. Qiling Backup allows customers to save backup copies of their files on either a third-party cloud drive or the company's own cloud storage.
To back up your data on a third-party cloud drive, select Local Drive and scroll down to add Cloud Device, then fill in your account information.
Step 7. Click on Proceed to start a backup. The backup process will display as a card on the list view of the screen once done, and a click will allow you to see more details about handling the backup job.

Conclusion
In Windows 8/10/11, creating a File History backup is a comprehensive process. However, the function of File History has been gradually decreasing from Windows 10 to Windows 11, with complementary and replacement backup software becoming more prominent. Despite this, Qiling Backup stands out as a reliable and experienced alternative, making it a potential default choice for users.
FAQs
1. Is Windows 10 File History incremental?
In Windows 10, the "File History" feature allows you to create incremental backups of your files on an external or network drive, helping to prevent data loss due to storage failure, accidental deletion, or corruption.
2. How do I know if the File History backup is working?
To check if File History is backing up your data, go to File Explorer, select This PC, double-click on the target backup drive, right-click on the File History folder, and select Properties. If the backup process is active, a progress bar should be visible and information on the file size should be displayed.
3. Why can't I turn on File History?
If File History isn't working on Windows 10, try updating your computer to the latest OS version, then restart the Indexing Service, install the latest driver update for your external hard drive, and run SFC to repair corrupted system files.
Related Articles
- 2022 Best Samsung Backup Software for PC/Phone (Free Download)
- Windows 10 Incremental Backup | Wise Backup Method
- Best Ways to Store Videos Long Time[4 Choices 100% Working]
- How to Clone Encrypted Hard Drive to SSD/HDD
- [Explained] Windows Server 2012/2016/2008 C Drive Keeps Filling Up? How to Fix It
Your Windows Server C drive is filling up because it's being used as the default drive for many system files, programs, and temporary files. To free up space, consider moving the page file, temporary files, and other unnecessary files to a different drive. - 5 Methods | Get Rid of Windows Server C Drive Full Issue
If your Windows Server C drive becomes full, it can have severe consequences. Fortunately, there are five easy methods to optimize your Windows Server computer's performance by addressing this issue, as outlined in our article.