A Complete Guide to Windows Server Backup and Restore [2022 Update]
Windows Server Backup is a built-in backup tool provided by Microsoft for servers running Windows Server OS, allowing users to back up and restore their servers.
Today's article delves into Windows Server Backup, covering its features, limitations, installation, and usage, including backing up and restoring data with this tool. Let's dive in!
What Is Windows Server Backup (Features and Limitations)
Creating a backup of your files and servers is crucial to prevent data loss, which can have a significant financial impact. Servers, in particular, are vital components that collect and serve files or information, making it essential to safeguard their data to avoid disruptions to business operations.
Backing up data is crucial for organizations to prevent data loss due to accidents, ransomware, or system failure. Windows Server, developed by Microsoft, is a powerful operating system designed for servers, which run continuously unlike consumer PCs. By backing up data, organizations can ensure their data is safe and secure, even in the event of a disaster.
Windows Server Backup Features:
- Administrators can back up a full server, specific files, folders, and selected storage volumes as long as the data size is under 2 TB with block-level backups.
- With Windows Server 2008 R2, administrators can create faster and smaller incremental backups, restore Windows to dissimilar hardware, and more.
Windows Server Backup Limitations:
- If your server is running a virtualized Windows server, Windows Server Backup won't recognize and back up the configuration and hardware settings.
- The backup options are limited, as complete data restoration is only possible with Hyper-V and not with any other hypervisor or VMware.
- Another limitation is that challenges are storing the Windows Server backups on a network location.
How to Install Windows Server Backup
Windows Server Backup is a feature in Windows Server that allows users to back up and restore server data, including system files, applications, and user data. It can be installed on servers running Windows Server OS.
To install Windows Server Backup on your server, go to the Control Panel, click on "Programs and Features", then click on "Turn Windows features on or off". In the resulting window, scroll down and check the box next to "Windows Server Backup", then click "OK".
Step 1. To add roles and features to a server, start by accessing the "Server Manager" and opening the "Add Roles and Features Wizard." Click "Next" to proceed.
Step 2. In the Installation type section, keep the default settings for "Role-based" and "Feature-based" installations, and click "Next".
Step 3. Click on "Next" in both the "Server" and "Server Roles" sections.
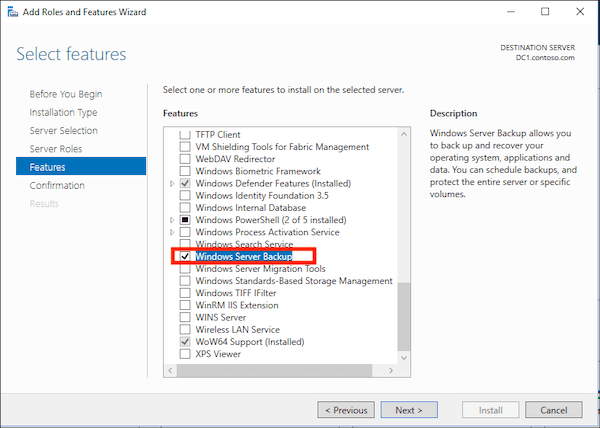
Step 4. Select "Windows Server Backup" in the features section, and then select "Next".
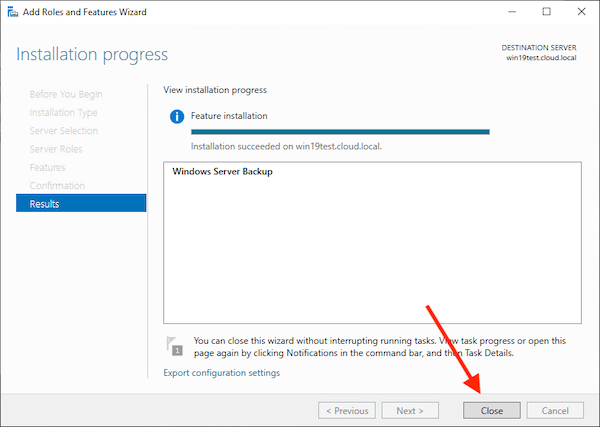
Step 5. After clicking "Install" in the "Confirmation" section, the Windows Server Backup feature installation will begin. Wait for it to be completed.
Step 6. Once the installation is complete, click "Close".
How to Back up and Restore Data with Windows Server Backup
Backing up and restoring data from servers with Windows Server Backup is distinct from backing up and restoring personal computer data.
To properly backup and restore your Windows server data with Windows Server Backup, you can follow these steps:
- 1 - Backup Windows Server Data with Windows Server Backup
- 2 - Restore Windows Server Data with Windows Server Backup
1 - Backup Windows Server Data with Windows Server Backup
To backup Windows server data using Windows Server Backup, follow these steps:
How to backup data using Windows Server Backup:
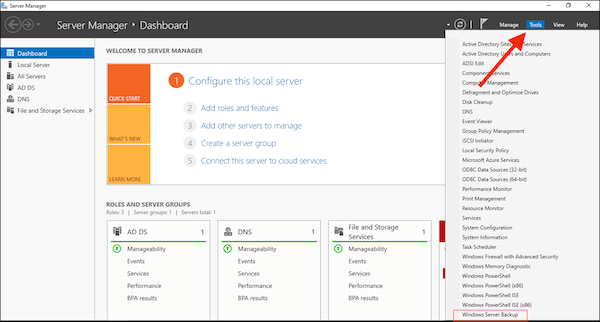
Step 1. To access Windows Server Backup, open Server Manager, click on Tools, and select Windows Server Backup. Alternatively, in Windows Server 2008 and Windows Server 2008 R2, open Start, select Administrative Tools, and click on Windows Server Backup.
Step 2. Enter Backup Operator credentials in the User Account Control dialog box to proceed further. Click "OK" to continue.
Step 3. Choose "Local Backup.". In the "Action" menu, select "Backup once."
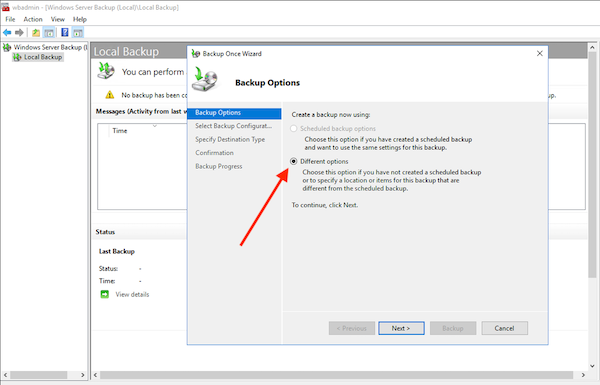
Step 4. In the "Backup options" window, select "Different options" and then click "Next".
Step 5. Now select "Full server (recommended)" in the "Select backup configuration" section, and click "Next."
Step 6. In the "Select Backup Destination" section, choose the location where you want to save the backup. This will be where your data will be stored in case you need to restore it later.
Step 7. Click on "Backup" in the Confirmation section, then click "Close" once the backup is completed.
2 - Restore Windows Server Data with Windows Server Backup
Here's how to restore the backup using Windows Server Backup:
Step 1. Launch "Windows Server Backup" and choose "Local Backup."
Step 2. In the "Action" section, select "Recover..." to open the Recovery Wizard, which guides you through the process of restoring your computer to a previous state.
Step 3. In the "Getting Started" section, you will be asked to select the source of the data to be restored, which can either be from the local server or another server.
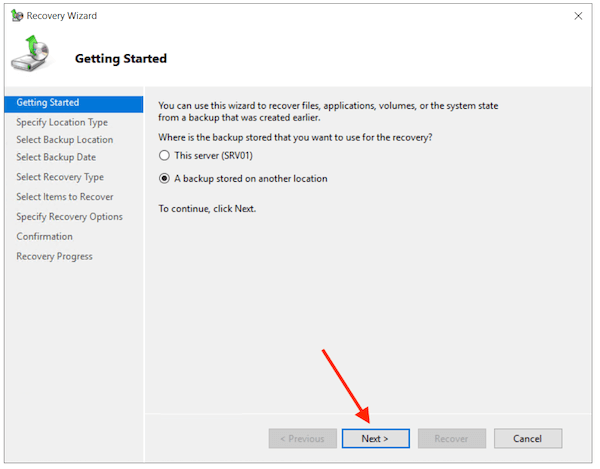
Step 4. To recover data, select the location where the data was stored, either "This server" or "Another server," and click "Next." If the data is on the same server, select that server and click "Next." If the data is on a different server, select "Another server" and click "Next." Then, in the "Specify location" window, choose "Local drives or Remote shared folder" and click "Next."
Step 5. In the "Select Backup Date" section, choose the desired backup date and click "Next".

Step 6. In the "Select Recovery type" section, choose "Application" and click "Next."
Step 7. Now, in the "Select Application" section, select "Exchange".
Step 8. To view the application components, click on "View Details" and select the checkbox "Do not perform a roll-forward recovery of the application database" if the backup was created recently.
Step 9. In the "Specify Recovery Option" section, select the location where you want to restore the data, then click "Next."
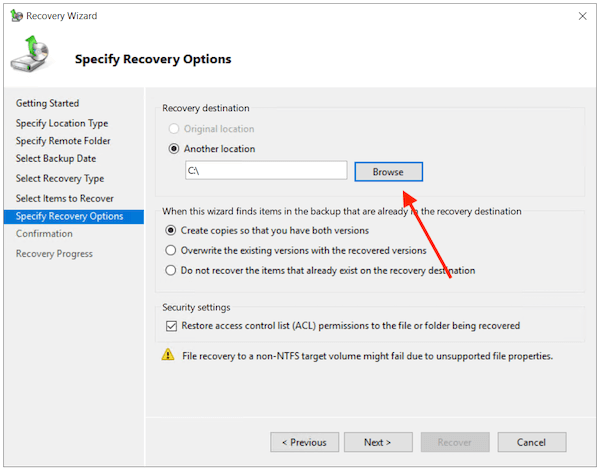
Step 10. Select "Recover to original location" to restore data directly to its original spot, or choose "Recover to another location" to select and restore databases and files individually to a different location.
Step 11. Confirm the recovery settings and click on "Recover" to initiate the recovery process, which can be monitored in the "Recovery Progress" section.
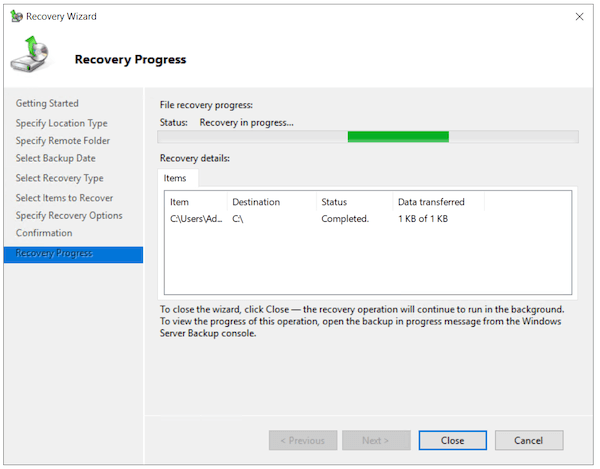
Step 12. Once the recovery has been completed, click on "Close".
Backup and Restore Data with Windows Server Backup Software
Qiling Backup Enterprise is a backup solution that replaces Windows Server Backup, offering a more comprehensive and reliable way to protect data.
The Qiling Backup Enterprise allows for automatic backup of specific files or the entire system, with a bare-metal recovery mode to quickly restore the server if the OS is damaged. Additionally, it enables the cloning of hard drives and more, ensuring swift server restoration.
The Qiling Backup Business makes it extremely easy and convenient to back up and restore the Windows Server tool, making it a great solution for users who want to protect their data.
To learn how to back up Windows Server 2016, 2019, 2022, 11, 10, 8, or 7 using Qiling Backup Business, follow the step-by-step guide below.
1 - Backup Windows Server Data with Qiling
To back up Windows Server data with Qiling, follow the full guide which includes the necessary steps to ensure your data is properly backed up.
Step 1. Open Qiling Backup Enterprise. Then click "Backup and recovery" to set a new backup.

Step 2. Select "File backup" as the target option at the top, then choose the specific files you want to back up.

Step 3. You can choose the destination where you want to put the backup by clicking "Browser" to select the desired location.

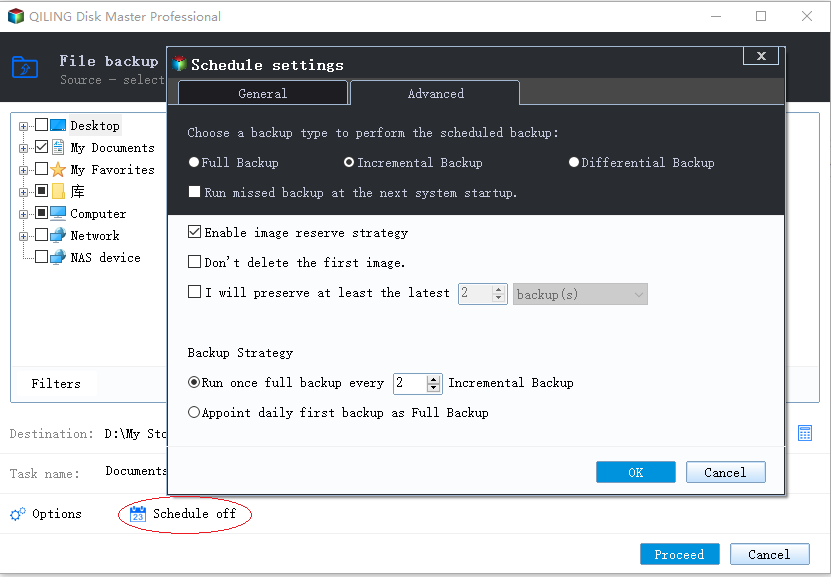
Step 4. You can customize your backup scheme by clicking "Schedule: Off". This allows you to set up a new schedule, which includes options for backup cleanup and advanced settings. Click "New" under the "Schedule" catalog to start setting up your customized backup scheme.

Then set the backup frequency based on your needs.
Step 5. Click "Backup options" on the bottom-left corner of the interface.

Here, you can customize various settings such as performance, encryption, and email notifications to suit your preferences. Once you're done, click "OK" to return to the main interface.
Step 6. When you've completed all settings, click "Proceed" to initiate the backup process.
2 - Restore Windows Server Data with Qiling
To recover Windows Server data with Qiling, start by launching the Qiling software and selecting the backup you want to restore from. Then, choose the recovery mode you need, either a full system recovery or a file-level recovery. Next, select the destination where you want to restore the data, and Qiling will begin the recovery process.
Step 1. Launch Qiling Backup on your computer. Click on the "Recovery" button.

Step 2.Click the "Browser" button on the top-right corner.

Step 3. A window about recovery will come out. Find and choose the file you need to recover.
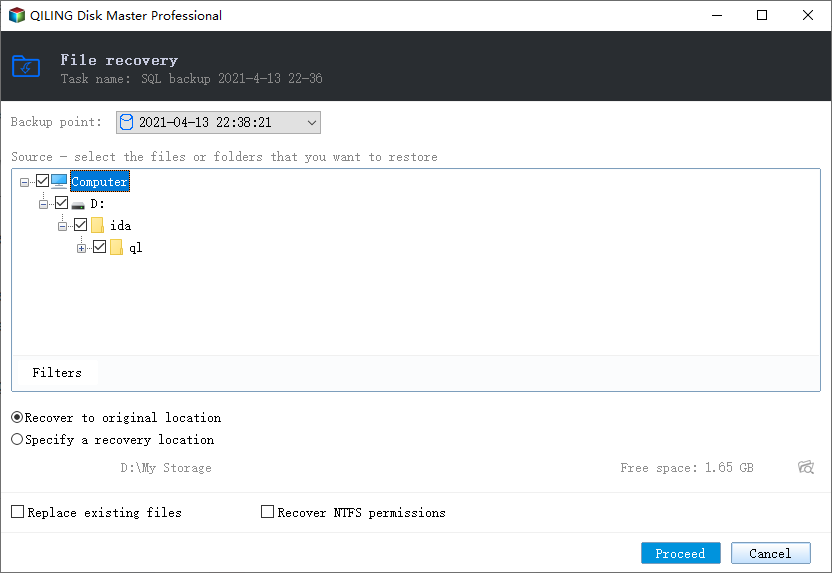
Step 4. You can either browse to select a new location or recover the original location. Once you've made your choice, click the "Proceed" button to initiate the recovery process.
Conclusion
Windows Server Backup is a free tool for backing up and restoring server data, but it has limitations, particularly when it comes to backing up virtual machine configurations and managing backups across network locations, which can be time-consuming and challenging.
For organizations or individuals requiring a comprehensive solution for server backup and restore, Qiling Backup Business can be downloaded and installed.
The Qiling Backup Business is a more advanced and feature-rich backup solution compared to Windows Server Backup, offering a wider range of tools and capabilities.
Windows Server Backup FAQs
We've also provided answers to a few questions about Windows Server Backup, which can be found below.
1. How to Stop Windows Server Backup in progress?
- Step 1. Open "Dashboard" and click "Devices" in the navigation bar.
- Step 2. Click on the server in the list of computers, then click "Stop backup" for the server in the "Tasks" pane.
- Step 3. Select "Yes" to confirm your decision.
2. How to check the Windows Server backup history?
To check the backup history on Windows Server 2012, navigate to the Server Manager dashboard, click on "Tools" in the top right corner, and select "Backup and Recovery" from the drop-down menu. Then, click on "View Backup History" in the Backup and Recovery window.
- Step 1. Open a command window after logging in to the Windows Server 2012 system with an administrator account.
- Step 2. To view the backup history, type "wbadmin.exe Get Versions" and press "Enter".
3. Is Windows Server backup free?
You can use it to back up data without any cost.
4. Where is Windows Server backup in 2019?
To find the Windows Server Backup tool, open the Server Manager, select Tools from the upper-right column, and choose Windows Server Backup.
Related Articles
- Most Reliable Backup Software for Multiple Computers [2022 New List]
- Windows Server Backup Incremental (Available on Windows Server 2012/2016/2019)
- How to Backup and Restore Active Directory in Windows 2022/2019/2016?
- How to Back Up Windows Server 2019 Files in 2 Ways [Proven Solutions]
- Free! How to Move Files from OneDrive to Another OneDrive
You can move files from OneDrive to another OneDrive using various methods, including manual copying, syncing, or Power Automate. This enables you to improve data safety, create backups, and free up storage space. Additionally, you can use software like Qiling Disk Master to transfer files from one user account to another. - How to Move Files from OneDrive to Teams
Are you searching for an easy way to move files from OneDrive to Microsoft Teams? In the article below, you can find convenient methods to do so, along with detailed step-by-step guides on how to easily upload files to Microsoft Teams using multiple ways.