Speed Up Databases with a RAM Disk and Disk Cache
A database tries to keep your working set in memory, and while it fits, the disk barely matters. The trouble starts when the data grows past the buffer pool: every query that misses memory becomes a random page read, and a mechanical drive serves those slowly.
This guide explains where database workloads wait on storage, what a disk cache genuinely fixes, why transaction logs and tempdb need different treatment, and how to set either option up without putting data at risk.
PAGE CONTENT
- Where Databases Wait on the Disk
- What a Disk Cache Fixes
- Why Logs and tempdb Need Care
- Set Up a Cache for the Database Drive
- Optional: Put tempdb on a RAM Disk
- FAQs About Caching for Databases
- Back Up Windows Before You Change Settings
Where Databases Wait on the Disk
Database storage traffic splits into patterns that behave very differently:
- Buffer pool misses. When a query needs a page that is not in memory, the engine performs a small random read. This is the pattern that decides how responsive the database feels.
- tempdb spill. Large sorts, hash joins, and window functions stage intermediate results in tempdb, which can mean heavy temporary reads and writes.
- Transaction log writes. The log is written sequentially and must be durable before a transaction is acknowledged. This is a write problem, not a read problem.
- Maintenance operations. Index rebuilds, integrity checks, and backups read the whole data set, usually in a single pass.
- Cold starts. After a service restart, the buffer pool is empty and the engine re-reads the pages your workload needs.
Only some of those benefit from a cache, and knowing which is the difference between a useful optimisation and a waste of time.
What a Disk Cache Fixes
Where a cache helps:
- Repeated page reads. The same hot pages are requested every day, so once they are in the cache, small random reads stop hitting the platter.
- Cold starts and restarts. Instead of waiting for the buffer pool to refill from a slow disk, much of the working set is already on fast storage.
- Repeated maintenance passes. A second integrity check or index scan reads the same data the first one did.
- Reporting queries. Reference tables and lookup data that change rarely are ideal cache material.
Where a cache does nothing:
- One-pass backups. A backup reads each page once, so there is nothing to reuse. Speed these up with an incremental or differential strategy instead.
- Transaction log writes. The log is written, not re-read, so a read cache leaves it untouched.
- Write-heavy insert and update paths. Caching accelerates reads; it does not speed up durable writes.
- A database already on an SSD. The cache has little left to add, and the memory it reserves may be better given to the database engine.
Back up before you change any storage setting, so database backup software and a full verification are in place first.
Why Logs and tempdb Need Care
Two parts of a database system deserve separate treatment:
- The transaction log is not a caching problem. It is written sequentially and must be durable, so a read cache changes nothing about it. Never enable OS write caching on the volume holding the log, because a power failure could lose acknowledged transactions. Keep the two ideas apart with write caching vs read caching.
- tempdb is recreated at every start. It holds only temporary working data, so its contents are disposable by design - which is exactly what makes a RAM disk defensible for it, and for nothing else.
- Database files are the opposite. The .mdf and .ndf files are the permanent record. Putting them on a RAM disk means a power cut erases the database, and no backup recreates a day of work instantly.
Set Up a Cache for the Database Drive
Qiling Fast Cache keeps copies of the most-read blocks of your data volume on RAM or an SSD, which removes repeated page reads from the platter.
Step 1. Download, install, and open Qiling Fast Cache. On first run the task list is empty.

Step 2. Click the "+" button to create a cache task and select the volume that holds your database data files. Leave the log volume out of the task.
Step 3. Choose the medium and size. Reserve the RAM tier from memory the database engine does not need, and give the SSD tier the wider working set.

Step 4. Create the task and let it warm. Then compare read latency and buffer pool hit ratio against your pre-change baseline.

Optional: Put tempdb on a RAM Disk
If the data volume is already fast and tempdb spill is your remaining bottleneck, a RAM disk is a legitimate option - with strict conditions:
- Only tempdb, never user databases. Temporary objects are rebuilt automatically; your data is not.
- Only on a server with memory to spare. 32 GB is a realistic minimum, and the database engine needs its own buffer pool first.
- Size it explicitly after moving. SQL Server sizes tempdb from the model database, so re-check the file sizes once it lives on the new drive.
- Make sure it is mounted before the service starts. If the RAM disk is missing when the engine runs, tempdb fails and the instance will not start properly.
Step 1. Install Qiling Disk Master, which includes the RAM disk feature in the free edition.
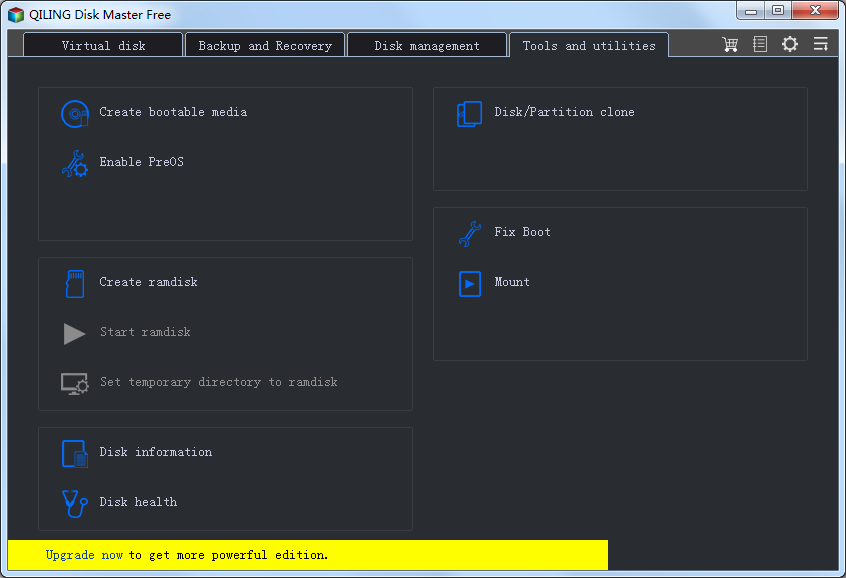
Step 2. Open the Tools and Utilities page and click Create ramdisk.
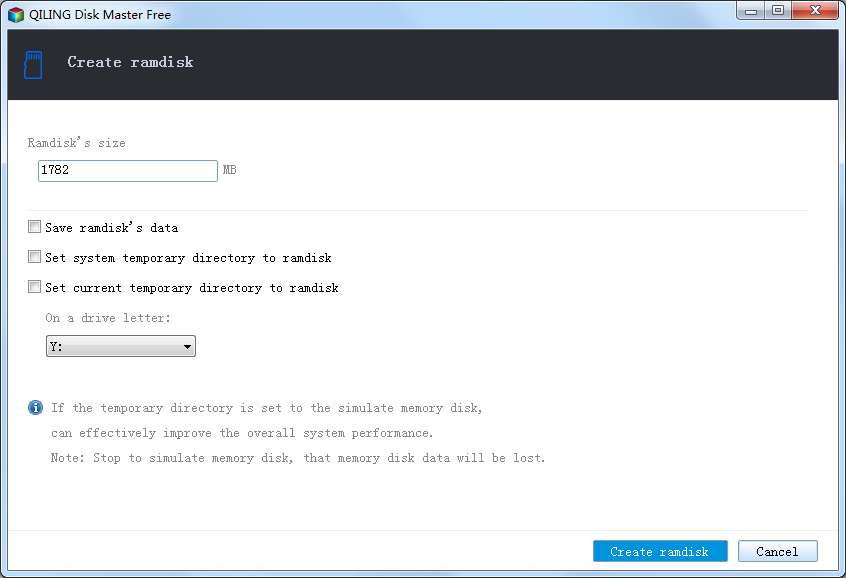
Step 3. Allocate a fixed size that fits your largest tempdb working set, choose a drive letter such as T:, select NTFS, and enable mounting at startup so the disk exists before the database service starts.
Step 4. Move tempdb to T: using the standard procedure for your engine, then measure tempdb spill waits across a few days of real workload.
- Note
- If the RAM disk disappears while the engine is running - a failed allocation, a memory shortage, or a reboot without the disk mounting - tempdb becomes unavailable and the instance can stop. Test the startup order before you rely on this in production.
FAQs About Caching for Databases
Does a disk cache speed up database backups?
No. A backup reads every page once, so there is nothing to reuse. Incremental or differential backups reduce the work instead.
Should I put my database files on a RAM disk?
No. The data files are the permanent record, and a RAM disk erases them at shutdown. Only tempdb is disposable enough to justify it.
Will caching help if the database is already on an SSD?
Very little. The engine's own buffer pool already caches hot pages in memory, so add RAM to the server before adding another cache layer.
What should I measure before and after?
The buffer pool hit ratio, average read latency, and page life expectancy in SQL Server, or the equivalent read metrics in MySQL. If the hit ratio does not move, the cache is not covering the pages you need.
Is write caching safe for a database drive?
Not for the log volume. Write caching acknowledges writes before they reach the disk, so a power failure can lose committed transactions. Leave it off for database and log volumes.
Back Up Windows Before You Change Settings
Before you move tempdb or change storage layout, make sure the system itself is recoverable. Qiling Disk Master creates a full Windows image you can restore from if anything goes wrong.
Part 1: Create a Full System Backup
Step 1. Install and open Qiling Disk Master. On the home screen, open "Backup and Recovery" and choose "System Backup". This option automatically includes Windows and the hidden boot partitions, so you do not have to select them one by one.

Step 2. Check the source. The disk where Windows is installed and its system partitions are already ticked for you. If you only need your personal documents, run a separate "File Backup" task instead.

Step 3. Click the destination box and choose where the image should be saved. Use an external HDD or SSD, a NAS, or any drive other than the one Windows is installed on, and make sure it has enough free space.

Step 4. Review the task summary and click "Proceed". Wait until the progress bar reaches 100%. Do not unplug the drive or turn off the PC while the backup is running.

Part 2: Restore Windows from the Backup
Step 1. Open Qiling Disk Master again, go to "Backup and Recovery", and select the recovery option. Your backup images are listed, so pick the one you created before the changes began.

Step 2. Choose the target disk or partition. Normally you restore to the original system disk. If the drive was replaced, select the new disk instead, and the restore rebuilds Windows together with its boot partitions.

Step 3. Preview the restore plan, click "Proceed", and confirm the warning. The PC restarts to finish the job, and Windows comes back exactly as it was on the day the image was created, with your files and programs intact.

- Note
- Keep the backup image on a separate drive, and refresh it before changing storage cache settings.
Conclusion
A disk cache is a good fit for a database only in one specific situation: the engine outgrew its buffer pool, the data sits on a mechanical drive, and the workload re-reads the same pages. In that case it removes random page reads from the platter and shortens cold starts. It cannot help with one-pass backups, transaction log writes, or inserting new rows, and it adds nothing on an all-SSD server. Treat tempdb as the one place where a RAM disk is defensible, and never put the database files themselves on volatile storage. Measure the buffer pool hit ratio and average read latency before and after, and let the numbers decide.
Protect your PC with Qiling Backup—create a system image before your next round of settings changes.
For more Windows 11 performance guides, see How Big Should Your Disk Cache Be?, SSD Cache Block Size Explained, What Is Cache Warm-Up?, Write Caching vs Read Caching, and Windows 11 Fast Cache.
Related Articles
- When a Disk Cache Does Not Help (and What to Do Instead)
Why one-pass backups, log writes, and processor-bound work stay slow no matter how the cache is configured. - Should You Put the Page File on a RAM Disk? (Short Answer: No)
- Is a RAM Disk Worth It? An Honest Look at Speed and Risk
- How to Speed Up Virtual Machines with a Disk Cache on Windows 11
- Docker and WSL2 Performance: RAM Disk and Disk Cache Tips
- Caching for Backup and Imaging Software Explained
Products
Articles & Tutorials
- Data Recovery
- Data Backup
- File Recovery
- File Backup
- System Backup and Restore
- Disk and Partition Clone
- Technical articles
- Mobile articles
- Disk Master Help
- Windows Data Recovery Tutorials
- Windows Secure Delete Tutorials
- Windows Partition Management Tutorials
- Windows File Backup and Restore Tutorials
- Windows System Backup and Restore Tutorials
- Windows Disk Backup and Restore Tutorials
- Windows Clone Tutorials