How to Speed Up a Plex Media Server with a Disk Cache
A media server feels slow in a very specific way: posters take seconds to appear, the library crawls while scanning, streams stutter on a weak connection, and the drive clicks constantly. These are not one problem but three, and they respond to different fixes. A disk cache solves two of them, a RAM disk solves part of the third, and the remaining bottleneck is your network or your CPU.
This guide covers where a media server actually waits, what caching can and cannot do for it, and how to configure Qiling Fast Cache and a RAM disk around Plex or Jellyfin on Windows 11.
PAGE CONTENT
- Where a Media Server Actually Waits
- What a Cache Helps With, and What It Does Not
- Step 1: Cache the Drive That Holds Your Library and Metadata
- Step 2: Move Transcode Temp to a RAM Disk
- Step 3: Fix the Bottlenecks a Cache Cannot Touch
- Step 4: Measure and Protect the Server
- FAQs About Media Server Caching
- Back Up Windows Before You Change Settings
Where a Media Server Actually Waits
Break the workload into three parts and the right fix for each becomes obvious.
- Metadata and thumbnails. Plex and Jellyfin store posters, artwork, subtitles, and a database of your library. Browsing the interface reads thousands of small files and many database entries, and generating new thumbnails writes thousands more.
- Transcoding. When a client cannot play a file as-is, the server converts it on the fly and writes the result to a temporary folder. That is a burst of both CPU work and continuous writes.
- Media reads. Serving a stream means reading a large file sequentially, whether from a single hard drive or from an array.
Library scanning, which reads every file's metadata, is the heaviest of all and often the moment people first notice the server is slow.
What a Cache Helps With, and What It Does Not
| Activity | Does a disk cache help? | Why |
|---|---|---|
| Browsing the interface | Yes | Repeated reads of the same artwork and database pages |
| Re-scanning a library | Partly | Repeated file metadata reads hit the cache; new files are read once and do not |
| Thumbnail generation | A little | The writes are new data, but reading source files becomes faster |
| Playing one large file | Barely | A single sequential stream has no repetition to cache |
| Replaying the same file | Yes | The second playback can be served from cache, if the cache is large enough |
| Transcoding | Indirectly | Temporary writes suit a RAM disk better than a cache |
The important nuance: caching transforms browsing and repeat access, not raw streaming throughput. If playback of a single large file stutters, the problem is bandwidth, CPU, or the drive's sequential speed, and no cache fixes that.
Step 1: Cache the Drive That Holds Your Library and Metadata
This is the highest-value change for a media server, because it targets the small repeated reads that make the interface feel sluggish.
Step 1. Download and install Qiling Fast Cache.
Step 2. Open the program and click the + button to create a cache task.

Step 3. Select the drive that holds your media library and, if it is a different one, the drive with the server's metadata. Set a generous cache size, and add the SSD tier if you have a spare SSD so the cache survives reboots and stays warm for the next scan.

Step 4. Click OK. Browse your library and run a scan, then check the hit rate to see how much of the repeated reading is now served from cache.

Step 2: Move Transcode Temp to a RAM Disk
Transcode files are written at a high rate, are read back immediately, and are worthless the moment the stream ends. That is the definition of data that belongs in memory.
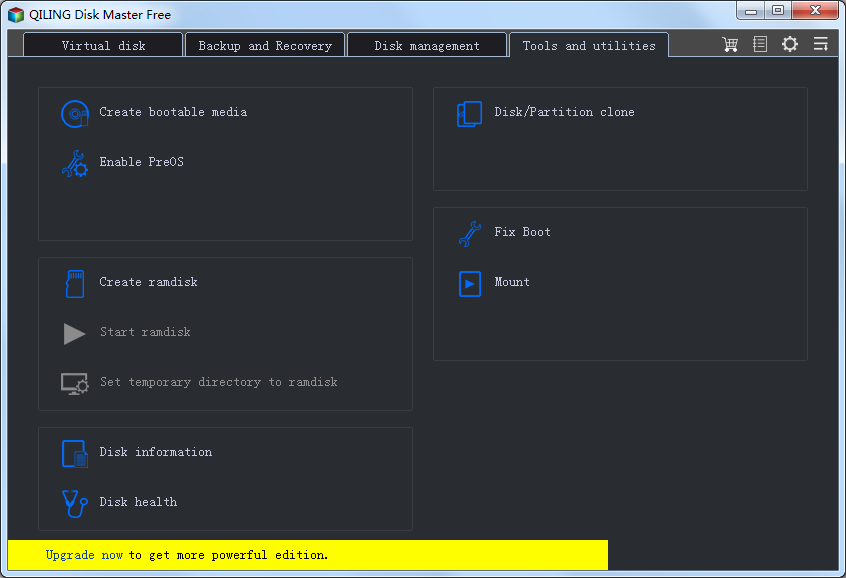
Step 1. Create a RAM disk with Qiling Disk Master. Open the Tools and Utilities page and click Create ramdisk.
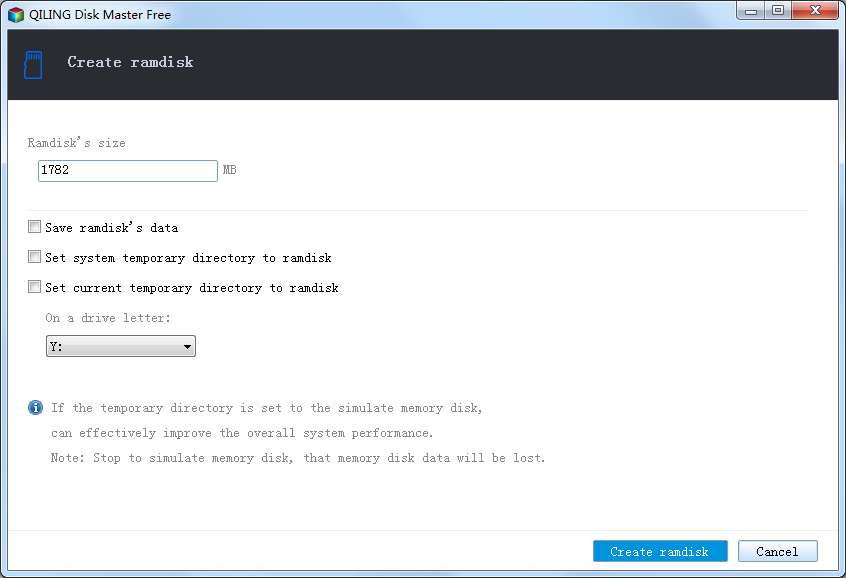
Step 2. Size it for your worst case. A single 1080p transcode needs a few gigabytes of temporary space; multiple simultaneous 4K streams need considerably more. Start with 8 GB, keep at least 8 GB for Windows, and create the disk with a letter such as R: and NTFS.
Step 3. In Plex, open Settings > Transcoder and set Transcoder temporary directory to R:\Transcode. In Jellyfin, open Dashboard > Playback > Transcoding and set the transcode path to the same folder.
Step 4. Restart the server software so the setting takes effect, then play something that requires transcoding and confirm the folder fills up while the stream runs and empties afterwards.
- Note
- Transcode files are disposable, so losing them in a crash costs nothing. Do not put the server's metadata directory on the RAM disk, though — it must survive reboots.
Step 3: Fix the Bottlenecks a Cache Cannot Touch
- Use hardware transcoding. Intel Quick Sync or an NVIDIA encoder handles conversions in dedicated silicon, freeing the CPU and reducing stutter for multiple streams. Enable it in the server's settings.
- Prefer direct play. Choose clients or settings that can play your files without conversion. A direct stream uses no CPU and no transcode temp files.
- Check your network. A 1080p stream needs only a few megabits, but a 4K remux can exceed 100 Mbps. Use wired gigabit where possible, and be aware that a single gigabit link is shared by every client.
- Keep metadata on an SSD. Plex and Jellyfin write many small files; a hard drive makes library scanning and interface browsing slow regardless of caching.
- Avoid the drive spinning down. If your media drive sleeps, the first request after idle takes seconds. Keep it awake during viewing hours.
- Do not let sync or backup jobs overlap viewing. A cloud sync client scanning a media folder will compete with streaming for the same disk.
For a library stored on a NAS rather than a local drive, see Can You Use an SSD Cache for a NAS or Network Drive? for what can and cannot be accelerated.
Step 4: Measure and Protect the Server
- Time a library scan before and after enabling the cache. This is the clearest single measurement, because a scan reads your whole collection.
- Time interface browsing by opening a large library and scrolling. This is where a cache shows up most dramatically on a hard drive.
- Check the hit rate. A rate above 50 percent means the cache is covering a useful share of reads; a very low rate suggests the library is being read sequentially, where caching has little to offer.
- Back up the metadata. Your media can be re-ripped or re-downloaded, but watch history, playlists, and matched metadata cannot. Keep a system image and a copy of the server data folder.
FAQs About Media Server Caching
Will a disk cache stop my streams from buffering?
Only if the buffering is caused by slow disk reads of repeated content. Buffering from insufficient bandwidth or an overloaded CPU is unaffected.
How big should the transcode RAM disk be?
Allow a few gigabytes per simultaneous transcode. Two 1080p streams fit comfortably in 8 GB; several 4K streams may need 16 GB or more, and you should always leave 8 GB for Windows.
Can I put the Plex metadata folder on a RAM disk?
No. It must persist across reboots, because it holds your library database, watch history, and matched artwork. Cache the drive instead.
Does caching help a library on a NAS?
Not the network share itself, because a mapped share is not a local volume. Cache the local drive that holds your server and metadata, and consider the NAS's own SSD cache for the media.
Why is the first scan always slow?
Because a scan reads every file once, and the first read of any file is always a cache miss. Caching speeds up rescans and browsing, not the initial pass.
Is a RAM disk worth it for a media server with only transcodes on it?
Yes, if you transcode regularly. It removes a continuous stream of temporary writes from your SSD and speeds up the conversion pipeline. See Is a RAM Disk Worth It?
Back Up Windows Before You Change Settings
Cache settings are safe, but your server's metadata and history are worth protecting. Qiling Disk Master creates a full Windows image you can restore from if anything goes wrong.
Part 1: Create a Full System Backup
Step 1. Install and open Qiling Disk Master. On the home screen, open "Backup and Recovery" and choose "System Backup". This option automatically includes Windows and the hidden boot partitions, so you do not have to select them one by one.

Step 2. Check the source. The disk where Windows is installed and its system partitions are already ticked for you. If you only need your personal documents, run a separate "File Backup" task instead.

Step 3. Click the destination box and choose where the image should be saved. Use an external HDD or SSD, a NAS, or any drive other than the one Windows is installed on, and make sure it has enough free space.

Step 4. Review the task summary and click "Proceed". Wait until the progress bar reaches 100%. Do not unplug the drive or turn off the PC while the backup is running.

Part 2: Restore Windows from the Backup
Step 1. Open Qiling Disk Master again, go to "Backup and Recovery", and select the recovery option. Your backup images are listed, so pick the one you created before the changes began.

Step 2. Choose the target disk or partition. Normally you restore to the original system disk. If the drive was replaced, select the new disk instead, and the restore rebuilds Windows together with its boot partitions.

Step 3. Preview the restore plan, click "Proceed", and confirm the warning. The PC restarts to finish the job, and Windows comes back exactly as it was on the day the image was created, with your files and programs intact.

- Note
- Keep the backup image on a separate drive, and refresh it before changing server folders or transcoder settings.
Conclusion
A media server is three workloads in one, and each has its own fix. Cache the drive holding your library and metadata with Qiling Fast Cache to make browsing, rescans, and repeat playback dramatically quicker, especially when the library lives on a hard drive. Move the transcoder's temporary folder to a RAM disk created with Qiling Disk Master so conversion output never touches your SSD. Then leave the parts a cache cannot help to the tools that can: hardware transcoding for CPU load, and a wired network for bandwidth. Measure a library scan before and after, and keep a backup of your metadata, which is the one thing on a media server you cannot simply download again.
Protect your PC with Qiling Backup—create a system image before your next round of settings changes.
For more Windows 11 performance guides, see Windows 11 Fast Cache, Can You Use an SSD Cache for a NAS?, Is a RAM Disk Worth It?, How to Check Cache Hit Rate, and Move the TEMP Folder to a RAM Disk.
Related Articles
- What Is Transcoding?
Understand why transcoding happens before optimizing for it. - Can You Use an SSD Cache for a NAS or Network Drive?
For libraries stored on a NAS rather than a local drive. - Is a RAM Disk Worth It? An Honest Look
- How to Use an SSD Cache for an External Hard Drive
- Windows 11 Fast Cache: Speed Up HDD with RAM and SSD Cache
- How Cloud Sync Clients Use Your Disk and Cache
Products
Articles & Tutorials
- Data Recovery
- Data Backup
- File Recovery
- File Backup
- System Backup and Restore
- Disk and Partition Clone
- Technical articles
- Mobile articles
- Disk Master Help
- Windows Data Recovery Tutorials
- Windows Secure Delete Tutorials
- Windows Partition Management Tutorials
- Windows File Backup and Restore Tutorials
- Windows System Backup and Restore Tutorials
- Windows Disk Backup and Restore Tutorials
- Windows Clone Tutorials