Create Monterey USB Installer on Mac [A Step-by-Step Guide]
macOS Monterey was launched in 2021 with several innovations and enhancements, and you may wish to install it on your Mac. Having a handy bootable USB installer lets you quickly install the latest macOS on numerous devices, do a clean install, or update your present system.
To create a Monterey USB installer on a Mac, you'll need to meet certain prerequisites, including a Mac running Monterey or later, a USB drive with at least 8GB of free space, and a computer with internet access. Once you've got these requirements covered, you can proceed with the procedures to create the USB installer, which involve opening the Terminal app, downloading the Monterey installer, and using the `createinstallmedia` command to create the bootable USB drive.
| Main Steps | Step-by-step Troubleshooting |
|---|---|
| Step 1. Download macOS Monterey on Mac | Open the Mac App Store, search for "macOS Monterey", and click "Get" to initiate the download process.Full steps |
| Step 2. Format USB Drive in Disk Utility on Mac | Insert the USB drive into your computer, open the Finder application, and verify that it doesn't have any important files or data on it.Full steps |
| Step 3. Create macOS Monterey USB Installer on Mac | Launch /Applications/Utilities/Terminal.app.Input sudo followed by a space...Full steps |
| Step 4. Install Monterey with USB Installer on Mac | Connect the bootable installer to an online Mac that can run the desired macOS version, and then follow the on-screen instructions to install the desired version of macOS on the target Mac.Full steps |
Do I Need a Monterey USB Installer
You'll want to create a Monterey USB Installer on your Mac for several reasons. This involves generating a bootable USB installer for the latest macOS version. You would want to do this for a variety of reasons.
To avoid data loss, back up your important files using the Deep Data Recovery tool before installing macOS.
Back Up Your Mac and Never Lose Data
You can back up and restore your MacBook/iMac without relying on Time Machine, iCloud, or external hard drives. This can be done by using the built-in Backup feature in System Preferences, which allows you to create a backup of your Mac's data to a local drive or a network location.
Let's look at some of the most prevalent reasons:
Clean Installation on Mac
Reinstalling Monterey on your Mac involves deleting the current operating system and starting again. You can do this by creating a USB installer, booting your Mac from the USB flash drive, and installing the new macOS version without losing data or settings from the previous system.
Multiple Macs to Update to Mac
Upgrading multiple Macs to Monterey can be time-consuming, but creating a USB installer can simplify the process. By installing the updated macOS version on a USB stick, you can install the same version on all your Macs, saving time and effort.
Encountering Several Problems with the Current MacOS
You may want to reinstall macOS Monterey due to issues with your current version. A clean install using a USB installer can resolve problems and prevent data loss from the previous system. This method allows you to reinstall the latest version without worrying about mistakes or damaged data.
Upgrading Mac's Hard Drive
Making a Monterey USB installer can be helpful if you're planning to upgrade your Mac's hard disk or SSD, as it allows you to install the updated macOS version on the new storage device without having to clone the whole system.
Step 1. Download macOS Monterey on Mac
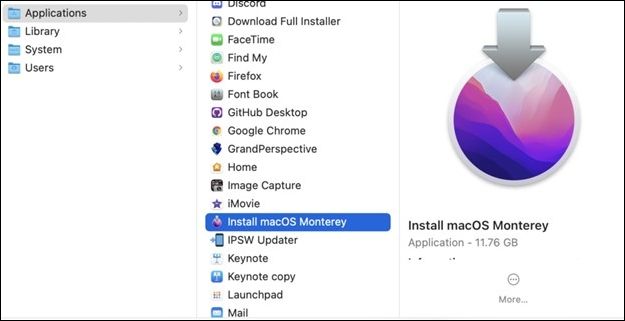
Go to the Mac App Store, search for "macOS Monterey", and click "Get" to initiate the download.
Note: This will launch Software Update in Mac System Preferences. Download to start.
Once the macOS Monterey installer is fully downloaded, head to the Menu bar and quit the Install Monterey process. This is necessary because we don't want to install the Monterey operating system itself, but rather create a Boot Disk.
Share this article on social media if it helps.
Step 2. Format USB Drive in Disk Utility
Step 1. Insert a 16GB or larger USB drive into the computer to proceed.
Step 2. To confirm that Launch Finder is empty, you can simply open the application and verify that it doesn't have any critical or essential information. This ensures that you're starting from a clean slate and can begin the process of adding new content or configurations without any potential conflicts or issues.
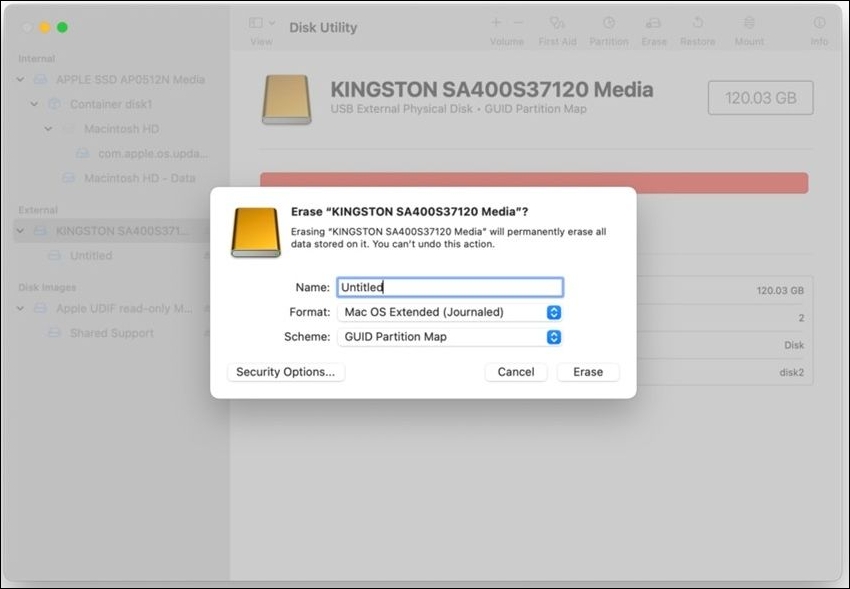
Step 3. Now, Launch Disk Utility and choose your USB drive. Your drive will be formatted as APFS.
Step 4. Click the Erase option in the bar, then select Format > Mac OS Extended (Journaled) > click Erase.
Step 3. Create macOS Monterey USB Installer with Terminal
Step 1. Launch /Applications/Utilities/Terminal.app.
Step 2. Input sudo followed by a space.
Step 3. Drop the macOS Monterey installation program into the terminal.
Step 4. The whole command is sudo /Applications/Install macOS Monterey.app/Contents/Resources/createinstallmedia
Step 5. To add a USB flash drive to the terminal window, first, open the terminal and navigate to the directory where the USB drive is mounted. Then, add the `-volume` command followed by the path to the USB drive.
Step 6. To get the complete path to the final, complete path, you'll need to use the command sudo /Applications/Install macOS Monterey.app/Contents/Resources/createinstallmedia --volume /Volumes/Untitled.
Step 7. Press "Enter" after typing in your password.

Note: The transfer to your USB flash drive will start when you click this button and may take around 5-10 minutes, depending on the speed of your USB drive.
Step 4. Install Monterey with USB Installer
For Apple Silicon, follow the steps below to install Monterey USB Installer:
Step 1. Connect the bootable installer to an online Mac that can run the desired macOS version. This will allow you to install the new operating system on the Mac you want to upgrade.
Step 2. To start the Mac by pressing and holding the power button until the Startup Disks pane appears.
Step 3. To install macOS, select the drive with the installation and click Continue. Then, follow the on-screen instructions to complete the installation process.
For Intel Macs, follow the steps below:
Step 1. Connect the bootable installer to a Mac that can run the desired macOS version, and boot it up.
Step 2. To boot your Mac in safe mode, launch your Mac and hold down the Shift key until you see the Apple logo. The computer will then boot with only the necessary system files and drivers, and without any third-party applications or extensions.
Step 3. Release the Option key when you see the black screen with bootable volumes listed.
Step 4. Choose the disk from which the installer may be launched automatically. Then either hit Return or click the on-screen arrow.
Step 5. If asked, choose the language you prefer.
Step 6. From the Utilities tab, select Install macOS, then click "Continue" and follow the on-screen instructions.
Recover Lost Data After Monterey Installation
Data loss is unpleasant, especially after switching to a new OS like Monterey. Fortunately, the Deep Data Recovery tool can help recover lost data from various storage media, including USB drives, external hard drives, and memory cards, making the transition smoother.
Deep Data Recovery
- Recover lost data from various internal or external devices, including SD cards, with specialized software designed to retrieve deleted or corrupted files from devices connected to a Mac.
- In special situations, such as when your Mac becomes unbootable, data recovery tools can still help retrieve your important files and information, providing a safety net for your digital life. These tools can be especially useful in cases where your Mac is unable to boot up, making it difficult to access your data through normal means.
- Data recovery software can help restore files that have been lost due to sudden deletion, formatting, hard drive corruption, virus attack, or other unexpected events. It works by scanning the affected storage device, identifying recoverable files, and recovering them to a safe location.
Here are the steps to recover lost data using Qiling data recovery software in one paragraph:
Step 1. Select the drive to be scanned
In the main Deep Data Recovery window, select the drive you need to recover lost/deleted files from and click the "Search for lost files" button.
Note: Before attempting data recovery, it's recommended to create a backup of your Mac by clicking "Disk Backup" from the left sidebar, ensuring that your data is safe in case of further loss. Once backed up, the software can then recover data from the Mac backup, allowing your computer to write new data again.

Step 2. Select your lost data/files
Deep Data Recovery for Mac scans the selected disk volume and displays the scanning results, allowing users to sort and find specific files.

Step 3. Recover lost/deleted data
After finding the desired files, preview them and click "Recover" to initiate the recovery process of your deleted or lost Mac files.

The Final Words
Creating a Monterey USB installer is a quick and easy method to upgrade or repair your Mac. To do this, you can follow a step-by-step procedure to make a bootable installer for Monterey, which can then be used to do a clean install of the latest macOS version.
If you experience data loss after installing Deep Data Recovery for Mac, you can recover your data using the software itself. To avoid this issue, always back up your data before installing or upgrading, and ensure you have the necessary resources and tools before beginning any operation.
Create Mac OS Monterey USB Installer FAQs
This section will help you answer some of the commonly asked questions to help you with any ambiguity left.
1. How to create macOS Ventura bootable USB?
To create a macOS Ventura bootable USB, first, use the Disk Utility tool on your Mac to format the USB drive. Then, use the Terminal app to generate a bootable installation.
2. How to get Monterey resources to create a bootable installer?
To create a bootable installer for Monterey, you'll need to download the installation file from the Mac App Store and have a USB disk with at least 16GB capacity. This will allow you to make a bootable installer for Monterey. The installation file itself is available for free download from the Mac App Store.
3. What is the Monterey USB installer for?
The Monterey USB installer is a bootable USB stick that allows you to install, update, or repair macOS Monterey on multiple devices.
4. How do I clean install macOS Monterey?
To install macOS Monterey cleanly, start by booting your Mac from the Monterey USB installer, then use Disk Utility to wipe the existing system drive and format it for the new installation. From there, follow the installation steps to install the latest version of macOS on the freshly formatted disk.
Related Articles
- What Does Wipe Cache Partition Mean and How to Wipe the Cache Partition
- How to Erase All Content and Settings on Mac [macOS Ventura/Monterey]
- [Fixed] How To Disable the Keychain on Mac and Remove Saved Password on Mac
- Best Method | Install macOS Monterey on Unsupported Mac
- Windows 10 System Interrupts 100 CPU - How to Fix?
Do you know how to fix Windows 10 system interrupts 100 CPU? this guide can help. It explains what System Interrupts is, what causes high CPU usage, and how to fix it. After reading, you can choose a suitable method to solve System Interrupts 100% CPU usage. - Windows 11 Is Getting ReFS Support for Enhanced Data Proteciton
The recent Windows 11 Insider release includes ReFS support, but what's the significance of this addition? To understand, let's first compare ReFS with NTFS, the traditional file system used by Windows. NTFS has limitations, such as limited scalability, lack of support for large volumes, and vulnerability to data corruption.