Best Method | Install macOS Monterey on Unsupported Mac
If you're a MacOS user who feels held back by update limitations on your old Mac, don't worry - there are still ways to install macOS Monterey on your unsupported Mac, despite the challenges posed by the latest macOS updates.
This article will provide detailed information about all the key points you need to remember while trying your luck. Continue reading and explore all the recent updates your friends and family have been raving about ever since.

Can I Install macOS Monterey on an Unsupported Mac
Fortunately, you can install macOS Monterey on an unsupported Mac and enjoy all the updates, contrary to conventional ideas. This opens up a whole new world of possibilities. So, why should you go through the hassle of installing it? The real magic in macOS Monterey lies in its numerous benefits, which include improved performance, new features, and enhanced security. Installing it on your unsupported Mac can be a game-changer, and the points listed below will convince you to do so at the earliest.
- With the latest features, you can take advantage of upgraded versions of previous ones, making them more efficient to use, and potentially helping you perform better.
- The new features in the latest update, such as Do Not Disturb mode, enhance productivity and focus. Additionally, the Apple Universal Control feature has been a game-changer, allowing for seamless connections between all Mac devices.
- macOS Monterey offers improved features for Facetime and video communications, allowing users to capture, record, and create content more efficiently and effectively, enhancing their overall experience.
We have talked enough about macOS Monterey's good aspects. Let us determine if we can install the version directly or take another road. Suppose your Macbook falls in the list of the given names. It would be best if you struggled a little, but we have covered you. Let's find out.
- iMac (Mid 2007, after upgrading the CPU)
- Xserve (Early 2008 or newer)
- Mac Pro (Early 2008 or newer)
- iMac (Early 2008 or newer)
- MacBook Pro (Early 2008 or newer
- MacBook (Early 2008 or newer)
- iMac Pro (2017)
- Mac Studio (2022)
If your MacBook's model is in the list of unsupported Macs, don't worry, you can still install macOS by using your Mac differently, such as installing it on a different Mac or using a different method.
How To Install macOS Monterey on Unsupported Mac
You can install macOS Monterey on an unsupported Mac, although it may take extra time compared to downloading it on a supported device. With some effort, you can achieve this by following 4 simple ways to install the operating system on your device.
To avoid losing important data, it's suggested to back up your files using Deep Data Recovery for Mac Pro before installing macOS.
Back Up Your Mac and Never Lose Data
To back up and restore your MacBook/iMac without using Time Machine, iCloud, or external hard drives, you can use the built-in "About This Mac" feature to create a backup of your computer's system and user data. This involves going to the Apple menu, selecting "About This Mac," and then clicking on the "Storage" tab.
Step 1. Learn How to Download macOS Monterey Resource
The first step for updating macOS Monterey on your device is downloading it. It does not take much time, like setting up other installers, but is a basic prerequisite. Wondering how to download MacOS Monterey resources? Don't worry. Please keep reading to equip yourself with enough knowledge about it all.
There are two basic methods to download macOS Monterey. The first method is to download it directly from the Mac App Store, which is the most straightforward and convenient way. The second method is to download it from Apple's official website, which is useful if you're having trouble downloading it from the Mac App Store.
Method 1: Download macOS Monterey From the App Store
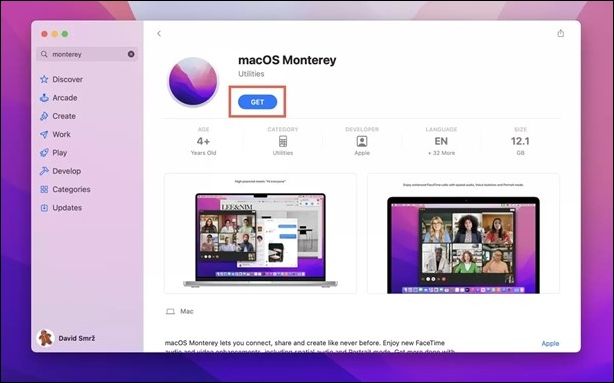
To install macOS Monterey, you can directly access the App Store and download it.
Step 1. To download macOS Monterey, go to the App Store on your Mac, click on the search bar, and type "macOS Monterey" to start the download process.
Step 2. Find the macOS Monterey result, tap the "Get" button, confirm your Apple ID, and download macOS Monterey.
Method 2: Download macOS Monterey From Third-party Sources
For a smooth macOS Monterey installation, consider using third-party resources like AppleInsider, Techspot, and MacRumors to identify potential bugs before installing. This can help you avoid any issues that may arise during the process.
Step 2. Prepare a USB to Install macOS Monterey on Unsupported Mac
After downloading macOS Monterey, prepare a USB drive with at least 16 GB of free space to install it on an unsupported Mac.
Here are two easy ways of preparing your USB stick for installing macOS Monterey.
Method 1: Prepare Your USB Via Disk Utility
Step 1. Attach or plug in the USB to your Macbook.
Step 2. Open the Disk Utility menu on your Mac.
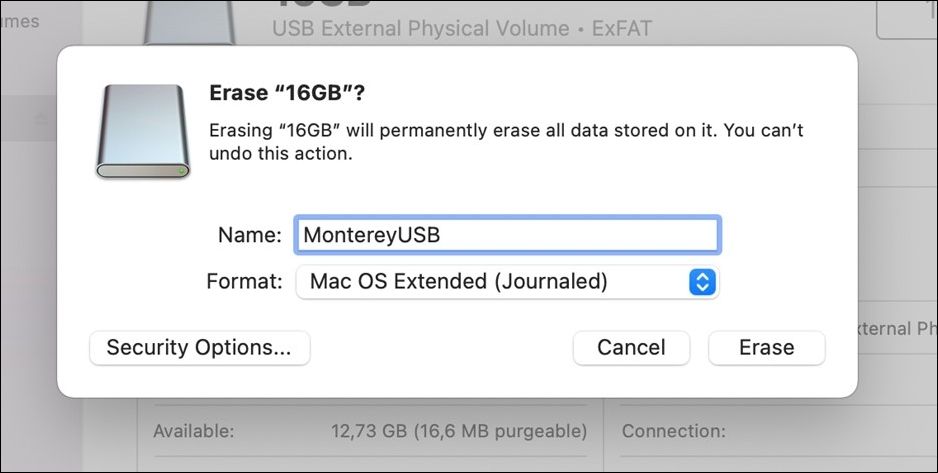
Step 3. To erase a USB drive on a Mac, find and select the USB drive, then click the "Erase" button from the multiple icons at the top of the window. If you're unable to erase the USB drive, you can find solutions to troubleshoot the issue, such as those listed on the webpage "can't erase the USB Drive on Mac".
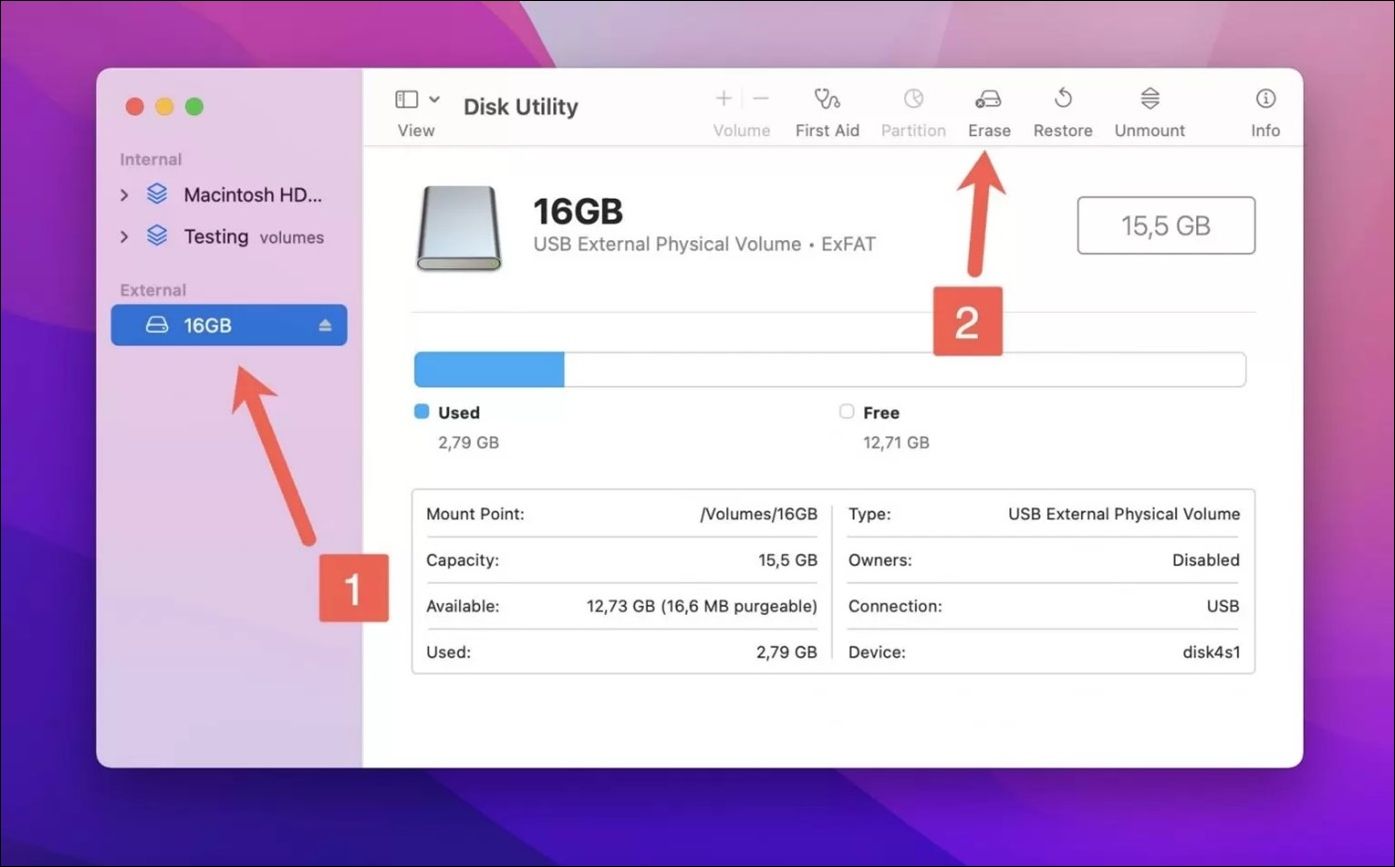
Pro-tip: You must check whether Mac OS Extended (Journaled) is selected.
Step 4. To prepare your USB for use, assign a memorable name to it, such as your pet's name or something you like. This will help you easily recognize it on the go. Once you've named your USB, click the "Erase" button to clear any existing data and make it ready for new files.
Method 2: Prepare Your USB Via Terminal
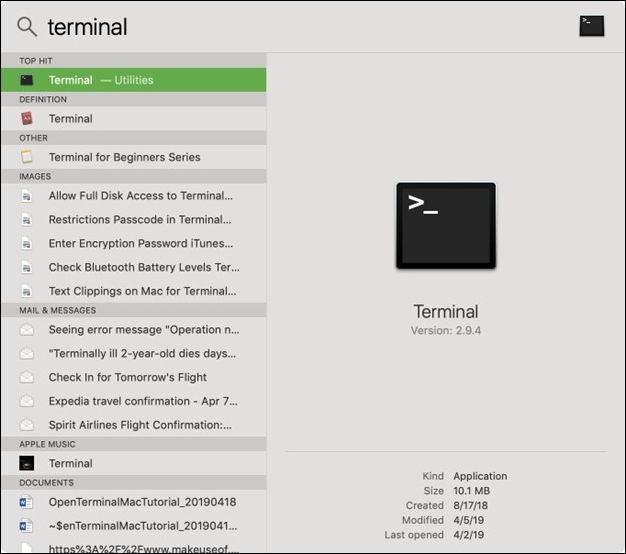
The other approach to using a Macbook is more user-friendly. It involves using a feature called 'Terminal' on your Macbook.
Step 1. To open Terminal, click on the Launchpad icon in the Dock, then search for Terminal and click on it to open it.
Step 2. Then, in the Terminal window, copy and paste the command which works best for the current version of your Macbook. Your command is this mentioned below:
sudo /Applications/Install\ macOS\ Monterey. app/Contents/Resources/createinstallmedia --volume /Volumes/YOURUSBDRIVE --nointeraction.
Step 3. To access the drive, enter the Return key and add your password, then name the drive by opening the Disk Utility on your MacBook and renaming the "Myvolume" option to your selected username before booting the drive.
Note: To delete all the USB drive information, simply type Y and press the return key.
Step 4. The Terminal will erase the data in the drive, and your bootable USB is ready.
Share this article on social media to read it anytime.
Step 3. Create a macOS Monterey Bootable Installer with OpenCore
Now that our USB is all booted, we have successfully downloaded the macOS Monterey. The next step is to create an installer using OpenCore Legacy Patcher.
Step 1. To get started, download the OpenCore Legacy Patcher and open it. Then, navigate to the "Create macOS Installer" option to proceed with the installation process.
Step 2. Once you see a pop-up window, click the Download macOS installer option and select the version you want to download.
Quick Tip: To download the non-beta version of macOS, select the non-beta version from the list of macOS versions displayed on the screen.

Step 3. Once you've downloaded macOS Monterey, add your username and credentials to InstallAssistant to proceed with the installation process.
Step 4. To install macOS Monterey, tap on the Flash Installer button, then select the USB drive you've plugged in, and wait for the installation to complete, indicated by a Success message on the screen.
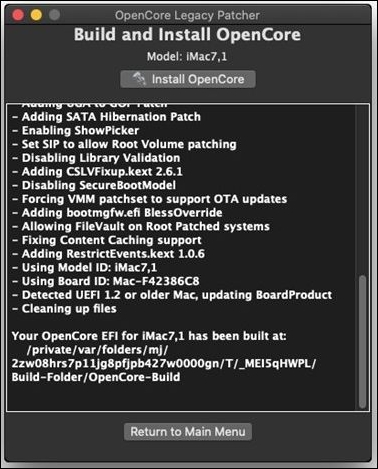
Step 5. To proceed, run the OpenCore Legacy Patcher, select the "Build and Install OpenCore" option, and then tap on "Build OpenCore".
Step 6. To install OpenCore, open the "Build and Install OpenCore" window and click the "Install OpenCore" button.
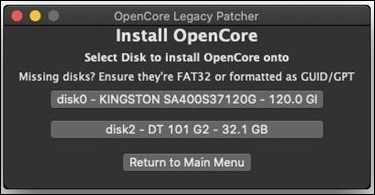
Step 7. Insert a USB drive, tap on it and select the partition labeled with EFI letters, then wait for the message "OpenCore transfer complete" to finish the process.
Step 4. Install and Boot macOS Monterey on Unsupported Mac
The final step is installing macOS Monterey and booting it on your device, marking the completion of the process.
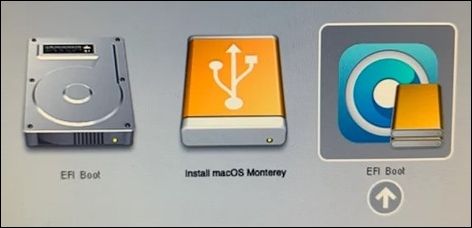
Step 1. Insert the prepared USB drive into your MacBook, followed by a restart of the MacBook.
Step 2. Click on the EFI boot option that displays the OpenCore icon to proceed.
Step 3. To install macOS Monterey, start by going to the Apple menu and selecting System Preferences. Then, click on Software Update and follow the prompts to download and install the latest version. Once the download is complete, tap on Install macOS Monterey on the next screen and let the installation process finish.
Keep Data Safe When Running macOS Monterey on Unsupported Mac
Installing macOS Monterey on an unsupported Macbook can be a fun experiment, but it comes with risks, including the potential to damage your data. If you access and use third-party resources, you may inadvertently corrupt your important files and data, which can be a major headache since many critical documents are stored on your device. If you're unable to locate essential data on your Mac, consider using professional data recovery software like Deep Data Recovery for Mac to help you recover your lost files.
This data recovery software is a handy tool that offers a range of features, making it a valuable resource for users. With its ability to recover deleted files, restore lost data, and even recover data from damaged or corrupted storage devices, this software is a must-have for anyone who wants to safeguard their important files.
- Recovering deleted files on Mac is made easy with the Qiling recovery tool, which can also perform Mac Trash recovery.
- You can use this tool to recover deleted iMessage on Mac, as well as retrieve other deleted files such as videos, images, documents, and audio.
- Recover lost files when encountering malware attacks, system crashes, accidental formatting, and other unexpected events.
If you have downloaded the Mac data recovery tool, follow the written tutorial to keep your data safe when running macOS Monterey on an unsupported Mac. We have also added operation screenshots to make it easy to understand.
Step 1. Select the drive to be scanned
In the main Deep Data Recovery window, select the drive you need to recover lost/deleted files from and click the "Search for lost files" button to proceed.
Note: Before attempting data recovery, it's recommended to create a backup of your Mac using the "Disk Backup" feature. This ensures that your data is safe and can be recovered if needed. Once the backup is created, the software can proceed with data recovery, allowing your computer to write new data again.

Step 2. Select your lost data/files
Deep Data Recovery for Mac will immediately scan your selected disk volume and display the scanning results on the left pane, allowing you to sort and find specific files if needed.

Step 3. Recover lost/deleted data
Once you have found the desired files, preview the files and then click "Recover" to begin the recovery of your deleted/lost Mac files.

Conclusion
Don't let an outdated MacBook hold you back from optimizing your device usage. With the right tools and knowledge, you can breathe new life into your old device, even if you can't afford a new one. The article provides a helpful guide to ease the process, and Qiling's features can give you peace of mind by protecting your precious data. So, don't let fear hold you back - find a solution and keep going!
Install macOS Monterey on Unsupported Mac FAQs
If you have further questions, please review the ones listed below. If a query remains unsolved, don't forget to leave it in the comments.
1. How to install macOS Ventura on an unsupported Mac?
Installing Venture like Monterey might take a while, but these steps will guide you through installing macOS Ventura on an unsupported Mac.
Step 1. To install macOS Venture, start by obtaining the Venture installer, then prepare a USB drive for installation. Next, access a patcher to get started.
Step 2. After a successful download, the open-core patcher app is run and the user clicks on Build OpenCore.
Step 3. Once done, click on Install OpenCore to USB/internal drive from the options.
Step 4. To install macOS Ventura, first, restart your device and select EFI boot from the options on the screen. This will load open core, where you can choose to install macOS Ventura. Select it from the options in the open core picker, and the installation should be successful.
2. Can I run macOS Monterey on my old MacBook?
To determine if your MacBook is compatible with macOS Monterey, check your model number and year. If it's not compatible, you'll need to run a few steps to update your MacBook to a compatible version of macOS. This may involve running a specific version of macOS, such as macOS High Sierra or macOS Mojave, and then updating to macOS Monterey from there.
3. How much RAM does macOS Monterey need?
If you want to install macOS Monterey on your Mac, it needs at least 16 GB of RAM to function well.
4. How to create macOS Monterey bootable USB?
There are two ways to make a USB drive bootable: plugging it in and erasing data after naming it with the macOS extension, or using the terminal option on your device, which is more convenient.
Related Articles
- Create Windows 10 Bootable USB on Mac | Beginners' Guide
- Fixed: Copy/Cut/Paste Not Working in Windows 10/8/7
- Mac Won't Boot or Start After macOS Big Sur/Catalina/Sierra Update
- How to Fix Virtual Disk Service Error: The Disk Is Not Empty [Full Guide]
- [Solved] Kernel Data Inpage Error Windows 10 (Blue Screen)
Kernel Data Inpage Error (Blue Screen) in Windows 10? Learn 5 proven fixes to resolve this BSOD, including CHKDSK, SFC, DISM scans, and data recovery tips for unbootable PCs. - Laptop vs. Desktop: Which Is Better for You? [Comparative Analysis]
Laptop vs. Desktop: which is better for you? Compare cost, portability, performance, storage, and screen size to find the right computer for gaming, work, or personal use.