How to Fix 'Erase Assistant Is Not Supported on This Mac' Error
The "Erase Assistant is not supported on this Mac" error is a common issue reported by Mac users, occurring when trying to use the Erase Assistant tool, essential for resetting their MacBook to factory settings or wiping their Mac before reinstalling the macOS. This inbuilt feature allows users to securely erase their device, a crucial step when trading or selling their Mac. To resolve this issue, users can try restarting their Mac, checking for software updates, or seeking assistance from Apple Support. If the issue persists, users may need to consider alternative methods for erasing their Mac, such as using a third-party tool or seeking professional help, ultimately ensuring their Mac is properly erased and reset.
- Eliminate and clear all user accounts along with the data they have preserved.
- To erase a Mac device, you can perform a factory reset, which will remove all content, applications, and settings from the device. This process is also known as erasing the Mac.
- To prevent your Mac from being deleted from the iCloud service, you can toggle off Activation Lock and Find My on your Mac. This will remove the device from the iCloud service and prevent it from being remotely erased or disabled.
- To completely erase all data on your Mac, including the macOS installation, you can use the built-in Disk Utility app. Go to Applications > Utilities and open Disk Utility.
If you're experiencing an "Erase Assistant is not supported on this Mac" error, don't worry, it's a common issue that can be resolved. To fix this, you can try restarting your Mac in Recovery Mode, which will allow you to access the Erase Assistant. Alternatively, you can also try using the Terminal command `csrutil disable` to disable System Integrity Protection (SIP), then restart your Mac and try erasing it. If these methods don't work, you may need to take your Mac to an Apple Store or authorized service provider for further assistance.
Why Do I Encounter 'Erase Assistant Is Not Supported on This Mac'
The Erase Assistant tool is available on Intel-based and Apple Silicon Macs, but only on macOS Monterey or later versions with an Apple T2 security chip. If your Mac meets these requirements, you can use this feature; otherwise, it's not available due to software or hardware limitations.
The error "Erase Assistant is not supported on this Mac" occurs on macOS Monterey or Ventura when the system doesn't have the required T2 or Apple Silicon chip, making the older macOS versions incompatible with the chips.
To check if your MacBook has a T2, M1, or M2 chip, follow these steps. First, click the Apple logo in the top left corner of the screen and select "About This Mac.
Step 1. To access System Information on a Mac, press the Command + Space shortcut to activate Spotlight, then type "System Information" into the search bar.
Step 2. Hit the System Information to launch it.
Step 3. Opt for iBridge or Controller located on the left side.
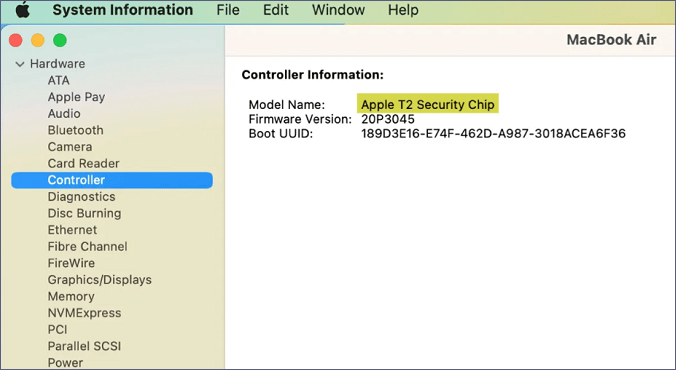
If you can't see "Apple M1 chip" or "Apple M2 chip" or "Apple T2 Security Chip," it's impossible to use Erase Assistant on your Mac.
How to Fix 'Erase Assistant Is Not Supported on This Mac' Error
The error "Erase Assistant Is Not Supported on This Mac" is a standard issue, but you can bypass it by erasing your Mac in Recovery Mode. This is possible on Intel Macs or Apple Silicon Macs with a T2 chip, as long as they're running Monterey or higher.
If you have an outdated macOS version or own an incompatible device, you can't use this tool to factory reset your MacBook Pro or Air, so the best way to wipe your Mac is by using macOS Recovery.
In the case of Apple Silicon Macs:
Step 1. To boot your Mac into macOS Recovery, turn it off by clicking the Apple logo in the top left menu bar and selecting "Shut Down".
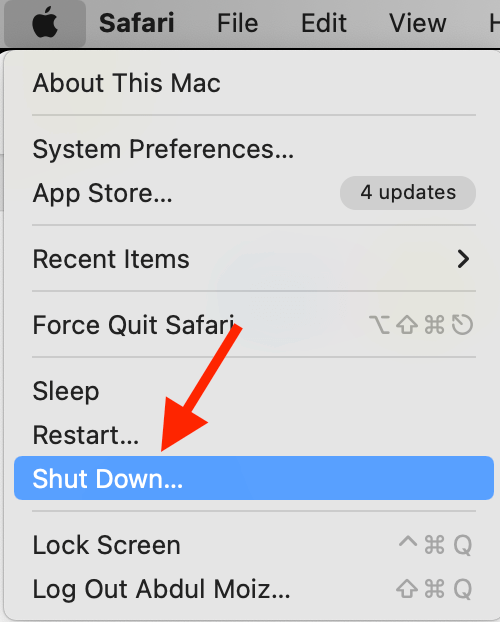
Step 2. Give your Mac a few minutes to shut it off completely. After it's switched off, the screen will be black.
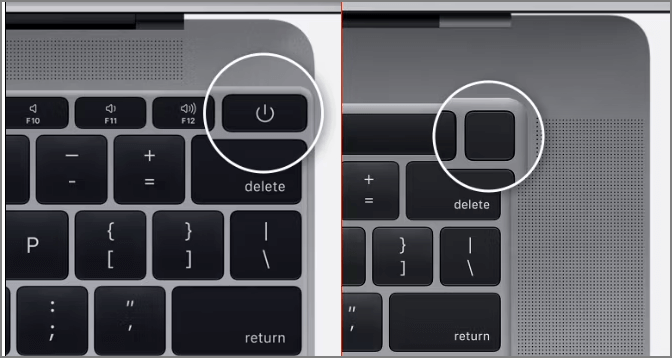
Step 3. To enter macOS Recovery on Apple Silicon Macs, press and hold the power button until the computer restarts and you see the Apple logo, then release the power button and immediately press and hold the power button again until you see the macOS Utilities window.
In the case of Intel-based Macs:
Step 1. To access macOS Recovery on an Intel-based Mac, you need to press and hold the Command + R keys on your keyboard.
Step 2. Keep holding the particular keys until you notice the Loading startup options screen.

Step 3. After selecting "Options," click on the "Continue" button in the startup options window.
Step 4. Select a volume to retrieve by choosing one from the list provided and clicking "Next".
Step 5. Choose the administrator account, and hit "Next".
Step 6. On the next screen, you will be prompted to enter the account's password.
Step 7. Hit the "Continue" button after entering the password.
Step 8. Launching macOS Recovery on your Mac was successful.
How to Factory Reset Mac in Recovery Mode When Erase Assistant Not Working
Once you've learned how to boot your Mac into Recovery Mode on both Intel-based and Apple silicon Macs, you can erase your Mac without relying on Erase Assistant.
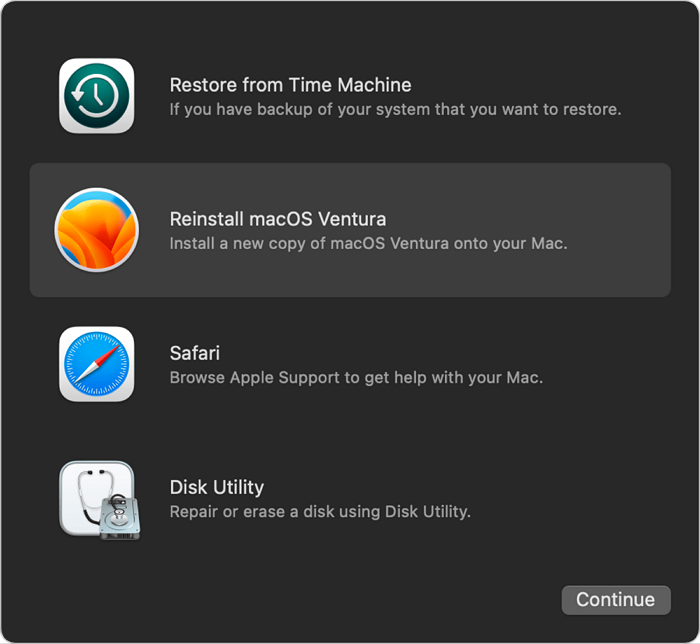
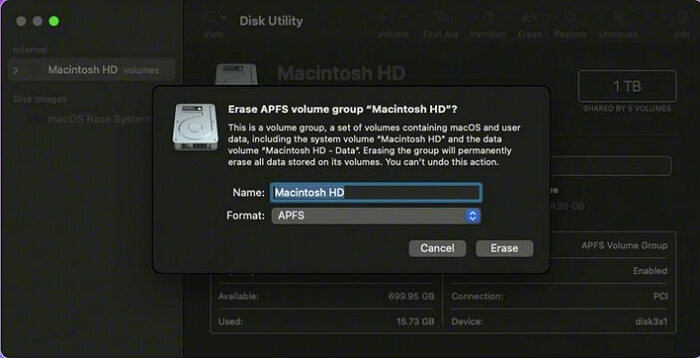
Step 1. Boot Mac into Disk Utility and click "Continue".
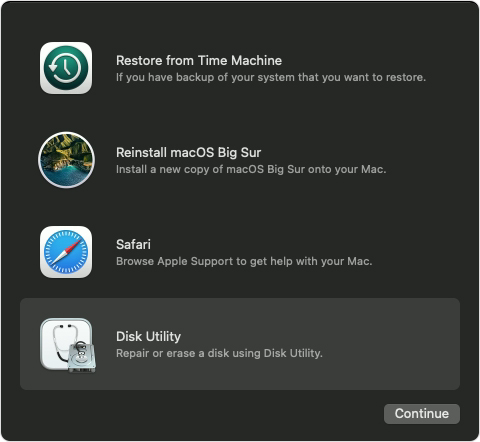
Step 2. To erase the internal hard drive, select it from the sidebar, then click on the "Erase All Data" button. This will completely remove all data and restore the drive to its factory settings. Be sure to confirm the action by clicking "Erase" in the pop-up window.
Step 3. To boot your Macintosh HD, you need to reinstall macOS after erasing all the data on it.
To fix the 'Erase Assistant Is Not Supported on This Mac' error, follow these steps: Go to System Preferences > Erase Assistant and click on the "Erase Assistant" button. If you're still experiencing issues, try restarting your Mac and then go to System Preferences > Erase Assistant. If the issue persists, reset your Mac's NVRAM and SMC, and then try erasing the Assistant again. If you're still having trouble, you can also try reinstalling macOS or resetting your Mac's PRAM.
Why Can't I Find My Erase Assistant on Mac
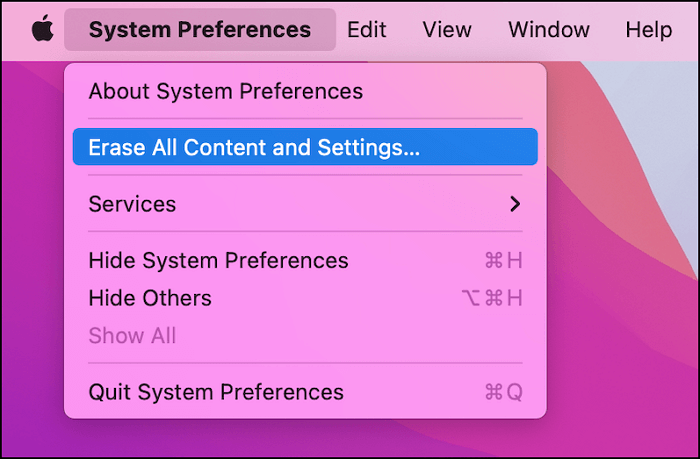
To erase all content and settings on your Mac, go to System Settings, then click on Erase All Content and Settings, which is located under the General tab. This feature is only available on Macs with T2 or M1/M2 chips running macOS Monterey or later. If you have an earlier version of macOS, you won't be able to find this option. To use Erase Assistant, select your reason for erasing the content, choose the type of erase, and follow the on-screen instructions to complete the process. This will restore your Mac to its factory settings, eliminating all personal data and settings.
Steps to find Erase All Content and Settings on macOS Monterey:
Step 1. Select the Apple menu, and opt for System Preferences.
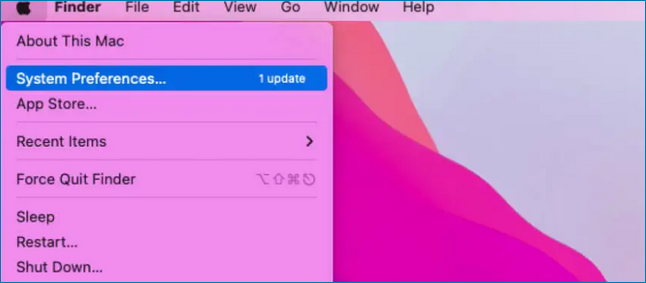
Step 2. To erase all content and settings on your Mac, go to System Preferences, then click on the "Erase All Content and Settings" option. This will completely reset your Mac to its factory settings, removing all user data, applications, and settings.
Steps to find Erase All Content and Settings on macOS Ventura:
Step 1. Hit the Apple menu, and select System Settings.
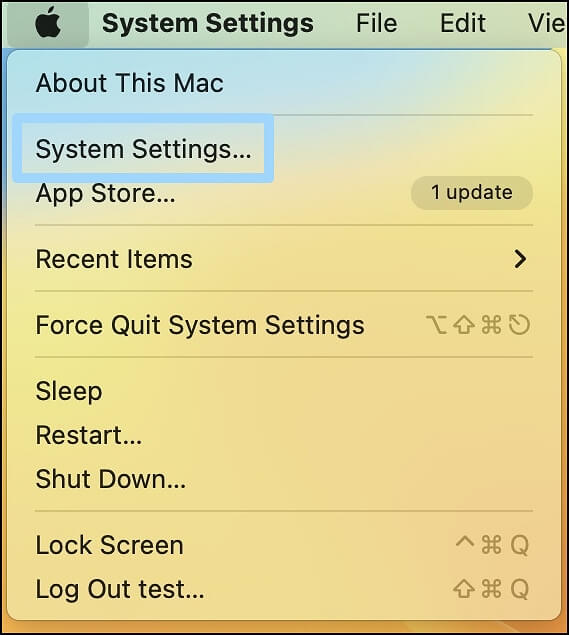
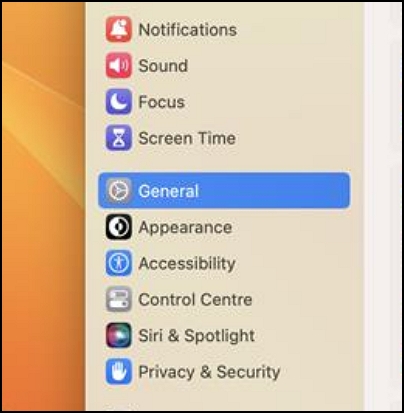
Step 2. Opt for "General".
Step 3. Select "Transfer or Reset".
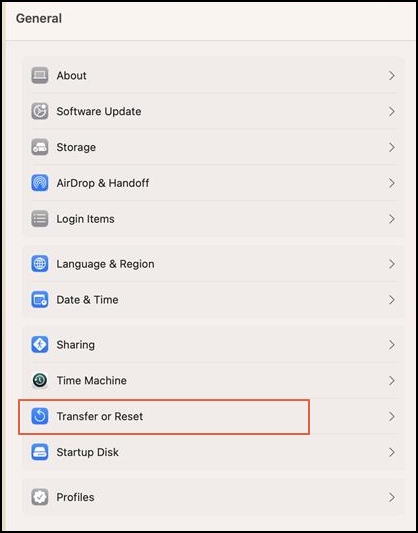
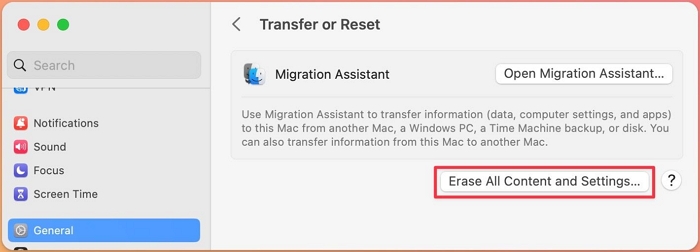
Step 4. Here you will see the "Erase All Content and Settings" tab.
How to Erase All Content and Settings on macOS Ventura/Monterey
Now that you know how to find the setting on macOS Monterey or Ventura, let's get started with the steps to format your MacBook. To begin, ensure your MacBook is connected to a power source and the battery level is at least 50% charged.
Step 1. Click on the "Erase All Content and Settings" button.
Step 2. Type your administrative password to confirm your function.
Step 3. You can choose to backup your Time Machine data or skip this step by selecting Continue.

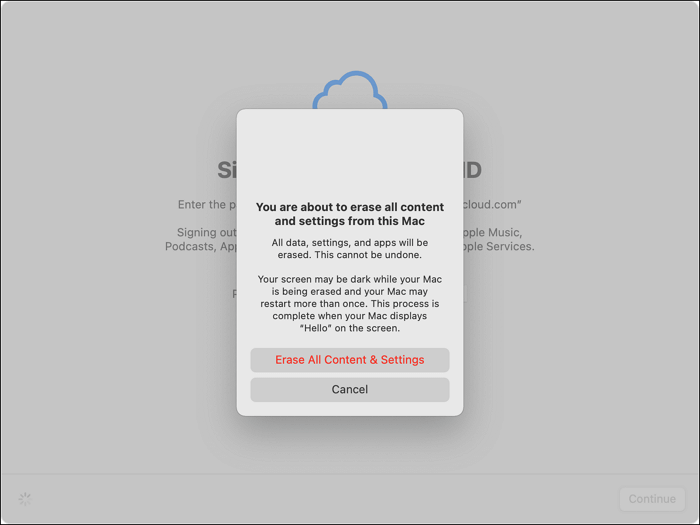
Step 4. The MacBook will be completely erased, removing all data, settings, and media. To confirm this choice, click the "Continue" button.
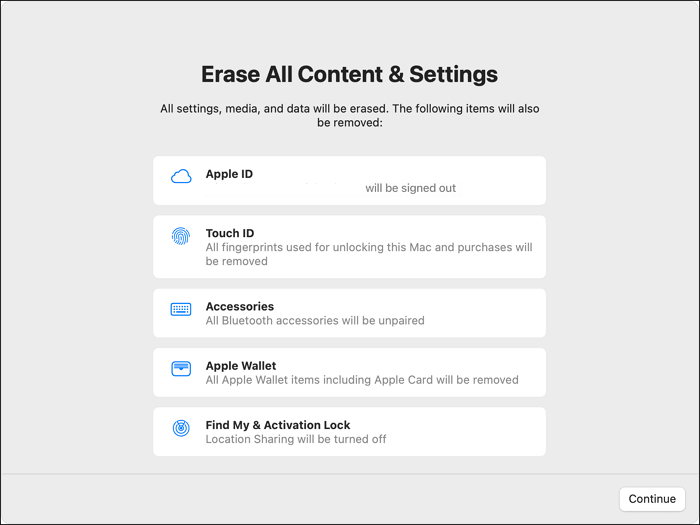
Step 5. Make sure to sign out of the Apple ID by typing the password.
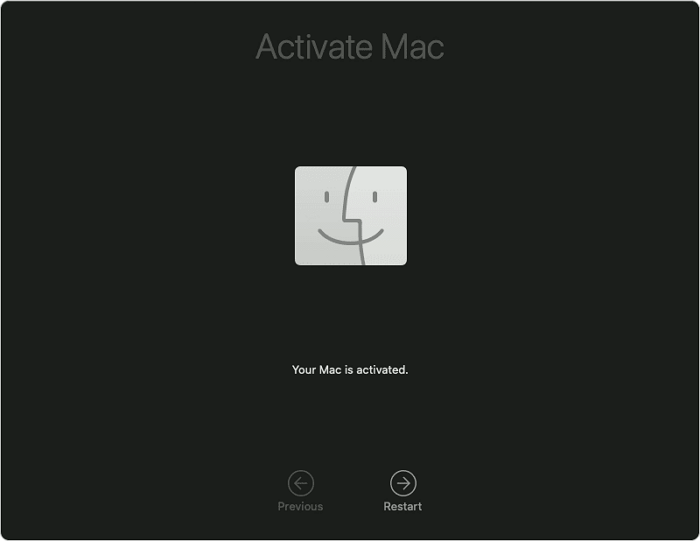
Step 6. You will need to reinstall macOS and all of your applications after hitting the button with the red words.
Step 7. To get started, wait a few times to let the process complete. Then, hit the "Restart" button, adjust the settings as needed, and you're ready to start using your MacBook.
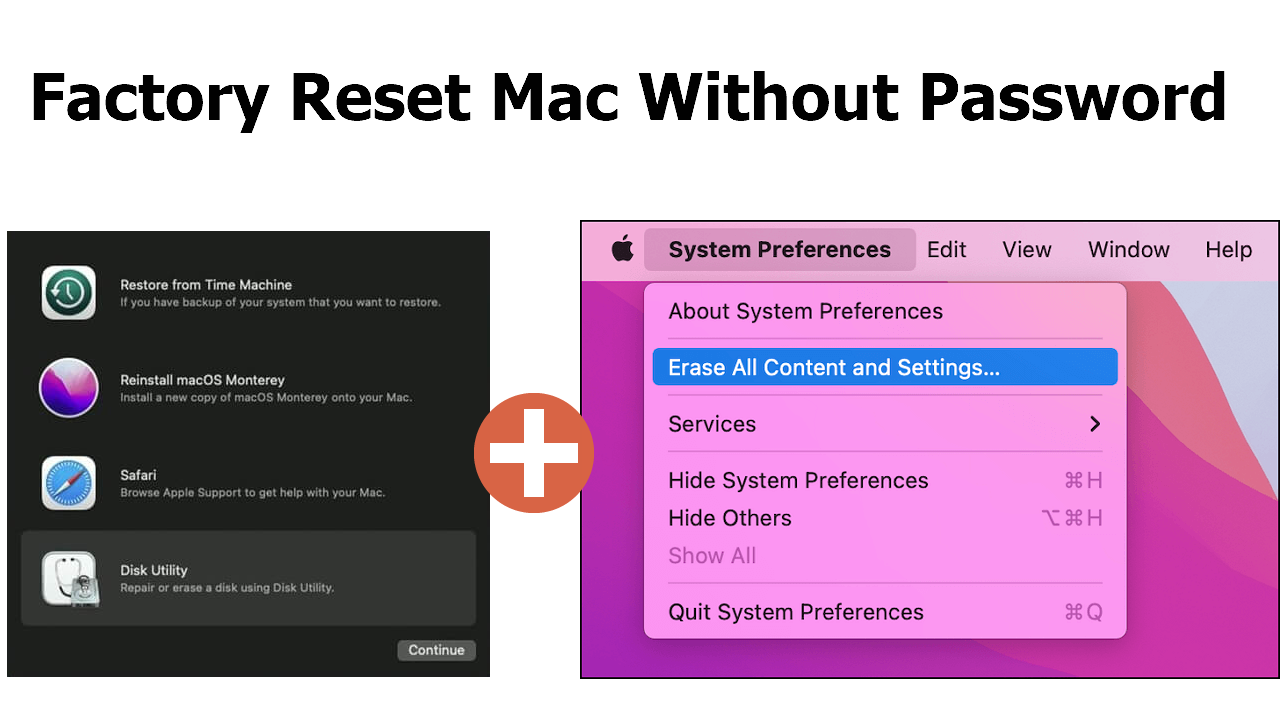
To factory reset your Mac without a password, you can follow the steps outlined in this article, which provides a detailed tutorial on how to do so.

Factory Reset Mac Without Password [for macOS Ventura/Monterey]
If you've forgotten your Mac password, you can still factory reset your device. This tutorial will guide you through the process, allowing you to restore your Mac to its original settings and start fresh.
How to Restore Files After Using the Erase Assistant on Mac
Losing data is a common risk when erasing all content and settings on macOS Ventura or Monterey. If you've experienced data loss while trying to fix the "Erase Assistant Is Not Supported on This Mac error", don't worry! A professional data recovery software like Deep Data Recovery for Mac can help you quickly recover lost data with just a simple click.
This tool enables the recovery of various data types and simplifies the data retrieval process in several ways.
- On a Mac, you can recover deleted files by employing a recovery tool. This allows users to retrieve a variety of file types, including documents, audio, and photos.
- The software can handle a variety of file formats, including FAT (FAT16, FAT32), APFS, HFS+, HFS X, exFAT, NTFS, and others.
- This software is strong enough to assist you in securely recovering data from a variety of devices, including Mac USB recovery.
Download this professional tool today to recover files after a factory reset on your Mac using the Erase Assistant.
Step 1. Search for lost files
Select the disk location where you lost data and click the "Search for lost files" button.
Note: Before attempting data recovery, it's recommended to create a backup of your HDD/SSD by clicking "Disk Backup" from the left sidebar, which will allow you to recover data from the backup if needed, and also enable you to reuse the original disk.

Step 2. Go through the scanning results
The software scans the selected disk volume and displays various file types, including pictures, documents, audio, videos, and emails, in the left pane.

Step 3. Select the file(s) and recover
To recover deleted data, click the data to preview, and then click the "Recover" button to restore it.

Summary
If you're familiar with macOS fundamentals but encounter an error notice saying "Erase Assistant is not supported in this Mac," it's likely due to an Intel-based Mac without a T2 Security Chip, and there's no way to fix this issue.
If you're experiencing the error that prevents you from deleting files and preferences on your Mac, there are possible solutions and ways to utilize Erase Assistant. However, if you've lost data while trying to fix the issue, you can use Deep Data Recovery for Mac to quickly retrieve your lost data.
Erase Assistant Is Not Supported on This Mac FAQs
Here are the FAQs for the topic:
1. How to factory reset MacBook Big Sur without Erase Assistant?
1. Connect your MacBook to a power source and make sure it's turned on. 2.
- Boot MacBook into Disk Utility. Select Disk Utility and continue.
- The drives are kept in the left-hand column inside the Disk Utility app.
- To erase the internal drive, select Macintosh HD and choose Erase from the top menu. Select the disk you want to erase and click on Erase. Confirm your choice to erase the disk.
- To reinstall macOS Big Sur, you can boot from the Recovery Mode by holding down the Command (⌘) + R keys while booting the Mac. This will allow you to access the Utilities window, where you can select the "Reinstall macOS" option and follow the on-screen instructions to complete the installation.
2. Why is the Erase Assistant not supported on this Mac?
The Erase Assistant is not supported on your Mac because it doesn't have Apple Silicon or it's not an Intel-based Mac with a T2 security chip, or it doesn't support Erase Assistant. This means you won't be able to use the Erase Assistant feature. You may want to consider upgrading your Mac or using a different feature to erase your device.
3. How to find Erase All Content and Settings on macOS Monterey?
To erase all content and settings on a macOS Monterey computer, go to the Apple menu in the screen's corner, select System Preferences, and then choose "Erase All Content and Settings" from the options.
4. Can I recover data after using the Erase Assistant on Mac?
If you've used the Erase Assistant on your MacBook, don't worry - your data might still be recoverable. A professional data recovery software like Deep Data Recovery for Mac can help you retrieve your lost data.
Related Articles
- How Long Does It Take to Format an External Hard Drive [Full Guide]
- 6 Proven Ways to Fix Windows Update Download Error 0x80248007
- Hades 2 Save File Location & Config File Location on PC/Steam/Xbox
If you're having trouble finding your Hades 2 save file location, this article is for you. we will guide you through different methods to locate your game saves and config files on PC, Steam, or Xbox, including how to back up your game saves using Qiling Disk Master. - [FIXED] How to Fix Hogwarts Legacy AutoSave Not Working
If you're experiencing issues with the Hogwarts Legacy autosave not working, you can try resolving the problem and recovering any disappeared game data. To fix the issue, you can refer to the article for guidance. Alternatively, you can use Qiling game data recovery software to retrieve lost game saves. - How to Fix Last USB Device Malfunctioned Error on Windows [Efficient Ways]
If you've encountered the last USB device malfunctioning error on your Windows computer, you can no longer access the data on your USB drive. The leading cause for this error includes a damaged USB port or drive. How do you solve this error? Read on to learn the possible fixes to this error. - What Is Mds_Stores High CPU Usage and How to Fix It?
Are you familiar with Mds_Stores high CPU usage? Are you worried about why the Mac Spotlight Search is not working correctly? Do you know how to fix it? Is your Mac running slower than usual? Can you hear the unpleasant noise of the fan at weird times? Read until the end to get more information.