5 Ways to Fix the 'Device Doesn't Support Miracast' Error in Windows 11
The "Device Doesn't Support Miracast" error occurs when trying to project your phone or tablet screen onto a PC using Miracast, a feature that allows wireless screen sharing. This error is often caused by connection or driver issues, and can be resolved with simple solutions, which are discussed in the article, to fix the error in Windows 11.
The Windows ecosystem has a Connect app that mirrors phone or tablet screens onto a PC, eliminating the need for HDMI cables. This is similar to Miracast, a projection technology that wirelessly casts screens onto a PC, using Wi-Fi Direct to connect devices without any additional medium.
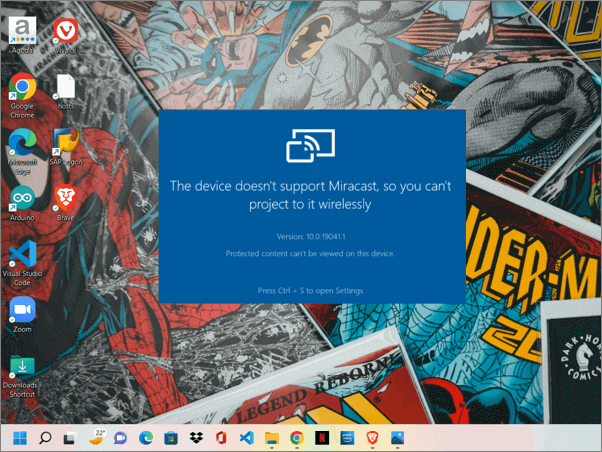
Users are experiencing an error when trying to launch the app for projection, specifically the message "this device doesn't support Miracast, so you can't project to it wirelessly". This issue may be caused by various factors such as network settings, outdated drivers, or system compatibility.
Solutions to fix the "this device doesn't support Miracast" Error
The solutions aim to address the root causes of the issue. It's recommended to try each solution one by one to effectively resolve the problem.
The fixes attempt to address the underlying reasons causing the problem and resolve the root cause, and can be further understood by reading this article from Microsoft Community.
Check the Miracast Compatibility
Most modern PCs are compatible with Miracast technology, but older devices may require updates or changes to ensure software compatibility.
Steps to check the compatibility:
Step 1. Open Windows Terminal manually using the search box.
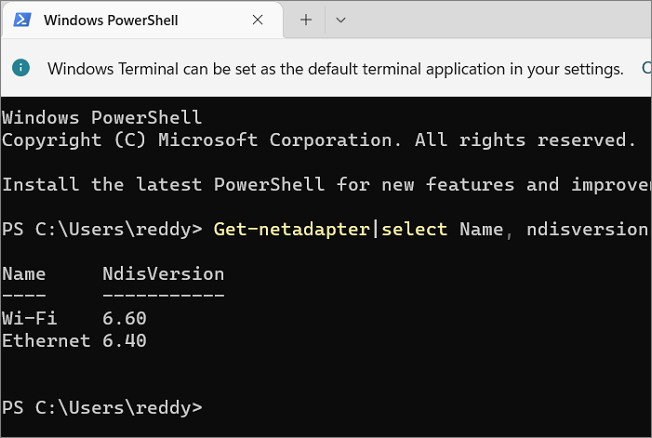
Step 2. In the terminal, enter the command below and click "Enter."
Get-netadapter|select Name, ndisversion
Step 3. If the Wi-Fi Ndisversion is 6.30 or higher, it means the device supports Miracast. If it's lower, the issue might be due to outdated drivers, which can be updated to resolve the problem.
Connect Devices to a Single Wi-Fi Network
To enable Miracast on your device, both the phone and PC must be connected to the same Wi-Fi network. If your PC is connected via Ethernet, connect it to a nearby Wi-Fi network.
Step 1. To access the Wi-Fi settings, go to the quick settings on the taskbar and click on the Wi-Fi icon, or go to the Settings app and select "Network & internet" or "Connections" (depending on your device and OS version).
Step 2. Check your Wi-Fi network and connect your other device to the same network.
Step 3. To forecast the screen onto the PC using the Connect app, open the Connect app on your device and select the PC you want to connect to. Then, tap the "Mirror" or "Screen Mirroring" option to start the screen casting process.
Configure Firewall and Network Protection Settings
Windows Firewall may prevent screen projection if it flags the device as suspicious. To troubleshoot, temporarily disable the firewall for public networks, allowing the device to cast until the issue is resolved.
Steps to disable Windows Firewall:
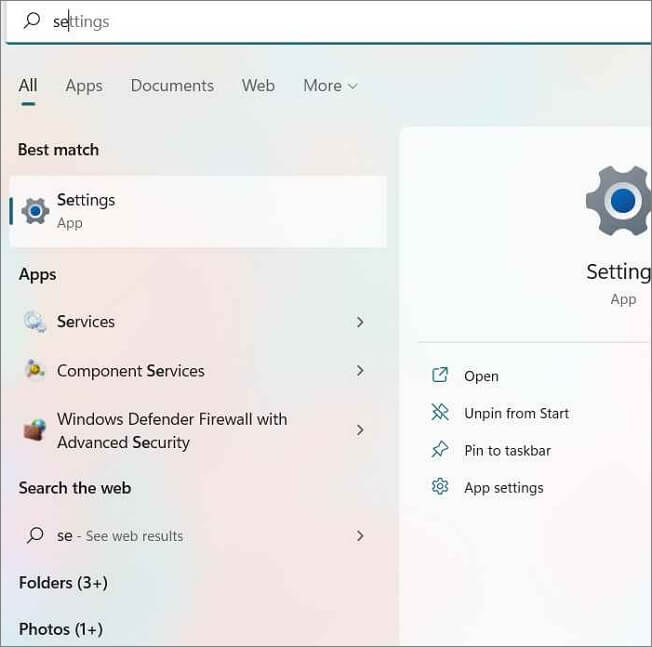
Step 1. To open the Settings app, press the Windows key + I on your keyboard or search for "Settings" in the Start menu.
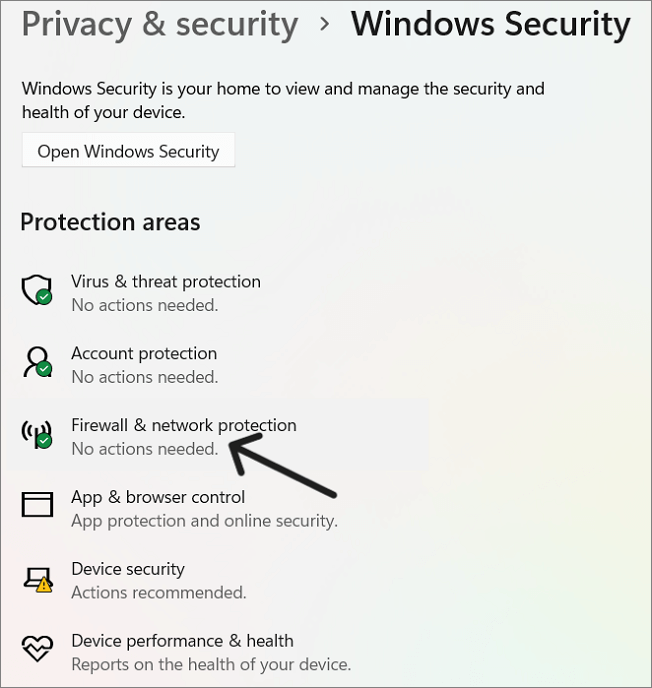
Step 2. Navigate to the Privacy and Security section.
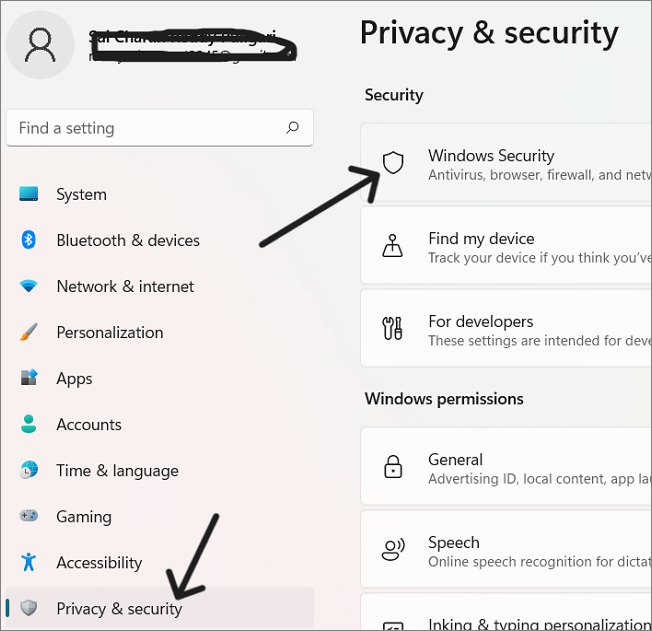
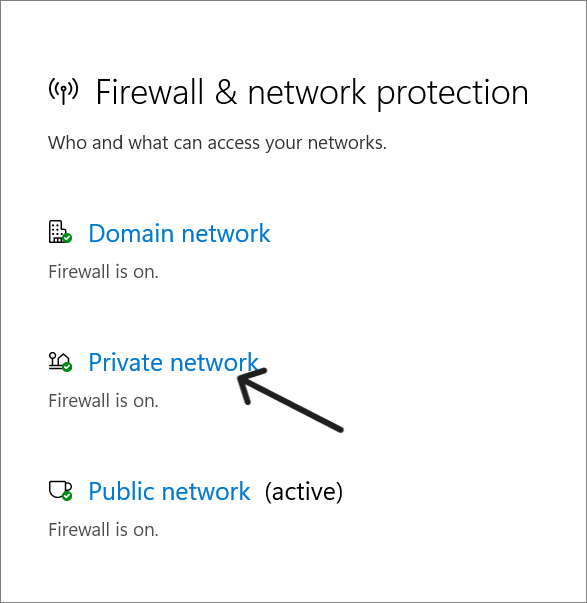
Step 3. Click on "Windows Security" and move to the Firewall and Network Protection tab.
Step 4. Click on "Private Network" and disable the Microsoft Defender Firewall.
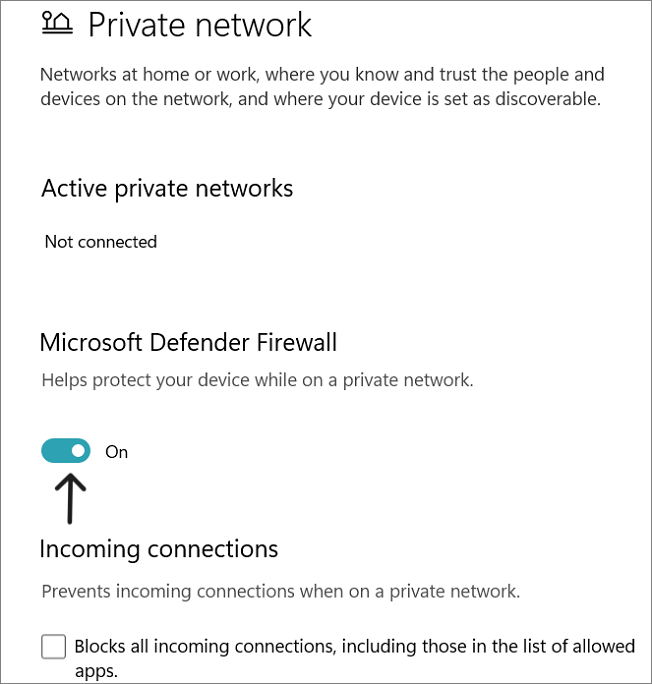
If the Miracast test works, it means the defender is blocking it. Now, enable the Microsoft Defender Firewall again and configure the firewall settings by following these steps:
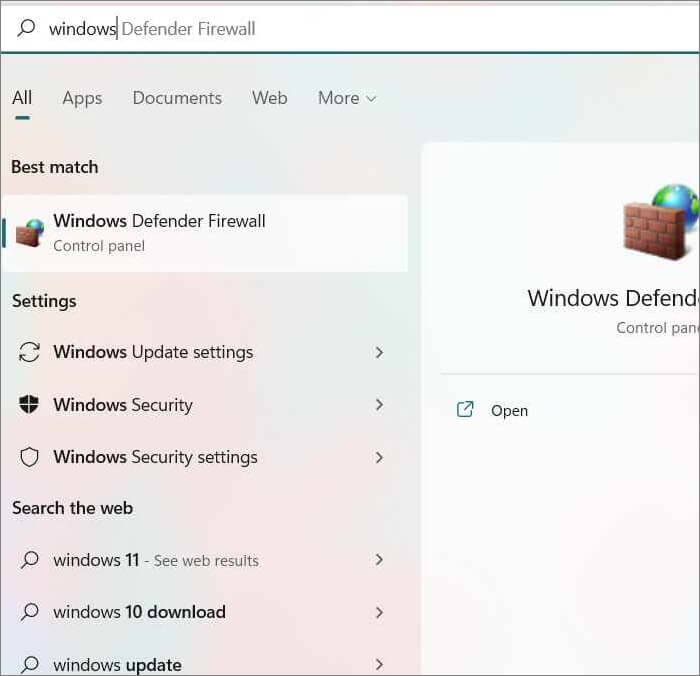
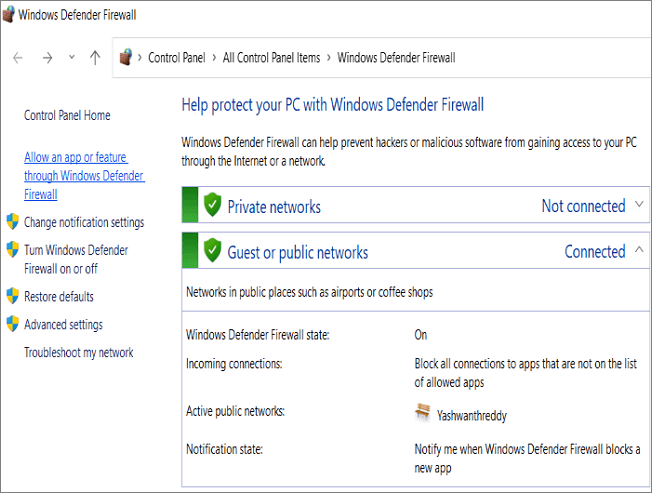
Step 1. Search for "Windows Defender Firewall" using the search box.
Step 2. To allow an app or feature through Windows Defender Firewall, go to the Start menu, type "Windows Defender Firewall" in the search bar, and click on the result. Then, click on the "Allow an app or feature through Windows Defender Firewall" option in the left-hand menu.
Step 3. To find Wireless Display, check both the public and private columns, and click on "Change Settings."
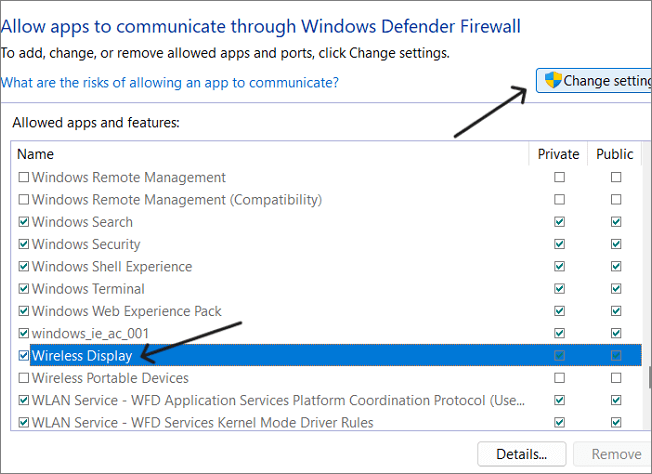
Step 4. Open the Connect app, ensure it's allowed in both public and private networks, and click OK.
Alter Wireless Mode Property and Value
If your Wi-Fi adapter's default value is set to 802.11 b\g, it may cause issues, so change the check or change the properties to fix the error.
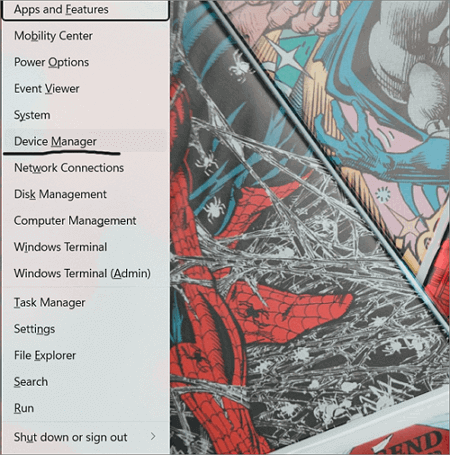
Step 1. Open Device Manager using the Search box.
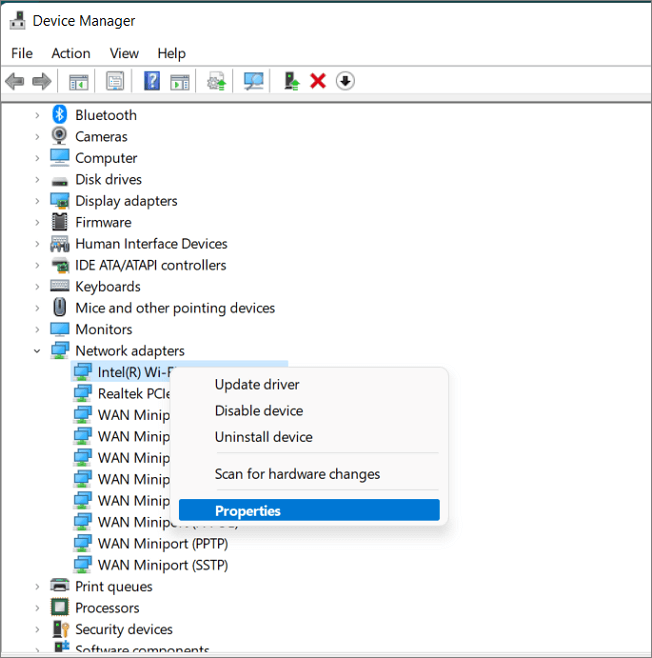
Step 2. Expand Network Adapters, find the Wi-Fi driver, and right-click on it.
Step 3. Click on "Properties" and open the Advanced tab.
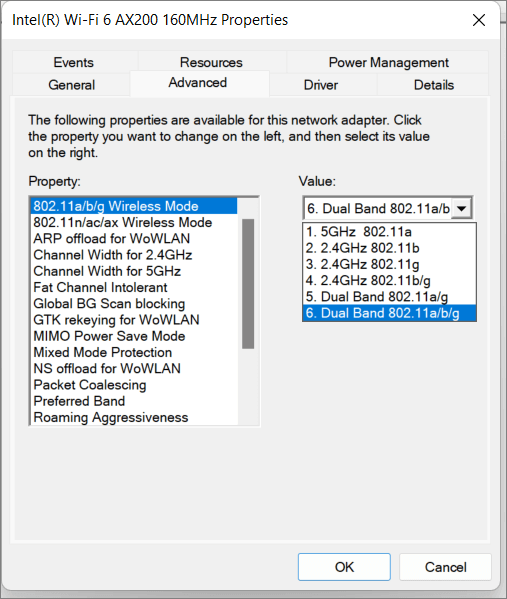
Step 4. Select 802.11 Wireless mode and Dual Band for Property and Value respectively. Click OK to confirm the changes.
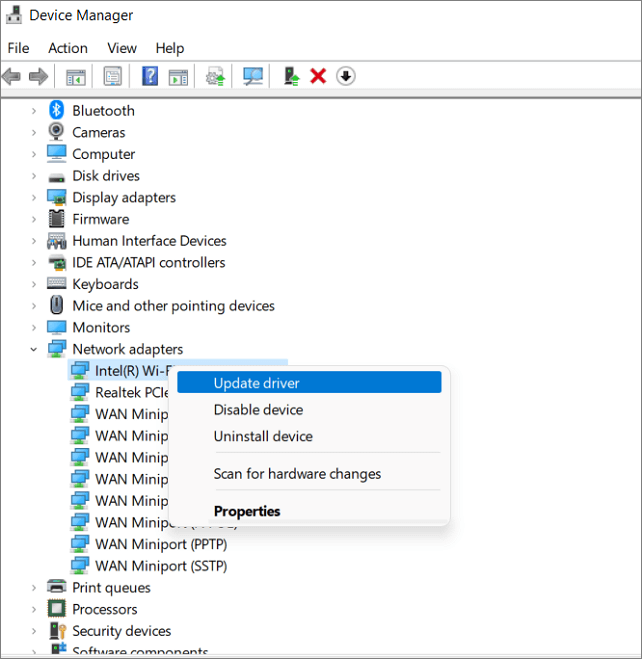
Update or Reinstall the Wi-Fi drivers
If your system is not compatible with Miracast, even on Windows 11, it might be due to outdated driver versions. To resolve this, you can either update or reinstall the drivers.
Step 1. To open the Device Manager, you can search for it in the search bar and select the result. Alternatively, you can press the Windows key + X and select Device Manager from the menu.
Step 2. Expand the Network Adapters and Right-Click on Wi-Fi drivers.
Step 3. To check if the casting is working, go to the settings of your device, select the "Sound" option, and then click on the "Output" or "Playback" tab. Look for the device that you are trying to cast to, and if it's listed, it should be working.
Step 4. If the printer is not working, click on "Uninstall" and reboot the system, which will automatically download the driver while restarting.
If you're still unable to project your screen onto your PC after trying all the fixes, you can troubleshoot the "This device doesn't support Miracast" error on your device, which may resolve the issue or provide alternative solutions. For more detailed guidance, you can refer to the article by Windows Report.
Final Verdict
Windows uses the Miracast technology, developed in 2012, to cast phone or tablet screens onto a PC. However, if there's an error with Miracast, you won't be able to continue, but fixes are available to resolve the issue and address all the reasons causing the error.
If you find this article helpful, share it with your friends and leave a comment about it. If you have any queries regarding the topic, feel free to ask them in the comment box, and do let me know of the future issues you wish to see articles from Qiling.
Related Articles
- [Fixed] Target Disk Mode Not Working on macOS Ventura/Monterey
- SSD Temperature Range: Everything You Should Know
- How to Factory Reset Microsoft Surface with Every Possible Way
Learn how to factory reset Microsoft Surface safely. Use Windows settings, recovery options, or reset methods while protecting data. - 4 Ways | How to Stop Windows 11 Update Pending Restart
If you're seeing a 'Windows 11 update pending restart' message under the Windows updates menu and aren't sure how to stop it, don't worry - this article is here to help. We'll guide you through the process of stopping the Windows 11 update pending restart. - File Formats | What Is SR2 File? All About the SR2 File Extension
The SR2 RAW file formats are associated with Sony digital cameras. This article contains all the information and details about the photo file format. Keep reading the post; you can learn how to open and convert the SR2 files. - What Is VCRUNTIME140_1.DLL and How to Fix Issues with VCRUNTIME140_1.DLL
Learn what VCRUNTIME140_1.dll is and how to fix missing or not found errors. Repair Microsoft Visual C++ Runtime and affected apps.