How to Format Tesla USB on Mac [Detailed Instruction]
Tesla's 128GB USB drive requires formatting to save videos or play media from it. If you're using a Mac and want to format your Tesla USB drive quickly and easily, this guide can help. It provide you with efficient ways to format your Tesla USB on your Mac.
Preparation Before Formatting Tesla USB on Mac
Before formatting Tesla on a Mac, it's essential to know that the Mac does not support formatting all file system formats. In fact, macOS only supports a limited number of formats, which means you may encounter compatibility issues when trying to format Tesla on your Mac.
- exFAT is a file system that is compatible with all versions of Windows and modern versions of macOS, making it a suitable choice for file storage and transfer.
- FAT32 is a file system that supports Windows and macOS, but has a file size limit of 4GB, making it less suitable for handling large files.
- APFS is the default file system for Mac computers with macOS 10.13 or later, replacing HFS+. It provides improved performance, security, and efficiency, and supports features such as snapshots, cloning, and encryption.
- Mac OS Extended is used for mechanical drives or older macOS systems.
Formatting a Tesla USB drive on a Mac requires choosing a compatible format. Not all formats are supported, so it's essential to select one that works. FAT32 and exFAT are the most suitable options for Tesla USB drives on a Mac.
If you want to know the difference between these formats, you can click on the button.
You can also learn more about the Tesla USB format by clicking on the button, which provides additional information.
Tutorial for Tesla Format USB, Everything You Should Know
Setting the USB to the proper format for your Tesla can be easy. This page provides a detailed guide on Tesla format USB, making it simple for you to follow.
Formatting a Tesla USB on a Mac is the topic at hand. I will proceed directly to the instructions.
How to Format Tesla USB on Mac via Disk Utility
Disk Utility, a program that comes with macOS, allows you to format internal or external hard drives and create disk images with ease, making it a more user-friendly alternative to using terminal commands on Mac. To format a Tesla USB on Mac, simply follow the steps in Disk Utility to complete the process.
Step 1. To connect your Tesla to your Mac, plug the Tesla USB into your computer. Then, navigate to the "Applications" folder on your Mac.
Step 2. Find "Utilities" or click "Command+Space" to type "Disk Utility".
Step 3. Insert the USB drive into your computer.
Step 4. The user should click the "Erase" button at the top of the page, then name the disk and select the "exFAT" format for it.
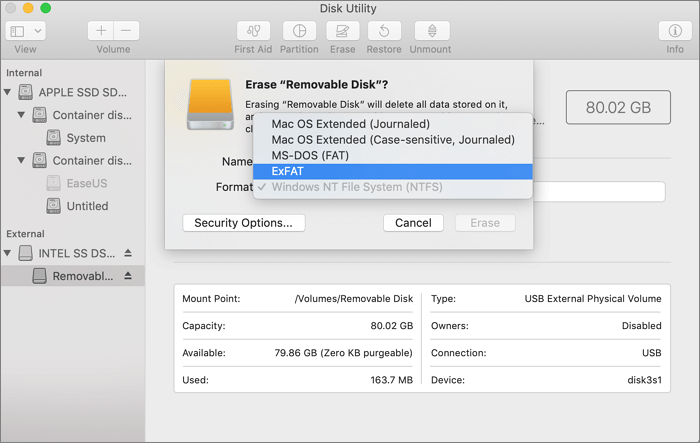
Step 5. Click "Erase" and confirm the format of the Tesla USB.
Step 6. Finish formatting Tesla USB on Mac with "Disk Utility."
How to Format Tesla USB on Mac via Terminal
To format a Tesla USB on Mac with Terminal, you can use the `diskutil` command. First, open Terminal and type `diskutil list` to find the device name of the Tesla USB drive. Then, type `diskutil eraseDisk -volumeName 'Tesla' -type 'MS-DOS FAT' /dev/diskX`, replacing `/dev/diskX` with the actual device name. Finally, type `diskutil info /dev/diskX` to verify the formatting. This will format the Tesla USB drive with a FAT file system, which is compatible with Tesla's requirements. Be careful when using Terminal commands, as they can be destructive if not used correctly.
Step 1. Plug in the Tesla USB to your Mac.
Step 2. Hold down "Command+Space," type "terminal," and open it.
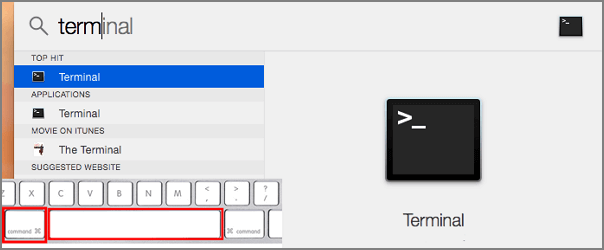
Step 3. Type "diskutil list" and find Tesla USB.
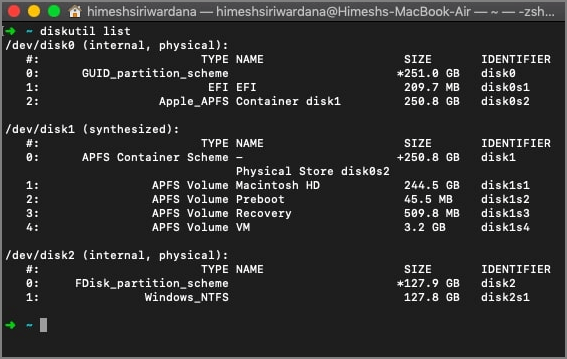
Step 4. Enter the following formatting command.
sudo diskutil eraseDisk exFAT TeslaFormat /dev/disk2.
The exFAT file system is a type of file system that allows for large file sizes and is commonly used on USB drives and memory cards. It can be replaced with other file systems such as FAT32, NTFS, or HFS depending on the specific requirements and compatibility needs.
"TeslaFormat" refers to the name of the drive.
The command "dev/disk2" refers to the USB number, which can be found in the disk list.
Step 5. Complete the Tesla USB format. Type "diskutil list" to see if it exists.
Formatting a Tesla USB on a Mac can be done in two ways. For more information on formatting a USB on Windows or Mac, you can click the provided link. The details of the process are available on the linked page.
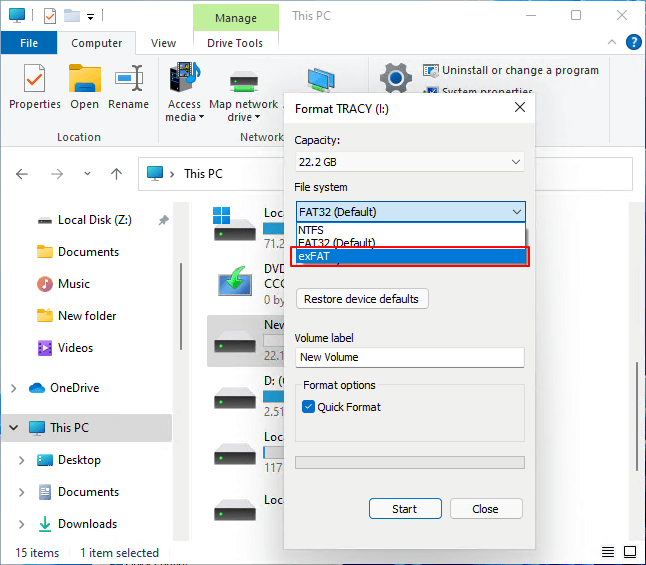
To format a USB or external hard drive to ExFAT, start by connecting the drive to your computer. On Windows, go to File Explorer, right-click on the drive, and select "Format.
If you need to format your USB or external hard drive to ExFAT, you can do so on your own by following the steps on this page, which will guide you through the process on both Windows and macOS.
Conclusion
This guide provides two methods to format an external hard drive on a Mac. The first method is to use Disk Utility, which is a relatively simple process. Alternatively, you can use a Terminal command, but be careful as this method requires precision to avoid mistakes.
FAQs About How to Format Tesla USB on Mac
The steps above should help you format a Tesla USB on a Mac. If you have any further questions, here are some additional frequently asked questions.
1. Is exFAT compatible with Tesla?
Tesla supports the exFAT format, in addition to FAT 32, MS-DOS FAT, and ext3/4, but not NTFS.
2. What format does Tesla USB music use?
Tesla's USB music format is exFAT, which the media player supports. To play USB music, use the USB port in the center console.
3. How do you format a Tesla flash drive?
Formatting a Tesla flash drive can be done in various ways, including on a Mac or Windows computer, or by following specific steps on the Tesla itself.
Step 1. Insert the USB into the front port.
Step 2. Click on "Control" and select "Safety."
Step 3. Click on "Format USB Drive."
Related Articles
- How to Fix MacBook Pro Trackpad Not Working [10 Tested Solutions in 2023]
- NVRAM Reset Not Working on Mac, 3 Steps to Fix!
- How to Recover Unsaved/Lost/Corrupted Adobe Acrobat Files on Windows PC
- How to Fix 'It Looks Like You Don't Have Permission to Save Changes to This File' on Windows 11/10
- Chromebook vs. Laptop, Which One Should I Pick? [Full Guide]
Are you struggling to decide which device is better for using, Chromebooks or laptops? So you are engaged with the informative article that contains the apparent crystal differences between them and helps you to choose the right one. - What is a Client Server Network? How Does It Work?
In this article, you will learn about the client server network and how the model operates.