Tutorial for Tesla Format USB, Everything You Should Know
Looking for a simple way to format a USB for your Tesla? You're in luck! This page provides a straightforward guide on how to properly format a USB for your Tesla, making it easy to get started. Just continue reading to learn more.
Can You Format USB in Tesla?
Tesla, a well-known car brand, has gained a significant following in the industry. One of its notable features is the ability to format USB devices in its cars, specifically starting from the Tesla Model 3 and later versions.
For Tesla owners, formatting a USB device is a common task, especially when they need to update their car's software or transfer files.
1. Store videos on the USB flash drive:
Sentry Mode records the last 10 minutes of footage before an event to the USB, and the exterior cameras also record and store video footage of the surroundings on a USB flash drive.
2. Play media from USB:
You can play audio files from a connected USB flash drive, which is automatically recognized as a media source by Media Player.
All these functions require you to format your USB to the proper format. However, do you know what format Tesla uses?
What Format Does Tesla Use?
Before formatting your USB, it's essential to know the formats supported by Tesla, as not all file system formats are compatible. Tesla only supports specific formats, which include:
- exFAT
- FAT 32
- MS-DOS FAT (for Mac)
- ext3/4
Tesla only supports USB devices in specific formats, so users need to reformat their USB drives to the correct format, typically NTFS, if they have a capacity of more than 32GB. This ensures compatibility and allows the USB to work properly with the Tesla.
Formatting a USB device to the proper format is crucial for it to work correctly. To do this, you'll need to use a formatting tool, such as the built-in formatting software on your computer or a third-party tool. The type of formatting you'll need will depend on the device you're using the USB drive with, but most modern devices require the USB drive to be formatted in a specific way.
Full Guide on Tesla Format USB - Two Solutions
Formatting a USB device in a Tesla is a straightforward process that can be done in two easy ways. Firstly, you can use the touchscreen to navigate to the USB device and select the "Format" option, which will erase all data on the device and prepare it for use in the Tesla. Alternatively, you can use the vehicle's settings menu to format the USB device, providing another convenient option for users.
Tesla's built-in tool allows users to format a USB drive directly from the car's touchscreen, eliminating the need for a separate computer. This feature is convenient for users who want to quickly format a USB drive without having to physically access a computer. The process is straightforward, with users selecting the USB drive from the car's screen, choosing the format option, and confirming the action.
To format a USB drive for an older Tesla using a third-party USB formatting tool, first, download and install a USB formatting tool such as Rufus or Etcher on your computer. Next, connect the USB drive to your computer and launch the formatting tool. Select the USB drive as the target device and choose the correct file system and partition scheme for your Tesla's operating system, typically FAT32.
You can use Tesla's built-in formatting feature or third-party tools to format a USB for your Tesla, and if needed, you can also use it in your Tesla even if you're unable to return to it in time.
To format your USB using Tesla's built-in ability, follow these steps. First, plug your USB drive into your Tesla's USB port. Then, navigate to the 'Settings' menu and select 'USB'.
Use Tesla to Format USB with Its Built-in Tool
In this guide, you can learn the exact steps to format USB devices in your Tesla without installing any other programs. Let's start now.
Step 1. Connect your USB to the car.
Step 2. Go to Controls > Safety > Security.
Step 3. Scroll down the menu and find "FORMAT USB DRIVE".
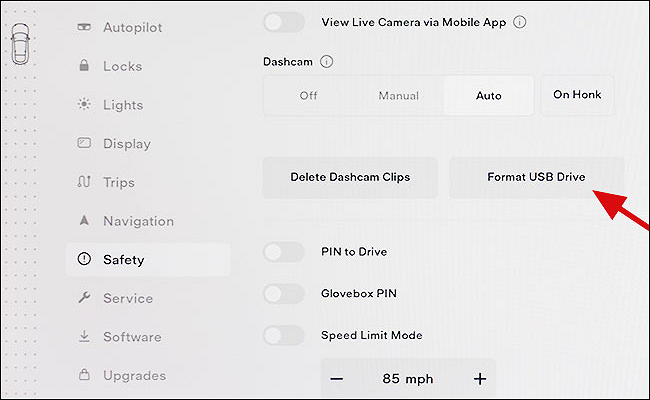
Step 4. Continue to format by tapping on the "Format" option.
You can use a third-party software like Rufus to format the USB drive on your PC, making it compatible with your Tesla. This will allow you to prepare the USB drive for use in your Tesla without needing to physically access the vehicle. Simply download the software, select the correct settings for your USB drive, and follow the prompts to format it. This method is a convenient alternative to using the Tesla app to format the USB drive.
Method 2. Format USB for Old Tesla with Third-Party USB Formatting Tool
You can also format a USB on a PC using a third-party tool, Qiling Partition Manager Free, which is a free tool compatible with Windows 11/10 and Windows 8.1/8/7.
It can format USB with simple clicks. Now, let's see how to use Qiling Partition Master to format a USB for a Tesla.
Step 1. Select the USB drive to format.
To format a USB drive, connect it to your computer, download and launch Qiling partition software, and right-click the USB drive to choose "Format".
Step 2. Set the drive letter and file system on USB.
Assign a new partition label, file system (NTFS, FAT32, EXT2, EXT3, EXT4, or exFAT), and cluster size to the chosen partition, then click "Proceed".
Step 3. Check "Yes" to confirm formatting USB.
Click "Yes" if you see the Warning window. If you have important data on it, back up the data in advance.
After this process, you can format the USB to the proper format. Well, if you want to use Mac to format a USB, there is a link to help.

Guide on macOS: Format USB Drive in 2022 [2 Ways]
Formatting a USB drive on a Mac can be a straightforward process, but it may cause issues if not done correctly. To avoid problems, it's essential to follow the proper steps. First, ensure the USB drive is properly connected to the Mac.
Qiling Partition Master is more than a USB formatting tool, offering comprehensive disk management solutions to manage various types of hard drives. It provides a range of features beyond just formatting, making it a versatile tool for managing hard drives.
What Else Can Qiling Partition Master Do?
The main features of the USB flash drive, aside from formatting, include its primary functions.
- Convert MBR to GPT
- Initialize disk to MBR or GPT
- Format and wipe the disk partition
- Extend, resize, create, or delete the disk partition
- Check the file system and perform a disk surface test
Qiling Partition Master is an ideal format tool in Windows that makes it easy to manage your disks and partitions. It's a great download to have if you're experiencing format problems.
Conclusion
After reading the guide on Tesla format USB, you should now know how to format a USB in your Tesla. The guide provides two solutions to format the USB, but be cautious when choosing the device to format to avoid data loss.
If you're struggling with formatting your USB flash drive, you can simplify the process by downloading Qiling Partition Master, which can assist you in formatting your drive in a more straightforward way.
FAQ About Tesla Format USB
The Tesla's touchscreen display can be formatted for a USB drive, which can help improve the vehicle's performance and reduce the risk of data corruption. To format a USB drive in a Tesla, you can follow these steps: insert the USB drive into the vehicle's USB port, navigate to the "Settings" menu, select "USB," and then choose the option to format the drive. Alternatively, you can also format the USB drive by going to the "System" menu, selecting "USB," and then choosing the option to format the drive.
1. Does Tesla accept exFAT?
Besides exFAT, Tesla still supports FAT 32, MS-DOS FAT, ext3, or ext4, and users need to format their USB to these formats for it to work on their Tesla.
2. How do I format a USB drive for a Tesla on Mac?
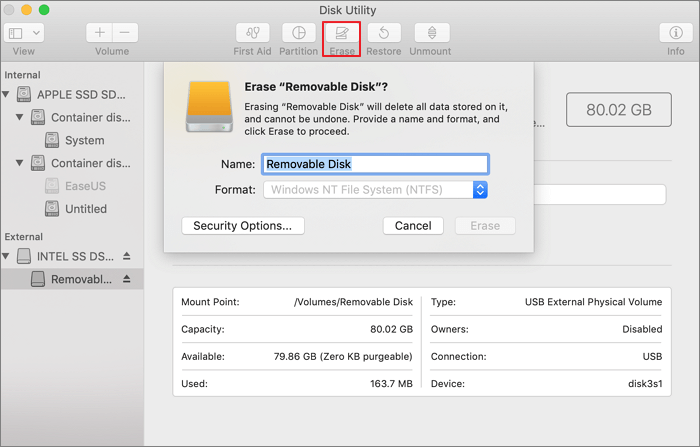
Step 1. Connect your USB to your Mac
Step 2. Open "Disk Utility".
Step 3. To erase a device, click on the device you want to erase, then select the format option and choose MS-DOS (FAT) as the file format.
Step 4. Click "Erase".
Then, Tesla can read and write on your USB.
3. Do I need a USB for Sentry Mode?
Sure, you need a USB to store and retrieve Sentry Mode footage.
Note: Tesla only supports FAT 32, MS-DOS FAT, ext3, or ext4.
Related Articles
- How to Fix Windows 10 Start Menu Critical Error
- Fix HDD Hard Drive Not Showing Up in Windows 10 Error
- How to Open Terminal on Mac and How to Use it [2022 Guide]
- 5 Ways to Fix Hard Drive Read Speed Slow Error
- Fixes for "An Error Occurred While PowerPoint Was Saving the File" in 2023
This article analyzes the reasons behind the error “An Error Occurred While PowerPoint Was Saving the File” and provides easy solutions to fix the issue, also introducing a professional tool to check for bad sectors and file system errors. - How to Fix 'An Error Occurred While Preparing the Installation' Error [macOS Upgrade Issue]
If you receive an error message saying 'An Error Occurred While Preparing the Installation', you can fix the issue and reinstall macOS by following this guide. This guide will show you how to resolve the error and regain access. It's also essential to check and recover any lost data, whether the issue is resolved or not.