[Quickly & Easily] How to Update BIOS with USB in 2023
The BIOS (Basic Input Output System) is a motherboard-installed chip with firmware that performs fundamental tasks, including booting and controlling the computer, identifying and configuring system hardware.
Updating the BIOS can be a lengthy process, but it has many benefits, such as improved system performance and stability. However, it can be intimidating, especially if you're not sure which BIOS to update to, as it requires getting the correct one from the manufacturer for your specific motherboard.
To update your BIOS with USB, start by preparing your system by creating a bootable USB drive with the BIOS update file, then shut down your computer and connect the USB drive. Next, enter your computer's BIOS settings by pressing the designated key (usually F2, F12, or Del) and navigate to the boot order settings to prioritize the USB drive. Save the changes and exit the BIOS settings. Your computer will now boot from the USB drive, and you can proceed with the BIOS update. Be sure to follow the on-screen instructions and take necessary safety precautions, such as disconnecting any peripherals and ensuring the computer is plugged into a reliable power source. It's also recommended to back up your data and create a system restore point before updating your BIOS.
What to Do Before Updating BIOS
Before flashing BIOS from USB, it's essential to prepare and understand the potential risks involved. While updating your BIOS can bring numerous benefits, it also carries the risk of bricking your motherboard, rendering it unusable. Therefore, it's crucial to approach this process with caution and carefully consider the potential consequences before proceeding.
To ensure your data is secure and safe, you will create a backup of your system image in case things go wrong and you need a backup. We recommend using Qiling Disk Master Pro as a tool to make a backup image of your computer before updating the BIOS. This will help protect your data and prevent potential issues.
This backup and recovery tool is a lifesaver, allowing you to create a precise image of your entire PC and restore it in case of disaster. With this tool, you can safeguard your digital life and ensure that your important files, settings, and applications are protected. By creating a backup image, you can avoid the hassle and frustration of reinstalling software, updating drivers, and reconfiguring settings, making it an indispensable asset for anyone who wants to keep their digital life running smoothly.
- This tool enables you to create a system backup and upload it to cloud storage, allowing you to safely store and access your system's configuration and data in the cloud.
- After updating the BIOS, clone the system image for transfer or restoration purposes. This involves creating a backup of the system's current state, including the operating system, installed applications, and settings, onto an external drive or cloud storage.
- Create a complete backup for future instances
- To prevent files from getting affected by viruses, you can create a security zone in your computer's settings. This zone, often referred to as a "sandbox" or "safe zone," is a designated area where files and programs can run without compromising the rest of your system.
- To create an image of an SD card and an ISO image of your operating system, you can use a tool like Etcher. First, download and install Etcher on your computer.
To ensure the security of your data and be able to recover to a previous state of Windows, you should regularly create system restore points. This way, you can revert back to a previous version of Windows if needed, and your data will remain secure.
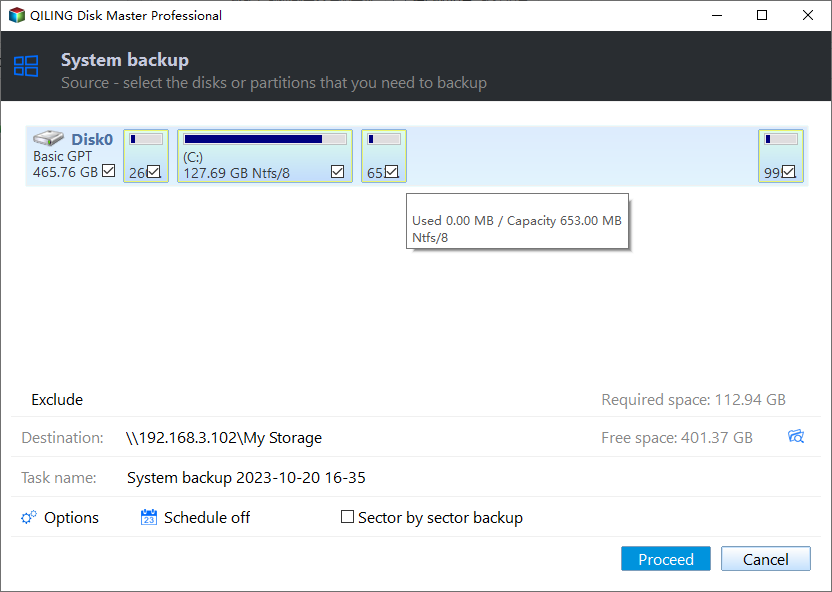
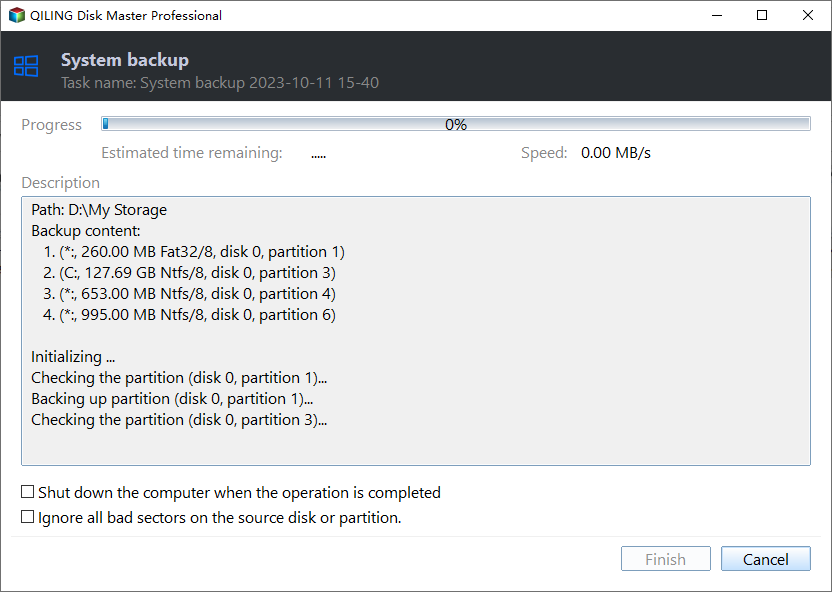
Here is how to back up your computer.
Step 1. On the main page, click "Select backup contents".

Step 2. Among the four available categories, click System backup.
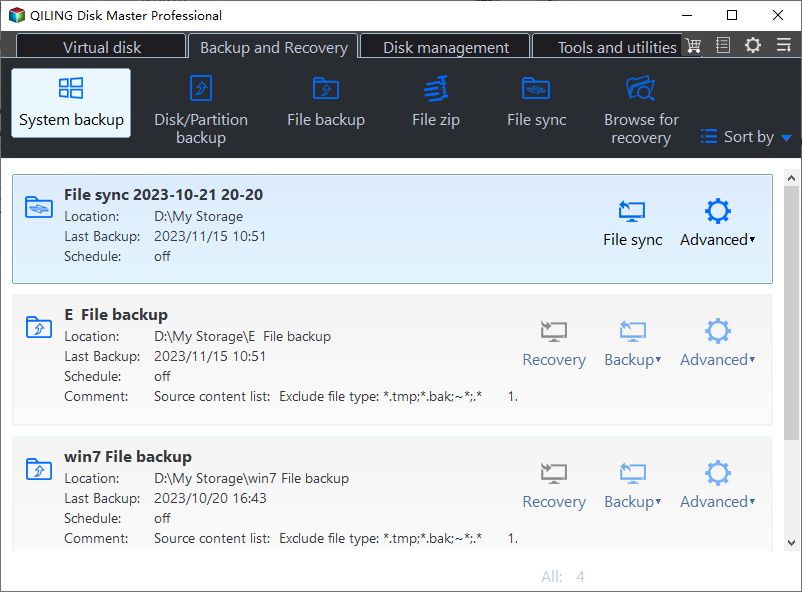
Step 3. Qiling Disk Master will automatically select your system partition, allowing you to simply choose the backup destination.

Step 4. You can save the backup file to either your local drive or a Network-Attached Storage (NAS) device for storage.
Step 5. After completing the backup process, you can check the backup status, recover, open, or delete the backup by right-clicking the backup task on the left.
How to Update BIOS from USB Drive
To update the BIOS, you need to download the correct version from the manufacturer's website, such as MSI for an MSI motherboard, specifically for the B550 or X570 model.
To successfully flash the BIOS on your PC, it's crucial to first ensure you download the correct BIOS for your motherboard. Once you have the right BIOS, you can use one of two methods to update it: these methods will be discussed.
| Workable Solutions | Step-by-step Troubleshooting |
|---|---|
| Way 1. Update BIOS via BIOS Flashback | BIOS Flashback is a feature that allows you to update your motherboard...Full steps |
| Way 2. Update BIOS via UEFI Setup | In this step, we will talk about the other method to update the BIOS...Full steps |
Way 1. Update BIOS via BIOS Flashback
BIOS Flashback is a feature that allows you to update your motherboard BIOS without turning on your PC, requiring only the power supply to be plugged in.
To update your BIOS, start by downloading the correct BIOS file for your specific motherboard from the manufacturer's website. Once you have the file, create a bootable USB drive and copy the BIOS file onto it. Then, restart your computer and enter the BIOS setup by pressing the designated key (usually F2, F12, or Del).
Step 1. Format the USB drive into the FAT32 file system.
Step 2. Copy and paste the BIOS file into your USB.
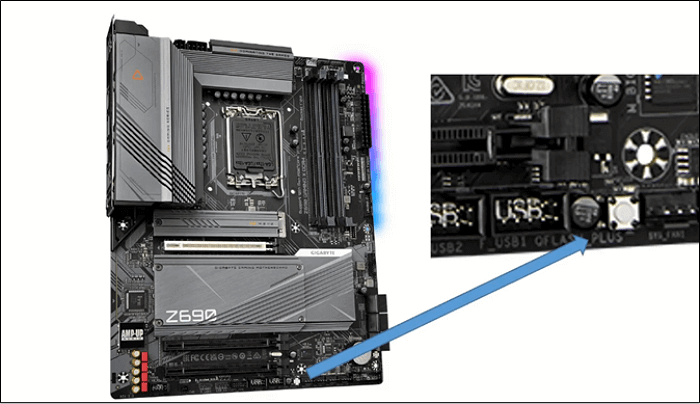
Step 3. To find the BIOS-labeled USB port on the back of your motherboard, locate the section of the motherboard that lists the BIOS settings, typically found near the CPU socket. Look for the USB settings, which may be listed as "USB Legacy Support" or "USB 3.
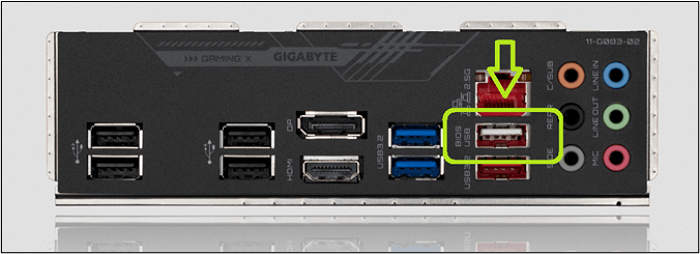
Step 4. Connect the USB, then press the BIOS button.
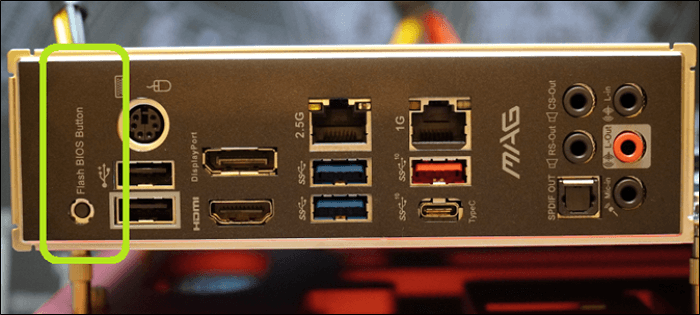
The BIOS button, which can be used to enter the BIOS settings, might be located on the motherboard's back or IO port, but on Gigabyte motherboards, it's actually on the motherboard itself, often found in a specific location, such as the top right corner.
If your motherboard is not from Gigabyte, then the BIOS flashback button is likely at the back of your IO port, where you'd normally find the USB ports and other peripherals, and it's usually a small button or switch that you can press to initiate the BIOS update process.
After pressing the button, the motherboard lights will turn on and off, indicating that the BIOS update is complete, and the PC is ready to be used with other hardware and components.
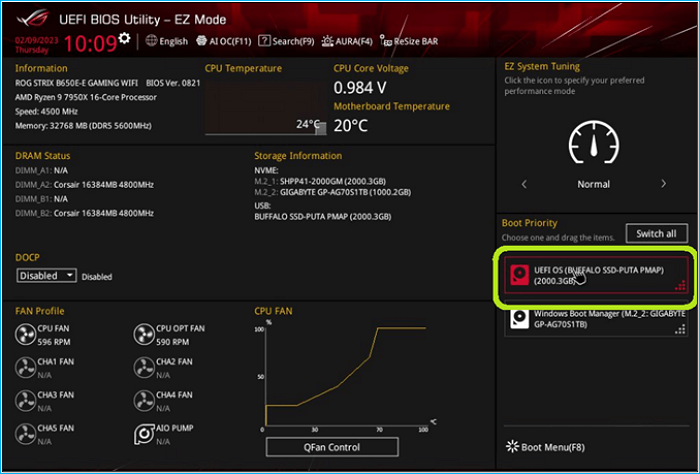
Way 2. Update BIOS via UEFI Setup
To flash the BIOS via the UEFI setup, you need to access the UEFI settings by pressing a specific key during the boot process, usually F2, F12, or Del, depending on your motherboard. Once in the UEFI settings, navigate to the "Advanced" or "Advanced Settings" tab, then look for the "BIOS Update" or "Flash BIOS" option. Follow the on-screen instructions to select the BIOS update file and confirm the update. It's crucial to ensure you have the correct BIOS update file for your motherboard model.
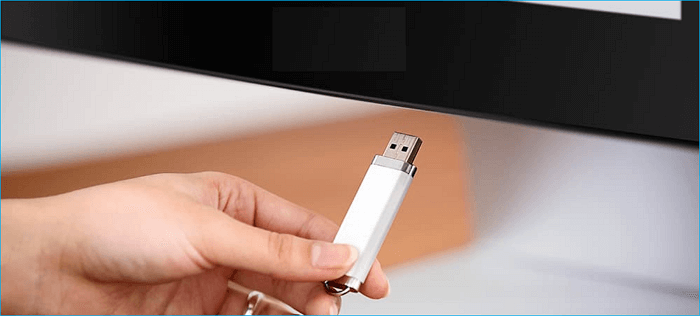
To proceed, plug your USB drive containing the BIOS file into your computer. Then, enter your BIOS settings by restarting your computer and pressing the designated key (usually F2, F12, or Del) to access the BIOS menu. From there, you can navigate to the "Boot" or "Advanced" tab, and look for an option to prioritize or boot from the USB drive. Select this option and save your changes.
Step 1. Plug in the USB and turn on your PC.
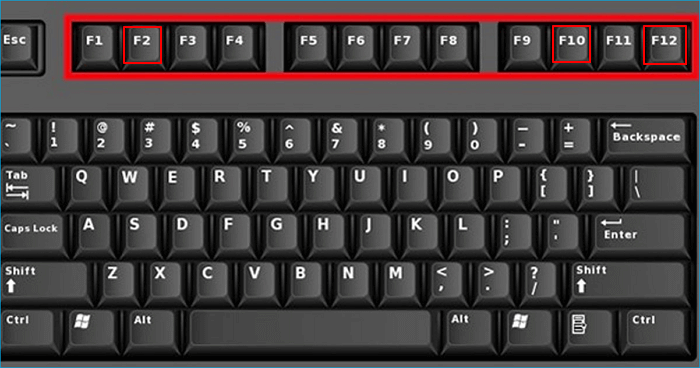
Step 2. To access the BIOS, press the F10, F12, or F2 key on your keyboard, depending on your PC or motherboard.
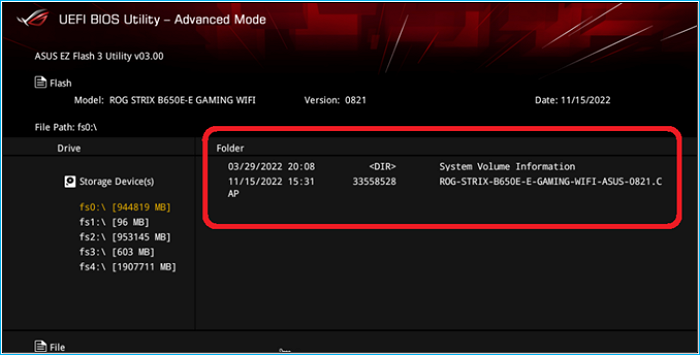
Step 3. Once in the BIOS, boot from USB.
Step 4. Once in the USB drive, select the BIOS file.
Step 5. Confirm when the BIOS prompts.
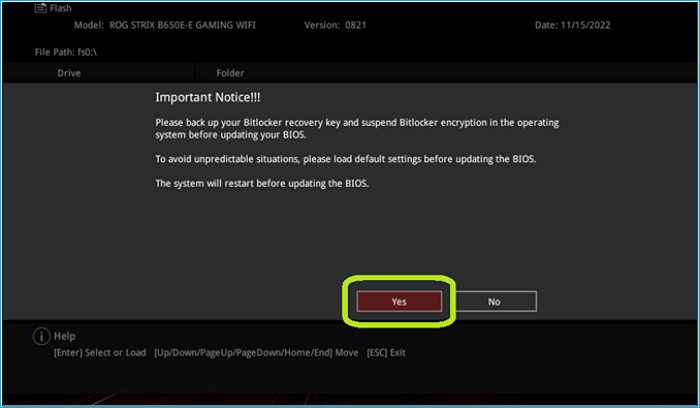
Once confirmed, the BIOS upgrade process will take 2-3 minutes to complete. After that, the PC will restart and boot into Windows with the updated BIOS.
- Notice:
- Flashing BIOS with a USB drive is a viable option for various laptop brands, including Acer, ASUS, and Lenovo. There are two methods to achieve this: using a USB drive with a specific executable file, or utilizing a USB drive as a bootable device with a BIOS update file.
The Importance of Updating BIOS
Updating your BIOS can have several benefits, despite the common misconception that it's meant to boost performance. In reality, your motherboard manufacturer releases new BIOS versions for your chipset as they become available, which can improve overall system stability and functionality.
Updating the BIOS is often necessary to ensure compatibility with the latest hardware, software, and technology, and also to utilize next-generation CPUs if supported by the motherboard.
So, here's why updating BIOS is essential to sum it all up:
- Updating the BIOS will provide the latest support to your motherboard, chipset, and other components, ensuring they work together seamlessly and efficiently.
- The new update will enable you to access previously unlocked options, including the Resizable bar, giving you more flexibility and customization options.
- It'll allow you to use your CPU's latest generation of processors.
- It'll help you add newer RAM compatibility.
- It'll provide stability to your hardware.
BIOS updates can be necessary sometimes to fix performance issues, although many manufacturers suggest upgrading only when needed.
The Final Say
To update your BIOS with a USB drive, it's crucial to download the correct file for your specific motherboard model. You can use a tool or check your system settings/BIOS to find the exact version. Once you have the correct file, head to the manufacturer's website, download the BIOS, and follow the steps outlined in this article.
Before proceeding with the update, it's recommended to create a backup of your system or Windows using Qiling Disk Master Pro to ensure your computer's security in case the update goes wrong.
FAQs
1. Can I update a BIOS without a USB?
If you have a UEFI motherboard, you can update the BIOS without needing a USB pen drive, but you should still check your manufacturer's guide for specific instructions.
2. Can a BIOS update destroy a motherboard?
If you improperly update your BIOS or experience a power disruption, it can potentially damage your motherboard and even render it unusable, including voiding any manufacturer warranty.
3. What USB should I use for BIOS update?
To use the USB stick in your BIOS/UEFI, you should format it into FAT32 format, ensuring it remains a USB 2.0 stick.
4. Is flashing BIOS the same as updating?
No, it's not. Updating your BIOS requires you to shut down your PC, as it's an overhaul of the firmware of your computer's motherboard. Therefore, it needs to be tended to carefully.
Related Articles
- How Do I Format an SD Card in Linux? [2023100% Working Solution]
- FIXED: System Image Recovery Failed [Updated 2023]
- How to Fix Atomic Heart Keeps Crashing Issue on PC
- PC Not Working Properly? Try A Fresh Install Windows 10
- Fix a Broken USB Stick and Recover Data
If your USB stick is logically or physically broken, a full data recovery solution can help. To recover data files from a broken USB flash drive, memory stick, or thumb drive that's inaccessible, you can download Qiling data recovery software to get your files back. Five fixes are also available to help you fix a broken flash drive. - What Is the CTF Loader and How to Fix CTF Loader Issues on Windows 10
Windows error messages can be particularly frustrating for average users, especially when they're unsure about the cause of the issue. If you're experiencing a CTF loader error on your Windows 10, such as the “CTF loader has stopped working” message, this post aims to provide assistance with resolving these CTF Loader Issues on Windows.