macOS Sonoma Upgrade Failed | 3 Tested Solutions in 2023
Apple has launched macOS Sonoma, its latest desktop OS version, which was introduced at WWDC 2023 and is now available to developers. The new features include web apps in the dock, interactive widgets on the desktop, and locked private browsing mode, but some users have reported that the upgrade to Sonoma has failed.
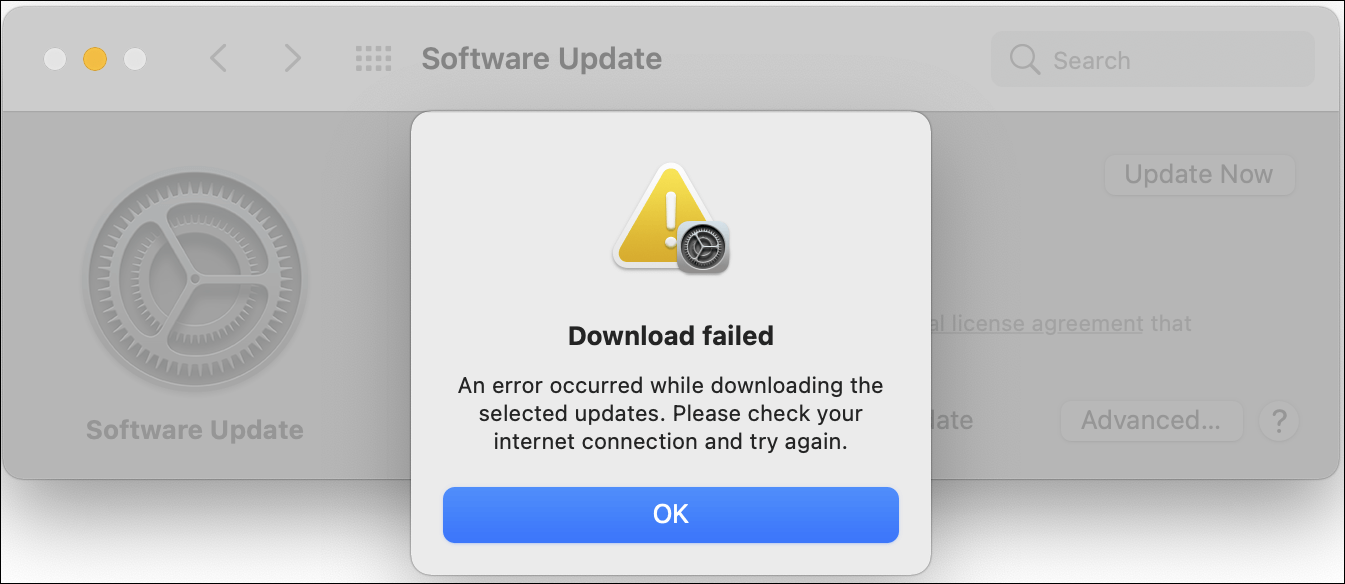
I'm trying to upgrade to Sonoma on my Mac, but when I click "upgrade" in System Settings, it downloads the install program, installs it, and reboots, but the older version still shows in System Settings, with an upgrade available message.
The biggest macOS Sonoma upgrade failed scenarios include download stopped, installation failed, and MacBook unable to restart after the upgrade. If you encounter this issue, don't worry, as there are 3 practical methods to solve the error, which will be introduced in this article.
| Workable Solutions | Step-by-step Troubleshooting |
|---|---|
| Fix 1. Restart Mac to Fix macOS Sonoma Upgrade Failed | Hit the Apple icon, and choose Restart while holding down the Touch ID and Control keys...Full steps |
| Fix 2. Upgrade macOS Sonoma in Recovery Mode | Shut down your system entirely, and hold down the Touch ID for a few seconds...Full steps |
| Fix 3. Create USB Installer to Upgrade macOS Sonoma | Insert your USB drive into your MacBook, and the Disk Utility will format your USB...Full steps |
Why macOS Sonoma Upgrade Failed
When downloading and installing macOS, you may encounter a faux warning, which can be caused by various reasons. Some common causes of this warning include software compatibility issues, corrupted installation files, or outdated system software. Additionally, other factors such as insufficient disk space, hardware incompatibility, or network connectivity problems may also trigger the warning. Understanding the root cause of the issue is essential to resolve the macOS Sonoma upgrade failure problem.
💾Not Enough Storage for macOS Sonoma
The most common reason for macOS Sonoma upgradation failure is inadequate storage space. The installer package for macOS Sonoma is 13 GB, requiring 13 GB of free space on your PC. If you don't have enough space, you'll receive a warning message, which may be related to the issue of Mac Software Update not working.
💻Your Mac Does Not Support macOS Sonoma
Upgrading to macOS Sonoma may be hindered by incompatibility issues, preventing installation on certain MacBooks, thus it's essential to verify system support for the latest macOS version before upgrading.
If you have an unsupported Mac and want to install macOS Sonoma, this article provides a guide on how to do so.

macOS Sonoma, also known as macOS 14, is now available for download, but it may not be compatible with all Mac models. To install it on an unsupported Mac, you'll need to create a bootable USB installer, which can be done using a Mac that already has Sonoma installed or by using a third-party tool.
This article provides a step-by-step tutorial on how to install macOS Sonoma on an unsupported Mac, offering a guide for those looking to upgrade their operating system.
😫macOS Sonoma Installer Corrupted
A corrupted installer file is another issue that prevents installing macOS Sonoma, which can be resolved by deleting the installer and downloading it again. This involves deleting the installer from the Applications folder and emptying the Trash bin on your MacBook.
Note: Before upgrading to macOS Sonoma, ensure your MacBook is compatible with the new operating system and has sufficient RAM and storage space.
macOS Sonoma is compatible with these MacBooks:
- iMac Pro from 2017
- MacBook Pro from 2018 and later
- iMac from 2019 and later
- Mac Pro from 2019 and later
- Mac Studio from 2022 and later
To check storage in Finder on your MacBook, follow these steps: simply open Finder and click on "Applications", "Documents", or any other category you'd like to view, and the storage space used by each item will be displayed on the right-hand side of the window. Alternatively, you can click on "All Files" at the top of the window to view the total storage used by all files and folders on your MacBook.
Step 1. Open "Finder" and locate your disk in the left sidebar.
Step 2. To get information about a disk, right-click on the disk and select "Get Information".
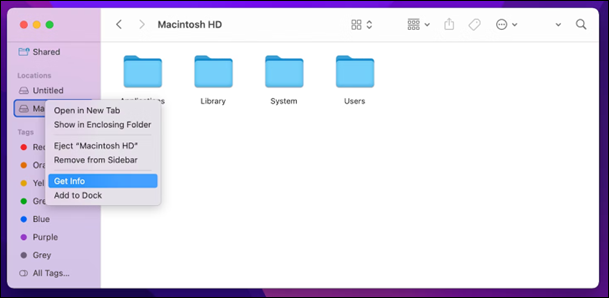
Step 3. Search for "Available" and used storage under General.
How to Fix macOS Upgrade Failed
If you're experiencing issues with macOS Sonoma upgrade not showing up, there are three potential fixes to try. The first solution involves checking the Software Update preferences and ensuring that the "Get macOS Sonoma" option is selected. If that doesn't work, you can try restarting your Mac in Safe Mode and then checking for updates again.
Fix 1. Restart Mac to Fix macOS Sonoma Upgrade Failed
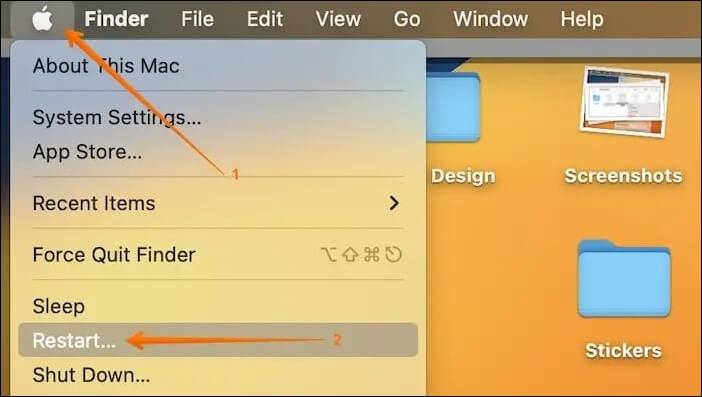
If your MacBook is experiencing issues, such as a failed macOS Sonoma upgrade, restarting your device can often resolve the problem. To restart your MacBook, you can try shutting it down normally by going to the Apple menu, selecting "Shut Down," and then clicking "Shut Down" again. Alternatively, you can force restart your MacBook by pressing and holding the Power button until the device turns off, and then pressing the Power button again to turn it back on.
Step 1. To restart your Mac, click the Apple icon in the top left corner of the screen, then select "Restart" from the drop-down menu.
Step 2. To restart your Mac, hold down the Touch ID and Control keys while clicking on the "Restart" option in the pop-up window that appears. Alternatively, if your Mac is frozen and unresponsive, you can perform a hard restart by pressing the power button.
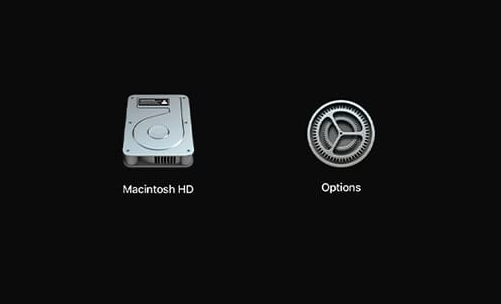
Fix 2. Upgrade macOS Sonoma in Recovery Mode
To resolve the macOS Sonoma upgrade failed issue on your MacBook, you can try upgrading macOS 14 in Recovery Mode. To do this, restart your MacBook and immediately hold down the power button until the startup chime sounds for the second time. Release the power button and press the "p" key to select the boot drive. Then, select your language and click "Continue". From the Utilities window, select "Disk Utility" and follow the on-screen instructions to erase the startup disk.
Step 1. Shut down your system entirely.
Step 2. To boot your iPhone in recovery mode, hold down the Touch ID button (also known as the power button) for a few seconds until the phrase "Loading startup options" appears.
Step 3. Hit the options right next to the Mac's Sonoma beta full installer and the continue button.
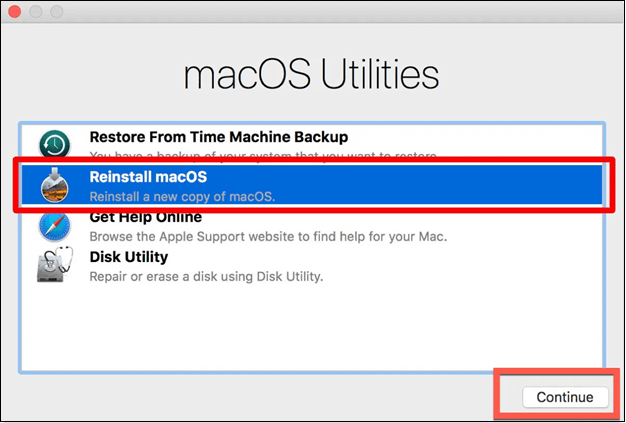
Step 4. To start Mac in Recovery Mode, you would need to restart your Mac and immediately hold down the Command (⌘) + R keys. This will boot your Mac into a special recovery environment that allows you to access various system utilities and diagnostic tools, such as Disk Utility and Terminal.
Step 5. Hit the "Reinstall macOS", and continue.
If you're having trouble starting your Mac in Recovery Mode, there are several solutions to try. First, ensure that the Mac is properly shut down and then press the power button while holding down the Command (⌘) + R keys. If this doesn't work, try resetting the System Management Controller (SMC) and the Power Management Unit (PMU) by shutting down the Mac, unplugging it, waiting for 30 seconds, and then plugging it back in.
If your Mac won't boot into Recovery Mode, don't worry! There are several solutions to fix the issue.
If your Mac won't boot into Recovery Mode, don't worry - there are solutions! One solution is to boot your Mac in Safe Mode, which can help identify if a third-party app is causing the issue. Another solution is to reset the System Management Controller (SMC), which can resolve power-related issues.
"Facing macOS Sonoma upgrade failure? Don't worry, help is here!
Fix 3. Create USB Installer to Upgrade macOS Sonoma
You can quickly get macOS Sonoma developer beta on your USB thumb drive and use it to upgrade macOS 14 on multiple Macs without having to download a large macOS file each time.
To create a macOS Sonoma bootable USB for upgrading, you'll need to format it, which means the previous macOS will be erased upon installation. Therefore, it's essential to back up your data before using it. The process involves the following steps.
Step 1. Insert your USB drive into your MacBook.
Step 2. Disk Utility will format your USB using Mac OS Extended.
Step 3. To change the name of a volume to "My Volume", start Terminal, enter the command `sudo nvram -d com.apple.
sudo /Applications/Install\ macOS\ Sonoma.app/Contents/Resources/createinstallmedia --volume /Volumes/mycolume.
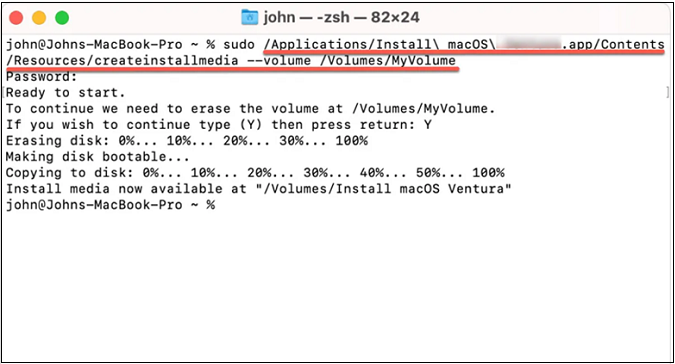
Step 4. Type your Admin password if needed, and hit the "Enter" button.
Step 5. Type in Y to confirm, and hit the "Enter" button.
Step 6. The message "Terminal would like to access files on a removable volume" should be followed by an "OK" button.
Step 7. To complete the process, plug in your USB after exiting the Terminal.
Your Mac or MacBook has been upgraded with a fresh installation of macOS Sonoma.
Bonus Tips: Recover Data After Upgrade macOS Sonoma Failed
The latest macOS Sonoma upgrade has introduced new features and fixed technical glitches on MacBooks, but it's unrelated to PC files. If your Mac update deleted everything, it's likely due to an interrupted installation process or insufficient space on your Mac.
If an upgrade to macOS Sonoma fails, data can be lost, but there's a top-notch data retrieval software that can help recover it. Deep Data Recovery for Mac, a professional data retrieval software with a user-friendly interface, allows you to recover missing data, including photos, with just a few clicks.
If you've deleted files on your macOS Sonoma or have failed to recover them after upgrading to Sonoma, there are steps you can take to recover them. To start, you can try using the built-in Time Machine feature or the Disk Utility tool to restore deleted files.
Note: To create a backup, click on "Disk Backup" on the left, which will allow you to recover data from a backup image in case of disk damage or data loss.
Step 1. Select the location
After updating to macOS Sonoma/Ventura/Monterey/Big Sur, select the disk where your lost data was located, then click "Search for lost files" to initiate the recovery process.

Step 2. Find lost data after the scan
Deep Data Recovery for Mac scans the selected disk volume, displaying the scanning results on the left pane, allowing users to find specific data using file type and file path.

Step 3. Recover data after macOS update
After the update, select the target files that were accidentally lost and click the "Recover" button to retrieve them.

Conclusion
If you're experiencing issues with your macOS Sonoma Upgrade, there are three useful techniques to try. These solutions may help resolve the upgrade failed issue. If you're successful in resolving the error, but still notice data loss, consider using a professional data recovery tool, such as Deep Data Recovery for Mac, to retrieve your lost data.
macOS Sonoma Upgrade Failed FAQs
Let's consider the below-mentioned FAQs to understand the topic better:
1. Why does my macOS Sonoma update keep failing?
macOS Ventura cannot be upgraded to Sonoma due to various reasons, including insufficient disk space, incompatible hardware, and network problems. To troubleshoot the issue, ensure your Mac meets Apple's required hardware specifications, check if you have enough storage, and set up a reliable internet connection.
2. How do I update Sonoma on Mac?
To download macOS Sonoma, go to Settings > General > Software Update, and select "macOS Sonoma Developer Beta" from the drop-down menu after clicking the "i" button next to the Beta Updates tab.
3. Why can't my Mac install Sonoma?
The latest Sonoma update is not compatible with all Mac models, specifically those released before 2017, such as the iMac Pro, MacBook Air, Pro, and Mac Mini from 2018 onwards.
Related Articles
- 4 Ways to Open Microsoft Management Console [2023 Step-by-Step Guide]
- 2 Ways to Log in as Administrator in Windows 10
- [PS4 USB Format] How to Format USB for PS4
- Format FS=FAT32 Quick: Full and Comprehensive Guide on Use It
- What Is MIMO? Multiple-Input Multiple-Output Explained
MIMO is one of the key technologies used in wireless communication today. That's why this article will help you understand what MIMO is and how it works. And it'll also briefly explain its sub-version called MU-MIMO. - What Is an Open System? Everything You Need to Know about It
Every computer today uses various elements. One such element includes using open-source software or programs that help us commit to everyday operations. Open System is one of the key things about the way computers work. It's a significant standard and in this article, we'll define what it is and how it works.