How to Upgrade to macOS 14 [macOS Sonoma]
In this article, you'll learn:
- Requirements: Does My Mac Support macOS 14
- Upgrade to macOS 14 via the Mac App Store
- To perform a clean install of macOS 14 using a bootable USB, start by creating a bootable USB drive using a tool like Disk Utility or a third-party software. Next, ensure your Mac is set to boot from the USB drive by going to System Preferences > Startup Disk and selecting the USB drive.
- Upgrade to macOS 14 from macOS Recovery
The latest operating system from Apple, macOS 14 (also known as Sonoma), was released on June 5th. Apple typically unveils major versions at the WWDC event, sparking curiosity among users and developers. This post will guide you through the process of upgrading to macOS 14.
Since macOS 10.9, Apple has been using California landmarks to name its operating system versions. Notably, the company has trademarked several names associated with notable California locations, such as Yosemite, Mavericks, and El Capitan, but has yet to utilize them in their naming scheme.
| Mammoth | Sonoma | Skyline |
| Shasta | Pacific | Miramar |
| Tiburon | Diablo | Sequoia |
| Redtail | Grizzly | Redwood |
| Rincon | Farallon | Condor |
The rumors surrounding macOS 14 have been put to rest with the WWDC publishing, providing clarity on what features to expect.
Here are some new features that macOS Sonoma will have.
- 📱Desktop Widgets: Corporate professionals would love it if Apple reinstated the Dashboard feature, which allowed users to add widgets to their desktops.
- 🌴Dynamic Island: Apple's Dynamic Island feature, introduced in iOS 14, can be used to reduce clutter on the Mac interface. It allows users to utilize the pill cutout for the selfie camera and Face ID for various purposes.
- ⏱️Time Machine iCloud Backup: The idea of backing up Time Machine data offsite is a great one, and I hope Apple will consider implementing this feature, as it would be a huge hit with Mac users who love the convenience of Time Machine.
Let us learn the detailed statements of how to upgrade to macOS 14. Before that, don't forget to mark this guide by sharing it on Facebook, Twitter, or SNS.
Requirements: Does My Mac Support macOS 14?
Given the uncertainty surrounding Apple's compatible models for macOS 14, it's essential to note that Apple typically doesn't withdraw support for existing models. Therefore, it's reasonable to assume that macOS 14 will be compatible with the same models supported by Ventura or Monterey.
Take a look at the possible Mac models compatible with macOS 14 –
- Mac Studio
- iMac Pro
- MacBook (2017 and above)
- MacBook Pro (2017 and above)
- iMac (2017 and above)
- MacBook Air (2018 and above)
- Mac Mini (2018 and above)
- Mac Pro (2019 and above)
General Requirements
| ✨Factors | Requirements |
| 💽Hardware | The model must be compatible with the new macOS version. |
| 💬Memory | 4 GB or more |
| 🏠Storage space | 40 GB or more |
| 🌐Internet Connection | Needed |
| 🍎Apple ID | Needed (for some features) |
Upgrade to macOS 14 via the Mac App Store
To upgrade to macOS Sonoma, one of the best ways is to use the Mac App Store. You can do this by following these simple steps:
Step 1. Launch the "App Store".
Step 2. Type the operating system's name in the search bar on the left-hand side.
Step 3. Select "Get" or "View".
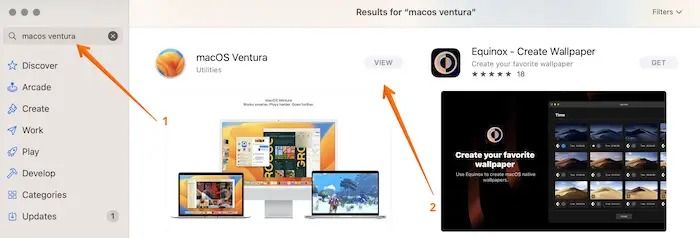
Step 4. Click "Download" to start the process of downloading macOS 14.
Step 5. Wait till the download completes.
Step 6. After that, the installation process will start right away.
Several issues may arise during the upgrade process, so let's take a look.
Lack of storage space
Macs often struggle to update due to insufficient storage space, making it crucial to check available storage before initiating the update process.
An issue with the Apple servers
If you're experiencing issues with the installation, check the Apple servers' system status page to see if the update option has a green signal. If not, you'll need to wait until it's resolved.
Corrupt installer
Be cautious when downloading the macOS installer, as it might be damaged or corrupted if obtained from unofficial sources, potentially disrupting the installation process. To avoid this, it's best to download it directly from the official Apple website.
If your Mac is stuck on checking for updates, try restarting your computer, resetting the System Management Controller (SMC), and checking for any software updates. You can also try resetting the NVRAM, running a System Report, and checking the System Logs for any errors.
If your Mac is stuck on the "checking for updates" screen when you're trying to update it, you're not alone. Many users have reported this issue, where the update process seems to be stuck on this screen without any progress.
Perform a Clean Install of macOS 14 Using a Bootable USB
A clean installation from USB is a process that completely deletes the previous operating system, making your Mac completely brand new, but it will clear the entire hard drive and may result in data loss, so it's essential to back up your data first.
Recommendation:
![]() Pros
Pros
- Clears the hard drive
- Quick startup due to the absence of startup apps
![]() Cons
Cons
- It takes a lot of time
- Users must back up important files and apps
Here are the steps to create a bootable USB drive for macOS 14 installation in one paragraph:
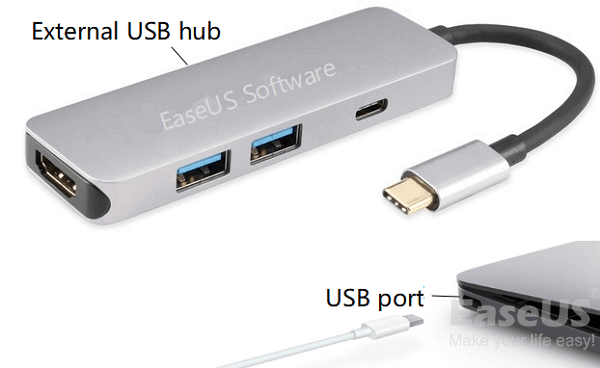
Step 1. Connect the USB drive.
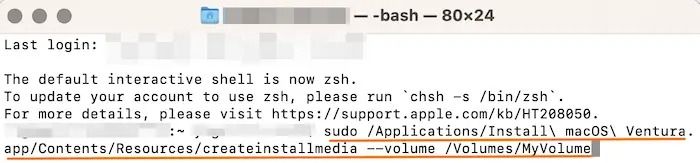
Step 2. Go to Terminal.
Step 3. Type - sudo /Applications/Install\ macOS\ Ventura.app/Contents/Resources/createinstallmedia --volume /Volumes/MyVolume
(Use the name of the macOS you want, and instead of MyVolume, write the name of your volume)
Step 4. When asked, give the admin password.
Step 5. If no characters appear in the Terminal, press "Return".
Step 6. Enter Y when prompted for confirmation.
Step 7. Press "Return".
Step 8. You will see an alert that says the Terminal wants to access files on the removable volume and then asks if you want to allow it.
Step 9. Select "OK".
Step 10. After it is done, quit Terminal.
Step 11. Disconnect the USB drive.
Solved: USB Flash Drive Not Showing Up on Mac
If your Mac isn't recognizing a USB drive, try restarting your computer, checking the USB port for any blockages, and ensuring the USB drive is properly inserted. You can also check the Disk Utility app to see if the drive is recognized, and try formatting the drive if it's not. Additionally, if you're using a USB drive with a Mac running macOS High Sierra or later, you may need to update your operating system to the latest version. If none of these steps resolve the issue, you can try using a different USB port or contacting the manufacturer for further assistance.
Backing up important data is critical before performing a clean install. You need to back up -
- Important apps
- Crucial files and documents.
- Images and videos
If you haven't backed up your data before a clean install on your MacBook and have lost some vital information, don't worry. You can use reliable data recovery software like Deep Data Recovery for Mac to help recover your lost data.
The Deep Data Recovery for Mac is an easy-to-use and efficient data recovery software that comes with a wide range of features, making it easy for users to recover data.
Highlights:
- Data recovery refers to the process of retrieving data from situations such as malware attacks, formatting, accidental deletion, etc.
- Easy retrieval of images, videos, documents, emails, and more.
- Mac data recovery-Modern storage devices come in various forms, each with its own strengths and weaknesses. Hard Disk Drives (HDDs) and Solid-State Drives (SSDs) are traditional storage options, with HDDs offering high storage capacity at a lower cost but slower performance, while SSDs prioritize speed and reliability.
- Support from remote IT specialist team whenever needed.
Step-To create a bootable disk on Mac, start by inserting a blank USB drive into your computer. Next, download and install the Disk Utility app from the Mac App Store.
Step 1. Install and run Deep Data Recovery for Mac on another Mac computer, and select "Unbootable Mac > Start" to recover data from an unbootable Mac.
Step 2. To create a bootable disc, select a prepared USB drive, then click "Next" to begin the process.
- Warning
- The creator will prompt to erase the drive to reallocate the space, then write bootable files to the drive. Please back up all USB files before processing "Eraser".
Step 3. The program creates a 2GB space on a USB drive, reserving it for boot files, while leaving the remaining space available for storage.
Step 4. Once the process is complete, boot the corrupted Mac from a bootable disc and follow the guide to start the recovery process. To minimize data loss, we recommend restoring the data to an external hard drive.
Step 5. After booting the Mac, launch Deep Data Recovery for Mac, then select the disk location where the lost data and files are located, such as an internal HDD/SSD or a removable storage device. The recovery tool will then automatically scan for the lost files.
Note: Before attempting data recovery, it's recommended to create a backup of your Mac to prevent further data loss. Once backed up, the software can then recover data from the Mac backup, allowing your computer to be restored and new data to be written.

Upgrade to macOS 14 from macOS Recovery
macOS Recovery is Apple's built-in recovery system on Macs, allowing users to restore files from Time Machine backups, set up security policies for multiple volumes, repair internal storage, and more. Before upgrading to macOS Sonoma, understanding macOS Recovery is essential.
Upgrading to macOS 14 from Recovery Mode is possible, but it may come with some issues.
😦Loss of data
Users may experience data loss during updates, but having a data backup before the process can prevent this. If a backup isn't available, professional data recovery software can be used to retrieve lost data.
💾Hardware incompatibility
One of the most prominent issues that can arise is the incompatibility of your system with the software, which is why it's crucial to ensure your device can support the macOS before installing it, and refrain from force installing the latest macOS.
🧷Installation issues
A macOS update may fail due to a lack of space on the hard drive or a corrupt installer file, which can cause interference during the update process. To resolve this, check the hard drive and remove unnecessary files to free up space. Additionally, avoid using disputed sources to download macOS installers.
🖥️Wi-Fi problems
During the upgrade process, Wi-Wi-Fi connectivity issues can occur during the installation process, disrupting or failing it. To resolve this, check if the Wi-Fi connection is stable and ensure that Wi-Fi settings are not changed during the upgrade process.
Tips for ensuring a successful upgrade using macOS Recovery
To successfully upgrade using macOS Recovery, follow these tips:
- Make sure your system has enough storage space.
- Having a reliable internet connection is crucial for various aspects of life, including work, education, and entertainment. It enables seamless communication, access to information, and online transactions, making it an essential component of modern life.
- Download the macOS installer from the official website.
- Check the compatibility of your system with the new macOS version.
- Ensure your Mac has a full battery and is connected to the power supply.
- Back up critical files to prevent data loss.
Conclusion
Apple is expected to reveal details about macOS 14 at the WWDC event in June, but it's unclear what new features will be included.
According to Gurman from Bloomberg, macOS Sonoma is expected to focus on minor updates, with the primary goal of ensuring that every feature and app works seamlessly across all Apple devices.
Installing macOS 14 can be done in various ways, but it may come with the risk of data loss. If you're facing this issue, consider using professional data recovery software like Deep Data Recovery for Mac, which is a user-friendly, reliable, and robust tool to recover your lost data.
How to Upgrade to macOS 14 FAQs
To upgrade to macOS 14, there are multiple options available. For more information, you can refer to the list of questions and answers provided, which provides a better understanding of the upgrade process.
1. Why can't I download macOS Sonoma?
You may be unable to download macOS Sonoma due to various reasons, including insufficient storage space, an unstable internet connection, incorrect preference settings, or hardware and software incompatibility.
2. Why can't I upgrade my Mac operating system?
You can't upgrade your Mac operating system because it requires sufficient storage space and RAM, or there might be issues with your internet connection.
3. How to download iOS 14 on Mac?
You can download iOS 14 on Mac via the App Store or by booting into Recovery Mode.
4. What are the new features of macOS 14?
macOS Sonoma's new features have not been officially announced, but users would love to see additions such as Desktop Widgets, Dynamic Island, and enhanced Time Machine iCloud backup capabilities.
Related Articles
- 4 Ways to Fix Mac Won't Start in Safe Mode [Support macOS Ventura/Big Sur/Mojave]
- How to Increase Transfer Speed of External Hard Drive
- Black Screen After BIOS Update [Causes & Fixes]
- How to Fix Your Computer Is Low on Memory on Mac
- How to Recover Deleted Files by Date/Time
While selecting recovered files from third-party data recovery software, you may get stuck at finding the target files by file types. If some software allows you to recover deleted files by time, isn't it nicer and quicker to find the files you are looking for? - Recover Deleted NetFlix Profile & History
Your NetFlix profile disappeared or Netflix profile keeps getting deleted by itself? With Profile gone, so the NetFlix viewing history. This page collects some easy ways to help recover deleted NetFlix profile and history.