Mac Recovery Mode [Beginers' Guide on macOS Ventura/Monterey]
Mac Recovery Mode Overview
macOS Recovery Mode is a built-in feature of Mac that helps recover the system from various situations. It allows you to repair the internal storage device, set security options, reinstall macOS, and even restore files from a Time Machine backup, making it a useful tool for troubleshooting and recovery.
Knowing how to boot your Mac into Recovery Mode is an excellent idea, as it allows you to repair files or reinstall the macOS base system with ease. This article will discuss the Mac Recovery Mode in detail, providing you with a comprehensive understanding of how to access and utilize this feature.
How to Boot Mac into Mac Recovery Mode
To boot your Mac into Recovery mode, the steps differ based on your Mac model. Check the sections below for specific instructions.
Boot Mac into Mac Recovery Mode [Intel Macs]
Here are the steps to boot Intel Macs into Recovery mode:
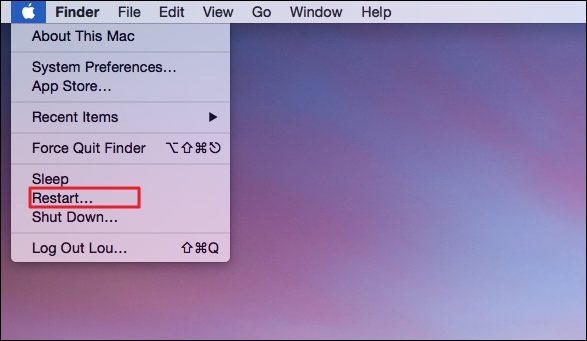
Step 1. Select the Apple logo on the screen and choose Restart from the drop-down menu.
Step 2. Press the Command and R keys and hold them till you see the Apple logo. The macOS Utilities window will then open, allowing you to repair the disk and reinstall macOS with ease.

Boot Mac into Mac Recovery Mode [Apple Silicon Macs]
To boot Apple Silicon Macs into Recovery mode, you can press and hold the Power button until the Mac turns off, then press and hold the Power button again until the boot chime sounds for the second time, and finally, release the Power button and immediately hold down the Command (⌘) + R keys until the Apple logo appears. Alternatively, you can also restart your Mac, immediately hold down the Power button until it shuts down, then press and hold the Power button again until the boot chime sounds for the second time, and release the Power button and immediately hold down the Command (⌘) + R keys until the Apple logo appears.
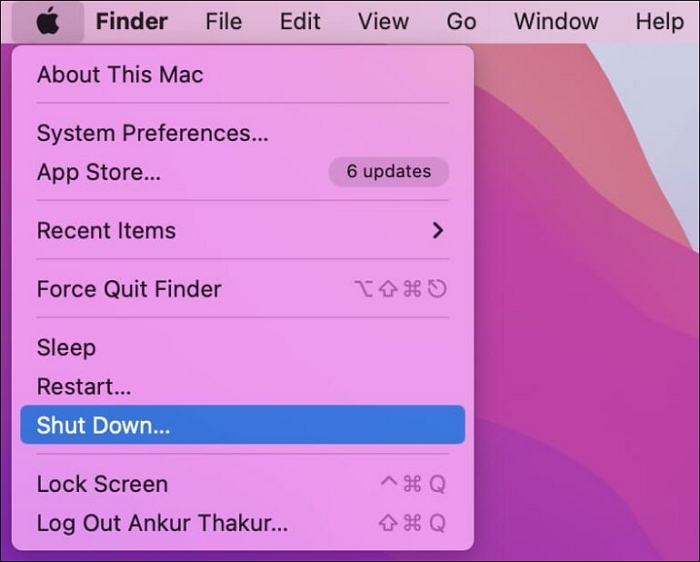
Step 1. Go to the Apple menu. Click on Shut Down. Wait for the system to turn off.
Step 2. Press the Power button and hold it until you see "Loading startup options". Then, select "Continue" from the options menu.

Step 3. Choose the volume you want to recover (if prompted). Select Next.
Step 4. Choose the administrator account. Click on Next.
Step 5. Enter the password and select Continue.
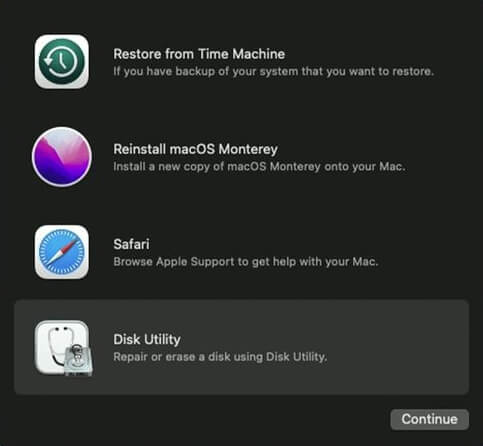
What Can You Do in Mac Recovery Mode [Four Features]
The Mac Recovery Mode allows users to fix startup issues and reinstall the OS, improving efficiency, but with limitations on third-party apps and tasks available.
Here are the four functions offered by the macOS Utilities window in one paragraph:
Function 1. How to Use Restore from Time Machine Option on Mac
If you've used Time Machine to back up files on your Mac, you can use the "Restore from Time Machine" option to restore those files. This will allow you to restore your Mac to a previous date, potentially recovering important data or resolving update issues.
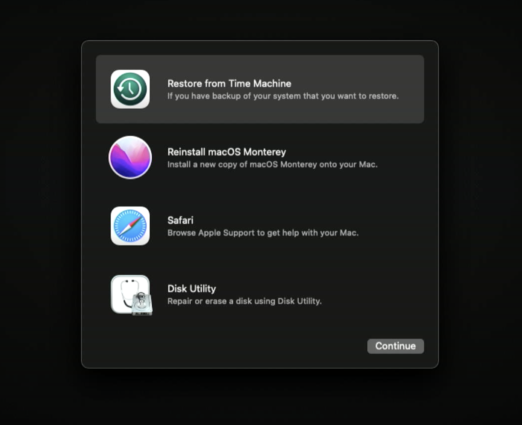
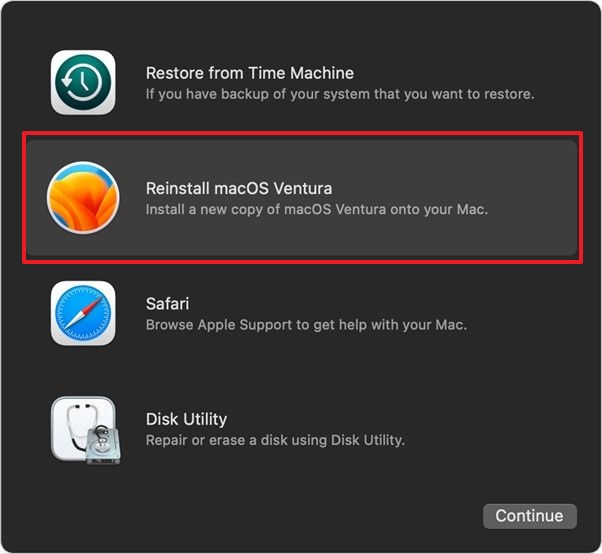
Function 2. How to Use Reinstall macOS Option on Mac
The Reinstall macOS option allows you to download and install a fresh version of the operating system on your device, which is necessary after a severe virus attack, and displays a thumbnail of the macOS to be installed.
Function 3. How to Use Safari Option on Mac
In the Safari options, you can seek help from Apple support for various issues. However, you can't use bookmarks, browser add-ons, or extensions. For more information, you can visit Apple's support pages.

Function 4. How to Use the Disk Utility Option on Mac
To repair or erase disks on your Mac, using Disk Utility is the best option. This tool allows you to erase or repair a Mac disk, including the startup disk, and can also be used to repair external hard drives. Additionally, Disk Utility's First Aid feature can be used for repair purposes.
Rescue Data from Mac Before Fix Issues in Mac Recovery Mode
If you want to use Mac Recovery Mode to fix issues, it's essential to have a data backup. However, if you haven't backed up your data or are experiencing problems booting your Mac and accessing the internal hard drive, the best option is to use a reliable file recovery software, such as Deep Data Recovery for Mac.
With this excellent data recovery program, you can recover deleted files on Mac without any type limits, including music files, emails, photos, documents, videos, and more. It also supports data retrieval from various Mac-based devices such as fusion drives, SSD, HDD, memory cards, cameras, USB drives, and others.
You can restore data in various situations, such as data loss due to a macOS update, system crash, human error, virus attack, or hardware failure. The tool can help you retrieve lost data, even if your Mac won't turn on after a macOS Ventura update. This means you can recover your data, regardless of the circumstances, and use the tool to rescue your data in emergency situations.
The Deep Data Recovery for Mac is a professional and efficient data recovery software that is user-friendly and requires only a few simple steps, making it accessible to both beginners and experts.
Step 1. Install and run Deep Data Recovery for Mac on another Mac computer, and select "Unbootable Mac > Start" to recover data from a Mac that won't boot.
Step 2. To create a bootable USB drive, select a prepared USB drive and click "Next" to begin the process.
- Warning
- The creator will prompt to erase the drive to reallocate the space; then it can write the bootable files to this drive. Please back up all USB files before processing "Eraser" to avoid data loss.
Step 3. The program creates a 2GB space on the USB to save boot files, leaving the remaining space available for storage.
Step 4. To fix the corrupted Mac, create a bootable disc using a different Mac, then restart the corrupted Mac and hold the power button until it shuts down. Next, insert the bootable disc, restart the Mac, and immediately hold the power button until it shuts down again. This process will boot the Mac from the disc.
Step 5. After booting your Mac, launch Deep Data Recovery for Mac and select the disk location (an internal HDD/SSD or a removable storage device) where you lost data and files. The recovery tool will then automatically scan for lost files.
Note: Before attempting data recovery, it's recommended to create a backup of your Mac to prevent further data loss. Once the backup is in place, the software can then recover data from the backup, allowing your computer to be restored and new data to be written.
Summary
You may need to use Mac Recovery Mode in situations where you need to reinstall the operating system or repair disks, and the steps may vary depending on your specific Mac model.
The recovery mode offers four functions - Restore from Time Machine, Reinstall macOS, Safari, and Disk Utility. However, using recovery mode can result in data loss, making it a good idea to seek help from a recovery tool if needed.
The Deep Data Recovery for Mac is a reliable and efficient data recovery program that can retrieve various types of data with ease. If you encounter any difficulties, you can always contact the remote team for help. With its professional features, you can start using Deep Data Recovery for Mac today to recover your lost data.
Mac Recovery Mode FAQs
Now that you know how to use Mac Recovery Mode, it's always a good idea to have more knowledge. To that end, here are some additional questions and answers to explore further.
Will Recovery Mode erase everything on Mac?
Recovery mode on Mac has multiple functions to choose from. If you opt for the Disk Utility function and select the Erase option, it will delete everything on the Mac and erase it immediately.
How to Fix Mac Recovery Mode not working?
To fix Mac Recovery Mode not working, try resetting the SMC, booting in safe mode, checking the keyboard functionality, verifying the recovery partition, and ensuring correct key combinations are used.
What can I do in Mac Recovery Mode?
In Mac Recovery Mode, you can perform various functions such as repairing the internal storage device, restoring files from a Time Machine backup, reinstalling macOS, and setting up security options.
How do I start Mac in Recovery Mode with the keyboard?
To start Mac in Recovery Mode, press and hold the Command (⌘) and R keys simultaneously, or use the Shift + Command + R keys combination.
Related Articles
- How to Fix Raspberry Pi Not Booting [4 Efficient Solutions]
- How to Fix DXGI_ERROR_DEVICE_REMOVED on Windows 10/11 [Fixed]
- New Computer Keeps Freezing? Find Causes & Solutions Here
- How to Solve Convert to MBR Greyed Out in Disk Management [Best Ways]
- Restore Point in Windows [What Is and How to Use]
Learn what a System Restore point in Windows is, how it works, and how to use it to recover your PC. A complete guide to creating and restoring Windows restore points to fix system issues. - How to Restore System Image from External Hard Drive Windows 10
Learn how to restore a Windows 10 system image from an external hard drive. Step-by-step guide with two methods: using a system repair disc or Qiling Backup for easy recovery without a repair disc.