How to Solve Convert to MBR Greyed Out in Disk Management [Best Ways]
You can solve the "convert to MBR greyed out" issue without data loss using a free partition manager. This tool allows you to resize partitions and merge them, effectively resolving the problem.
The "convert to MBR" option in Disk Management may be greyed out if the system is not bootable from the current disk configuration, or if the disk is not a basic disk. To resolve this, you can try converting the disk to a basic disk, or checking the disk configuration to see if it's set to GPT. Additionally, ensuring the system is set to boot from the correct disk or partition may also resolve the issue. It's also worth noting that if the disk is already in MBR format, the "convert to MBR" option will be greyed out. In such cases, you can try to use the built-in tool "convert to MBR" or use third-party software to achieve the same result.
Why Is Convert to MBR Greyed Out
The "Convert to MBR" option is greyed out because the chosen disk contains partitions, making it impossible to convert to MBR without first deleting the partitions.

The "Convert to MBR Disk" option can be greyed-out due to various reasons. To resolve this issue, you can try to disable the Secure Boot feature in your BIOS settings, or you can try to convert the disk to MBR using a third-party tool like Qiling Partition Master.
How to Fix Convert to MBR Greyed Out
To resolve the "Convert to MBR Disk greyed out" issue, you can delete all partitions on the disk and then attempt the conversion. There are three methods to convert a disk to MBR, which involve deleting all partitions, using a third-party tool, or using the built-in Disk Management tool. Alternatively, you can also use the built-in Diskpart command to convert the disk to MBR. However, be cautious when deleting partitions as it will result in data loss.
- To convert a GPT disk to MBR via Qiling Disk Master without data loss, follow these steps: First, download and install Qiling Disk Master. Then, launch the software and select the GPT disk you want to convert. Qiling Disk Master will automatically detect the disk and display its partition information.
- To convert a GPT disk to an MBR disk using Disk Management, follow these steps: 1. Open Disk Management and select the disk you want to convert. 2.
- In this method, you can convert the GPT disk to MBR via Diskpart command, which will delete all data on the disk. You need to back up your data before doing this. First, open Command Prompt as Administrator, then type the command "diskpart" and press Enter.
- Recommendation
- Method 1: A third-I recommend using a party partition manager as it's user-friendly and suitable for all users, ensuring that you won't lose any data during the process.
- For methods 2 and 3, deleting partitions will result in data loss, so it's crucial to back up all essential data beforehand.
Method 1. Convert to MBR via Qiling Disk Master
With the help of Qiling Disk Master, you can easily convert a GPT disk to MBR without losing any data. This program also allows you to format a partition, merge partitions into a single larger one, or resize partitions on Windows. For a safe and secure conversion, download Qiling Disk Master.
And follow the steps to convert GPT to MBR safely and quickly.
Step 1. Install and launch Qiling Disk Master on your computer, go to the Disk Converter section.
Step 2. Select "Disk Management" tab page to continue.
Step 3. To convert the target GPT disk to MBR, select the disk you want to convert, right-click, and choose "Convert to MBR" from the context menu. This will initiate the conversion process.

Qiling Disk Master is a powerful disk partition converter that can also convert MBR to GPT without data loss, in addition to supporting the conversion of other disk-related tasks.
By downloading this software, you can enjoy the numerous conveniences it brings to your computer, making your computing experience more efficient and enjoyable.
Method 2. Convert to MBR via Disk Management
To convert a GPT disk to MBR, you can use Disk Management to delete all partitions, but this method will result in data loss, so it's essential to back up all necessary data first.
Step 1. To convert a disk to MBR, right-click the partition on that disk and select "Delete Volume".
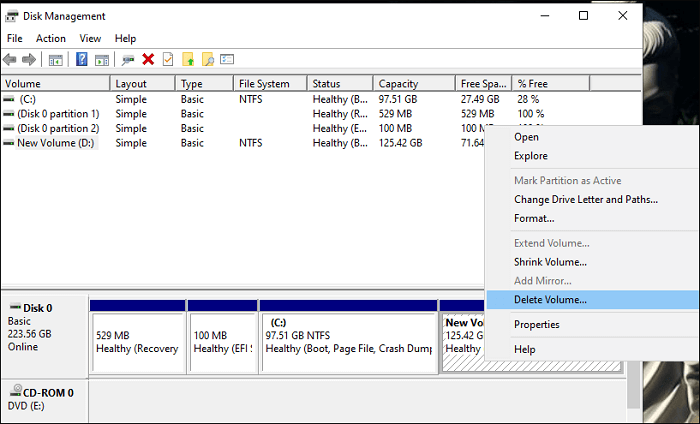
- Tip
- If the Delete Volume greyed out, it may be caused by operating system files or page files, and Qiling Disk Master can help resolve the issue.
Step 2. To erase data and partition on the disk, you'll be prompted to confirm that you want to delete all data on the partition. Click "Yes" to confirm, which will also delete all partitions on the GPT disk.
Step 3. To convert a GPT disk to MBR, right-click the disk and select "Convert to MBR Disk," which will make the entire disk become an unallocated space. This process allows the disk to be clickable again.

Method 3. Convert to MBR via Diskpart Command
To convert a GPT disk to MBR using the Diskpart command, you'll need to back up important data first, as this method also deletes volumes and data. Then, open Command Prompt as Administrator and type "diskpart" to enter the Diskpart tool. Next, list the disks with "list disk", select the GPT disk with "select disk X" (where X is the disk number), and then convert it to MBR with "convert mbr".
Before attempting to clean install Windows 10, it's essential to note that using the Diskpart command method will result in the loss of volumes and data. Therefore, it's crucial to backup any vital data before proceeding with this method. This ensures that your important files and information are preserved, even if the installation process doesn't go as planned.
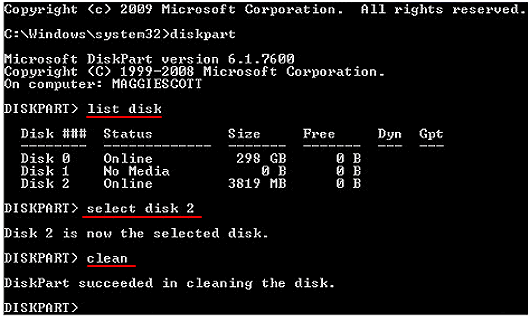
Step 1: After starting "Command Prompt" as an administrator, type "diskpart."
Step 2: To identify the disk designation of the GPT disk, type "list disk" in the command prompt and take note of the disk designation.
Step 3: To select the GPT disk, type "select disk X" and press Enter, replacing X with the actual disk number.
Step 4: This stage is crucial. After typing "clean", click "Enter" again to securely delete all data on the disk. Please ensure you have a backup before proceeding.
Step 5: To convert a disk to MBR format, enter the command "convert MBR" and wait for the confirmation prompt. Once you see "Successfully converted the chosen disk to MBR format," you can stop.
Step 6: Once you're done, type "exit" and close the "Command Prompt."
The problem of "convert to MBR greyed out" can be solved in three ways. If you're experiencing this issue, try the following solutions to resolve the problem. If you encounter other issues with Disk Management, click the button below for assistance.
Conclusion
You likely enjoyed this tutorial! When converting GPT to MBR, it's essential to avoid losing important data, which can be a challenge. Most known solutions require creating a backup in advance, a process that can be time-consuming and complicated. If you prefer using the command line, Diskpart could be a good option, but you'll need to delete all GPT volumes first.
But with a third-You can use Qiling Disk Master to easily convert a disk between GPT and MBR without losing any data or deleting partitions, making it a simple party solution.
FAQ of Convert to MBR Greyed Out
This guide has walked you through solving the problem of MBR grey out. If you have further questions about converting to MBR greyed out, you can find answers in the FAQs below.
1. Why is GPT converted greyed out?
The conversion from MBR to GPT is not completed when the "convert to GPT Disk" is greyed out, likely due to existing partitions on the selected MBR disk. This process can only be done on empty non-system disks using Disk Management, requiring you to back up essential data and delete all partitions for the conversion to be successful.
2. How do I convert my hard drive to MBR?
- The data on the basic GPT disk you wish to convert to an MBR disk should be backed up first. This will prevent data loss in case something goes wrong during the conversion process.
- If the disk has partitions or volumes, all of them must be deleted.
- Select the GPT disk you wish to change to an MBR disk by clicking on it. This will initiate the conversion process, which will transform the disk into an MBR disk.
3. How do I force MBR to GPT?
- Before converting the basic MBR disk to a GPT disk, back up the data on the disk to be converted first.
- If there are partitions or volumes on the disk, delete them. This will ensure the disk is completely erased and ready for reinstallation.
- To convert a MBR disk into a GPT disk, select the MBR disk you want to convert by clicking "Convert to GPT Disk".
Related Articles
- How to Open Zip File on Mac [Ventura/Monterey/Big Sur]
- Microsoft Word Files with An ASD Extension Cannot Be Opened from This Location [Fixed]
- How to Fix Printer Driver is Unavailable Error on Windows 10/11 [Fixed Lately]
- What Is MBR2GPT and How to Use It on Windows 10 [2023]
- WD Easystore VS My Passport: Which One to Pick?🔥
WD Easystore VS My Passport: which is better and which one to choose? If you don't have an idea, you've come to the right page. This article will tell you the difference between WD Easystore and My Passport. After reading, you can pick the right one. - What Does Shrink Volume Do? How to Safely Shrink Volume?
As digitization continues to advance, global users are competing in the data storage race, prompting the need to understand what shrinking volume does. This article delves into the concept of shrinking volume in Windows 10/11, providing a clear explanation and introducing two safe methods to achieve this.