What Does Shrink Volume Do? How to Safely Shrink Volume?
Digitization has led global users to compete in the data storage race, with big companies relying on effective storage solutions and many users optimizing their existing storage capabilities. Windows 10/11 users can rely on the "Disk Management" utility for end-to-end management of advanced storage tasks, including shrinking volumes, which is a feature that can be used to reduce the size of a volume.
The reliable option to shrink volume is through the "Disk Management" utility, which decreases the partition space to create unallocated space on the disk. This article will guide you through the process of shrinking volume in detail, providing you with the knowledge to safely use this feature on your Windows 10/11 system. You can also learn more about shrinking the C drive by clicking the link below.
To fix the issue of being unable to shrink the C drive on Windows 11/10/8/7, try the following steps: 1) Check if the disk is in use by other programs or services. 2) Ensure that the disk is not locked by any other user.
Windows is unable to shrink the C drive due to various reasons, including disk errors, disk formatting issues, or corrupted system files. To resolve this issue, four efficient solutions can be employed: checking the disk for errors and fixing them, using the built-in Disk Cleanup and Disk Defragmenter tools, running the System File Checker (SFC) to scan and replace corrupted system files, and using third-party partition software to resize the C drive.
What Does Shrink Volume Do in Disk Management
The process of shrink volume, also known as volume reduction, is a technique used in various industries such as manufacturing, logistics, and supply chain management. It involves reducing the volume of a product or package to minimize storage space, transportation costs, and handling requirements.
In Windows 10/11 Disk Management, the "shrink volume" function allows for automatic relocation of all ordinary files to decrease the partition space, effectively shrinking the partition size.
The next question that comes to mind is when to shrink volume on a Windows 10/11 system. To determine this, it's essential to consider the top reasons for selecting shrink volume, which include.
- To optimize storage, you can utilize the unallocated space on your computer to create a new volume specifically for storing important files. This separate volume can provide an additional layer of protection and organization, allowing you to keep sensitive information separate from other data.
- Using the unallocated space to set up SD over-provisioning.
- Extending the size of the adjacent volume using Disk Management.
The shrink volume function in Windows is a feature within the Disk Management utility, allowing users to shrink a basic volume, extend a basic volume, change a drive letter, and initialize a new drive among other advanced storage tasks.
Here are the crucial points to consider before moving ahead with the shrink volume in Windows 10/11 system in one paragraph:
- The primary partitions and logical drives on raw petitions or the partitions using the NTFS file system format can be operated for shrink volume.
- It's advised not to choose block-level copy for data transfer as it copies bad sectors to the new disk.
- To identify the unmovable file, you can check the Application Log for Event 259, which can help pinpoint the specific file that's preventing the volume from shrinking. This is particularly relevant for certain files that cannot be automatically relocated during the shrink volume process.
- There is no need to reformat the disk to shrink the partition.
If you're experiencing issues with a shrinking volume in Windows, you can refer to this link for assistance.
How Long Does It Take to Shrink Volume
The total time required to complete the Shrink Volume process on Windows 10 or 11 devices is approximately 30 minutes to 1 hour, depending on the system configuration and available disk space. This time frame may vary based on the number of files and programs stored on the computer, as well as the speed of the hard drive or solid-state drive (SSD) being used.
The key factors affecting the total time in completing the shrink volume include:
- The size of the partition is reduced
- The space being freed
The partition size increase causes the shrink volume process to take longer, due to the larger data set and corresponding space allocation, resulting in a quicker completion time if the partition size is reduced.
The time it takes to free up space using the "shrink volume" feature can vary depending on the amount of space being freed. If the space is relatively small, the process can be completed quickly, but if a larger space needs to be freed, it may take several minutes to complete.
The time it takes for the shrink volume process to complete can vary between 15-20 minutes and 1-2 hours, depending on factors such as the amount of data being compressed and the system's processing power. It's advisable to avoid shutting down or restarting the system during this process to prevent any potential issues.
How to Safely Shrink Volume in Windows 10/11 - 3 Ways
After calculating the time taken to shrink volume, we'll explore the different ways to achieve it. In Windows 10 or 11 devices, there are three ways to shrink volume:
- Way 1. Shrink Volume via Qiling Disk Master
- Way 2. Shrink Volume via Disk Management
- Way 3. Shrink Volume via Diskpart
To compare the different ways of doing something, a quick table can be created with various options. This table allows for a brief comparison of the different methods, making it easier to decide which one is best. The table can include columns for different aspects, such as time, cost, and effort, to help make a more informed decision.
| Feature | Qiling Disk Master | Disk Management | Diskpart |
|---|---|---|---|
| Operation difficulty | Easy | Lengthy process | Lengthy process |
| Suitable users | Professional and individuals | Individuals | Individuals |
| Additional features | Multiple and advanced features | Limited features | Limited features |
Way 1. Shrink Volume via Qiling Disk Master
Looking for a safe, quick, and easy way to shrink volume in Windows 10/11? Qiling Disk Master is the perfect solution, offering simple steps to achieve this in Windows devices. It's easy for Windows 10/11 users to quickly download Qiling Disk Master from its official website.
Qiling Disk Master is a powerful disk manager that offers various features, including quick disk space adjustment, creating new partitions, and merging partitions, and is compatible with Windows operating systems from XP to 11.
Features of Qiling Disk Master:
Qiling Disk Master is an all-in-one partition manager that offers a range of key features, including.
- 1. It can quickly resize encrypted partition.
- 2. It creates partitions on USB drive.
- 3. Microsoft's Smart Windows 11 Upgrade Assist provides additional performance benefits to Windows 11 users by optimizing system resources and streamlining the upgrade process, making it easier to stay up-to-date with the latest features and security patches.
- 4. The software has additional disk management features, including converting Master Boot Record (MBR) to GUID Partition Table (GPT), formatting partitions, and merging partitions, among others.
Qiling Disk Master is a professional partition management software that allows both beginners and professionals to shrink or extend Windows 10/11 partitions without any data loss. This makes it a much easier solution for users looking for alternatives to other methods, such as understanding what shrink volume does.
To shrink a volume using Qiling Disk Master, follow these steps:
Step 1: Locate and select target partition to shrink
Go to the Partition Manager section, right-click on the partition you want to shrink, and select "Resize/Move".
Step 2: Adjust to shrink partition
To shrink a partition using the mouse, you can drag the end of the target partition to reduce its space. This involves clicking and holding the mouse button on the partition boundary, then dragging it to the desired smaller size.
Once you've created the target partition, you can adjust the partition size box to shrink the target partition. That's it.
Step 3: Execute operation
Click the "Proceed" to keep all changes.
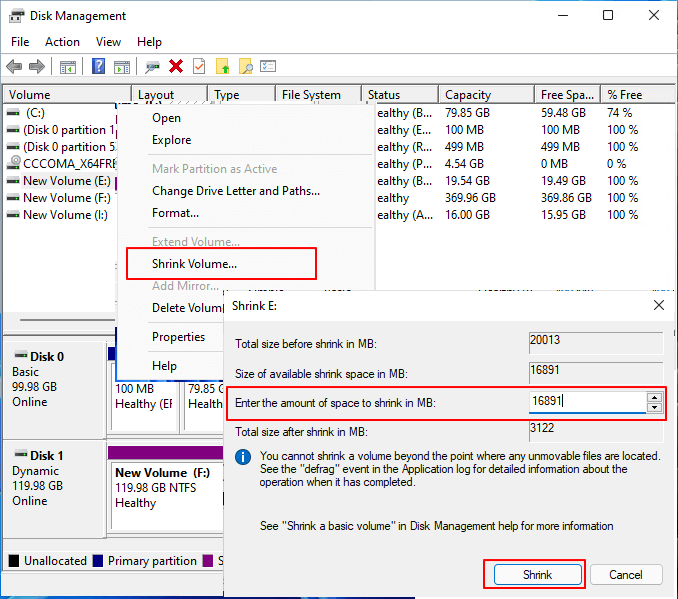
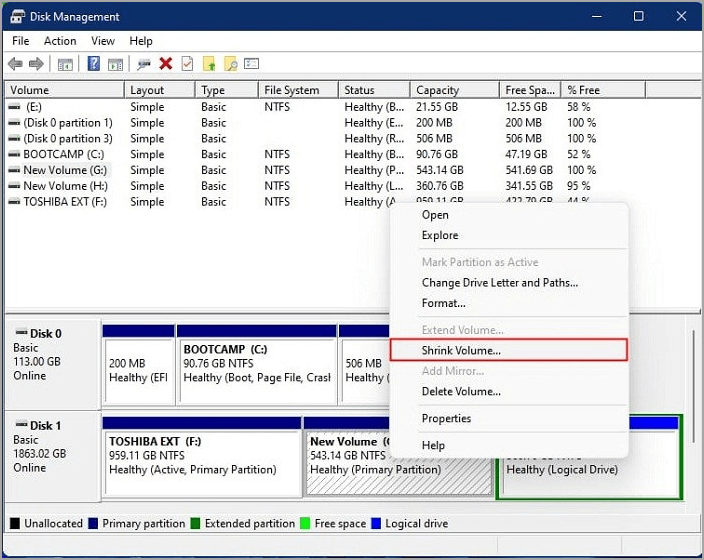
Way 2. Shrink Volume via Disk Management
To shrink a volume using Disk Management, go to the Disk Management utility, right-click on the volume you want to shrink, select "Shrink Volume", and follow the prompts to set the new, smaller size for the volume. This method is straightforward and doesn't require any third-party tools, making it a good option for both beginners and professionals.
Here are the quick steps to use Shrink Volume via Disk Management in one paragraph:
Step 1. Open the "Disk Management" option in Windows 10/11 system.
Step 2. Select the "Shrink Volume" option in the disk management menu.
Step 3. Wait for the disk management to query available space to shrink.
Step 4. In a pop-up window, you can enter the size you want to decrease.
Step 5. To complete the shrink volume using disk management, click on the "Shrink" button.
Way 3. Shrink Volume via Diskpart
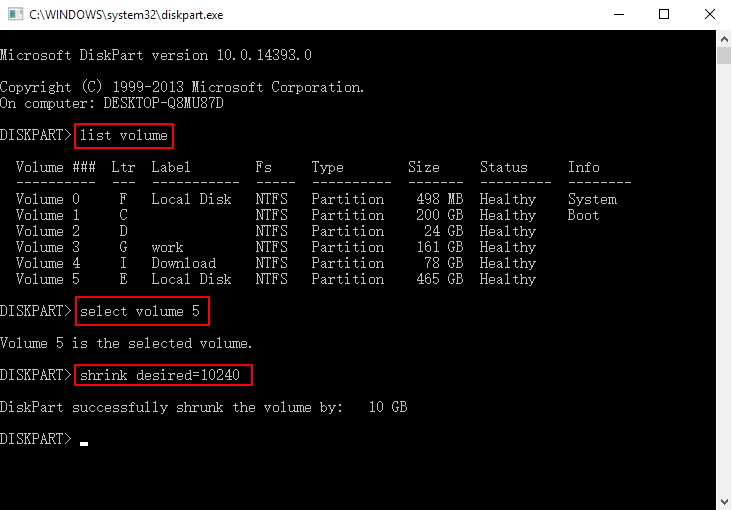
The method of shrinking volume via Diskpart commands is another approach. Diskpart is a dedicated command interpreter that helps manage computer drives, including virtual hard disks, volumes, partitions, and disks. To use Diskpart, first list the objects, select the one you want to manage, give it focus, and then use specific Diskpart commands.
The steps to shrink volume via Diskpart are:
Step 1. Go to "Windows + R" to open the run window.
Step 2. Enter "diskpart" into the run window and press "Enter".
Step 3. Input the following commands and press "Enter" after every command
list volume
select volume # (here # is the volume number)
shrink desired = * (here * is the amount of space required to shrink)
Step 4. You'll receive a message saying "DiskPart successfully shrunk the volume by: …" if the volume shrink is successful.
Step 5. Input "Exit" and press "Enter" to close DiskPart.
Conclusion
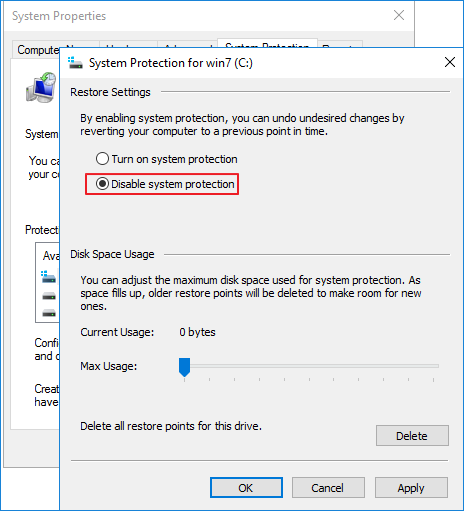
The details of shrink volume in disk management are clear, and it's easy to understand its safety. Shrink or extend volume doesn't affect system data, and the time taken is dependent on the amount of space.
The process of safely shrinking a volume in Windows 10/11 can be completed using three methods. Users can follow detailed steps to shrink volume using diskpart and disk management, making it easy for both beginners and professionals to understand. Alternatively, Qiling Disk Master remains the best option for safe, quick, and reliable shrinking of volume on devices.
FAQs Related to What Does Shrink Volume Do
What does shrink volume do?
1. Is it safe to shrink volume?
Shrink volume operations are secure and do not affect data, whether the unallocated space is located in the user space or elsewhere, as the unchanged information remains intact.
2. What is the difference between shrink volume and extend volume?
The shrinking volume feature helps create unallocated space on the right side of the partition, but users cannot move it. In contrast, the extended volume is only available if there is a contiguous unallocated space on the right side of the partition that needs to be enlarged.
3. What happens if I shrink the D drive?
When you shrink the D drive, the unallocated space will be created after the D partition, not the C drive, so it can't be used to extend the C drive.
Related Articles
- How to Fix macOS 13 Ventura Installation Failed/Stuck/Frozen (2023 Tips)
- All About Samsung SSD Reset Tool | Full Guide
- Change Directory in Terminal Mac | Get All Information Here
- macOS Sonoma Upgrade Failed | 3 Tested Solutions in 2023
- Fix Unallocated Space Cannot Create Partition in Disk Management [Windows 7/8/10/11]
Are you trying to create a partition in your hard drive with unallocated space and getting the 'Unallocated Space Cannot Create Partition' error? Learn more about this error, its causes, and the possible solutions in the article below. - How to Unblock Websites on School Chromebook 2024
Want to unblock websites on your school Chromebook in 2024 without the hassle? This article is your go-to guide, providing you with the necessary steps to access blocked websites on your school-issued Chromebook.