How to Fix DXGI_ERROR_DEVICE_REMOVED on Windows 10/11 [Fixed]
The DXGI_ERROR_DEVICE_REMOVED error is a frustrating issue that can cause games to crash, but it can be resolved by updating your graphics drivers, checking for driver conflicts, and ensuring your system meets the game's minimum requirements.
A DXGI error, primarily caused by issues with drivers, system specifications, and graphic cards, can be resolved in various ways. To fix the DXGI_ERROR_DEVICE_REMOVED error on Windows 10/11, you can follow the troubleshooting steps outlined in this article.
What Is DXGI_ERROR_DEVICE_REMOVED?
The DXGI_ERROR_DEVICE_REMOVED error is a DirectX issue related to the graphics card, occurring when it disconnects from the computer.
The DXGI_ERROR_DEVICE_REMOVED error can occur due to various reasons such as overclocking, incompatible graphic card, or outdated drivers, which can cause the graphic card to heat up or malfunction, resulting in the error message.
To avoid the error when playing games like Arma, Battlefield, and GeForce experience, ensure your graphic card, drivers, and system specifications are up-to-date and compatible. This will help prevent the issue from arising.
How to Fix DXGI_ERROR_DEVICE_REMOVED?
If you're having trouble getting rid of the DXGI_ERROR_DEVICE_REMOVED error, don't worry - we've got you covered. To give you an uninterrupted gaming experience, we've identified 5 ideal ways to fix this problem. These solutions include [insert 5 solutions here].
- Fix 1. Turn Off the Shadow Play
- Fix 2. Change the Registry
- Fix 3. Turn Off the Anti-Aliasing Feature
- Fix 4. Uninstall and Reinstall the Graphics Drivers
- Fix 5. Roll Back Driver Updates
1. Turn Off the Shadow Play
To resolve the DXGI error in games like GeForce Experience, simply disable the hardware acceleration feature called Shadow Play, which is useful for screen recording.
That's you can do it.
Step 1. To run GeForce Experience as an administrator on your laptop, click on the shortcut to open the application, then right-click on the shortcut and select "Run as administrator" from the context menu. This will launch the application with elevated privileges, allowing you to perform tasks that require administrator access.
Step 2. To disable the in-game overlay or share feature, go to the "General" tab on the left panel and toggle off the "In-Game Overlay" or "Share" option.
Step 3. Select "Apply" and save the changes on your computer.
Step 4. Rebooting the computer may resolve the error, but it's not a guaranteed solution. The error may persist or return after the reboot.
2. Change the Registry
The fatal error "Direct3D driver returned the error code" can be resolved by adjusting the registry key to clear the DXGI error.
You can do it by following these steps.
Step 1. Type Window+ R on your home screen to open the Run Dialog Box
Step 2. Write "Regedit" in the dialog box and press the "Enter"
Step 3. 1. Open the terminal and type "sudo apt-get install register-editor" and press enter.
Computer\HKEY_LOCAL_MACHINE\SYSTEM\CurrentControlSet\Control\GraphicsDrivers
Step 4. To update the graphics drivers, right-click the blank space in the "GraphicsDrivers" section and choose "New > DWORD (32-bit) Value".
Step 5. The value of the DWORD is set to 0 and named "TDR Level".
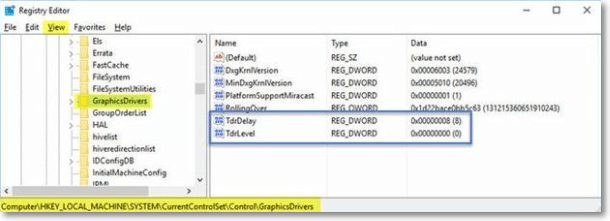
Step 6. Save the changes and restart your computer. The error will be removed.
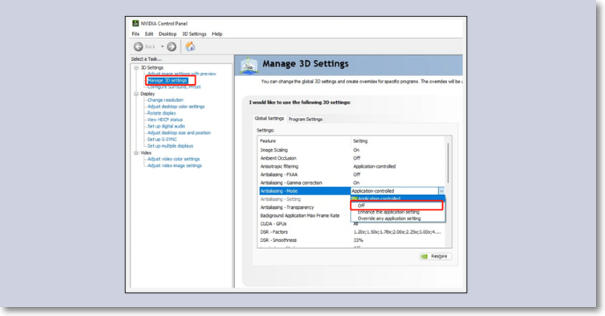
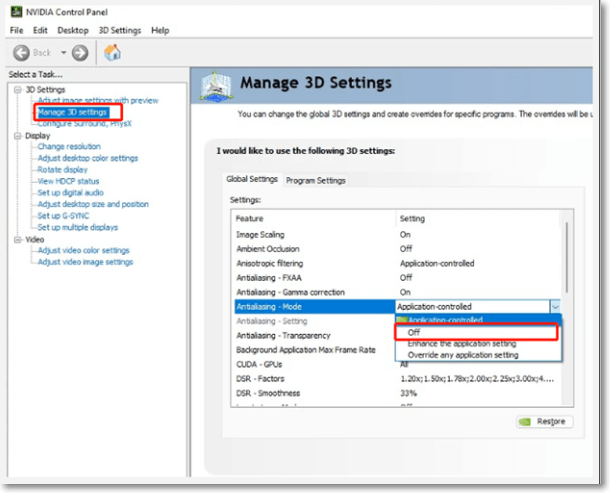
3. Turn Off the Anti-Aliasing Feature
The anti-The aliasing feature in graphic software can improve display quality, but it may cause DXGI errors. To resolve this, disable aliasing in the NVidia Control Panel.
Step 1. The Nvidia Control Panel can be accessed by right-clicking on your desktop and selecting it from the options.
Step 2. To enable anti-aliasing, go to the "Manage 3-D settings" in the control panel, then select "Global Settings" and look for the "Anti-Aliasing Feature" option.
Step 3. Turn all settings to "Off", click on "apply and save the changes", and verify that the error has been resolved.
4. Uninstall and Reinstall the Graphics Drivers
To resolve the issue, you can uninstall the existing drivers and let Windows install its own compatible drivers, which will ensure the smooth functioning of your program file.
The process is quite simple for this.
Step 1. To view the list of installed devices, search for "Device Manager" on your home screen, which will display your PC name and a comprehensive list of all installed devices.
Step 2. Find the affected device and select its "properties"
Step 3. Click on the "Driver" and then select "Update Driver"
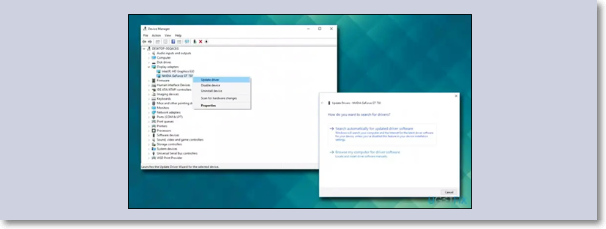
Step 4. Choose "Search Automatically for updated Driver".
Step 5. The windows will find and install the necessary updates, and after restarting your computer, the DXGI will not appear again. This is a normal process and the computer will be ready to use once it's restarted.
5. Roll Back Driver Updates
The DGXI error can occur due to driver updates, which can be resolved by removing the update and reverting to the initial version, ensuring compatibility with gaming software.
This is the procedure to remove any driver update
Step 1. To find the recently updated software, visit your PC's "Device Manager". In the Device Manager, look for the section that lists all the hardware components of your PC, such as disk drives, sound cards, and network adapters.
Step 2. Press the Right-click to see its "Properties".
Step 3. In the properties window, go to the "Driver" settings and select the option to "Roll Back Driver".
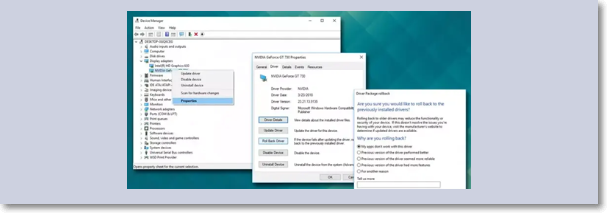
Step 4. Restart the system, DXGI error isn't there.
The Bottom Line
Consistency is crucial for a quality gaming experience, but the unforced interruptions in the display can be a major killjoy. The DXGI error can cause your gaming graphics to crash, resulting in lost progress or a complete shutdown. This issue is often caused by problems with the graphic card, drivers, or overclocking of your PC.
To resolve DXGI error, consider the following five methods, all of which are compatible with Windows 10-11: these methods can be tailored to suit your system's requirements and personal preference.
Do let us know your thoughts about the article.
Related Articles
- Fix 0x80070780: The File Cannot Be Accessed by the System Error in Windows 10/8/7 [10 Fixes]
- Fix WD External Hard Drive Not Showing Up/Recognized Error [2022 Tutorial]
- How Much Storage Do I Need on My Laptop [Windows/Mac]
- 4 Ways to Solve macOS Ventura Recovery Mode Missing [2022 Guide]
- What Is VCRUNTIME140_1.DLL and How to Fix Issues with VCRUNTIME140_1.DLL
If you're experiencing problems with VCRUNTIME140_1.DLL, you're not alone. This DLL file, short for Visual C++ Runtime Library, is a crucial component for running various Windows applications. However, issues like missing or corrupted files can cause errors and crashes. To resolve these problems, you can try reinstalling the Visual C++ Redistributable Package, checking for any software updates, or running a System File Checker scan to replace any damaged system files. Additionally, ensuring that your system meets the minimum requirements for the application you're trying to run can also help resolve the issue. - Windows KB Update: KB3194798 | KB 3192441 | KB 3192440
You may have already known the Windows Operating System update. However, do you know what Windows KB update means? If you are looking for information on it, this article will introduce all the information you need to know, including the definition, how to update it, the significance of it, etc.