Black Screen After BIOS Update [Causes & Fixes]
Upgrading your BIOS via the manufacturer's website can sometimes result in a black screen on startup, especially if the update was flawed or the motherboard is faulty. This issue has been a common problem for many users, and it's essential to address it to recover your data and get your computer up and running again. Fortunately, this article from Qiling provides a solution to resolve the black screen after BIOS update and offers a way to protect your data on your computer.
Why Is There a Black Screen After BIOS
After updating the BIOS, the computer may display a black screen with no progress, indicating that the BIOS cannot configure the necessary files for startup, ultimately preventing the Windows screen from loading.
The fault of the computer screen turning off after a short time of use is a common issue that can occur in all brands of computers, including Lenovo, HP, ASUS, MSI, and Dell. This phenomenon can be caused by various reasons, including faulty hardware, software glitches, or even overheating issues.
- Motherboard overheating
- Ineffective BIOS update
- Change in BIOS settings
- Corrupted hard drive
- Incompatible BIOS
- Corrupted RAM
- Failing CMOS memory
The situation is quite worrisome, as you can't access the data or perform any operation during this fault, which in extreme cases can lead to losing all system data. Many newbies get frustrated after seeing this issue, but frustration isn't a solution. Instead, reading below will provide the perfect solution for you.
How to Fix Black Screen After BIOS Update
If you're experiencing issues with no screen or display after a BIOS update, there are quick fixes to resolve the problem. Follow these 9 simple methods below. By following these instructions, you should be able to resolve the issue and get your screen or display working again.
- Fix 1. Make Cables and Monitor Properly Connected
- Fix 2. Unplug External Peripherals
- Fix 3. Resume Interrupted BIOS Update
- Fix 4. Use a Third-Party Tool to Fix the Black Screen
- Fix 5. Perform a Startup Repair
- Fix 6. Turn off Fast Startup
- Fix 7. Repair Boot Record
- Fix 8. Check for GPU
- Fix 9. Rollback/Reinstall Graphics Driver
Fix 1. Make Cables and Monitor Properly Connected
A black screen can occur due to improper connection or disconnection between monitor cables, which is a hardware issue. To resolve this, ensure that the cables and monitor are properly connected, following the correct steps for a secure connection. This should resolve the issue.
- Turn off your monitor.
- Check the condition of its Connection Points.
- Check the condition of connecting cables.
- If you see any defect, replace the concerned accessories.
- Now attach the cables and turn on the Monitor.
- If the Monitor starts normally, everything is fine.
Fix 2. Unplug External Peripherals
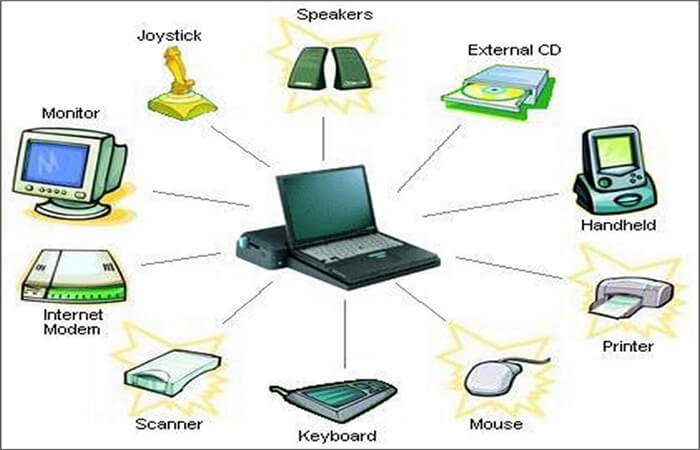
To start your computer system, remove all external peripherals such as the mouse, keyboard, printer, USB, speakers, and projector. This will allow you to access the BIOS settings and resolve any issues related to the external devices.
Step 1. Press and hold the PC's power button for 5 seconds.
Step 2. Wait for the system to turn off.
Step 3. Now, unplug all the external devices.
Step 4. Press the Power Button to see if Windows starts normally.
If the fault is clear, you can plug in all externals now.
Fix 3. Resume Interrupted BIOS Update
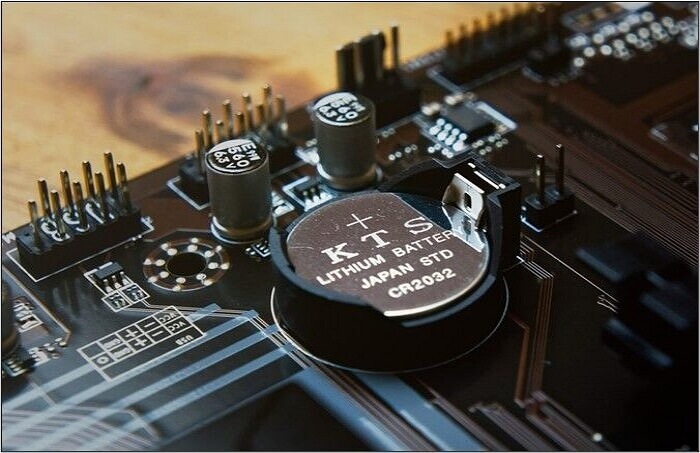
If your BIOS system gets interrupted during an update, it will display a black screen. To resume the update, simply detach and then reattach the removable batteries, and the system should complete the procedure. This is the most straightforward method to resolve the issue.
Step 1. Turn off your system and unplug your AC adapter.
Step 2. Press Press the power button for 40 seconds to discharge the system. The remaining current will be dissipated. This is a safety precaution to prevent electrical shock.
Step 3. Unplug your battery and wait for a few seconds.
Step 4. Now install the battery and connect the AC adapter.
Step 5. Turn on your system to see if the BIOS Update has resumed automatically.
If yes, allow it to complete. The system will load the Windows screen after its completion.
If you do not know how to update your BIOS, you can refer to the articles below for help.
Fix 4. Use a Third-Party Tool to Fix the Black Screen
To fix a black screen on your computer, use a bootable disk to boot Windows from it, and Qiling Disk Master's "Boot Repair" feature can help you boot your computer to the Qiling WinPE desktop and fix errors on the boot disk.
It supports one-Get your Windows computer up and running smoothly with our expert repair services for all types of black or blue screen errors. Whether you're a tech-savvy individual or a complete newcomer, our solutions will have you fixing boot problems like a pro in no time.
Step 1. After connecting the external drive/USB to your computer, start Qiling Disk Master and navigate to "Tools and utilities," then click "Create bootable media."

Step 2. Insert a blank USB drive or CD/DVD, and then click "Create" to burn the Windows ISO file onto it.

Step 3. Connect a bootable drive to a new computer, reboot by pressing F2/Del, set the drive as the boot disk, and exit the BIOS by pressing F10.
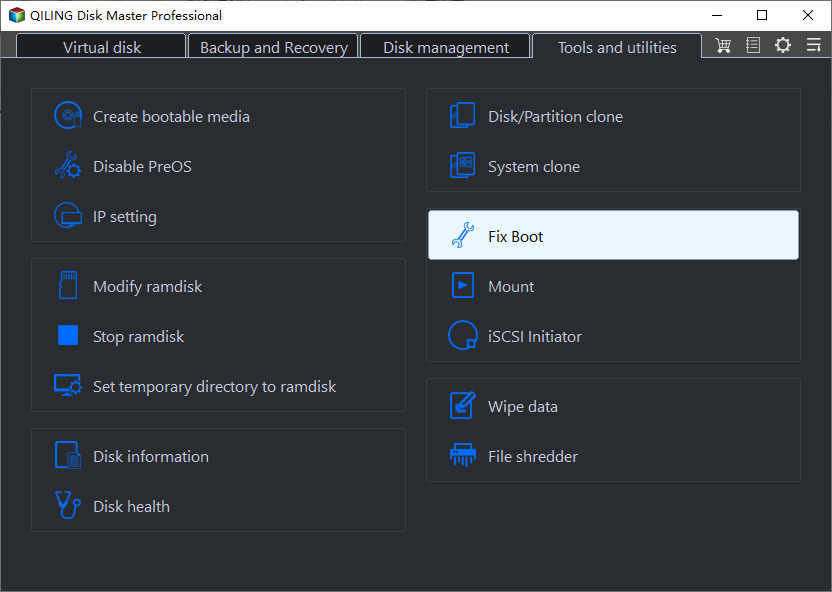
Step 4. Boot the computer again and enter the WinPE interface. Then, open Qiling Disk Master, click on "Tool and utilities" and select "Fix Boot".
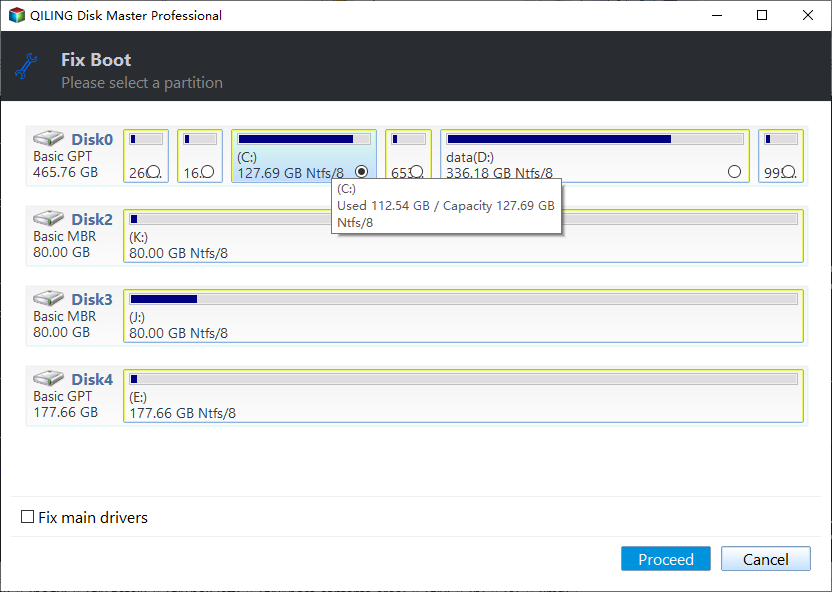
Step 5: Select the system you want to repair and click "Repair."
Step 6. The system will be successfully repaired and you will receive an alert, then click "Finish" to complete the boot repair process.
Download a Windows boot repair tool to potentially fix a black screen issue on your Windows device.
Fix 5. Perform a Startup Repair
Since BIOS deals with computer startups, issues within the startup files can stop BIOS configuration, causing a black screen. To fix this, do a startup repair, which can identify and repair defective files, allowing the system to start normally. The process is relatively straightforward.
Step 1. Press and hold the power button for 5 seconds to turn off the system.
Step 2. Connect the recovery drive and turn on your computer.
Step 3. In the start-up menu, choose "Repair your computer." It will direct you toward Windows Recovery Environment.
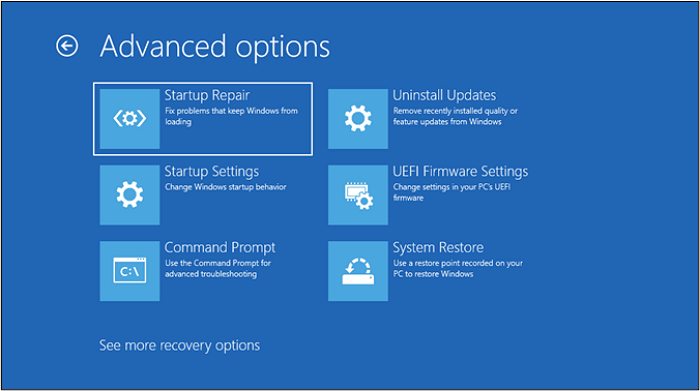
Step 4. Choose "Troubleshoot" from the available options, then select "Advanced Options."
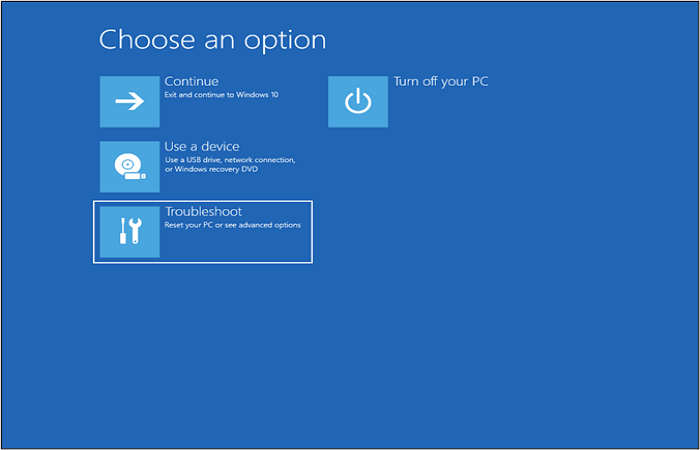
Step 5. In the advanced options, click "Startup Repair". Then follow the on-screen instructions.
Step 6. The system will check and repair all files.
Step 7. Now restart the system and check the status of the error.
Fix 6. Turn off Fast Startup
The fast startup feature helps systems start quickly by creating a hibernation file that stores drivers, programs, and the current system state. However, issues with this file can cause a black screen, and disabling fast startup may be necessary in such cases. To do this, follow the steps provided.
Step 1. Press Windows + R to run the dialog box.
Step 2. Type "powercfg.cpl" and press Enter.
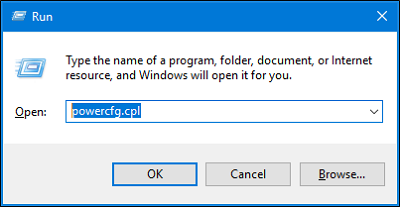
Step 3. To access the Power Options window, go to the Power Options window, click on the left side, and then click on "Choose what the power buttons do".
Step 4. Go to Shutdown Settings and uncheck the "Turn on the fast startup."
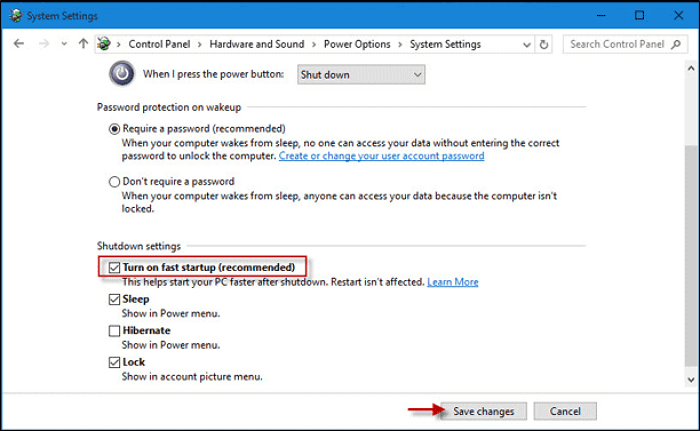
Step 5. Click "Save Changes". And turn on the computer. It will resolve the error.
Fix 7. Repair Boot Record
The Master Boot Record (MBR) stores crucial information about the operating system's location. Any damage to the MBR can directly affect the startup process, resulting in a black screen. Fortunately, Windows has a built-in method to repair the boot record, making it the recommended approach to fix the issue.
Step 1. Turn off your computer and remove the AC adapter.
Step 2. Start the system and click "Repair your computer."
Step 3. Select "Troubleshoot" and then "Advanced Options."
Step 4. Click on the command prompt and type the following:
bootrec /fixmbr bootrec /fixboot bootrec /rebuildbcd
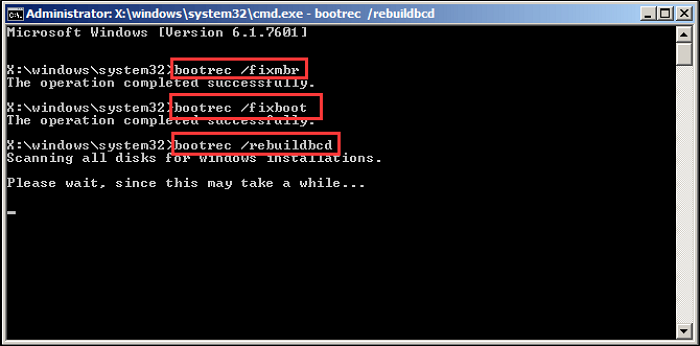
Step 5. Type "Exit" and Press Enter.
Step 6. Restart your system, the error will be fixed.
Fix 8. Check for GPU
The GPU controls system graphics and can be damaged by dirt, damage, or overheating, resulting in an idle black screen, making it necessary to complete a GPU Checkup.
The main component of a GPU is your graphics card. To troubleshoot, remove the card from the PCIe x16 slot and check its condition. If it's worn out or defective, replace it. If not, simply insert it again and start the system.
Fix 9. Rollback/Reinstall Graphics Driver
A graphics driver update can sometimes interfere with the BIOS settings, causing the computer to freeze during startup, resulting in a black screen.
To resolve the issue of a driver update causing startup problems, roll back the update by booting your system to Safe Mode and reverting to the previous driver configurations, which allows for a smooth startup. This negates all updates causing startup issues. The process involves booting to Safe Mode and using the previous driver configurations.
Step 1. Turn off your system.
Step 2. Connect the recovery drive and turn it on.
Step 3. Select "Repair your computer" and then choose "Troubleshoot".
Step 4. Now visit "Advanced Options", click "Startup Settings", and choose "Restart".
Step 5. When the system restarts, press F5 to proceed to "Safe Mode with Networking".
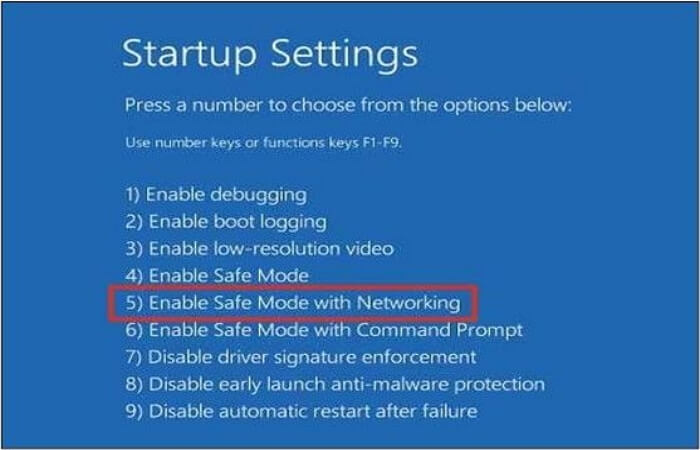
Step 6. Type Win+X on device options and expand the "Display Adapters" option.
Step 7. Right-click on your graphic driver and see its properties
Step 8. Now move to the driver tab and select "Roll Back Driver".
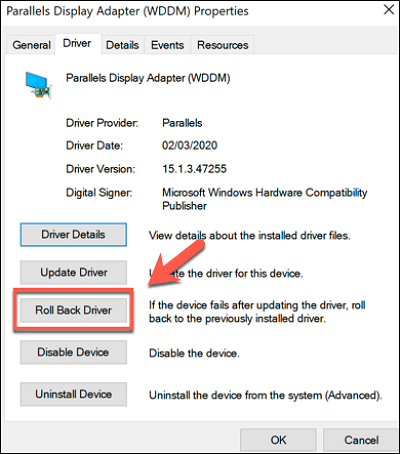
Step 9. To resolve the issue, the system will cancel all pending updates and then restart itself. This should resolve the error and ensure the system functions properly once it's back online.
If you enjoyed this post, consider sharing it on your social media platforms to help spread the word and reach more people.
Bonus Tip: How to Backup Your PC to Prevent Data Loss
In today's digital age, data is crucial, and computers often serve as the primary storage device. However, they are vulnerable to various issues such as viruses, malware, and hardware problems, which can compromise data integrity and accessibility.
The problem in hand - Creating a system image of your computer is crucial to prevent data loss in case of issues like a black screen after a BIOS update. To achieve this, we recommend using the Qiling Disk Master, a user-friendly and reliable backup and recovery tool.
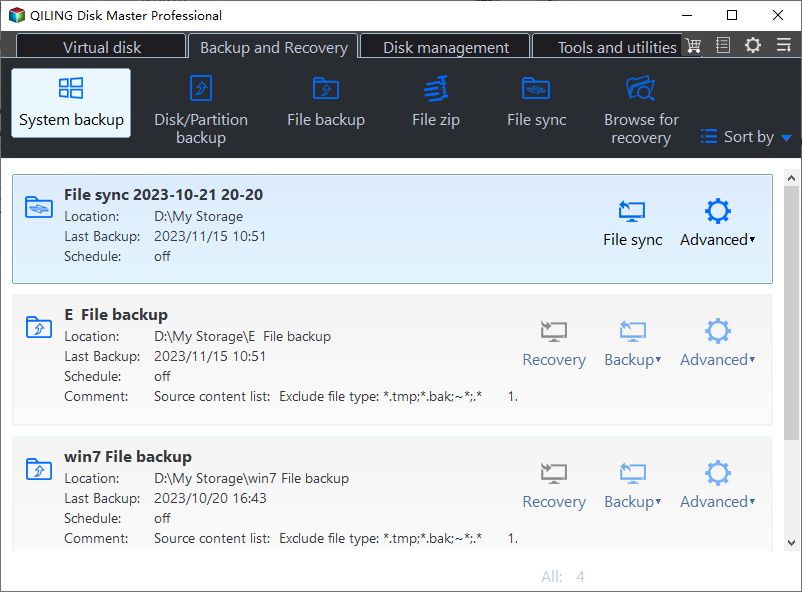
Qiling Disk Master is a user-friendly backup tool compatible with Windows 7/8/10/11, allowing backups of systems, disks, partitions, files, and applications.
The software offers a range of features, including the ability to back up multiple hard drives simultaneously, store backups in various locations such as local drives, external drives, NAS, Security Zone, and Cloud, and clone a hard drive for backup and recovery.
Qiling Disk Master Pro
- It allows you to install Windows on a hard drive for another computer.
- It provides a one-click backup with instant recovery options
- It allows you to create automatic, scheduled backups in various formats, including full, incremental, and differential backups.
- It can help create a split backup for cloud storage and compress backups.
- It provides 250GB of free cloud storage to back up your computer to the cloud.
The Qiling Disk Master is a solution for all your data security, backup, and loss issues. Download and try it to experience its benefits.
Here is how to back up your computer with Qiling Disk Master.
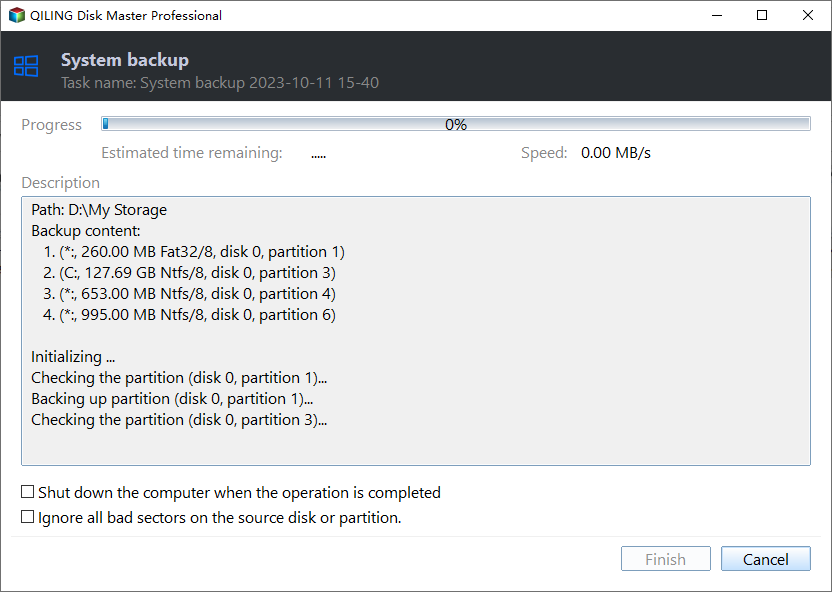
Step 1. Launch Qiling Disk Master on your computer and click the "Create Backup" button on the home screen. Then, click the big question mark icon to select the contents you want to backup.

Step 2. To back up your Windows operating system, click on "OS" to initiate the backup process.
Step 3. The process will automatically select the Windows operating system information and all system-related files and partitions, eliminating the need for manual selection. Next, choose a location to save the system image backup by clicking the designated area.

Step 4. The backup location can be a local drive, external hard drive, network, cloud, or NAS, with external physical drives or cloud storage being recommended for preserving system backup files.

Step 5. The Windows system backup process can be initiated by clicking the "Proceed" button after selecting customization settings such as enabling an automatic backup schedule and making differential and incremental backups. The completed backup task will be displayed on the left side in a card style.
To Wrap Things Up
The "black screen after BIOS update" issue occurs when a computer shows a still screen without loading the Windows main page after a BIOS update, likely due to incorrect updates, incompatible drivers, corrupted hardware, malfunctioned RAM, or motherboard overheating.
To resolve the "black screen after BIOS update" problem, consider the following 8 fixes. Each step is described with pictures, and we recommend using the Qiling Disk Master to protect your data in case something goes wrong. This tool can help keep your data safe and sound, and downloading it can get rid of data safety, security, and recovery problems.
FAQs on Black Screen After BIOS Update
Here are the most frequently asked queries about the black screen after a BIOS update:
1. What happens if a BIOS update goes wrong?
Updating the BIOS with the wrong version can cause the computer to become unusable, resulting in a black screen and other startup issues, affecting all startup procedures.
2. Can I cancel a BIOS update?
It's not possible to cancel an ongoing BIOS update as it can cause the system to become unbootable, making it difficult to update in the future. The best option is to wait for the update to complete and then revert to the previous BIOS settings.
3. Do I have to reinstall Windows after BIOS update?
The BIOS update only affects the startup process of your computer and has no impact on the operating system or overall functionality, so reinstalling Windows is not necessary after a BIOS update.
4. Does updating BIOS change anything?
A BIOS update typically resolves bugs and software issues related to computer startup, without impacting the system's performance, efficiency, or stored data.
Related Articles
- An Error Occurred While Processing Your Request [How to Fix]
- macOS Sonoma Upgrade Failed | 3 Tested Solutions in 2023
- [3 Solutions] Fix Corrupted USB on Mac Without Losing Data
- Different Ways to Turn Off Mac Startup Sound Temperaily and Permanently
- Portal/Portal 2 Save File Location - Everything You Need to Know
The Portal Save File allows you to resume your progress from where you left off, and in this post, we'll show you how to locate it and use a professional backup tool to safeguard your save files. - PowerShell Check If File Exists | 4 Examples
Do you want to check if a file exists using PowerShell? Then this post explains how to use PowerShell to check if a file exists. You can use this command inside a batch file or a script or in your program, and figure out if the path exists or not.