Not Enough Space for macOS Sonoma on MacBook Pro/Air [4 Proven Fixes]
macOS Sonoma, the latest version of the Mac operating system, is named after a region in Northern California known as Sonoma, continuing Apple's tradition of naming operating systems after cities.
macOS Sonoma, succeeding macOS Ventura, is set to be released in the second half of 2023. It was announced on June 5, 2023, at Apple's Worldwide Developers Conference.
Apple's macOS Sonoma aims to enhance both work and play experiences with new features such as screen savers, desktop widgets, improved video conferencing, and enhanced Safari, Passwords, Messages, PDFs, and Notes capabilities.
The latest macOS upgrade requires at least 20 GB of space on your drive, so make sure you have enough space available before starting the upgrading process, otherwise you won't be able to install macOS Sonoma.
This guide will walk you through the process of resolving the issue of not having enough space to install macOS Sonoma. To address this problem, you'll need to free up space on your Mac by deleting unnecessary files, emptying the trash, and considering a storage upgrade if necessary.
| Workable Solutions | Step-by-step Troubleshooting |
|---|---|
| Fix 1. Use Built-in Optimization Tool | Click on the Apple menu, choose About This Mac, and select Storage > Manage...Full steps |
| Fix 2. Clear System Data on Mac | Clear system data on Mac to free up storage. Here are 5 practical ways to clear it...Full steps |
| Fix 3. Uninstall Unused Applications | Open Finder, choose Go followed by Applications, and uninstall the ones you don't want...Full steps |
| Fix 4. Delete Junk and Duplicate Files | Click on the Apple menu, choose the About This Mac option, and select Storage in the menu...Full steps |
How to Check Space for macOS Sonoma on Mac
Before updating to macOS Sonoma, ensure you have at least 20 GB of free space on your system, even if you're doing a clean install, and consider freeing up some extra space for any unexpected installments.
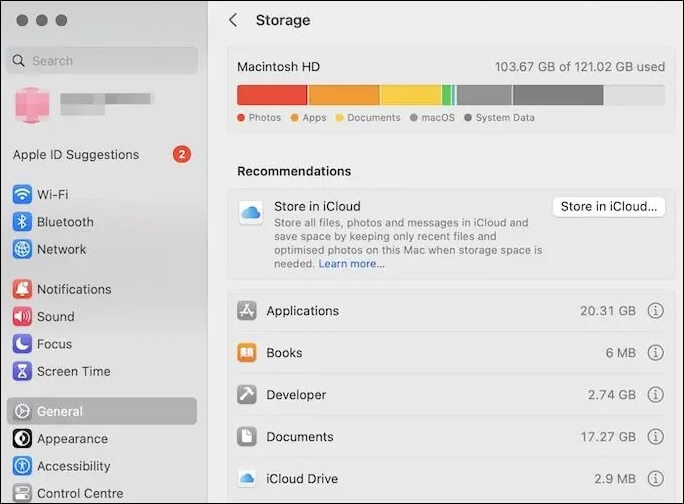
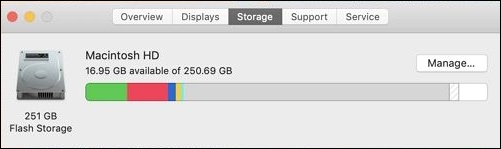
To check the space you have on your MacBook Pro/Air, go to the Apple menu, select About This Mac, and then click on Storage. You will see a pie chart and a bar graph showing the available space, used space, and other storage details.
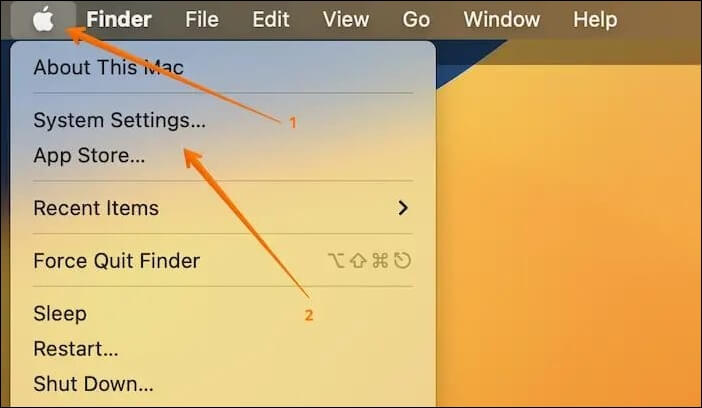
Step 1. Click on the Apple menu.
Step 2. Choose "System Settings" from the drop-down menu.
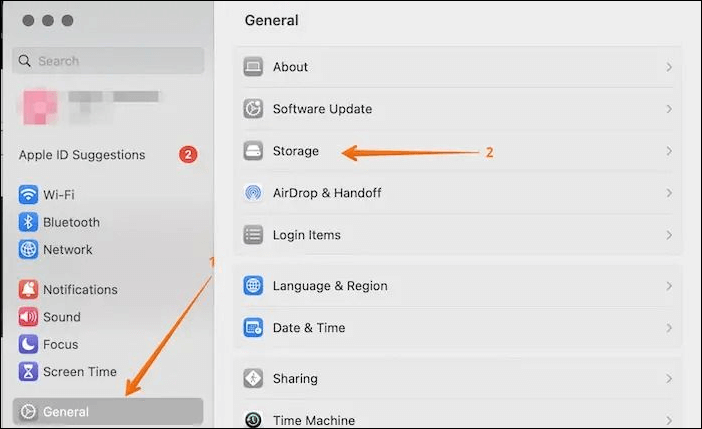
Step 3. To access the storage settings, click on "General" from the sidebar, followed by Storage on the right side.
To determine the space you have on your Mac, you can check the "About This Mac" window. To access this window, click the Apple logo in the top left corner of the screen, then select "About This Mac" from the drop-down menu. In the "About This Mac" window, click on the "Storage" tab.
Step 1. Go to "Disk Utility".
Step 2. Click on the top part of the boot volume.
Step 3. Check out the free space number available.
How to Fix Not Enough Space for macOS Sonoma
To fix the not enough space issue for macOS Sonoma upgrade, it is essential to back up your data first. This precautionary measure prevents potential data loss during the upgrade process. Once backed up, you can then explore various solutions to free up space, such as deleting unnecessary files, uninstalling unused apps, and optimizing storage on your Mac. By taking these steps, you can ensure a smooth upgrade to macOS 14 and avoid any potential data loss.
Fix 1. Optimize Mac Disk Using Built-in Optimization Tool
Did you know Mac has an in-A built-in optimization tool for file scanning is available, allowing you to scan files and remove them with ease, and can be found in the Recommendations tab.
If your Mac runs an older macOS version, follow these steps:
Step 1. To check the storage on your Mac, click on the Apple menu, choose "About This Mac", select "Storage", and then click on "Manage".
Step 2. From the left panel, select the "Recommendations" tab.
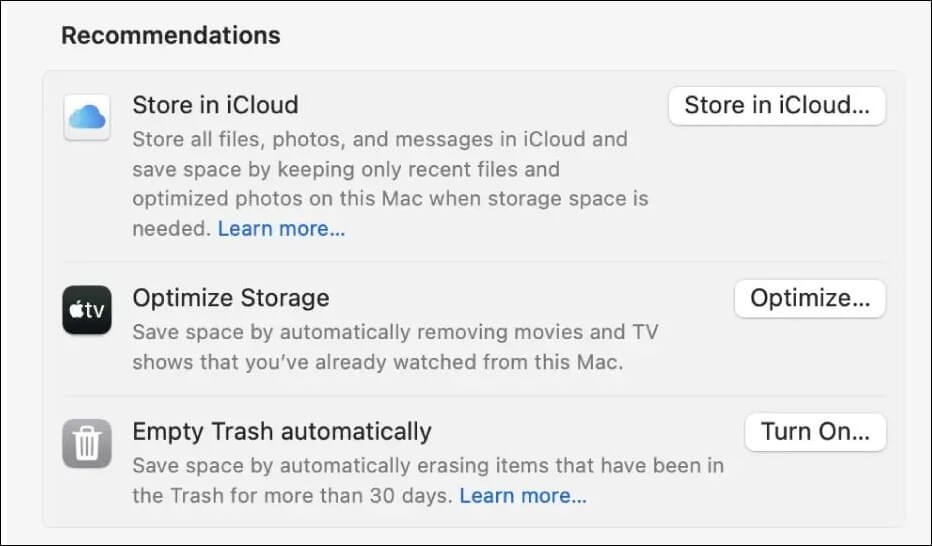
Step 3. Select the "Optimize Storage" option.
Step 4. Once you're done, you will see "Completed" written on the right.

Follow the steps below when your Mac runs macOS Ventura:
To check storage space, follow the path mentioned in the previous response, and then scroll down to the Recommendations section, where you will find all the ways to optimize storage.
Fix 2. Clear System Data on Mac
Mac has a built-in feature that prevents users from directly deleting system data, as most users may not know what can be safely removed and may inadvertently cause system damage. This built-in protection helps maintain system stability and security.
Here are 5 practical ways to clear system storage safely:
- Empty Mac Trash bin
- Clear Time Machine snapshots
- Remove unnecessary iOS backups
- Delete cache files in the Library
- Update Mac operation system version
Fix 3. Uninstall Unused Applications on Mac
To free up space for macOS Sonoma installation, uninstall unused applications and remove leftover files, which you can reinstall later if needed. This process may take some time, but it's worth the effort to ensure a smooth installation.
Step 1. To view all installed applications on your Mac, open the Finder, navigate to the "Applications" folder, and select "Go" from the top menu bar. This will display a list of all the applications installed on your computer.
Step 2. Uninstall unwanted apps by right-clicking on them and selecting the "Move to Bin" option.
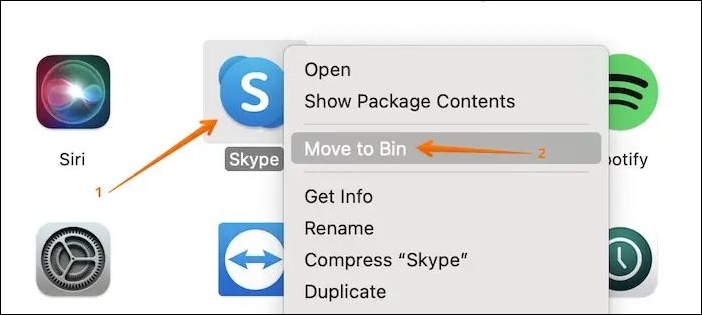
Step 3. Restart the system.
If you're encountering the "not enough space" issue during the macOS Sonoma installation process, you're not alone. To resolve this, you can free up space on your startup disk by deleting unnecessary files, emptying the Trash, and using the built-in Storage tab in the About This Mac window to identify and remove large files.
Fix 4. Delete Junk Files and Duplicate Files
To resolve the low storage space on your system, consider getting rid of junk files, which can accumulate despite your best efforts at organization. Take a closer look at your system and follow these steps to eliminate them.
Step 1. Click on the Apple menu.
Step 2. Choose the "About This Mac" option.
Step 3. Select "Storage" and go to "Manage".
Step 4. Choose "Reduce Clutter".
Step 5. Select "Review Files".
To remove duplicate files based on size, you can use a tool or script that scans your computer for files of the same size and then prompts you to delete the duplicates. This process can help free up storage space and declutter your digital life.
When you click "Move to Trash" on a Mac, the files are not permanently deleted and don't free up space. They are simply moved to the Trash folder on the disk.
Deep Data Recovery for Mac is a highly efficient data recovery software that assists in the seamless restoration of data, making it a powerful recovery tool for users.
The software can recover permanently deleted files on a Mac, regardless of the reason for data loss, including situations such as recovering formatted hard drives, system crashes, virus attacks, and human error. It's also user-friendly and suitable for beginners, making it easy to follow the steps to recover accidentally deleted data on a Mac.
Note: To create a backup of your Mac, click on "Disk Backup" on the left first. This will allow the software to recover deleted files from the backup image, preventing further damage to your disk and data, making it a safer and more reliable process.
Step 1. Select the location and scan
Launch Deep Data Recovery for Mac, select the disk where the lost data is located, and click "Search for lost files" to initiate the scanning process.

Step 2. Filter and preview lost files
After the scan, use the file format filter on the left or upper right corner to locate the deleted files you need to recover.

Step 3. Recover lost data or files
You can double-Click a file to preview its content, or choose multiple files to recover them at once. Click "Recover" to restore the lost data to a local or cloud drive.

Conclusion
To upgrade to the latest version of macOS, note that macOS Sonoma will take up at least 20 GB of space on your system, so it's essential to free up additional space before proceeding.
Installing macOS Sonoma can be challenging due to limited space, but there are several solutions to overcome this issue. Clearing browser caches, deleting junk files, and uninstalling unused applications can help free up space and make the installation process smoother.
Data loss can occur when implementing these solutions. To recover lost data, users can utilize professional data recovery software. The Deep Data Recovery for Mac is a reliable tool that can help restore various data types.
Not Enough Space for macOS Sonoma FAQs
Are you eager to know more about the lack of space for macOS Sonoma? In that case, browse through the questions and answers listed below -
1. Is it safe to install macOS Sonoma?
It's safe to install macOS Sonoma, but be cautious with the beta version and consider installing it on a secondary system or downgrading to Ventura if you have critical data.
2. Should I upgrade to macOS Sonoma?
Whether or not you should upgrade to macOS Sonoma depends on your needs and system compatibility. Check if your system can install Sonoma and consider its features to decide if you want it.
3. Is macOS Sonoma stable enough?
macOS Sonoma is currently stable, but only beta updates are available to users, with more information to come when the public version is released.
4. How much storage is needed to update macOS Sonoma?
20 GB of free space is required to update to macOS Sonoma, and it's a good idea to have some extra space available for any additional installations that might be needed.
Related Articles
- Top 2 Ways | How to Create Bootable USB from ISO Windows 10
- How to Solve Convert to MBR Greyed Out in Disk Management [Best Ways]
- Locked Out of MacBook Pro, Air? You Can Reset MacBook Password Now
- Fixed: System Image Restore Failed, Windows Cannot Restore a System Image in Windows 10/8/7
- Windows Credential Manager Free Download and View Password
Learn how to view saved passwords in Windows Credential Manager, manage web and Windows credentials, and recover stored login information safely. - Windows File and Folder Permissions Guarantee Your File and Folder Security [You Must Know]
Learn how Windows file and folder permissions work, how they protect data, and how to manage access for users and groups safely.